Introduction by B.B. Pelletier
Guest blogger
Here’s another guest blogger. BG_Farmer customizes a QB36-2 for us. He admits to not being an experienced airgun tinkerer, so this will provide some encouragement to those who’ve been waiting for a beginner’s project.
If you would like to write a post for this blog, please email me at blogger@pyramydair.com.
Bloggers must be proficient in the simple html that Blogger software uses, know how to take clear photos and size them for the internet (if their post requires them) and they must use proper English. We will edit each submission, but we won’t work on any submission that contains gross misspellings and/or grammatical errors.
From Clunk to Thunk: A Beginner Customizes a Chinese QB36-2
by BG_Farmer
After just a couple months of airgunning, I dedicated my Hammerli 490 to 10m targets and 20m plinking with open sights, as it’s too much fun to mess up with a scope. However, I wanted to keep up my skills with scopes for firearms, as that was one of my initial justifications for getting an airgun.
I decided to get another air rifle to dedicate to long-range targets and silhouette shooting with a scope. Since we have a breakbarrel and a sidelever (my wife’s QB88), it seemed that an underlever would be best, especially considering the scope requirement.
At my level of the sport and cheapness, however, a TX200 or HW97 seemed silly. That kind of money would go to a 10m gun or PCP, so I ended up with a QB36-2 (generic industry base for Tech Force 99) for a low price, with the hope I could improve and fix it if necessary and learn something in the process. I wasn’t disappointed.

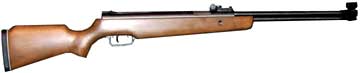
Canted action, massive stock – my work was cut out for me
Out of the box, the gun was pretty much as BB described it in his Tech Force 99 blog, except that the entire action was mounted at an angle due to an improperly drilled rear action screw (behind the trigger group), resulting in a cant.

It was easy to fix the cant with a drill and tap, but the huge stock and excessive length of pull just didn’t fit me, so I whittled down the tight-grained, beech-like wood (acacia?) substantially with 50-grit sandpaper and some saw and chisel work. I removed all but what was necessary of the cheekrest.
I recontoured the forearm since the original design looked racy but resulted in thin, fragile wood at the front. The pistol grip was reduced from chunky to merely substantial. I block-sanded up to 220 grit (at least as thoroughly as the factory) before using a water-based walnut stain and 3 coats of oil-based semi-gloss polyurethane with a scrub-pad finish (to cut the sheen a bit). The finishes were chosen mainly because I’ve used them before and had the materials on hand. My goals were function and fit beyond all else, although I may try my hand at making it fancier or even adding checkering later.
Accuracy testing…and more problems
After the stock work, I was pretty happy with the rifle, as it fit me and was shooting accurately and powerfully. Accuracy at 20 yards was approaching .50″ with little effort using Crosman Copperhead Competition Wadcutters. You can see why I liked it despite its problems. As far as power, it penetrated both sides of a steel, water-filled can at 20 yards with the same pellets. With open sights, I consistently hit targets at 50 yards and a coffee can at 75 yards.
I added a scope, according to my original plan. I originally selected a 4×32, but it broke within 50 shots. A 3-9x32AO went on next. It held up but wouldn’t stay in place after several hundred break-in shots. The scope stop bent like a potato chip. The rifle also started to shoot erratically, which I blamed on the scope-shift at that time, although now I don’t think that was the main problem.
One day, the rifle wouldn’t cock, so I shook it vigorously and whacked it gently against a post, whereupon a coil of spring fell out. The rifle actually cocked better and shot smoother afterwards, despite the occasional piece of spring jamming the action. However, I knew I needed to fix it before it could be used seriously.
Spring time!
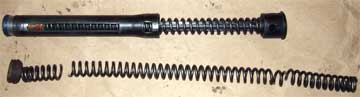
Having spent a good deal of time redoing the stock, I decided to see if I could also improve the firing cycle rather than simply replace the broken spring, so I ordered an aftermarket spring (Jim Maccari’s e3650) and synthetic seal (Maccari’s Apex) along with some of Jim’s heavy tar.

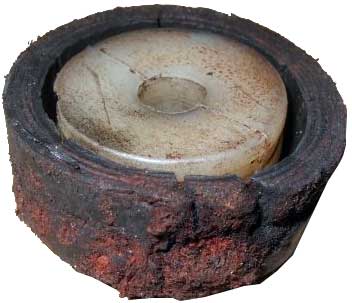
The spring was broken in several places, with the longest piece being roughly 8″ long. The leather seal was torn (probably at time of manufacture by the rough cocking shoe cutout) and dry, despite having lubricated it as much as I dared. It’s amazing that the gun shot at all. I think the torn seal allowed enough energy to come up from the spring to put out pretty good (but inconsistent) power via dieseling.
The piston is fabricated out of rolled steel and had some pretty rough welds on it. Remarkably, the finish inside the cylinder was smooth (except for the cocking shoe cutout). I’m no tuner, but it seemed pretty obvious what had to be done in terms of polishing and lubricating. After degreasing with acetone (I’m not recommending it; it’s just what I used), all contact surfaces and rough welds were smoothed down to 220-grit smoothness. Sounds coarse, but it did the job. It was certainly much smoother than the factory finish on the interior metal, even after several hundred shots of break-in.
My goal was not to equal the original factory specification of 900 fps or the 1100 fps claims some make for this rifle. I just wanted to make it smoother and more consistent, with just enough velocity (gauged by use) to shoot well to 50 yards with the proper pellets.
I spaced the preset spring in the piston until there was a little preload on it when pushing in the end cap. It’s still a hand operation. WARNING: Use a spring compressor. I knew my spring was broken, so there was very little tension on it, but I should have been more careful and used a compressor anyway. The stock spring on a QB36-2 is monstrously long, so it has a huge amount of preload (compression when uncocked).
The difference in stack height (compressed length) between the old and new springs was approximately 1.8″, but I spaced the new spring about 1.25″ inside the piston, using washers to take up the space. When I ran out of washers, I used pennies sandwiched between washers.
Due to the position of the piston latch, there was very little (if any) room for spacing at the base of the guide. I was afraid that making the piston heavier would degrade the firing cycle. In the end, I think the extra weight in the piston may have actually improved the firing cycle, working in concert with the somewhat softer spring to stabilize the piston’s velocity.
Sealing the deal
The synthetic seal got a custom (shade-tree engineered) mounting, made with a plastic conical washer to fit inside the seal. The new seal also required spacing (fender washers) on top of the piston, since it was thinner than the factory one. The design depends on the seal thickness, as the seal and piston are pushed back by the sliding cylinder. I added a drop of silicone oil on the edge of the seal before inserting it in the cylinder.
On the forums, I’ve seen many nice lathe-turned seal conversions, and was afraid mine would explode on the first firing, but it’s held for about 300 shots with no sign of degradation. Maybe the blue thread locker I used on the (original) screw secured the seal. If it breaks, I’ll make something better. Meanwhile, it works.
Tarred & molyed
After polishing parts and assembling the piston and seal, the cylinder and main tube got very spare amounts of Beeman M2M Moly Paste rubbed in, while the spring got a very light coat of Maccari’s heavy tar on the outside and on the plastic spring guide, as well as a little bit of M2M moly on the ends.
The trigger was light enough for me, so I didn’t do anything fancy other than make sure it had no burrs. I also added a little M2M moly. If I were to do it over again, I’d do even less to the trigger and dispense with the moly, since the trigger is now almost lighter than I like it. Variations are almost a certainty, however, with these guns.
How it all turned out
Putting the rifle back together, I didn’t have high expectations, given my level of knowledge (none) and mechanical ability (little), but it did cock and fire. Actually, it cocks very smoothly and lighter than before, with the cocking effort roughly in the high 20s, whereas it was in the mid-30s when new. The firing cycle is now amazingly smooth, just a little harder/rougher than my Hammerli 490 (which is not a harsh shooter at all). Of course, the power is higher, too.
There was no dieseling, even on the first shot, and no vibration to speak of, although I could have been just a little more generous with the heavy tar. The power is probably slightly reduced from stock, but nowhere near as much as I would have thought. It still puts a Copperhead wadcutter through both sides of a water-filled, steel can with a nice plume of water for effect, and 75-yard shots at coffee cans with RWS Superdomes are possible.
The weight of the gun and its muzzle-heaviness have now become an asset. With the new spring and seal, the rifle doesn’t move when fired, so it’s excellent for offhand (which is good, because that’s the way I shoot). I believe the original spring with its significant preload might have been too much for the stroke, not to mention obviously brittle or otherwise deficient. I was amazed at the obvious differences in quality between the stock spring and seal and the Maccari replacements. I shouldn’t have to say it, but I will anyway…the Maccari parts were of much higher quality than the Shanghai originals.
Soon, I’ll remount the scope. I expect it to stay on better, although I still need to deal with a bit of barrel droop. Accuracy is consistent now with RWS Superdomes and Crosman pointed pellets, so I’m hopeful that the rifle is going to work out for my application. Ironically, while continuing to shoot the 490 and debugging this one with open sights, I’ve found that I’m getting good enough with open sights again (even at decent ranges), that I would consider getting rid of scopes. Almost daily practice with airguns is better training than what I formerly thought was frequent shooting.

BG_Farmer, good article. Makes me want to pick one up!
.22 multi-shot
BG_Farmer, Very interesting blog. Happy that you were able to repair the weapon, and hope it will improve more as you use it. I recieved my Crosman Sierra Pro this week (got a replacement one), and have been happy with it so far. I don’t think it was new, but didn’t see much wear around the breech locking pin. I will say that it’s tougher to break than the original I bought, but if it is one that was repaired they did an excellent job. Let’s hope it was an American made spring or something other than foreign parts. Thomas
How stout does the anti-beartrap look? Do you think it would hold if the sear fails while the breech is open?
Excellent story,,,told well, easy to follow. Would love to see some close up pictures of the finished stock to accompany the descriptions of grips, cheek piece, etc.
Guest bloggers,,,a great idea,,it is inspiring.
Thanks
Eric and BG_Farmer,
I agree with Eric. How about a follow-up blog that shows the stock you modified?
And if you don’t have a chronograph, ballistic putty (duct seal) and Neutrogena transparent facial bars (soap) can be used for comparisons of penetration. Too late to do this one, but for all your future blogs.
B.B.
BG-Farmer,
Excellent writing. Thank you for sharing all this with us. I’ve been looking at a B26 for a while assuming it would need exactly what you had to do. We seem to think alike about how the rifles should shoot. Smooth and accurate with fps being further down the list.
Derrick
Great article. Shows what can be done with some careful work. I would also like to see some pictures of your stock work.
.22MultiShot,
Thanks. Give it a try, but with a model and modifications that fit your needs.
Thomas,
I would not worry about your Quest and didn’t mean all foreign springs are no good. The QB36-2 has an extremely long spring that is heavily preloaded and prone, apparently, to be brittle.
If this is a beginner’s work, I may as well give up right now. This all reminds me of something Charliedatuna said which is that most Chinese rifles have a lot of internal problems including broken springs when sent for the factory. Inconsistency remains a problem even when it’s not visible.
B.B. (and all). I understand what barrel droop is, but I’m wondering why it is manufactured on purpose, especially by a high quality manufacturer like Diana. What possible advantage is there to not aligning the bore with the barrel?
Matt61
Vince,
I can’t guarantee the anti-beartrap, but it does hold in normal use and has held a couple of times when the sear wouldn’t engage (broken spring piece blocking latch). I suspect that any problems (have seen the YF horror story) come from either trusting it completely or trying to polish and lubricate the mechanism.
Eric/BB/anonymous,
Remember that the stock was mainly modified to fit me and my nefarious purposes, so its a bit of a work in progress regarding close-up finish quality. I had actually hoped it wouldn’t be today, because yesterday’s HW is so gorgeous:). That said, I would be happy to either document what’s there in more detail or wait till I re-re-finish it and do step-by-step.
BB,
I’m fighting the chronograph, but I see the attraction with this aspect of the hobby. Next time, I’ll try to quantify things more completely one way or the other. I love “splatology”, BTW.
Thanks for giving me this opportunity.
Derrick,
Thanks for your kind words. I know its counter to the trend, but I also value firing behavior and consistent accuracy above everything else. The B26 looks interesting, as does almost every other rifle I see:).
Matt,
Most of the work was done with a screwdriver and sandpaper. You are obviously a meticulous and intelligent person, so you should have no problem with any of it.
Matt61,
i don’t have a 1000 yard range, but do have 1000 yards!
Matt61,
Barrel droop is probably still a problem because small German manufacturers have never had a Demming or Juran management class.
B.B.
hey bb.
first off i would like to confirm that umarex has announced that regarding to the rws model 34 and panther, “both rifle barrels are tighter at the muzzle”…no surprise, you were right. And also i would like to know if i try the model 34 scope combo and plow through the scope rail, is the creation that you are coming out with a whole new rail, or if i ruin mine will i be out of luck? wow, run-on
thanks,
John
sorry, one more thing. will a front sight globe from a cfx fit the 34 panther. also will the cfx butt pad fit the model 34
John,
The new base will cover the existing base on the rifle, so any messed-up holed with be covered.
I cannot say for certain, but I doubt very much that Gamo sight parts will interchange with Diana. It’s too great a leap. Gamo and BSA, perhaps, because Gamo owns BSA.
B.B.
so if the scope stop pin hole is ruined it won’t effect the function of your base?
thanks bb
john
John,
No.
B.B.
bg_farmer
Thanks for the vote of confidence. How do you keep the stock symmetrical when sanding it? If I did it free hand, I expect that it would turn out uneven–not up to factory standards anyway.
Matt61
henry
That was an inspiring article you recommended on long distance shooting. That could be me shooting the B30 at 100 yards–sort of like MiniMe.
Would you say that long distance high power shooting is identical to airgun shooting except for handling the recoil of higher power guns and gauging the wind?
Matt61
BG_Farmer,
Thanks for the blog. It was great and interesting. Have one of those broken China rifles in my basement.
Had all the same issues you mentioned yet still managed to shoot OK for a $20 rifle. The after about 1,000 shots it failed and will no longer cock.
Maybe I’ll find out what a spring compressor looks like and try to take my rifle apart to see what made it stop cocking.
DB
Matt,
Keeping the stock symmetrical (within visual limits) is actually not too difficult, if you use sandpaper on a stick (thick dowel or small slat, depending on contours). 50 or 60 grit will take off material fast enough not to be discouraging but not fast enough to make unintentional mistakes irreparable.
DB,
BB has a spring compressor in his tuning series. Your rifle may have a broken spring — on mine, end coils broke off and blocked the piston latch, so that it wouldn’t cock.
Dear BB or any one else that can help me,
I have the oppritunity to purchase a Birmingham Webley Stingray carbine in .22 or a Beeman R7 in .177 can you tell me anything about these guns.
Hi BG_Farmer,
Great blog! You had to do almost as much work as I did on my TF99. I had to tweak my receiver in my 20 ton press to get rid of enough barrel droop to use my scope. The barrel was already straight. I replaced my spring with a square profile die spring from McMaster-Carr. I also got seals and tefon stock to turn down in my lathe to replace the horrible leather seal and seal mount. My plastic spring guide had also broken, so I turned a new one from some 3/4′ B7 threaded rod and used thrust washers on both ends of the spring. I recrowned the barrel because the accuracy out of the box on mine stunk. I also polished and reworked my trigger to get it useable. Now my gun shoots pretty smoothly, with decent accuracy, but the spring guide pings like a high pitched tuning fork with every shot. The original gun didn’t come anywhere near that advertised velocity of 900 fps. If I remember right, it was around 620- 650 fps with .22 Meisters. After all the work, it picked up about 50- 60 fps. I haven’t done anything to the oversized, tree trunk stock though. Maybe some time when my life gets a little less complicated… Can’t wait to see what your finished stock looks like!
/Dave
Meant to say teflon, not tefon…
BTW, a metal lathe with a tailstock makes a nice spring compressor.
/Dave
BG_Farmer,
Thanks for the blog. As others have said maybe there is hope for me. If I ever get home for more than 1 day at a time maybe I’ll at least get my Charlie trigger in my shadow.
These blogs are great. Gives a an old guy hope that maybe someday I’ll have time for this great hobby.
Thanks to you and all the other air gunners out there.
Al Pellet
bb,
hello I just joined a 4h shooting club and was looking for
a rifle of my own. From looking at blogs I believe that a popular choice is between the gamo c.f.x. And the RWS model 34 panther. In older posts you mentioned that you preffered the c.f.x. Is this still your view? I think the rws would last longer and be more accurate, is this the case? For what purposes is the cfx better?
/Dave,
Thanks for sharing your experiences. I actually expected just to do a little barrel/crown work and maybe something to the trigger, but those are both pretty clean on mine. Luck of the draw. I was prepared for spring breakage (at some point), but I actually thought the spring and seal complaints were over-blown: live and learn.
Sounds like you did a better conversion on the seal. Since this was my first project, I tried to keep everything at a level I could do in the dining room with my son. The seal makes a big difference — the old leather one had almost no resistance when fit in the cylinder with a finger over the port. The small Apex fit perfectly in mine, so well that I couldn’t justify trimming it.
Also, I really think the beast is oversprung as manufactured: most of the monster spring’s energy seems to go into slamming the ultra-light piston into the cylinder end. I believe the TF99 has a better spring: the Industry one in mine felt like tool steel, i.e. brittle.
I’ll have to look at where that barrel droop is coming from — press sounds like a good idea.
Really appreciate your characterization of the stock — it is “gianormous” to quote my 4 year old. Its the first rifle I’ve ever shot that gave me a backache, mainly due to the LOP putting the weight so far forward.
Incidentally, Shanghai rates QB36-2 in .177 at 900fps and .22 at 700 fps. Others advertise higher velocities, but say they’ve modified components; I couldn’t judge. Mine was faster than a .22LR out of the box, judging by the hypersonic whine of the first 3 shots, and all the formal testing I’ve seen puts the .177 in the ball park of the factory rating. Since I’m not an airgun hunter, velocity is only important as far as it affects trajectory and range, so I was/am pretty happy with a power output that would make others unhappy.
Al,
Thanks for the comment — I couldn’t justify my blog as an expert (which I’m not), but I hoped that people would see that if a yokel like me could do something, they could too:).
DB
I looked for the bolt to fit your five dollar 22 but no dice. keep looking one will turn up cheap.
jw
Stingray carbine,
The British-made Stingray is a fine spring air rifle with one major flaw. There is no provision for a scope stop on the 11 mm rails. No amount of clamping pressure alone can stop a scope from moving on the rails.
But overall, its a wonderful airgun.
B.B.
4-H,
In my opinion, the RWS Diana 34 is more accurate than the Gamo CF-X. However, it takes a lot of skill to extract all the accuracy, because the 34 is a breakbarrel and therefore very sensitive to how it is held.
Both rifles must be held using the artillery hold, but the 34 needs a better technique to do its thing. Both rifles are very well-built, but the Gamo suffers from a poor trigger design. That can be fixed with an inexpensive aftermarket trigger blade.
B.B.
bg_farmer, No worries on my Quest varient so far. I think the one I recieved is even better than the original. Yesterday I broke a cardinal rule I set for myself. I shot a Silver Eagle pellet (crosman’s ultra-lite brand), and it cracked off LOUD. More so than my first Sierra. I won’t be doing that again ever. Somehow I feel that there just isn’t enough resistance in the barrel, resembling “dry-fireing”. I don’t like shooting them in my brass barrelled Benji either for fear they might damage the rifleing. There ok for my Norica-Laurona (Marksman 0035), which I still haven’t figured out the manufactured date from the serial #’s. I found their web site but don’t know a thing about Spanish. Question, if I were to send the Marksman off for and over haul and maintenece check, who would you recommend? Could they possibly upgrade it to shoot in the 800’s fps range? I’d like the outside to remain unchanged,…scratches and all. But a little more ‘muscle’ in the action would be great. Hope you or anyone else can offer some advice, Thomas
Thomas,
Sounds like you’re good to go with your Quest. Honestly, I don’t know anything about the Marksman, BB may have some information. In your situation, I would find a friend who speaks Spanish and contact Norica. As far as upgrading the output to 800 fps, its likely not possible. In my very limited experience, the stroke and bore will be limitations that can’t be overcome to any substantial degree. A good tuner may be able to get close to the limits of the design and still have it shoot well, but I’m afraid that pushing it too far would just make it harder to cock and harsher firing but not gain you that much velocity. Probably better just to get it refurbished to stock (check seal, spring, etc.) and enjoy it the way it was designed.
?????, Thanks for the input. Yes I’m sure “hoppin’ up” the Marksman to the 800 fps would be pushing the perameters a bit. I have enjoyed it alot so far, and have no complaints with its performance. Who would you recommend I have it refurbished by. I read somewhere in past blogs af a few people that will work on older rifles, but not sure where I found them. Maybe BB could refresh my memory. Thanks again, Thomas
B.B.–Scott385-reporting in–in reading a lot of different blogs you wonder if any of these people even owned an air gun or rifle and I need you to dispell this advise I read. It concerned this guy who has a rws350 and decided to work on it witout a spring compressor-he said he weighed about 170lbs and a compressor wasn’t needed. He reported that he would start to unscrew the end cap and when it got close to coming off he would place the action on the kitchen table -lean on it and finish the job. He said the spring had hardly any compression on it and only stuck an inch out of the action. He reassembled the gun the same way-putting in the spring-placing the cap on it then leaning on it till he could screw the cap on.–IS THIS POSSSIBLE?
I have had a few of these Chinese guns and although the prospect of tuning one is very interesting, they really have no advantages over a Crosman except a few FPS, IF the tune turns out well, and a pneumatic is easier to shoot.
I had a similar situation with an inexpensive Tech Force pistol (TFS2-1). My concern with these poor quality products is that they may be purchased by inexperienced users that are enticed by the low price and not fully aware of the potential safety hazards that sometimes exist. Specifically, the forward breech locking mechanism on my pistol became loose and flew apart while loading. The major safety issue was the trigger locking device that holds the compressed spring in place after loading. After a few hundred shots, the pistol would fire during loading, closing the breech, and/or other subsequent movement. The problem was traced to the locking block which was poorly machined at the factory. My point is that these inferior and unsafe products should be either kept off the market or clearly sold as seconds in need of fine tuning or repair.
OK folks, Can anyone tell me where to find “Charlie de Tuna” after-market triggers? I can’t find much on the Pyramyd site.
Vince, I had a 97 and the beartrap mechanism looked pretty sturdy. Of course i still held the cocking lever while loading.
About the Crosmans Vs. Shanghai: A Shanghai is only more powerful IF it’s more powerful.
Looking for “Charlie de Tuna”,
You can find Charlie at https://charliedatuna.com/.
.22 multi-shot
.22 multi-shot, Thanks for the ‘link’. I checked out the site after figuring out the click and paste thing LOL’s. It’ was nice to find someone that shared the same opinion on lite-weight pellets as I do. Thomas
Thomas,
Sorry, I use the computer all the time and I forget that some things like copy and paste aren’t obvious!
.22 multi-shot
Scott298,
I had friends like your 350 tuner. Their names were Lefty, Stumpy and the Late Earl.
Get it?
B.B.
I regretted not putting more accuracy data into the article, but I did a quick 10M group this afternoon. This is a group of the first five shots at a 10M AR target, using (the cheapest) Crosman Wadcutters with open sights from an unsupported seated position (hunter style) w/5mph+ breeze. The rifle was sighted in for 50y and higher wind, so there’s considerable displacement, but not bad, I think, all things considered.
http://picasaweb.google.com/farmerbg0/QB362/photo#5201152458991017090
I just recieved my QB36-2 a few days ago. I think my gun makes alot more noise than it should. squeeking when cocking it, and a rather hard twank when discharged. alot of dieseling too.
Did you use some kind of kit for the new seal/spring. I’m thinking of disassemble my gun to check if something loose/spring damage or just tune it a bit 🙂
Tom (Schultz),
My guess is that the squeak is mostly the result of a dry and/or damaged seal and rouqh internals. The twang IMO is the result of a very powerful spring with no tar and a light piston, and may be aggravated by the dieseling (possibly as a result of a bad seal). Just my guesses. Don’t just throw lube in it — if the seal is bad, it will diesel even more.
I didn’t order a kit, since there isn’t one, just the small apex seal and the e3650 spring and some heavy tar (moly paste as well if you don’t have it). I was happy with the performance of e3650spring, but it probably does reduce the velocity some compared to the original spring, depending on how you space it up inside the piston. If your original is undamaged, you could try to lube & tar it and reuse it, although it looks like they’re prone to breakage. Smoothing the internal welds, etc., may help with that problem, however.
You have to make an adapter of some sort for the apex seal: a stack of washers with various outside diameters to fit inside the seal should work, or you could turn something on a lathe. Make sure the final thickness of the seal and adapter is the same as the original seal, or the gun won’t cock. You could try reconditioning the leather seal if its OK, but the small apex fit mine perfectly (diameter) and seems like a huge upgrade.
Be deliberate with the trigger group — its a bear to figure out assembly and disassembly, mainly due to its simplicity. In particular, look at the position of the trigger spring before taking it out!
What i did was that i disassembled my gun. I noticed the seal was bad not horrible, but it had som small cracks on the inside. I cleaned the inside with thinner (all i had). Added grease (what i had at the moment, probably not the best because thers more dieseling now, guessing the grease ignites to quick. I also polished the mussle and that gave the best result hitting-the-target-wise, it went from a 3″ group to under 1″. I’m dissasembling the gun again now using moly and I hope for further improvement. have ordered the seal, spring and tar. And thanks for the advice on the trigger mechanism, it took 3 hourd and two beers to put together again i tried all possible combinations before i finnaly stopped on the corect one.
One question about the adapter for the Apex seal, should i go for weight or not.
Thanks
Tom Schultz.
Tom,
My crown was/is good. It’s the luck of the draw with Shanghai guns, but on three guns I haven’t seen any accuracy problem that simple fixes won’t take care of.
In addition to cleaning internals, I would sand down all the rough welds on the piston, main tube, etc., and be sure to clean up the cocking shoe cutout in the cylinder: otherwise it will damage your new seal. The only lube I did was moly in tube and cylinder (light coat rubbed in) and on spring ends, heavy tar on spring, and a drop or so of silicone chamber oil rubbed on seal edge. Cocking mechanism and the like got moly paste.
RE: seal adapter. My current thinking is that weight is good, especially in combination with the softer/shorter spring. I incidentally added even more weight by using metal washers and pennies to space up the spring inside the piston. Recoil is essentially non-existent, so I don’t think any harm was done. I wouldn’t go out of my way to add neutronium tophat or anything, though:).
3hrs is good for the trigger group: I don’t even want to say how long it took me to figure out how that spring went in — along with the angst of wondering how many parts I had lost. I can’t say that I’ve ever seen a more economy-optimized assembly.
Please let me know how yours turns out: I have been amazed at what a different rifle it is post-tune. I use it as a rimfire/smallbore proxy up to 50yds., and I use it a lot.
Yes I’m amazed on how much better this gun is after only 5h total work. I bougth this gun cheap and knew from reading a few blogs that you’d have to spend a few hours tuning this to get it working well. I have to say now its working to the extent I can see the difference from different pellets. I have som BSA Elite 15.43g that I have to sand down the skirt on to make then fly straight. ( led deposits on the skirts) image: http://i303.photobucket.com/albums/nn134/schultztom/BSAElite.jpg
Thanks for all your blogs by the way they are very informative. Keep up the good work.
Tom.
Hi:
i had to rebuild my two qb36-2 ,.177 and .22. Both destroyed the factory springs in less than a week, but unfortunately, i wanted a fast solution and maccari springs are not available here in chile, the only solution was to use chinese 40 coil replacement for the 50 coil original spring. After disassembling the guns i discovered thta spring guides where broken in several pieces, so a friend made me 1″ diameter steel replacement for both spring guides and inox trigger guards. As many of you, i added a 1″ long, 3/4″ diameter steel bar to add weight to the piston (piston is very light compared to Diana pistons), used some spacers to preload the spring, to the point that the space between coils when cocked is just the needed to cock. A concept i dont share, because in my guns is working pretty well is that you have to respect the thickness of the seal. I am using an 1″ outer diameter by 1/4″ thickness oring and a teflon washer to keep the seal in place, which translates in 3cc of extra air, plus i shaved 4-5mm to the piston. Have to stop shaving piston point, just 0.5 mm before it couldnt be cocked, adding extra 3cc of air. A piston spring airgun works like a syringe, low air means low power, high volume of air means lots of power, doesnt matter how big and strong the spring is if you have no air to push the pellet. I have nothing against maccari or any other “superpower” springs, but my experience tells me that the spring has not importance until you have deburred, polished, lubed properly and recovered as much air as is possible. Other change was to cut the barrels to 14″, and recrowning. In the middle of all these adjustments, these guns killed 400 feral pigeons in the last two years. The result is that today i have two excellent airguns and no pigeons in my house, with a investment, excluding guns and scopes, of 30 dollars for replacement chinese springs and steel spring guides (15 each gun)).
Lothar,
Great read. My main reason for getting the Maccari spring was that I knew it wouldn’t break, not that it was “super”:)! In your situation, I would have done the same thing. I’m really interested in your barrel chop: did you re-attach the cocking-lever retainer?
RE: seal thickness. All I know is that with the apex seal (0.2″?) directly on the piston, the gun wouldn’t cock; with spacing to “approximately” the same thickness (0.4″?) as the old one, it would cock. Remember, this was the first time I ever opened up a springer, so I wasn’t going for the same level of detail you seem to have been shooting for.
I agree about value with this rifle, for those willing to work!
Tom,
The amount of work is pretty high, but its a pretty nice shooter once you’re done.
Those are some wacky pellet skirts.
Lothar do you have some pictures of the upgrade process. what does the 1″ spring guide look like? If i understand correctly you removed the leather seal and replaced it by an o-ring and a washer. What do you meen by shaving off the piston, how did you remove material, and why wouldn’t it cock if you removed too much?
BG_farmer:
As you, this are the first guns that i modify. All the information to do this mods was taken from internet searching and adapted by me. the measures are all aproximate and not everything worked at the first time. One solid piece teflon seals idea was taken from charliedatuna and for me it didnt worked, but that bad result with the teflon seal served as base to mount the oring. the tickness of teflon washer was reduced step by step to see how it worked, until it reached a little less than oring thickness and became a support to keep the oring in place.
The barrel was chop 3 times until the definitive length satisfied me. the first and second cut removed 1″ each and the third 4″. Was made using a hand saw to cut, a file to deburr and 400 and 800 grit sandpaper to finish the muzzle. Recrowning was made as suggested in one of chaliedatuna files (ball bearing and 800 grit sandpaper in the crown) and cocking lever was cut a litle bit longer than the barrel. Cocking lever retainer hasnt been attached. instead of retainer i m using a velcro strap, like those for laptop cables, to keep the lever in place and works pretty well.
The spring comment was because a chinese springer needs lots of work in other areas to become a good gun before worrying about the spring. Almost all sites tell you that spring is the most important part of the gun, and i dont agree. After changing the spring guide, and cleaning and deburring the gun, two years ago, i have not needed to change the chinese spring and power is excellent
Tom:
The point of the piston were the seal is located, was “shaved” using a bench rotary grinder, half milimeter at a time. The problem with cocking, i suppose, on a smaller seal can be produced by a bad quality control in the depth of the cylinder. But the point is that the cylinder contains about 0.5cc by milimeter the piston goes back when cocked and more air means more power
The steel spring guide is simply a replacement of the full original plastic piece. i can send you a photo of the seal and spring guide. send me your mail to lfkommer@gmail.com
Lothar Kommer,
I think you should write a guest blog about this. I think everyone would be interested in what you have to say.
B.B.
Lothar,
I definitely agree about doing the internal work before replacing the spring: the breakage IMO results from a spring thats too long and possibly brittle and lots of rouqh edges for it to catch on. My choices for springs were: 1) same over-length stock spring, 2) e3650. You must have gotten the same spring as is in the QB36-1 and other rifles…which didn’t even occur to me, although it should work quite well.
At any rate, it seems like we have similar results with shorter springs and heavier pistons: the reduced preload does not result in a massive loss of power or more recoil, since as you pointed out most of the power is made based on the air capacity. I don’t hunt with airguns, so power is of secondary importance.
I waffled on the barrel chop: at first I wanted to do it, but now I like the balance, and accuracy is great for my purposes. Even with scopes I like to retain sights, also, so I wanted to put the retainer back on.
Do consider BB’s offer — I would love to see how you did it in pictures.
Bg:
My only spring alternatives were, and still are, chinese 40 coil or chinese 36 coil. QB36-1 wasnt sold here. Technical support or guarantee?, No way.
Accuracy is not affected if barrel chop is made carefully. The critical point when cutting the barrel is not to crack o break any rifling, and in that case recrowning must go deeper in order to be as uniform as possible.
I dont really hunt. Pigeons became part of my own pest control program and that changed the whole wildlife in my house, letting other birds that are not a risk for the house, to live here. Now, both guns are used for plinking over 20 meters and eventually to help some friend with their pigeon problems, but that is done with scope.
Balance problem is not existent, steel removed from barrel is not even a pound, steel spring guide weights more, thats why thinking on weight problems i carefully drilled 3 holes in the stock that are 3/4″ by 6 to 8 inches long, from the rear of the butt plate to the front of the stock, plus a little sanding in the pistol grip to have a better shape for my hand.
Other benefit of short barrel is that lock time is reduced.
Mr. BB:
Thanks a lot for the offer, i would be happy to show how simple is to transform this undervalued gun in a very good gun.
Lothar,
I’m glad you will blog your story. Please email me here:
guestblogger@puramydair.com
B.B.
I thought Gaylord is only in the meet the fockers movie. There actually a living one here, It blew my mind ^^
Never heard of Chic Gaylord, the holster maker, or Gaylord Perry, the pitcher or Mitch Gaylord, the Olympic gold medalist?
B.B.