Introduction by B.B. Pelletier
Guest blogger
BG_Farmer’s last guest blog about the QB36-2 was so well received that he’s doing another stint with the same gun. Today, he’ll show us how he transformed the stock.
If you would like to write a post for this blog, please email me at blogger@pyramydair.com.
Bloggers must be proficient in the simple html that Blogger software uses, know how to take clear photos and size them for the internet (if their post requires them) and they must use proper English. We will edit each submission, but we won’t work on any submission that contains gross misspellings and/or grammatical errors.
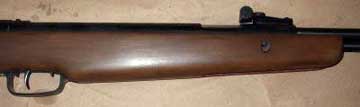
QB36-2 stock rework
My QB36-2 has seen hard use around my barn lot range. While I’m not a professional stockmaker, I did want to adapt the stock to fit my needs and preferences. To get an idea of what I started with, look at Pyramyd Air’s Tech Force 99 blog.
Wood, grain & finish
In general, I think the water-based stain and polyurethane finish was a viable approach to stock refinishing. Of course, there are simpler and more complex options. While looking at the pictures, keep in mind that pictures tend to make the finish look significantly shinier and somewhat darker and redder than it is in reality. I believe the red tint is inherent in the wood. There’s some figure to the wood. It tends to be subtle but shows in several of pictures. As finished, the wood looks similar to the walnut-stained beech stocks of economy firearms in days gone by, although not quite as hard and perhaps not as durable.
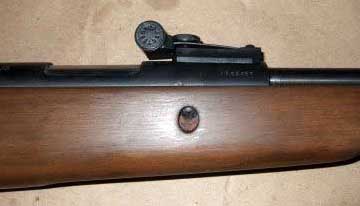
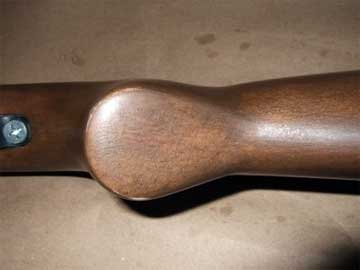
Forearm
Let’s start with the front, specifically the forearm, where I cut off 1.5″ from the front, made it perpendicular to the barrel and rounded the edges. The purpose of this was not only aesthetic, but to prevent breakage and vibration in the longer, thinner sections of wood in the original design.
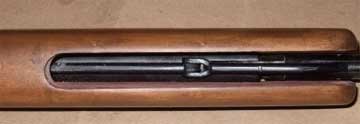
Cocking slot
From underneath, the work done on the tips is more obvious. Incidentally, most of the wood removal here was done by laying the stock in a miter box, making a square cut to length, then three 45-degree cuts (at the bottom and down the sides). What little material remained was shaped with sandpaper. This is fairly soft for a hardwood, as I noted several dents.
Triggerguard
Moving back, I rounded and smoothed the cutout for the trigger guard but didn’t make it flush for reasons noted earlier. The contour was purely my preference and seemed consistent with what I was doing elsewhere.

Pistol grip
The pistol grip is still quite beefy, but I managed to make it fit me better by removing material. I used 50-grit sandpaper wrapped around a 1″ dowel to do the shaping. Note also the new action screw (which I need to blue or paint black).

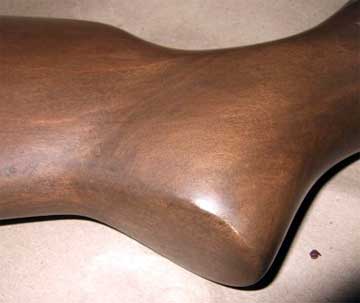
Buttstock
Now, we’re finally back to the rear of the stock. In general, the work around the cheekpiece and butt is shoddier than I would like (of course, it wasn’t intended for public viewing, either). I’m still debating whether I should leave the cheekpiece or go for a much more slender, ambidextrous stock. So, I left a little more wood and didn’t sweat the finishing too much in those areas.
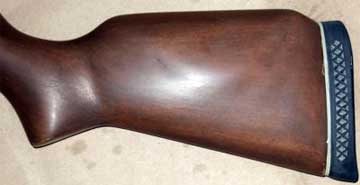
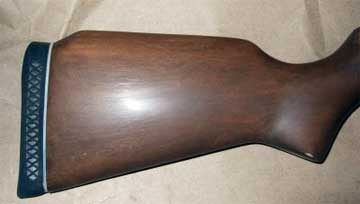
The right side was more or less left alone, excluding anything necessary for matching the other side. The hollow behind the pistol grip was deepened to match what was removed from the sides and until it “felt good.” The comb was left alone, except for removing the old finish.
The rear was cut off with a handsaw at an angle slightly different from the original, providing a slightly longer bottom projection (not sure its worth noting). This also facilitated re-use of the original pad, since a decent new one costs more than I want to pay.
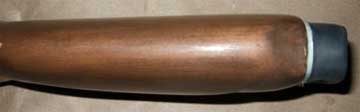
About 1.5″ was removed from the length of pull. This allows for comfortable shooting in cold weather and moves the balance point back far enough for me to properly support my left arm on my rib cage.
I created a sharp, rounded taper in front of the buttpad, which I justified because I’d seen it in a picture of a production rifle somewhere, and doing so meant that I could keep material in reserve for when I finally made up my mind.
In summary, if you can’t find a rifle that fits you perfectly and makes you happy, consider modifying a factory stock to suit your needs and tastes. Even though the one I’ve shown will probably please only me, it was a successful project.

BG_Farmer, Very nice job. What’s even better is that you’re pleased with it, and you deserve to be proud to show it off for such an accomplishment. Thanks for sharing it to everyone. I’ve been thinking of getting my girlfriend a Benji 397, and cutting the end of the stock to fit her. Picture some old hill-billy granny with the butt of a shot gun sticking out under her shoulder and you’ll get the picture!!! LOL’s Good work!!!!, Thomas
B.B. In part one you left off saying in part two you were going to talk about filling the tank….Did I miss something??? I’m wondering if I should send my gun back to A.F. because it won’t give full power until well after 20-30 shots. Then once it “comes on cam” (a little racer lingo there) the P.W. seems to do nothing till it’s alomost to its lowest setting. What it likes is 2500 psi max and will blaze all the way down to 1000. From SavageSam
SavageSam,
I answered you in the other place you asked this question. Remember, you only have to ask one time.
Friday.
B.B.
BG_Farmer
Nice job, there is only one way to learn and that is by doing. I sanded down a 10/22 stock and used linseed oil to keep it light in color. What to you think your stock or similar wood would have looked like without stain?
jw
BB, Here’s an elementary question for you. How do you grease/lubricate the spring in a break-barrel? Does it require removing the spring, or can it be done by removing the action from the stock and squeezing grease into the exposed stock? Thomas
OT…how long should a mainspring last?
I’ve been shooting an Avanti 853 and have a few thousand shots on it with no problem.
I recently purchased a Slavia 630 that I am pleased with, that I have put through a couple of tins of pellets (500’s).
On the yellow forum there was a thread recently concerning the R1 and one person mentioned the mainspring needing replacement after 2000 shots, another person mentioned needing a new spring plus compete tune at 7500 shots.
If this is the lifespan of a mainspring I gotta cut back on my plinking.
Thomas,
You really need to tear the gun all the way down to do this right. Besides removing the old lube, you’ll get a chance to see how the piston seal looks, ck for spring cant, remove burrs from the cocking lever slot, polish the cocking shoe and so on. If you’re really serious, you may need to shim the inside of the piston and/or build a new longer, tighter spring guide.
And you’ll need a spring compressor to do this safely. They’re pretty easy to build.
D
If I can comment on spring life, I believe it really comes down to the gun’s engineering design. From all the spring guns I’ve owned and repaired, it seems that spring life is directly related to how well the spring guide fits on the inside of the mainspring and how tightly the piston fits over the outside of the mainspring. If either is loose, the spring will buckle slightly, eventually developing cant and causing a potential failure point. Seems I post about guides here a lot. It’s because I think they’re really important.
How to buy a new mainspring:
When you buy a replacement spring for a gun, whether from Maccari or another source, pick a spring ID that best fits your spring guide first. Then look at OD of the spring to fit inside the piston, lastly look at length. It’s easy to shim the piston with a piece of sheet metal to make the piston fit snug. It’s easy to shorten a spring or add washers to make it slightly longer. It’s difficult to make a new spring guide or enlarge an existing spring guide to compensate for a poor fit.
D
Thomas,
To properly grease a mainspring, it must be removed from the gun. I did a 13-part spring-gun tuning report that shows what is involved. Read it here:
/blog/2006/08/spring-gun-tune-part-13-range-testing-the-r1-we-tuned/
With older guns that have lower-powered springs, oiling the spring sometimes works. That you can do through the cocking slot without disassembly most of the time. Sometimes the action has to come out of the stock.
B.B.
Off topic,
The mainspring in your Daisy Avanti 853 will last forever, because it doesn’t have one. That rifle is a single-stroke pneumatic.
In spring guns of high quality, mainsprings will last between 10,000 and 30,000 shots. The weaker guns will last longer than the powerful ones, as a rule.
I have retuned my R1 so many times for the book I wrote that I’m probably the last person to ask about spring life. But I did do a chapter on mainspring life after long periods of cocking that showed a mains-pring can be cocked for a straight month without loosing too much of its initial power.
I would put 15K shots on that Slavia before I thought about a new mainspring.
B.B.
bg_farmer,
Very nice job with that stock. Any idea what kind of wood it is made from? It looks a lot like the stock on my B30, and your comment about the red tint reminds me of what I read from some unverified source that the B30 stock is made of an “exotic” wood called Red Qiu. Maybe all these Chinese manufacturers are harvesting from the same forest and it is not that exotic after all. I’ll be interested to hear B.B.’s take on the B30 stock when the time comes.
Thomas, no doubt you have to take your gun apart to really grease the mainspring. However, I have been placing faith in the ad for Ballistol that the stuff “migrates” through the gun and have just sprayed it on without disassembling anything. I don’t know whether there’s anything to this.
Matt
B.B. and all,
Thanks for the info about mainspring durability. So this appears to be the limiting factor for spring gun use. I’m probably well-through the life of the IZH 61 spring, so how does one tell when your spring needs replacement without a chronograph?
Fortunately, the gun comes with a spare spring, but I want to prepare for the future since having this gun out of commission for any time would upset me no end. Does one order additional mainsprings from the importer, EEA? Is it as difficult to get parts from them as guns? I’m glad I bought the IZH 61 when I did because it has been backed up for months. Or can you get springs custom made from somebody else? Will this cost a fortune?
Matt61
Matt61,
Two things tell when the spring needs replacing – excessive vibration and lower power.
Contact Pyramyd AIR for a replacement mainspring.
Custom springs are not expensive. Maybe $30 at the most.
B.B.
Hi B.B. Back in 1989 my son was on the High school marksmanship team.I knew zero about air rifles,but I bought him a Crosman Mod.3100 .177 cal to practice with in the back yard.It made him a better shot with the .22 as he became state champ.My question is I found the paperwork and I paid almost $80.00 for that rifle ,a lot back then.It only shoots 500 fps,buts it”s anice rifle.Ever heard of it?Thanks
Crosman 3100,
Sure have. The 3100 breakbarrel was made in Spain for Crosman. It should still be a great little shooter.
B.B.
Can you use Crosman Silicone Chamber oil for oiling the breech on Airforce rifles?
Thomas,
Thanks for the compliment and the “word picture” — can’t wait to see how my wife likes being called a hillbilly granny…your girlfriend must be special.
B.B. Yes it”s stamped “Made in Spain” on the barrel assemby. And yes it is a great feeling rifle.I guess by today”s standards 500FPS is kind of low but it works like new and for obvious reasons he”ll never let it go.Thanks again for the info.
jw,
RE: unstained stock. I’ve seen one or two of these done as blondes on the forums, but I personally don’t like the look of unstained wood most of the time. Of course, I’m not sure how different types of simple oil finishes might affect the wood either, some might accentuate the red tint and others might change its cast. Not much of an answer, sorry!
Crosman Silicone oil,
All silicone airgun oils are pure and can be used that way.
B.B.
Matt,
I think you’re on the right track with your universal Chinese wood theory. When I get “inexpensive” gifts from young relatives, they often come in nice boxes or frames that are made of what appears to be the same “Chinese Beech/Red Qui” and usually finished the exact tone of my QB’s.
I think its a cross between red oak and balsa.
Thanks all for the input on spring life. If I can get 10000+ shots I can happily continue on my merry way…I was just worried, the fellow on the other forum who mentioned 2000 shots (maybe meant 20000)…at the rate I shoot I’d be replacing a spring every 4 or 5 months.
Again…thanks all, this place is invaluable.
It’s red stained pine. “Hardwood” is Mandarin for pine.
I have had good results using moly disulfide lube from McMaster-Carr on the spring and piston. I disassembled and degreased my chamber but it may also work through the cocking slot. There is no dieseling if you use the liquid and wait a day or two for the solvent to evaporate.
BB, thanks for the tip on shimming the spring. It made my gun shoot well.
Mandarin pine — funny. It may be more like a poplar, but the red is in the wood, although it can be brought out more by the stain. Aside from being a little soft in terms of surface dents, the wood seems fairly dense and strong.
BG_Farmer
At least it is an honest answer. So the stock even sanded down has a redish tint..interesting. Maybe it would make for a strawberry blonde?
jw
B.B.
Saved again. I’m glad to work with the PA techs anytime, and it’s nice to know that I’ll be able to keep loading and firing.
bg_farmer, whatever the Chinese wood is I’m impressed enough that I may have to get a gun with a real walnut stock to see what that does for me.
Matt61
JW,
The really interesting thing is that the red, maybe even purplish tint doesn’t seem to develop immediately. The bare wood in the cocking slot is distinctly reddish and dark, whereas the freshly cut or sanded wood is pretty light. Just for curiosity, I looked at the piece I cut off from the butt, and it is turning but is not quite as dark as the cocking slot yet. It might be really interesting to take one and sand it down, stain with dark water-based stain to bring out the grain, then sand it and age it for a while before coating, so that the wild color emerges. All just guesswork, though, since nobody seems to know for sure what kind of wood it is!
Matt,
I know what you mean about walnut…I’ve also seen some beautiful stocks made of cherry and maple. I need to keep my cuttings when I trim branches or remove unwanted trees…some of them might be big enough to make a stock, although they’re too small and/or crooked to do much else with.
bug farmer,
you have to season stock blanks for 3 years before they’ll make a warp-free stock.
Anonymous,
It would probably take me 3 years to get around to making one anyway, so that works out well:). Thanks for the tip.
BG_Farmer, Matt, and BB, Thanks for the tips on lubing the spring chamber. I’ve gotten the parts breakdown on the Quest varients, and have been studyiong them for the past week. If I had the proper tools (spring compressor,… got every thing else), I’d take a crack at it. But for the time being I just enjoy the Sierra as it is. I logged onto the Gateway site and read the reviews on the Sierra/Summit, and they were “less than stellar”. Oh well, next time I’ll step up in class and get a RWS Dianna model. Yes BG,…she’s a special little lady, thanks. I might purchase the Charley Da Tuna trigger for the Sierra later on down the road. Next year I might even have him tune it for me, but I want to make sure it’s broken in good. I’ve adjusted the trigger some and the “second stage” is getting shorter to what I want, but for some reason its pull remains inconsistant. Still having troubles keeping ‘any kind of scope’ zeroed in on the Sierra. Elevation seems to be the nemesis of this rifle,…too high one day, adjust it. The next day the same thing. Makes me want to wrap it around an oak tree sometimes. We’ll keep working on it!!! If I get really bent out of shape, I’ll stick it back on the rack and pull out the old 0035 Marksman (Norica). Shooting it feels like a Red-Ryder in comparison, but she’s always on target!!!! BG, did you get that 1377 yet? Today I had one in my hands to buy, but decided to hold off til later. Thomas
Thomas,
RE: sierra elevation. That sounds like the type of problem I was having with my QB36-2: 1) harsh recoil is moving scope, changing POI and/or 2) bad seal or spring problems leading to inconsistent velocity.
I didn’t get a 1377 yet — not sure of my schedule for a pistol purchase, as I’ve got way too many irons in the fire (i.e. arns in tha far) right now.
“off-hand stance” stock modification
Thanks bg_farmer for the inspiring example of ‘making your gun fit you.’
I made of changes on my Diana 54 so I could shoot off-hand with ease by using my skeleton to support my 10 lb gun as BB taught us.
I came up with this modification thru the stimulus of pain and suffering (neck, shoulder, low back, knee) and thru the information of these blogs.
I saw a picture of a metal palm rest made last century I think,,,and decided to make my own.
I decided to start of with just a rough peice of 2 x 4 and a dowel rod inserted into a convenient stock screw hole just forward of the trigger shield. It is about 4 inches high and I was going to modify it to fit me from there.
Turns out that it is REALLY comfortable and the first height I made seems to be perfect for me. The off-hand stance is VERY easy for me now. There is no stress at all in my body now. I am very happy with it and it was made with just stuff I had laying around. It looks pretty clunky, but for three weeks now it has been very stable,,,easy to simply put it in and take it out. I didn’t have to modify the stock actually at all. It works wonderfully.
So Thanks BB for all your wonderful tuteledge and thanks bg_farmer for your inspiration to make my gun fit me.
Eric,
You made my day. A rifle that fits is a joy, isn’t it? Offhand is really not the big deal that everybody makes it out to be, if you use a rifle that fits rather than one that looks like everybody thinks it should. Many LOP’s are way too long these days…I guess people don’t want to look frail, but that’s not a worry to me!
Honestly, I don’t know how anybody shoots some of the beautiful creations I’ve seen — I’d rather shoot my motely crew of “fits”. Shoving that elbow into my ribs adds stability like nobody can believe until they’ve tried it, and when I can’t do it, I feel like there’s no hope. Thanks again.
Where have a the images gone?
Great article, but some illustration would only improve it 😉
Tom,
The Pyramyd AIR server is down and it took the images with it. They have been gone for almost a day and I expect them to be back sometime tomorrow (Monday).
B.B.