by B.B. Pelletier
Guest blogger
Vince is rebuilding a Markham BB gun for Wacky Wayne, and here’s the second part of that project. If you’d like to write a guest post for this blog, please email me.
Bloggers must be proficient in the simple html that Blogger software uses, know how to take clear photos and size them for the internet (if their post requires them) and they must use proper English. We will edit each submission, but we won’t work on any submission that contains gross misspellings and/or grammatical errors.
Today we’ll see Part 2 of Vince’s project to rebuilt Wayne’s Markham model D BB gun.
Methuselah – Part 2
by Vince
First of all, before I even get started, let me make one point perfectly clear–yes, I’m probably the first one inside this BB gun in the past 100 years, but it is most certainly not a violation of Dee-Dee’s honor by any means! I’m inside the same way a surgeon is inside. I’ve got a job to do. I can make it better, faster, more accurate. I can give Wayne something that almost certainly no one else in the world has.
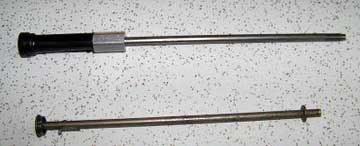
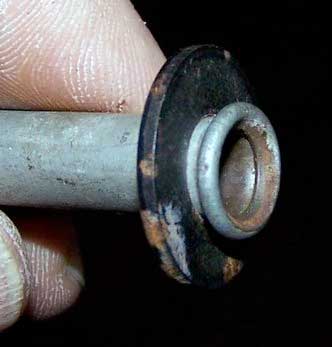
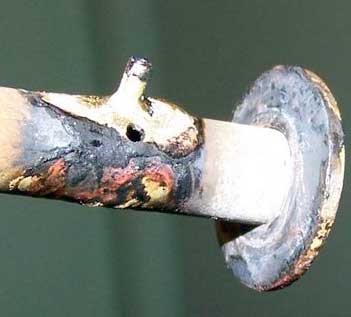
And so I continue resolutely onward. In Part 1, I covered the basics–getting Dee Dee operational again. And I largely succeeded; the gun was now quite capable of holding its own against any number of cheap BB guns at standard BB gun ranges. I couldn’t help but wonder about something when I took a good look at the removable shot tube.

Obviously this is not a horribly complicated part, especially since it’s all soldered together (like the rest of the gun). A tube is a tube, right? And since THIS tube is a bit oversized for modern steel BBs, it should be beneficial to replace it with ANOTHER tube–one sized for the ammo we use today.
So $12 + shipping later, a shot tube for a Daisy 499 Avanti Champion graces my threshold. I lay them side-by-side and start trying to figure out how I’m gonna make this work (not IF, mind you, but HOW).
As you can see, the Daisy tube is a fair bit longer. Or is it? Taking them apart tells a different story.
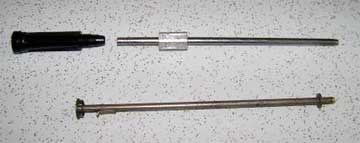
So I’m gonna have to make it longer as well as adding all the do-dads to it. I’m starting to get a fair idea how I want to proceed, so I start at the easy (breech) end first.
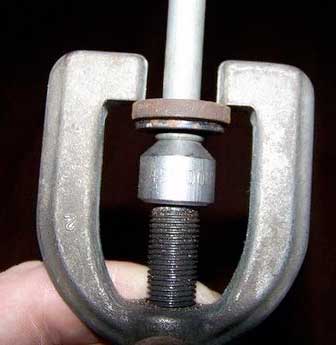
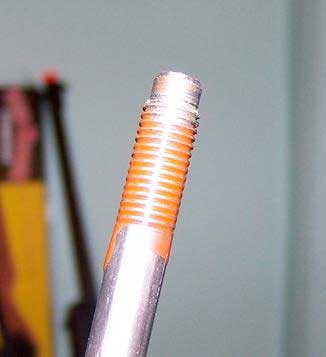
As you can see in the previous picture, there’s a disk soldered to the shot tube about 1/2″ from the breech end. All this does is help center the tube so it’s easier to install. Daisy thoughtfully threaded a portion of the 499 tube in the same general area. I spin a 5/16″ NF nut on it and–voila!–I’ve got a centering guide.
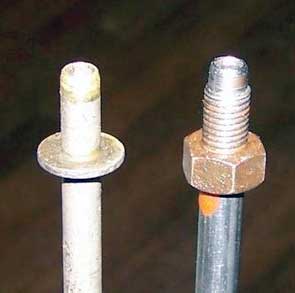
Centering guide is uncomplicated technology–just a nut.
Notice that the end of the Daisy barrel is turned down to a smaller diameter. The overall OD of the new shot tube is 5/16″–but the breech is necked down to 1/4″, the same as the Markham tube. Absolutely perfect for fitting into the compression tube plug. I’m beginning to wonder if Daisy was trying to make things easy for me.
Now that the rear of the shot tube was taken care of, I started working on the front. I rummaged around in some of my many junk bins and found an old 3/8″ OD steel fuel/brake lining tube that was almost 4″ long, plus a washer that fits over it.
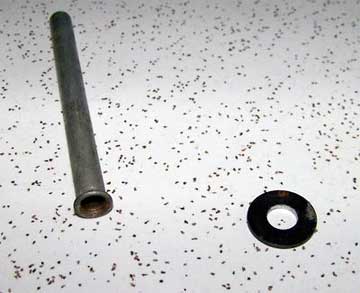
Stuff I found in my junk bins will find their way into the Markham.
The whole thing is held together with a flaring tool to keep it reasonably square. Then, I brazed it back together–not pretty but I’m not done with it.
Yes, the brazed pieces are ugly, but that’s why God invented bench grinders. For the rest of this write-up, we’ll call this the outer tube. I brazed it, by the way, for a very simple reason: I knew I was going to have to do other hot stuff to this assembly. If I’d soldered it at this point, it probably would have come apart in one of the following steps.
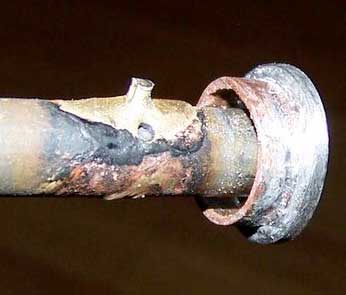
If you look at one of the pictures of the original Markham tube you’ll see a tab mounted about 3/4″ back from the muzzle. This locking tab secures the shot tube in the gun. You insert the tube, rotate it clockwise and this tab engages a locking lug. I figure that the easiest way of mimicking this is with a roll pin pressed into the outer tube.
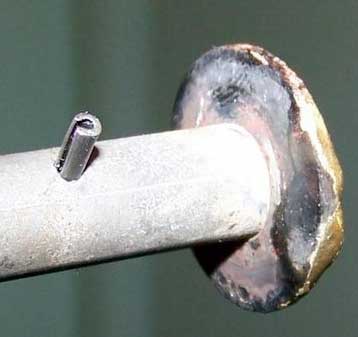
Roll pin makes a handy substitute for the locking tab found on the original gun.
I had inserted a 5/16″ drill bit into the outer tube before pressing in the roll pin to make sure the pin didn’t protrude inside. Obviously there’s not much meat in the thin-walled outer tube to grab the pin, so I brazed it in place.
More brazing. This time it was the roll pin. Read on to see why there’s a hole. Yeah, ugly. It’ll get better.
More ugliness, but now it’s real secure. Two notes here, by the way. First, see the extra hole? That was a boo-boo. I drilled it a little too close to the muzzle. Second, this is not the first roll pin! I originally tried brazing it with my oxy-acetylene torch, and the lil’ pin sticking up soaked up the heat so fast it melted away. This time I used a propane swirl torch (not your $10 Bernz-O-Matic) that does light-duty brazing without getting hot enough to actually melt the steel.
Last thing–there’s a collar that fits under the muzzle washer on the Markham shot tube and centers it on the barrel shroud. Serendipitously the ID of the shroud turns out to be 5/8″ and the OD of standard 1/2″ copper water pipe is (drum roll, please) 5/8″! Perfect fit, so I chopped off a 1/4″ piece of copper pipe and soldered it to the underside of the washer
The collar has now been fitted underneath the washer.
The last major step was sliding the Daisy shot tube into the outer tube and soldering them together, just like a sweat fitting.
I smeared some Vibra-Tite VC3 on the breech threads.

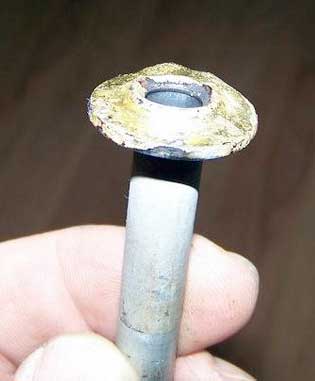
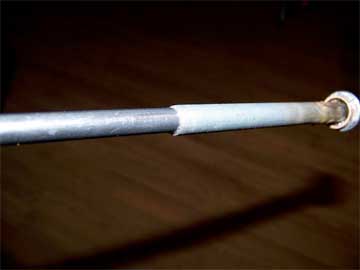
This is how it looked after I ground it down a bit, added some grooves and painted the muzzle end.
Before putting the guide nut on, I ground down and painted the muzzle end of the new tube assembly. I also cut little grooves around the circumference of the muzzle cap so Wayne can still grip it after chowing down on those greasy fries. The rest of the new tube assembly requires a bit of filing and fitting here and there, but after about 15 years of work it’s finally finished.
And no, I didn’t pretty-up the part that goes inside the gun. That’s not gonna help the gun shoot one iota better. That brings up the really big question: Does it shoot one iota better?
Well, yes, it does. Several iotas, in fact.
First iota is found at the chrony, where the better-fitting barrel means less air leakage around the BB and an additional 50 fps. So, Dee-Dee is now in the 220s. Funny thing about loading it, though–the BB takes a LOT longer to roll down the barrel and into the cone that’s supposed to hold it, and sometimes it doesn’t even jam itself in there hard enough to hold properly. The fix is simple: follow BB’s 499 loading procedure. Load the gun before cocking, and the cocking stroke helps suck the BB down the barrel and lodges it into the holding cone. That seems to do it.
No complaints about the chrony results, but the BIG payoff is on the target paper. With standard Daisy BBs (and a temporary, makeshift rear sight) the gun pulled off a couple 5/8″ groups at 15′. Not quite as good as BB did when he tested the 499, but not bad at all, in my opinion. Besides, the rear sight on it at this time is pretty pathetic–blurry, blurry and really blurry. I gotta do something about that.
A guess this is gonna turn into a three-parter after all.

My Goodness, Vince, you’re a ruddy genius! I am totally impressed with your creativity.
Thanks for the compliment, Joe, but frankly this was pretty easy. I got lucky on a lot of levels, and the use of standard measurements (inch vs. metric) on both guns just greased the skids.
I was also half-kicking around the idea of making a pellet barrel for it, using a Crosman 1077 barrel tube. i decided against it since that’s a bit out of character for it – it’s a BB gun, not a pellet gun. Then again, maybe I’ll run that one by Wayne.
Vince,
Fantastic improvising! Starting with the shot tube for a Daisy 499 was brilliant. Great work.
Here’s something for those that appreciate craftmanship and truly lightweight guns:
http://www.menefeconsignments.com/
kevin
I have to agree with Joe B., Vince. This showed some nice creativity in many areas on your part. I dub thee “craftsman”, roughly three stages above “parts changer” (the other stages would be ham fisted mechanic and tuner/mechanic).
Vince,
Great work! Your so creative!!
This one will be lots of fun and very cool.. a classic paper puncher!
Can’t wait to see you work on the two old BSAs I got.. I’ll have to build a parlor, so we can play like we were in the old days…
Much fun..
Wayne
Ashland Air Rifle Range
Vince,
Great job! I love it!
I would have been tempted to use JB Weld [of course that is because I never really learned how to braze! :(] Have time for an apprentice?
Any reason you used Vibra-Tite instead of Locktite blue? I’ve never heard of Vibra-Tite so I would like to learn if it is something I need to aquire.
Thanks,
.22 multi-shot
Vince,
Good engineering. Craftsman, yes Fred, that is a good description. I want to see how Dee Dee shoots with a decent rear sight.
Kevin,
Thanks for the link to the miniatures–exquisite pieces.
Mr B.
Wayne,
I have another idea for outreach with your range. If there are any smallbore rifle teams in the area, you could invite them to train with airguns. We’ve heard enough stories about how people improve dramatically with firearms after airgun training; it’s time to systematize this process. And this will be good publicity for individual shooters who may want to pick up a rifle for more practice. I don’t know of many who have rimfire ranges at home.
I also don’t believe that smallbore coaches have that many better things to be doing with their practice time, not if my coach was an example. My practice regimen for a year was 2X the thirty shot course 3X a week. There was no instruction beyond platitudes about maintaining a sight picture and not jerking the trigger. Otherwise, he would swear at us or ignore us.
Even increasing the distances of the target in a systematic way would have had a huge effect and using airguns even more. You could even pitch this by suggesting the airguns as a remedy for shooters whom the coach doesn’t know what to do with. I was one, and the coach’s only remedy was to recommend more equipment. First was the special shooting glasses with the correction placed above the middle of the lens, then the hook to the buttplate to keep the muzzle from dropping. If the airguns remedied a few problem cases, you would definitely get some attention.
Matt61
Matt,
Interesting observation about offering instruction as well. Sort of like a golf driving range where you can take lessons too?
There definitely might be some good instructors who would like a place to coach.
Herb
Vince,
What a cool project. Resurrecting the (almost) dead. I think it’s really cool when you can improve on a classic product while keeping the original look. If you were to make a pellet barrel for the gun, how would you load the pellets?
Vince,
Good work and looks really nice. The velocity range is pretty close to other small BB guns. You might have to use Avanti BB’s to get the maximum accuracy potential out of the shot tube.
.22 Multi-Shot – I like Vibratite n general because it is pre-applied. Clean the threads, slap this stuff on, and let it dry. Often I found that Locktite blue doesn’t seem to work too well if you don’t get the inside hole super-clean, but this stuff seems to work regardless.
UW Hunter, if I were to make a pellet barrel for it, it would have to be removed to muzzle-load a pellet. I don’t like that idea because I think constantly removing and replacing the barrel would tend to wear the parts and loosen the shot tube.
All,
A bit off topic – or at least late.
Another use of recycled lead. Make toys and ornaments. When I was a kid we used to make lead soldiers. Can not beleieve I forgot about it. We only did it for a short time.
We had an accident with the hot lead and Mom got ride of the whole thing.
Anyway you can still buy the molds. ebay or new.
http://www.dunken.com/chess/index.html
DB
BB,
One thing I noticed about the Marksman powerplant during Vince’s blogs is that it seems to be purely a spring piston mechanism, not a combination catapult and spring piston. My impression from reading your blogs was that BB’s guns were (almost?) always spring/catapult combinations.
Is Daisy the only common catapult powerplant, or is the Marksman pre-catapult?
BG_Farmer,
Yes, I noticed that as well. Markham also used the Daisy-type catapult mechanism on later models, and of course Daisy bought Markham in the 1920, so their guns became exactly the same.
But the early models did not have it.
B.B.
Bit off topic – BB regarding the RWS 350, I have ordered the forward spring guide that I destroyed so I will have to take the rifle apart one last time. Question – in your book on the R-1, you described turning the Lazer kit seal down (polishing it down on a piece of 150-1280 grit paper by chucking the piston up in a slow speed drill) until it would, together with the piston, slowly slide down the compression tube under it’s own weight(I finally read that part). Would you recommend doing this with the RWS factory seal as well? I can tell you it’s a very tight fit, having to force the piston home with the spring upon assembly.
.22 Multi-shot, as for the ‘JB Weld’… well, I don’t think I really trust the stuff as much as others do. I know that it can work very well, but frankly the manufacturer oversells its ‘metal-like’ properties – and that makes it hard for me to have a lot of confidence in the stuff.
Brazing isn’t hard to do – in fact, if you’ve got enough heat, it’s easier than soldering. Getting enough heat is the trick, but for a lot of light-duty applications a $30 Bernz-O-Matic swirl torch and MAPP gas works OK.
BG_farmer, BB might be able to confirm or deny this for me – but I believe the ‘catapult’ part of the Daisy functions mainly as part of the BB feed machanism. It pulls back and uncovers a loading port when the gun is cocked, and when the gun is fired it slams forward, blocking the port and preventing another BB from entering the barrel.
I’m basing this on the performance of my old 1894 with bad seals – and the catapult part of the gun was the only thing propelling the BB. I don’t think it was doing 30fps at that point, so I can’t imagine it’s for performance…
Vince,
Nice work and fine blog about it.
JB-Weld is great stuff. Does not like greese, oil, or vibration. Two-part plastic weld is better… but does not like UV or heat. For all epoxy clean is key.
Brazing was a good choice. Bet you were wishing for a TIG welder.
Thank you,
DB
Vince,
Thanks for the answers on Vibratite and brazing. I’ll have to try Vibratite – I’ve always wanted a threadlocker that you could pre-apply and let dry. I’ve also been frustrated by how clean parts have to be for blue Loctite.
As for JB-Weld, I’ve used it quite a bit for little things and it works well. However, even after the full cure time of 24 hours, it doesn’t seem to be at full hardness. After sitting for a while it does get very hard (never tried to measure how long that takes). A friend of mine that works with cars told me that he filled a stripped engine bolt hole once with JB-Weld, drilled and tapped it and it held great.
I’ll have to try brazing again (if I can find my torch). I haven’t tried it since high school. It was the last skill I was taught in metal shop and I think I had all of one lab period to practice.
DB,
I know JB-Weld doesn’t like to be exposed to petroleum products while curing, but I didn’t think it mattered after curing.
.22 multi-shot
You r nt ntrtng me.
Try again.
.22 multi-shot,
Had an old car, a broken aluminum valve cover, and no money. Fixed it with JB-weld. Would hold for a while then get soft and break again.
Fixed it several times before buying a new part. So in my experience it does not like oil. Guess it could also have been the heat.
At any rate brazing has none of those faults… done correctly.
DB
.22 multi-shot,
On the other hand. My wife’s ironing board popped a spot weld on one of the legs.
JB-weld fixed it and it held for ten years. And yes Mrs. DB irons. Back then she even did ironing for others to make a few bucks. Luckily we moved up a bit from those days.
DB
DB,
Yep, use the fix appropriate for the job. I didn’t intend to start a debate about JB-Weld :)! JB-Weld is limited to 500 degrees F. I don’t know how hot a valve cover gets, but I don’t know that it gets that hot. It may be the aluminum that was the problem. Aluminum forms a tough oxide very quickly over the exposed metal. For best bonding, aluminum probably needs to be exposed (filing/sanding/grinding) right before gluing.
Thanks,
.22 multi-shot
Vince,
You seem very capable of fashioning crude mechanical things and of finding creative ways to solve metal problems. I also see that you have written extensive reviews of many different airguns on other sites. You are very skilled, indeed.
However, here is a challenge that I think may even be beyond your ken…a trigger that has been described as “crude” by many, attached to an airgun admired by even more..
I am talking about the 850 CO2 rifle, which has many followers. Do you think that you could fashion some trigger modification/rebuild to yield a crisp 8-12 oz. let-off? How about just a 8-12 oz. trigger, forget crisp? Or how about a crisp 1 lb trigger?
Anything would be an improvement, but I have been told by 3 airgun tuners/modders that the “trigger is crude and nothing can be done with it other than the adjusting screws.”
Is this beyond you, or do you think that you could make a significant improvement? Is it possible that it is just impossible for anybody?
– Dr. G.
Dr G.,
Your talking the RWS 850 AirMagnum (or Hammerli)?
Take a look at this.
http://www.network54.com/Forum/583201/thread/1234885168/Add+a+second+stage+to+your+trigger
I haven’t tried it but it looks interesting!
.22 multi-shot
BG_Farmer,
The catapult part of the Daisy BB gun firing mechanism does just what Vince says–it bumps the BB off the shot seat and gets it moving. It is the air blast that accelerates the BB to top speed. It also serves as part of the feed mechanism by limiting the number of BBs that can be fired to one.
B.B.
Fred,
I have seen tighter-fitted pistons do well, too. The Venomac Mag 80 Laza kit was hard to move in the compression chamber, but it out-produced the Beeman Laser tune. So a closer fit than I describe might be worth trying. You can always make it smaller.
B.B.
.22 multi,
rws 850.
– Dr. G.
Dr. G, almost any mechanical problem has a mechanical solution unless one expects to get something for nothing. Look at the pump linkage mods done for the Crosman/Benji MPP’s some time back to ease the cocking stroke!
That being said, I’ve not seen an 850 in person and I have no idea what the 850’s trigger mechanism looks like. I’ve emailed Glenn Seiter at Umarex about getting some diagrams, I’ll have to wait to see what he says.
Vince,
Okay. I put the challenge to you because even two top names (ramain unamed, just in case you prove them wrong no need to embarrass) in the airgun field said that nothing could be done, but I don’t think that these professionals are willing to improvise like you seem to enjoy doing.
I look forward to hearing from you.
– Dr. G.
OK. Glenn Seiter did send me an exploded parts view. I’ll see what I can see and we’ll see!