by B.B. Pelletier
First, two announcements. Don’t miss the latest video episode from Airgun Academy. Episode 13 is about adjusting scopes, ironically enough. I say ironically in light of what we’ve been doing with the FWB 124. Also, the October podcast is up. It’s about selecting the right youth airgun.
Now, it’s time for today’s report.
Ever since I saw it at the SHOT Show in January, I’ve wanted to test the BSA Laser Genetics ND-5 laser designator for you. Now that I have it in hand, I’m slightly stumped how to proceed. How would you test the first atomic bomb, if some of your developing scientists told you it would destroy the world? How do I test a flashlight (I know that BSA Optics hates for me to call it that, but it’s the best analogy I can give) that shines brightly for five miles (8.05 kilometers)? And who needs such a thing?

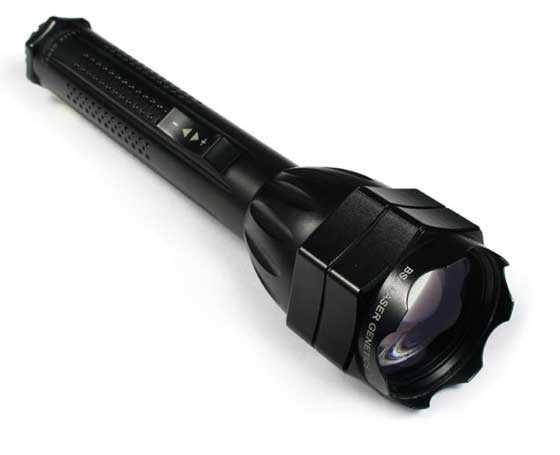
The BSA Laser Genetics ND-5 is a powerful handheld laser designator.
Well, I don’t really care who needs it, I WANT it! The ND-5 is a long-distance laser designator (a flashlight) that shines a highly visible green laser beam (532 nanometers wavelength) over unbelievably long distances. And there’s a simple thumb switch to adjust the collimation of the beam, which is just fancy talk for making the beam wider or narrower. A round button on the end of the barrel turns the light on and off, and the lens bezel is made to crack skulls, just like a tactical flashlight.

The beam can be set to narrow, which is hundreds of times as wide as a normal laser beam. Because it’s coherent light, it maintains this tight beam out to a far distance. While the above picture seems to show a white light rimmed in green, it’s actually solid green. The laser was so bright that it overwhelmed the camera.

Or you can adjust it all the way out to wide, which at three feet is just under a foot in diameter.

A power button on the end of the designator turns the light on and off.

The bezel is shaped for cracking skulls.
So, this is really a night vision device. And it’s one that doesn’t bother game animals. You can see the eyes of animals 1.5 kilometers away as clear as day when you shine the beam on them. I saw this in a demonstration video in the Gamo booth at the show. Okay, so typical NV gear costs $500 and more and gives you visibility out to several hundred yards. Or, you can buy one of these for $330 and extend your night vision by several miles. You decide. Oh, and you don’t have to wear this one. You carry it like a flashlight and use it the same way.
The designator comes in a handy padded carrying case that you’ll want to keep it in between uses. It uses 2 CR134A camera batteries to give up to seven hours of continuous use. It’s sealed with o-rings to keep water and dirt out, and the body is made from tough aluminum.

The ND-5 comes packed in a padded carry case that will hold it when it’s not in use.
One thing you’ll notice if you ever go to the SHOT Show is the proliferation of lasers. They’re everywhere! If you watch the darkened ceiling in the trade show main exhibition room, you’ll always see one or more laser dots walking along the girders and lights. But the ND-5 is to a normal laser like a Peterbuilt tractor is to a Mitsubishi pickup! The main display hall is not big enough to contain the power of this instrument. Even in a hall that measures a half-mile in length, the ND-5 is just starting to get the wind beneath its wings by the time it slams into the far wall. And that’s with all the lights turned on! You ought to see it in the dark!
The dark is where it’s designed to work. I can imagine varmint hunters, for instance, shining a light out and sweeping the country in front of them to determine whether they’re calling in a coyote or a cougar. It would make a difference whether you make ready your .17 HM2 or decide to use the .257 Roberts. Or at least get the .357 Magnum ready in case there’s a screwup and you become the hunted!
How can I show this more effectively?
So, I’m looking at ways I can show you this wonderful device, or at least how I can test it in a way that my description sounds interesting. If you can come up with anything to help me, please let me know.
Now for something completely different
I’ve been wanting to do a blog for awhile about reloading firearm cartridges. Just a one-parter to show the basics of what goes into turning a fired case into a loaded cartridge. I was out at the range yesterday and shot up some .45 Colt ammunition that I reloaded using the simplest of hand tools.
I want to do this report so we can talk more about ballistics, and I can use some firearm analogies that apply to airgunning but whose meaning would be lost if you don’t know how a cartridge works. For example, when reloading, case volume comes into play. There’s a relationship between the filled and empty volume of a cartridge case and the type of gun powder being used that determines the efficiency of the round created. And, you might get higher velocity if, before you fire each shot, you elevate the muzzle of the gun to get the powder piled up back near the primer flash hole. But do you even know what a primer flash hole is and how it works?
Well, that exercise is analogous to a spring-piston gun that’s most efficient when held in one orientation rather than another (i.e., held normally as opposed to held upside-down). Or held loose versus tight.
So, may I write this one report to explain how a cartridge is reloaded without offending anyone? I know it’s off the main track of airgunning, but it really isn’t as far off as it seems.

BB
I am anxiously looking forward to the report in which you test the scull-cracking capability of the ND-5 laser designator.
You certainly don’t need to ask our permission to do an off-airguns blog. Most of us will eagerly consume whatever you decide to write about. Besides, some of your best blogs have been off the topic of airguns.
Love the last photo. Very artsy. Do you mind if I use that image for my Christmas cards?
Slinging Lead,
I love the last picture, too. Tom asked a guy at the range to take this picture. It was so overexposed that you couldn’t see any facial features. So, I suggested that Tom use Photoshop filters to turn his image into a cartoon character. I think he succeeded.
During our Airgun Letter days, Tom tuned so many guns for articles that I referred to him as Tommy Tune. Being the oddball that he is, he preferred Tommy Toon. A self-fulfulling prophecy 🙂
Edith
That picture next to one of Harry Callahan back in the day would explain all of Harry’s traits. “To Harry, love, Dad”
ka
SL,
I think that picture is better-suited to a Halloween card.
B.B.
Should we be calling you Tommy Callahan? 🙂
ka
“So the questions is…punk… did I fire 9 rounds or 10 rounds from this Benjamin Marauder…?”
Interesting stuff is that flashlight 😉 though right now – not for my budget 🙂 SL i too am always for diversity so this topic is great
B.B.
You look just like Harold Francis Callahan with that SAA 🙂 Great shot!
Just to continiue on BB SMGs:
IzhMech (“Baikal”) just recently announced MP-562K SMG. It is yet another Drozd incarnation, but…
That Drozd is built into a real WW2 PPSh-41 SMG.
All the features are in place – high-capacity drum mag, single and burst fire, all wood’n’steel construction, and, of course, that’s a real combat SMG, that could see action on Eastern Front.
If I’ll get a chance I’ll be able to test it in a few days. That must be heavy AFAIR the real PPSh 🙂
duskwight
duskwight,
I would really like a short guest blog of that one! The PPSh is a world-class subgun that would be highly desirable as a BB gun.
They sell the actual firearm over here in modified semiauto form. The guns are not expensive, but I can’t reload for it and I know I would blow through a lot of ammo.
B.B.
B.B.
Yes, I’ve heard a bit about difficulties of reloading and prices for 7,62×25 and Mak ammo in US.
However, if I’m not mistaken, some dudes rework 9×19 brass into Mak’s.
Ok, as soon as I’ll be able to put my hands on 562, I’ll write a comment on it.
duskwight
duskwight,
Thank you!
B.B.
Love to see some reloading stuff, been doing it for 35 years!
B.B.
If you want to talk about reloading, then go for it. I am not personally interested, but I am sure that some others will be.
Closest thing for me is muzzle loaders. Reloading without a case. Every shot a custom hand load.
twotalon
twotalon,
Black powder will be next! The similarity between BP and precharged pneumatics is too great for me to miss that.
B.B.
BB – I discovered adult air rifles when I began looking for less expensive ways to shoot. The air rifles I’ve picked up over the last year satisfy 99% of my desire, but I have recently begun looking at reloading. It looks like I can get started for the cost of a few boxes of .243, so I am definitely interested in your proposal. Jay
Jay,
I will show what can be done easily with the least expensive reloading tools there are. Except for a powder scale that can also double as a pellet scale, the cost to reload one caliber is way less than $100.
Once you get going you can be shooting ammo for a fraction of the cost. That is a nice benefit, but being able to customize your rounds to do exactly what you want is the best benefit of all.
B.B.
I would love to hear more about this “flashlight,” since it seems to be a bit cheaper than NV. However, even at $330, it is more than I can do at this time. Do you think the prices will go down?
I’d also love to hear about muzzle loaders. I’m not into it now, but knowledge is a powerful thing.
Michael in Georgia
Michael,
I think once the Chinese find out how to knock this off we may see less expensive versions.
B.B.
@ Michael. I found them for $286.04 with free shipping. Google it. The place I seen it for that price is on amazon. Still high but better.
Morning B.B.,
You’ve got a person that is a regular on this blog who has one of the BSA Laser Genetics ND-5 laser designators. As soon as Frankb sees this topic I’m sure he’ll relate his experiences with it. All I can say is that a pair of binoculars and that laser designator sure are nice for watching animals at night. I’m wondering how it would work for coyote or fox hunting on a shrouded big bore rifle only of course where it’s legal.
Nice picture. We’re all glad that you’re now again able to get out and shoot it and it’s brothers and sisters.
Reloading, yes of course and sure. I’m particularly interested in the black powder “stuff” because of its similarity to PCPs.
Morning BB (Toon?),
we used to have someone monitoring this blog that appeared to be an expert in LED’s, particularly lasers. It would be nice for him to chime in on just what type, if any, danger this laser can present to eyesight of not only humans but the varmints one is hunting. Let’s say I’m a bit leery of a manufacturer’s advertising claims.
On another topic, I’ve been experimenting with my Marauder to get it to function efficiently on 2,000 psi charges as that’s really where my SCUBA tank is charged to, despite my pleading with the local shop to let it cool and then top it up to 2400 psi. Would you be interested in another blog on this process along with shooting it at 29 yards and then 15 yards to see if the three different pellets are indeed spiraling, causing them to shoot to one side or the other side of the target?
Fred PRoNJ
Fred,
Of course I would like a guest blog on that subject. Please proceed.
B.B.
BB and all…not sure who invented the laser power rating system but… the guy created the “Gillette” scale based on the power required to burn through one, Gillette razor blade. So came G1, G2 ratings or what is now abbreviated into Class I, II etc.
Anyway, below from the laser designers handbook of applications about power and safety;
* Class I/1 is inherently safe, usually because the light is contained in an enclosure, for example in CD players.
* Class II/2 is safe during normal use; the blink reflex of the eye will prevent damage. Usually up to 1 mW power, for example laser pointers.
* Class IIIa/3R lasers are usually up to 5 mW and involve a small risk of eye damage within the time of the blink reflex. Staring into such a beam for several seconds is likely to cause (minor) eye damage.
* Class IIIb/3B can cause immediate severe eye damage upon exposure. Usually lasers up to 500 mW, such as those in CD and DVD writers.
* Class IV/4 lasers can burn skin, and in some cases, even scattered light can cause eye and/or skin damage. Many industrial and scientific lasers are in this class.
I think that was Frank B. Frank?
Yes,I’m here…feeling very bad right now,but I do have the ND5 20mw laser collimeter and the ND3 18mw with aimable mount.The ND5 is so very cool for what it is,but the ND3 is the one to get for practical reasons….since I don’t get to paint targets for air strikes very often…..I’ve tried but alas,the planes never show up! Now the ND3 has many practical aplications,because it is small enough to mount on your scope with the furnished mount.The beam undiffused is as big as a pingpong ball.The mount allows you to quickly adjust it to run parralell with your scopes line of sight! Now here’s the big trick….the slide on the side of the ND3 allows you to open the beam to paint your scope’s field of view,so in total darkness you can see through the scope just like infrared NV,without having to “waste” light where it’s not needed!
Now it’s back to bed for me…..I’ll answer any questions later guys(and gals) Frank B
BB,
Great night tool! That laser light looks like just the ticket to attach to a critter gitter for some night rat sport. I’m finalizing the parts list for a 2250 based ‘ultra carbine’ just for that. Looks like I have to add this light to the list.
I would welcome an article, (or series of) on reloading. I don’t reload, but I know I’m close to starting. Been saving all my brass for this for last two years. Just haven’t caught up on my gun acquisitions list yet!
ka
KA,
There is also an ND-3 that is somewhat less expensive and mounts like a scope. They even make a tandem scope mount for it, so you can run it off a standard scope, I believe. That’s probably what you want.
B.B.
BB,
Yes, I am planning on using a bug buster, or variant scope. The tandem mounts and cheaper unit sound good. Is this available on PA’s site?
ka
To answer my own question… yes PA has ’em on the site.
ka
BB,
By all means a blog on reloading. I have been an avid reloader almost as long as I have been shooting. I started out as a kid with a $15 cast iron Herter’s press which was a monster and a set of cheap dies and a powder measure and scale from them. All told less than $60 – $75 in it and the ammo produced was great.
That press must have weighed 20 – 30 pounds and the thing was so strong and the leverage so great it would be no problem to swage 10 gauge shotgun slugs! In fact I did buy 30 caliber and 44 caliber swaging dies from them and the lead wire and gas checks and happily cranked out ammo till I ran out of wire and gas checks. It was my idea to buy adjustable core molds from them but never got “a round tuit”. And lead wire got so expensive that I quit swaging bullets.
I think I still have all that, though I no longer use any of the items.
Anyone,
Does any one here have any experience with modding the Disco? Stock from the factory I am only getting about 750 – 775 fps with CHP’s. Seems a little low to me for a PCP gun.
What is the most velocity one can get with good consistency in the shot strings and how to go about it?
Seems it should be possible to get around 900 fps with it and the CHP’s?
Btw, I took the advice of whom ever posted about the three screw trigger mod and bought the parts from a local hardware store and did it. Think the cost was like $3 – $4 for three stainless screws and a stainless spring. WOW! What a difference in the trigger now.
Thanks to whom ever made that post.
pcp4me
I hate to toot my own horn, but it may have been me that made the post about the 3 screw trigger mod. I cannot take any credit however, because it was pilfered from two sites I found online. The authors of these two DIYs deserve all the kudos.
http://www.spiralsol.com/airgunmod/1005.pdf (this was posted by diamus)
http://www.airgunfix.com/blog/airgun-mods-diy-tuning/benjamin-discovery-3-screw-trigger-mod/
(this was authored by a man by the name of Jon)
You may want to try the Benjamin Discovery power mod if you are not satisfied with your velocity.
https://www.youtube.com/watch?v=2IN_4quXIo8
Slinging Lead,
Went to the video on power adjuster mod. Went to the hardware store and bought a nylon 10-32 flat head screw and a stainless hex head 10-32 screw. Chucked the nylon screw in my drill press and turned down the head till it would just fit in the hole on the end cap. Cut it off to about 1/4″ and installed it inside the stock spring. Re assembled the gun and screwed the stainless screw into the end cap.
I can now answer my own questions about how fast this thing will go. Least without a spring mod. I did a few quick strings over my Alpha Chrony using CHP’s.
With the screw just touching the spring cap I get 789.7 fps avg with a 22.89 SD. Three turns in from contact I get 845.1 fps avg with a SD of 10.48. Four turns in from contact I get 870.0 fps avg with a SD of 5.83. Four and a half turns in I get 874.7 avg with a SD of 3.00!!! Bingo the “sweet spot”! At six turns in the gun becomes unsafe as the coils are binding and the gun sometimes fires when you close the bolt. At five turns in I get 897.4 fps avg with a SD of 5.65.
So I can safely do around 900 fps with a 14.3 gr CHP. RWS hobbies clock in around 970 – 990 fps with a SD around 5 at 5 turns in. They also shoot 25′ rested groups of .100 – .180″ ctc with boring regularity.
Downside to all this? You get only 10 – 15 really great shots before the velocity starts dropping off.
Upside? Much more power and some really great shot strings with ES around 10 fps. Also preliminary tests indicate I can now fill to higher pressure. I have not yet found the pressure where I get valve lock, but so far I can fill to 2000 psi with no valve lock. Previously it was 1800 psi before valve lock. So perhaps I can fill to a higher pressure and extend the number of good shots.
Thanks man for the info. With these two mods I now have a MUCH nicer gun. All I need now is the after market magazine mod to have a “poor man’s MROD”!
pcp4me,
http://www.qbmags.com/ has magazines for the Discovery and the word is they are working on a breech for the Discovery that will take the Marauder magazines (similar to the one they have under the “New Products” link for the QB rifles).
AR
A.R.,
Thanks man. Will probably wait for the new breech to come out. But I really appreciate every ones helpfulness.
I have had a chance to do some more testing with the power adjuster. At 2200 psi I get partial valve lock. However the difference in fps between partial lock and non lock at 2100 psi is only about 10 fps avg and so I can now get 20 really great shots averaging about 950 – 970 fps depending on when I shoot the string and how many shots per the string.
I still get another 15 good shots that would be ok if I am shooting 25 yds or less but at longer ranges I probably need to limit my shot count to 20.
I also tried some weaker springs but they did not work well. Max velocities when I reached coil bind were under the 750 fps starting velocities. Also starting velocities were so low that I could actually hear the difference between when the hammer hit the valve and when the pellet hit the target!
What I need is a spring that is say about 75% of the power of the factory spring and uses thinner wire so I can get more than 6 turns before coil bind. Ultimately I would like the power adjuster to go from about 550 fps for indoors with RWS hobbies to about 1000 fps for longer ranges out doors. Any one know where such a spring can be found?
pcp4me, please be careful how high you fill the Discovery. I know there is a lot of discussion about it on the forums, but here is what the manual says.
‘DO NOT fill the airgun to more than 2,000 psi. See “Overfill” information below.
…
Over Fill
This airgun is designed for optimal performance at a pressure no greater than 2,000 psi.’
Thanks,
AR
A.R.,
Lol that is why you void the warranty when you mod the gun. However mine is already our of warranty.
Also I have no intention to going over 2200 psi. Since that is only a !0% overage I doubt I will get too much problems. One possibility though is more rapid wear on the hammer spring and hammer itself. Also the possibility of breaking the valve.
Cross my fingers and hope!
CJr,
From yesterday.
Re: “Does the scope permanently stick to this epoxy you’re talking about, then? Epoxy sounds like glue so I’m guessing I’d better get it right the first time or else? Seems like I’m always making eye-relief adjustments or some such.”
Yes, epoxy is glue. No, if done correctly, your scope does not permanently stick to the epoxy or your rings. If you want to create “shims or inserts” between your scope and scope rings from epoxy to correct for droop or running out of adjustment on your scope here’s the basic instructions.
1-Optically center your scope or at least get your windage and elevation adjustments close to centered
2-Buy a stick of two part epoxy. I bought mine at walmart. One part was white and the other part was blue. This epoxy I’m referring to is the consistency of modeling clay. Once you knead the two parts together you activate the epoxy/glue.
3-Easiest way, not the only way, is to mount your almost optically centered scope on your gun. Mount your gun in a vise. Shoot 5 pellets onto a target at your preferred distance. I shot at 20 yards.
4-Without moving the gun or vise, take 4 pieces of masking tape and place them on the top of your scope parallel to your rings. Two pieces of tape on the scope on both sides and close to (1/8″) the front rings. Do the same near the rear rings.
5-Take two more pieces of masking tape and put them on top of your scope ring caps. With a pen or marker draw a reference line on all 3 pieces of tape that you’ve attached at the front of your scope so you can line up the scope when you re-install it.
6-Without moving the gun or vise, take off the top of your scope rings and remove the scope from the rings. Pay attention to which ring is the front and which is the rear.
7-Cut 4 strips of plastic wrap (glad wrap, saran wrap, etc.) slightly wider than your scope rings and about 4-5 inches long. Wrap one strip on the front of the scope in between your masking tape. It’s okay if it overlaps the masking tape since you can trim it later. Do the same thing on the rear of your scope.
8-Knead your epoxy. Divide the epoxy in half. Roll the epoxy into a slightly larger diameter than tootsie roll or pencil. Flatten these shapes to the width of your scope rings. Place one around the plastic wrap on the rear of the scope. Do the same on the front of the scope.
9-Wrap your two remaining strips of plastic wrap around the outside of the epoxy strips you just placed on your scope. Without moving the gun or vise, place the scope back in the rings. Put your scope ring caps back on and align with the marks you made. Install your ring screws and tighten just to the point you see pressure on the epoxy.
10-Without moving the gun or the vise, look through your scope and find the center of the pellet holes you made in your target earlier. Gently grab the out side of your scope and gently move it to approximately one inch above the center of your pellet holes. Continue to tighten your scope cap screws. Frequently look through your scope and pay attention to tightening the screws in sequence so you keep the crosshairs on target. Don’t tighten the screws all the way or you will squish out all of the epoxy that is the shim. Stop at about 1/16″ of epoxy. When you’re done the crosshairs should be adjusted downwards to the center of your pellet holes since you started one inch high. If the crosshairs are too high tighten your screws a little more. If it’s too low then take the scope caps off and add epoxy where you need it and start over. This epoxy has about a 2 hour work time so you can screw this up several times and still come out okay.
11-If any epoxy is touching the scope or scope rings gently remove it now before it dries. All of the epoxy should be contained within the plastic wrap if you made your plastic strips wide enough.
12-Allow the epoxy twice the drying time and gently pull back the edges of the plastic wrap to allow air to reach the epoxy and speed the drying time. Once it’s dry you can trim the plastic and remove the masking tape.
Now that I’ve typed this chapter it may appear complicated and involved but it isn’t. Of course, the plastic wrap step is to keep the epoxy from gluing the scope to your rings. I used the plastic wrap and it was tough to trim all the plastic wrap from the outside of the scope rings. Others that have used this technique sprayed their scope and rings with PAM or used carnuba wax instead of plastic wrap. If I do this again I’ll try that instead of the plastic wrap.
kevin
Kevin,
That is a good technique, much better than shims. Add it to an Leapers Accushot one piece (the best deal in town on a scope mount for AR and R/F dovetails) and you have a good chance of getting the best you can hope for out of the scope.
BG Farmer,
I confess. I’ve used pieces of plastic as temporary shims. The epoxy technique is an inexpensive, permanent fix that keeps stress evenly distributed around the scope tube. Kind of a poor mans Burris Signature rings (the ones that have the synthetic self-aligning inserts in various sizes that fit inside the steel rings).
kevin
Kevin,
Thank you so very much for those scope shim instructions. I’m saving them for my next scope.
-CJr
CJr,
You’re welcome. Always happy to help a fellow airgunner spend time and money.
kevin
Kevin
Your breadth of knowledge is staggering. You should write a book. I would wait an hour in the rain for you to sign it.
Ah, yes the Paul Watts R7. I must say it is a piece of art. I am horrible with open sights, but at 10 yards I can shoot ragged one hole groups, which for me is incredible. I will have to mount a scope soon to wring out all the accuracy I can, the raised comb begs for it. So far I am enamored.
I own two other HW rifles with Rekord triggers, but this one takes the cake obviously. The trigger is lighter than I am used to, but if Paul had this thing adjusted to his liking, I think I might need to try it for awhile before I start tinkering.
After shooting it with a scope, I promise a long-winded post sure to bore you to tears.
Paul Watts is a craftsman and a gentleman.
Slinging Lead,
Thank you. Your post made me smile since it reminded me of the first Paul Watts advanced tune gun that I shot. It was also an R7 in .177. Mine liked the jsb exacts in the blue tin best but crosman premier lites (7.9 gr. in the cardboard box) were a very close second.
I like a light trigger. I’m sure you’ll get used to it. LOL!
Once you mount a scope I’m sure you’ll have fun finding the best pellet for that fine gun. Looking forward to the long winded post.
kevin
Paul Capello has a video about the ND-3, the little brother of the ND-5. Used in conjunction with an illuminated reticle, the possibilities for night time fun are endless.
https://www.youtube.com/watch?v=2NnDJjIFnYc
This is something I desperately want, but can’t yet justify. You can buy a nice airgun for the cost of one of these things. Fortunately, my idol, Frank B has one. He will eventually weigh in.
SL,
Thanks for the link. Cool stuff gets pricey, doesn’t it?
Gotta have it!!
ka
KA
I will eat Ramen noodles for a month if need be. My airgun addiction cannot be slaked. Keep in mind I work the graveyard shift (11p to 7a) so this type of thing strikes a chord with me.
I know what you mean. I’m on the same track. Just not PCP yet.
ka
Outstanding video! Very cool product! I want one… I read one review on the PA site which warned of the dangers of looking directly into the laser… I’m wondering if this is a problem for animals as well ??
–Steve
Steve,
Any animal that sees this light from me has no worries about eyesight!
ka
ka,
I was thinking about my dog.
–Steve
Steve,
Ha! You got me! Your dog would NEVER be in my sights.
You could do what Paul Cappello did in his video and use stuffed animals for practice.:)
ka
Duskwight,
The PPSh is not yet ready for export, but Pyramyd AIR is looking at it. They want to carry it.
Here is the web page link:
http://www.baikalinc.ru/ru/company/357.html
B.B.
B.B.
Then I guess your dream becomes much closer 🙂 Hope you’ll enjoy it.
Maybe that’s my personal oddity: on the one hand I can accept any possible shape for a “business” airgun, knowing it adds to its effectiveness, on the other hand “fungun” must be as realistic, close to real firearm and true-to-life as possible.
Does anybody else have the same?
duskwight
Duskwight,
Speaking for myself, I love close replicas the best. I actually bought a Walther PPK/S firearm because of the BB gun. And my first Makarov was also a BB gun.
I wish someone would make a Sharps single-shot airgun.
B.B.
B.B.
Why not? I think it would be easily to do that in PCP with a help of a good gunsmith. Well, there would be some construction and CNC job, but the shape would be perfectly same.
I think 9 mm would be OK – big holes look better 🙂
From what I know about falling block Sharps’s overlay, it is almost perfect for that – much place and loading system/firing mechanism are quite fit for PCP-zation and you’ll be able to load bullets directly into barrel.
It seems to me it will resemble Condor or Talon in composition. Reservoir and reducing valve innside a butt of the stock, hammer and rod-activated valve before loading breech and voila. Of course, I suppose there will be some loss of pressure – too long path for air inside the breech, and there won’t be much shots from fill – but who cares as long as you have PCP Sharps?
duskwight
B.B.,
Didn’t gary barnes do a single shot big bore sharps look alike?
kevin
Kevin,
Most of the guns Gary Barnes made look like Klingon weapons. I told him that once. I called a .44 ball shooter of his a Klingon Eradicator.
If he made a Sharps lookalike I am unaware of it.
B.B.
BB,
I thought I was looking at the cover of the new Super Hero comic “Pneumatic Man”. I must get issue #1. What a collectors item that will be!
Yes, I’m definitely interested in a reloading 101 course.
-CJr
B.B.,
A blog on reloading? By all means! I would like to start reloading for the Mosin and the Mak!
Update on TX200. Got it this week! Walnut stock. I ordered it with a Leapers 6-24×50. The scope makes it heavy but I figured I could switch scopes with another rifle if needed.
First thing, I tried to sight the scope.. I fired the first pellet, it was high and to the right. Then, loaded the second. When I tried to close the lever, it did not swing! The catch release button was stuck! I was, to say the least, confused…. trying to figure out what happened. So, I decided to call PA, and there I was, sitting holding the lever with one hand, the butt of the rifle on my lap and my cell phone on the other, waiting for the “please hold” music to stop and a human to answer. Then they tell me, you are not pulling the lever far back enough. So, end of story, duh!
So, I shot several times to sight in and figure out hold, velocity, etc. Then I decided to shoot a group from 13 yd: a very careful, honest group to see what the rifle could do. I release the first… high and right by about 0.5 inch. Perfect, I say. Then, I shot the second. It did not feel right. The rifle sort of canted when releasing and jumped a little. Shot went higher and further to the right by about 0.25 inch. I figure it was my fault, and it probably was. Then comes the third, nothing! Can’t see impact. Then the fourth, but still nothing! I figure something is wrong with scope and they are landing out of field of view. Then I try the fifth, still nothing. The sixth shot showed what was happening. It tore slightly the edge of the very first hole. The rifle had put 4 shots through exactly the same .0177 inch hole! Again, end of story… Got a six-shot, 0.25-inch group at 13 yard, honestly.
Velocities are ranging between 930 and 960, with most falling within the 945-960 fps range.
I love this thing
T.E.
TE
Hell Yeah! The TX can certainly be disconcerting when it stacks all your pellets and leaves you wondering if you hit the target. Mine needs a swift cocking stroke as well. Sometimes it cocks, but the safety doesn’t set. Don’t you just LOVE the fishscale? And the mirror-like blueing?
If you have a digital camera, I would love to see what your walnut stock looks like.
Mine likes CPLs. What are you using?
S.L.,
I used CPLs too. All rifles I have shot seem to like them, plus I have several boxes of them. I do not see any need to try anything else on the TX, the gun is outshooting me anyway.
Yes, the look and solidity of the TX match its accuracy. It is exactly what I was looking for!
T.E.
Be careful of shooting cp at those velocities without any kind of lube. I leaded the crap out of my TSS by shooting dry cp in those velocity ranges in pretty short order.
twotalon
Twotalon,
Thank you. Any suggestions as to a less bore-leading pellet?
T.E.
Not many of the better pellets are the hard leading alloys. Try the AA , H&N, and JSB pellets.
Some springers can tolerate the cp because they blow a little lube all the time.
You could keep on shooting them and see how long it takes for problems to develop. When they start to lead up, they will lead fast. Accuracy goes away very quickly. If it happens fairly fast, then you need to look for a non alloy pellet. Leading will not hurt the barrel, but you have to watch the cleaning rod when you run the wire brush through it so you won’t dick up the crown.
‘twotalon
TwoTalon, thank you! . I would dread running a wire brush in a TX200, would have to do it from the muzzle end, ugh! I’ll try JSBs, which I already have
T.E.
T.E.,
If you want to shoot Premiers in any springer lube them with Whiscombe Honey. It doesn’t diesel and will keep leading as low as possible.
B.B.
Go ahead with the exacts if you want. See how they work for fit and accuracy.
I would still try the cp for a while if they are shooting good and you have a lot of them. The worst that will happen is that you might have to clean the barrel more often than you like.
I like a pellet that seats good and shoots good as long as it does not cause any problems on a regular basis.
twotalon
TE,
I’m sorry to hear you’re having trouble seeing your shots on paper with your new rifle. Some air rifles are like that and need breaking in first. Please put through at least 500 pellets before you call the manufacturer. If your shots don’t start spreading out so that you can see them after 500 shots then get back to this blog and we’ll direct you to someone who can help you. I know, I for one, have no trouble seeing the spread during my sessions so I’d be glad to help you. One thing you might try is gripping the stock as tight as you can and jerking the trigger. I know this works for me most of the time.
If you smoke a lot of cigarretes and drink a lot of coffee to get wired up helps too.Get yourself good and twitchy and your groups will be much easier to see and measure.
twotalon
CJr and Twotalon,
I about died from laughter when I read these two comments – priceless! You made my week, let alone my day.
TE – simply awesome. I too would be assuming the pellets must be off paper. I loved the story, and I must get something more accurate to shoot . . . . of course since I would go the .22 route, I would not need to worry about the leading.
Alan in MI
Hilarious! Hilarious! Side ache.
ka
T.E.,
Great report! I’m so glad you are now a member of the exclusive club. From now on, you will understand when we wax rhapsodic over the TX 200.
B.B.
To All: Crosman 2240 pistol; I have installed a power adjuster on the back end that tensions the hammer spring for greater or lesser power per shot. Additionally, I see that guys have also put heavier springs into this pistol. Anyone know the purpose of the heavier spring in a Co2 gun? Quicker hammer strike? More or less Co2 used per shot? Or…?
Guys do that to increase the power by mashing the valve in harder and for longer. You see the same thing with pcp guns too.
Power is not always increased by much with some guns. Gas usage goes through the roof.
twotalon
TT
Thanks!
Brian,
The harder the valve stem is hit, the longer the valve remains open (within limits, of course) and the longer it’s open the more CO2 gas can flow out. So a heavier hammer strike equals greater power, to a point.
B.B.
Without having seen Paul Capello’s video, I admit that based on the blog today and other descriptions of the ND-3/5 products that I’m wondering what they are good for. It’s like W.C. Fields comment: “Women are like elephants. Nice to look at but what do you do with them?”…. It seems that the ND lights are good as a powerful signaling device in an emergency or a super-powerful flashlight. Maybe the analogous concept are airguns that are powerful beyond any practical use. Questions/issues abound for the NDs. Most of the five mile range is outside of the distance for practical shooting or even seeing anything at all. If a flashlight will spook an animal (I’m guessing without having tried this), will an ND device not spook the animal when it is much more powerful and can burn retinas? Is the green color enough to offset this effect? If you have zeroed the ND with your rifle, it will be essentially useless outside of the zero distance, and range estimating at night is a whole different problem. If you haven’t zeroed the ND to your rifle, then it seems essentially like a powerful flashlight, and beyond a certain point, expanding the beam will diminish the illumination, even for a light as powerful as this one–an effect that will be increased with distance. As for a means of testing it, I guess a reasonable approach would be to try it out in the role that it is designed for which for our purposes would be using it at night for targets of opportunity like Wayne’s Quigley targets at distances of up to 50 yards and seeing what you can do.
Yes, yes, please do the reloading article. A friend was warning me that for reloading you really have to know what you are doing because the compression of the powder is an important factor. Oh no! spectres of flintlocks and blackpowder. I’ve never heard this before. Is it true? The Lyman 49th ed. reloading manual is spooking me more. Man is this complicated. It sounds like if you don’t lube your case exactly right it will either get stuck in the reloading die causing huge problems (too little lube) or lube can contaminate your primer and cause a hangfire (too much).
Here’s an airgun ID question. Below is a picture of Staff Sergeant Robert Miller who yesterday was posthumously awarded the Medal of Honor for service in Afghanistan. He is shown as a young child with an interest in bb guns (in a hint of his future career in the Special Forces).
http://www.foxnews.com/slideshow/us/2010/10/05/medal-honor-staff-sgt-robert-miller/#slide=7
The question is what model of airgun is that? All I can say is that it looks like an HW 97 but that can’t be right.
More great news from Yur’yev! When using iron sights, you do not have to jump back and forth between the front and rear sights to align them. You just focus on the front sight. I had been doing this out of my reading in tactical shooting. But I had supposed that for precision shooting you have to be more meticulous. David Tubb makes a big deal out of using a bubble level attached to his sights. And while he doesn’t go into much detail he seems to hint at moving back and forth between the front and rear sights. Yur’yev advises not to do this even with the small match rear apertures because it tires the eye muscles. Yay! His window for releasing the shot is extremely short–about 3 seconds. If that’s so, then the vast majority of people who you see at the shooting range, belaboring their shots, are doing it wrong.
Matt61
Matt,
That gun is a non-firing toy gun that probably looks like a Winchester 94.
As far as reloading goes, I do not load compressed powder charges. I reload simple, accurate and fun-to-shoot cartridges that are so far below maximum charges that they are inherently safe in almost any gun.
I will probably shock most reloaders with how simple I can make things.
B.B.
Matt61 —
It’s really important to focus on the front sight (rifle or pistol) when shooting a match gun. And it’s just too exhausting to the eyeball to run your focus back and forth. To be sure there comes an age where you cannot adjust the focus of your eye; the lens has hardened and you’re stuck with Bi-, Tri-focals or the line less vari-focal lenses (which are atrocious for shooting because the head position to focus on the front sight may be awkward). I’m deeply into that age group, so I’ve finally decided to buy a lens that’s exactly measured to give me sharp vision at the front sight when I’m pistol shooting instead of just finding a pair of cheap reading glasses that are close to the right prescription.
Once you adjust to looking only at the front sight, you’ll find that is a more meticulous way to shoot — or at least you get better scores. A spirit level is permitted in free rifle, but not in ISSF or NRA competition. They can be bought from MEC-Centra for an arm and a leg. See the Raabs’ site at centershot.com.
Three second rule: Marcus Raab has been patiently trying to get me to have the ‘courage’ to take the shot quickly. The rule seems to be “shoot the first 10 you see.” When I can do it smoothly, it really works.
Pete,
Getting it done efficiently isn’t easy, is it? My grandfather would whack me gently on the back of the head and make me start over if he thought I was taking too long to aim (BB can add that the the Single Mom series:)). I’ll often forget and think I could do better if I “take my time” (aiming), but the reverse is almost always true and if I don’t stop myself, I will “refine” that aim until my body is unsteady and end up taking a desperation shot when there really is no reason not to just take the rifle down and start over. When you can smoothly mount, aim, shoot, spot, dismount in what seems like one smooth motion, it feels really good.
Boy,you said an important mouthfull there BG…..
Hmm! I may have to see that Santa Claus is aware of this light 🙂
SlingingLead,please send me an Email if you see this….at frankbpc@aol.com.