by B.B. Pelletier
If you’d like to write a guest post for this blog, please email us.
Bloggers must be proficient in the simple html that Blogger software uses, know how to take clear photos and size them for the internet (if their post requires them), and they must use proper English. We’ll edit each submission, but we won’t work on any submission that contains gross misspellings and/or grammatical errors.
Today, blog reader CJr tells us about his first-time project of making a left-hand grip for his IZH 46m single-stroke pneumatic pistol. Enjoy!
by CJr
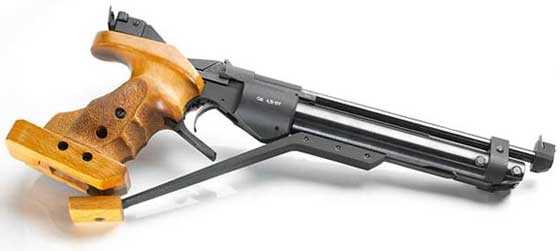
I’d been looking for a suitable entry-level competition target pistol that I could use for the AirgunArena.com eMatch pistol events and finally decided on the IZH-46M match pistol from IZH-Baikal. Back in March 2006, BB said, “The 27.5cm (just a hair shy of 11”) barrel is world-class. No human can shoot as well as this barrel permits, which is true of every world-class target pistol.” That’s what I was looking for! The bold print was his. If these barrels still exist on today’s pistols I will be a happy camper. And the $379.50 price tag isn’t bad either, for a good entry level competition pistol.

Here she is in all her radiant beauty.
This pistol had all the features I was looking for except one –- it didn’t have a left-hand grip option. Since this was the gun for me, that was sad news. But it wasn’t sad news for long. While Pyramyd AIR didn’t offer left-hand grips, I hoped someone else might. I searched the web and queried this blog but came up with nothing to my satisfaction. It was then that I decided to make my own.
Now, mind you, I am not a woodworker, woodcarver or carpenter. My only previous experience working with wood was helping my sons build their Pinewood Derby cars for Cub Scouts. But I was determined to make my own grips. After all how hard could it be?
Let’s get started
I started by visiting the local big box hardware store. Without much searching, I found a piece of baseboard trim that was just the right size and for only $2.38 for a 3”x5”x1” slab. Perfect — almost. They were soft pine, but they were cheap and looked easy to work with; and if my idea fell through, I wouldn’t have much invested in my folly. I bought two –- one for each half of the pistol grip.
What follows is a step-by-step approach I used to fashion my grips. I took each step with the intent to determine if it was feasible to continue or if continuing was heading outside my comfort zone. My main objective, of course, was to not damage the pistol in any way. As you’ll see, there was never any danger and no airgun was killed or injured during the making of this grip. I did have to be careful not to get sawdust into the vital areas of the pistol.
Remove the grips from the pistol
My first step was to remove the old grip halves from the pistol. Each grip half is held to the pistol grip tang by one screw through the grip and into a threaded hole in the tang. There’s one screw below the tang that goes through both grip halves to hold them together at the bottom. I removed those three screws and separated the grip halves from the tang, thereby removing them from the pistol. There was also the adjustable wooden palm shelf at the bottom of the grip’s right half held by two bolts through the adjustment slots. I removed that, also. All the hardware I removed I put in a zippered plastic bag to prevent loss.
Trace the grip outline on paper, transfer to wood and cut out new grip halves
I laid the grip halves on a piece of 8.5″x11″ computer print paper and traced their outlines to make patterns. I cut out the patterns with scissors, laid them on the blocks of wood I bought, traced the outline onto the wood, and used a jigsaw to cut out the shape of both grip halves.

Here’s a picture of the pistol with the grip removed, a freshly cut out grip half, the paper patterns and one of the pine blocks I started with.
Trace the outline of the pistol’s tang inside both new grip halves
Now that I have the new grips cut out, I want to make sure they’ll mount on the pistol. Since the left-hand grip I’m making is made up of two separate halves, I’ll call them the left side and the right side.
Left side
I took the freshly cut right side, reversed it and set it on the table in the new left side orientation. I set the gun carefully down onto the now-new left side and traced the outline of the tang onto the wood.
Right side
Next, I had to make sure that when I traced the tang onto the new right side, both grip halves would be properly positioned with the tang and aligned with each other. With the left side still on the table and the pistol in the correct position on top of it, I placed the new right side on top of the tang, aligned the two grip sides flush with each other — making sure I didn’t move the one on the bottom — then, carefully picked up the pistol and only the right side together and, while holding this arrangement, traced the tang outline onto the right side. This procedure was tricky because I had to make sure the wood didn’t slip on the tang. Actually, the shape of the grips at the top helped stabilize them against the pistol.
I’m glad I had a free hand in this
I had a Dremel rotary tool, so I bought a plunge router attachment for it for $27 at Sears and a 1/2″ router bit to cut out the tang groves. It’s kind of a free-hand operation following the traced outlines with the router bit, but the depth is constant because of the router attachment. Besides, imperfections will be hidden from sight. The old standard grip was shimmed inside. If I cut too much, I could shim it. As it turned out, both fit snug and flush.

Cut-outs for the pistol tang. Not pretty, but it works.
Drill, baby, drill!
The next step involved drilling the holes in the grips so they could be screwed onto the tang. I did this with a drill press by first drilling through the screw holes in the tang and into the new left side. Caution: Care must be taken so the threads in the tang are not damaged by the drill bit. To prevent tang thread damage, I first used a drill bit smaller than the hole in the tang. Next, I removed the grip and enlarged the hole with a bit the size of the original screw. I now knew that the left side would always match up with the tang using those holes.
I laid the left side on top of the right one, making sure they were flush with each other. With that larger drill bit, I drilled through the left side holes into the new right side. All the holes would line up and both grip sides would always properly align with each other on the tang and flush. The last step in this part of the process was to countersink the holes in the grips. With that done, I was ready to start carving.
Now, the real fun begins
Using the Dremel and router bit without the plunge router attachment, it was easy to make a free-hand rough carving of the grips. I had to always keep an eye on the original grips as a model while carving these.

These are pretty rough, so a little more carving and sanding is needed before I can shoot with them.
At this juncture, use your imagination to visualize a lot of sanding and cutting and wood filler. I used a router bit, rasp files and 150 on up to (down to?) 320 grit sandpaper. What a beauty I finally turned out!


After carving, sanding, wood filler and a bit of drilling — this is what I was able to do. For proof of concept, I could have stopped here and used these but now I’ve been bit by the wood finishing bug.
Time to stain my reputation
I decided to stain the grips a dark wood grain color to resemble the original grips. I’ll tell you right off the bat that this part of the process was a complete failure. I read some stuff on the internet, watched a few videos and felt I knew enough to proceed. I bought a can of MinWax Wood Finish, Tung Oil Wipe-On Finish and mineral spirits. I followed to the letter the instructions printed on the can of Tung Oil Wipe-on Finish for producing a semi-gloss, uniform, wood-grain appearance but ended up with the ugliest, blotchy chunk of wood seen by man. I’d show you a picture, but my camera refuses to download it.

Well, if you insist…here’s what the stained grips looked like.

These are the tools I used. (Drill press and scissors not pictured.)
Changes made that differ from the standard grip
I rounded off the trailing edge of the palm shelf because the sharp edge was very uncomfortable. My grips are smaller than the originals, but that’s a given. My next pair will be even smaller. The originals are purposely made large to allow for customization to any hand size. On the next pair, I’ll move up the grip flare (at the bottom of the grip) a bit higher. I’m talking about the part of the grip that flares out at the bottom on my new right side and not the adjustable palm shelf. I believe this flare is supposed to be designed to minimize any yaw in the barrel, whereas the palm shelf is designed to minimize droop caused by the wrist. Because my hand is small, the current flare does not quite reach my hand, and the palm shelf is adjusted as far up as it will go. Finally, on my next pair, I will choose a wood that doesn’t need stain. I will need something to make them waterproof and sweatproof. Staining is not my forte.

Final product (ok, I got silly).
Time to assess the results
My efforts were a success. These grips fit me like a glove — very comfortable, giving me a much more stable sight picture. I can’t wait for the stain to dry so I can start shooting. I wanted to make a set of left-hand grips that were suitable for competition shooting, and I succeeded. Can you do it? I believe you can.
I don’t think I possess any talents that you don’t have. Can I do it again? I think so. I’m emboldened, now. Would I do it for economic gain? I don’t think so. It’s too time-consuming the way I did it to make it affordable to a customer. However, I think I can make a set in about 4 hours, probably less with the proper equipment.

Wow DIY stuff i love this ! 🙂 Gun stock is great congrats!I ll make one for my Norconia just to try for fun
Southpaw Chuck
Great work on the guest blog and the grips. Harley grips, HILARIOUS.
I think that soft pine wood absorbed the stain unevenly due to the differences in hardness at the grain. Not your fault. I believe you will have much better luck with a harder wood.
CJr…
Nice job.
I am not good with wood. I think it is because it is easy to remove material too fast.
Also..
I left you an explanation about what we were discussing yesterday.
twotalon
Morning CJr,
Nice job! I like the Harley logo. I think Slinging Lead is correct about the stain.
Think about the future satisfaction when you win your e-matches with your custom left handed grips.
By the way, that’s a pretty fancy shop and work bench!
Bruce
Excellent write-up, CJr! Being a rider I like the Harley logo.
I have stained a lot of pine (mostly baseboard and doors) and the flat pieces do well. On a part like a grip the end-grain areas will come out darker than areas where the surface is parallel to the layers of the grain. Using a sealer before staining should help the color be more consistent.
Paul in Liberty County
Paul,
Yes I always use a sealer no matter what type of wood I am working with. I sometimes save the dust from the finer sanding and mix it with a clear sealer to make a custom sealer for that wood. Works wonders and a sealer makes the staining go much better.
Generally speaking if it is a very fine pore wood you can use a clear sealer. If it is coarse pored I recommend making the custom sealer for that wood.
Victor
From the other day…
If and when you get the TX200, I recommend the Centerpoint 4-16X40 scope. It is made by Leapers.
/product/centerpoint-optics-adventure-class-4-16x40ao-rifle-scope-w-free?a=2566
It has a nice thin reticle, and you can lock W/E adjustments with knobs at the base, just like my big ass FT scope. I think it is sized just right for the TX as well.
CJr,
I left you a comment on yesterdays blog on my experiences switching between HPA and CO2.
Bruce
CJr,
Excellent article! You had me riveted to every word! I have worked with wood (mouldings and the like) for many years and pine is notorious for ill staining. Try using a sanding sealer before staining to even out the wood’s stain absorption.
Super nice finished product. Determination and maintaining that vision of finished product, backed up by photos, it doesn’t get any better than that!
ka
CJr,wow….I would never have tried what you did.I was completely intimidated for you when you mentioned making these.Shows what little I know! You did an outstanding job my friend.You should be very proud,I like the last version with the logo.The staining wasn’t really your fault either….you just didn’t have the right stuff.I used to have some nice walnut boards that I talked a friend out of,because he was just using them for bookshelves.I will look for them,and if I can locate them I’ll send you a couple pieces.They’ve aged at least 12-15 years unfinished so they won’t split,and would be sweet with just an oil finish! I hope I can find them.Excellent job.
I should’ve read comments before I commented. Paul in L C nailed it on the staining of pine! 🙂
ka
Matt61
Also from the other day.
Yes, tomatoes make awesome targets. My plants were pretty anemic this year, which is strange because I had a bumper crop last year. I had so many that people I was giving them away to had so many, they were giving them away to other people. This year, not so much. (Banana peppers did awesome though)
Just like soda cans half-filled with water, what tomatoes do depends on where you hit them. Hit them in the bottom, and they fly into the air. Shoot them in the middle, and the pellet goes right through, almost no movement. Shoot them at the top, and you will likely scalp the tomato, or blow a nice crevice into it.
Cheap/free/improvised reactive targets are my favorite subject. Cheap lollipops (dum-dums) are good. Just drill some holes in the top of the fence to hold the sticks up. NECCo wafers (grandma candy) are good too. Nice shatter effect, sometimes it is so fine it looks like smoke.
Lately I have been using my shrimpy pathetic tomatoes that won’t mature. Also I have a multitude of these little brown glass vials that are left over from obsolete lab equipment where I work. They are about the size of a 9mm casing, and they shatter in a very satisfying way. By far, my most favorite reactive target remains the American Cockroach (Periplaneta americana.) Talk about free targets. Also they are very reactive. Sometimes they seem to shatter into a dozen pieces. Other times you will merely blow the head off (this happens often.) A roach can live a week without its head, this is only because it cannot drink water. If it could eat and drink without it’s head, a headless roach could die of old age. So if you are concerned with ‘humane’ kills on a cockroach, surprisingly one pellet is often not enough. I like to watch them squirm. Sometimes you blow apart the back half. Many times the back half will be filled with eggs, or more accurately, contain an egg casing. Killing dozens of birds with one stone is gratifying. Other times you will just blow apart their insides. Then they crawl around in circles because their gut is stuck to the pavement. Sometimes I even end their suffering with the soft caress of my boot. Luckily, these wonderful targets are plentiful at my workplace, but rare at the house. My beautiful tabby cat takes care of any that are unfortunate enough to venture into the house.
Some of you that have been reading my post to Matt may be thinking “Slinging Lead is one sick puppy.” While not entirely incorrect, I must remind these people that a cockroach nerve system is exceedingly simple, and does not contain pain receptors as higher life forms do. When you blow them in half, the only signal sent is something like “malfunction is sector 7G!” To me, they are like very disgusting robots that smell bad. Don’t ask me how I know they smell bad.
SL,
I am rolling with laughter over your cockroach dialogue! I’ve been considering using the same for targets, but can’t seem to get a safe shot. Somehow these little critters are lining themselves up with the water heater, clothes dryer, wife’s china cabinet behind them. Does anyone know how to train them to stay in front of such things like a plain wall or a box of drywall mud? Or how about staying put when the garage light goes on? This infestation is new for this year. Going to call exterminator…
ka
KA
The ones at my work are very aggressive. They will run toward you. I am not kidding. But their movement, while erratic, is predictable. They scurry very fast and then stop. More scurrying, and more stopping. It teaches you to fix your target quickly. If you have a pcp or pneumatic gun, you can use cleaning pellets to fire at the roaches. They will not scar your water heater, but will put a hurting on the filthy little creatures. Cleaning pellets don’t provide enough back pressure for a springer, and might damage the piston seal, like dry firing.
Slinging lead:
Thank you for the reactive target tips.
Have you any on getting spat tea out of a computer keyboard 🙂
Hilarious!
DaveUK
Dave
Finally, I get you back! I have spat out at least a half case of beer while reading your hilarious posts.
We must suffer from the same disease, because your sense of humor seems to mesh perfectly with mine.
Cheers, mate.
DaveUK,
My son spilled some soda or ice tea on this key board a year or so ago. We took it apart and washed off the silicon sheet that sits under keys. Easy job–no little springs to disappear, etc.
Bruce
Get a waterproof keyboard:
https://www.amazon.com/Xtreme-Flexible-Roll-Up-Mini-Keyboard/dp/B000N29F74
These were originally made for hospitals so they wouldn’t be a source of contagion. We have one for Tom’s travel laptop because it’s lighter than a regular keyboard (and more convenient than the laptop’s built-in keyboard)
The above is just one type. There are tons to choose from.
They work with Macs & PCs. Ours does not allow the Mac to use function keys.
I tend to eat & drink while at my desk, so I go through a keyboard in a year or less. I used to keep a stock of 3 keyboards in my closet so I’d always have a spare. As soon as this one dies, I’ve got one more spare. Then, I’m switching to the washable keyboard.
Edith
Fascinating. I was wondering how you got a sight picture on them since they rarely stay in one place. They sound almost like candidates for snap shooting. They are pretty gross and I exempt them from my usual intense dislike of mistreating animals. They’re probably akin to miniature Terminators. Does your cat eat the roaches or just kill them?
Matt61
CJr, nice work and you took the exact, correct approach on the drilling for the grip screws. As others have said, Pine board is the worst for consistent depth of penetration and color when staining. On the few projects I have undertaken, I would pre-stain the larger board or piece of timber before I start, to bring out the grain or imperfections before picking the area of the board that I want to use. Still, it’s pine and not always easy to get the results you might want, the sanding sealer is a great idea.
All that being said, you made a very good set of grips that actually fit you, that is the primary goal!
Cjr.,
having had two Harleys in my riding career (an XLCR and an FXRT from 1984), I think putting that decal on was a bad idea. Things only fell off my Harleys, which, by the way, is how I fell in love with Blue Loktite. 🙂 Otherwise, great idea, great blog and a fine looking finished product. Personally, I would have urethaned the pine a natural clear and not stained it but to each his or her own.
Now, enough about not going commercial. How much do you want for a set? 🙂
BB, just cleaned the barrel of one of the new rifles (the HW50S) I bought at the show, last night, with JB Non-Embedding bore paste. Can’t wait to shoot tonight to see if there’s a difference from the first 10 rounds I put through it Sunday because I couldn’t wait!
Fred PRoNJ
Fred
Many congrats on your new purchases. I myself bought an HW50S, my first Weihrauch rifle. I liked it so much that BB/Kevin/Volvo/Wayne’s endless harping about the R7 finally got to me, and I bought one of those too. Then Kevin, playing both the Devil’s and the Angel’s advocate, pointed out yet another R7 for sale that happened to be owned by Paul Watts. Only a fool would pass that up.
I now find myself in the position that it is hard to pass up deals on these guns on the classifieds, even though I need more airguns like I need more fat cells. I recently saw an older R7 with scope go for 260 or thereabouts. It almost made me sick that I missed that one.
BTW: DaveUK is correct. The HW50S is just about the perfect breakbarrel if you could only own one. It is neither big nor small. It has superb open sights. It has an elegantly styled stock. It has plenty of power. I remember reading somewhere that the receiver is milled thinner than other HW rifles. But it really does shoot some impressive groups especially considering the recoil, which seems to calm more as I shoot it. It is tied for second with my Marauder for accuracy.
Thank you, SL for the congrats. Yes I have joined the ranks of Wacky Wayne, UK Dave (sounds better to my ears than DaveUK), Kevin and everyone else but it didn’t stop there. I found a super R-9 Goldfinger combo and was able to do a cash and trade deal (Gamo Compact) and should have stopped there. If it wasn’t for that silver tongue devil at the Pyramydair table, Gene, I would have. I haven’t shot the R9 yet due to no darn pellets – I didn’t realize I had no .20 cal pellets but they should be here Wednesday!
Oh, I also couldn’t resist the Nitro but not from Benji, from Crosman. I wanted the gas strut rifle and with the Crosman name, which will be rarer in years to come since all other rifles will have the Benjamin name on it plus the very attractive price that accursed Ge ne offered me, well I can only justify the purchases as my 60th birthday presents to myself. That and I qualify for the senior citizens discount at Denny’s and movies! Whoo Hoo or is that boo hoo?
So Kevin, are you going to tell us what you bought?
Fred PRoNJ
Fred,
I’ve got a FWB 124, LGR Universal and HW55T on their way. The FWB 124 was part of a package deal so I’ll probably sell it soon after it arrives. I also bought a leupold 6.5-20 x 40 EFR with target turrets that was boosted by the leupold custom shop and while they were at they installed mil dots. At 25X this leupold focuses down to 10 meters. Great glass. Been looking for one of these since it takes almost a year for the custom shop to boost and add mil dots. Also found a burris compact 6X WITH AO (rare) on Fred Laidy’s table. I’ll mount the burris 6X on the HW55T. The leupold will replace a bushnell on a pcp.
Yes I saw the HW30 that Paul Watts had. I debated about that HW50 that was advanced tuned and sat in that terrific maccari walnut stock with Pauls checkering. Had a tough time walking away from that one.
kevin
Kevin,
When you’re ready to sell that 124 and before you put it onthe Yellow, send me an e-mail (you still have that motorcyclist business card I gave you, I hope) and let me know what you’re asking. Damn, I need to get professional help!
Kevin, appears you’re almost as ill as I am when it comes to this stuff.
Hey Cjr., for your next wood working project, are you interested in building a rack to hold air rifles? I’ve run out of room and will need something like that. If you leave out the Harley decals, I’m sure we can come to some sort of arrangement 🙂
Fred PRoNJ
Fred ProNJ,
Building a wood gun rack would make me feel like a high school kid in woodshop.
-CJr
Talon question… With my Talon SS, I’m finding that even with high scope mounts, I need to raise the scope higher for a more comfortable hold. Ergonomics are not the Talon’s greatest strength. The Airforce tri-rail riser should work well, boosting things up a little more. Do the Airforce open sights (not the Edge style ones) work with the tri-rail or will the back sight be too high?
Bristoview,
I can’t speak to the iron sights, but the tri-rail and high scope mounts work well for me using a 20 oz CO2 tank which I’ve wrapped with a sheet of the “rubber’ stuff that is sold for lining kitchen drawers .
I’ve got an adjustable wokbutt on my HPA tank which I covered with two beer cozies and two of the strap on pellet holders that PA sells. I don’t have to try and remember how many shots I’ve fired–makes old brain happy.
The covers over the tanks feel better against my face and deadens most of the dreaded tank ping.
Bruce
PS twotalon is correct–the HPA tank is shooting one mil dot higher than the CO2 tank.
Bad storm coming in. Power glitching already.
Will get back to you later. Computer already dumped once while I was trying to post.
twotalon
Another attempt. Power glitch dumped the computer right in the middle of a reply. Power lines going down from wind.
OK….
The rear open sight might be too high with the tri rail, but open sights are both adjustable for height, so may or may not work.
You can expect to re-zero any time you switch sights. Better to decide what you want to use and leave it there . I have guns with open sights that I use for close range work to help take guess work and scope focusing issues out of the picture.
You will find that such high scope mounting will cause you problems at close range. You will have a radical trajectory curve.
You can run the works through chairgun to determine what is going to happen with your trajectory.
twotalon
twotalon,
Those backup batteries for computers are pretty cheap now and you only need one to hold for 30 minutes, if that. It will not only keep you up during a brief power outage but will be much easier on the parts in your computer. I even use one on my DVR when I travel so don’t lose any recordings.
-CJr
might look into that.
twotalon
>You can expect to re-zero any time you switch sights. Better to decide what you want to use
>and leave it there .
Yes, that’s understood. What I’d like to do, not sure if it’ll work, but….. mount and sight in the open sights. Mount and sight in the scope on a one piece scope base, then tap a set pin through the one piece base and into the Tri-rail. This would allow me to slide the scope off, and back on without too much loss of zero. I’d still need to re-zero it, even after pinning the mount back in place because we all know the torques will not line up exactly where there were. A shift WILL happen. My experience with this however, is that I typically only need to rezero with a few clicks in any direction; very little adjustment needed. It doesn’t negate the need to rezero, but it minimizes what is needed and it only takes a minute. I haven’t tried it with the Talon, but it worked on other guns in the past. The open sights would stay put all the time.
>You will find that such high scope mounting will cause you problems at close range. You will
>have a radical trajectory curve.
Yeah, that’s my concern too. Best to keep the scope close to the barrel, farther above creates that trajectory issue you mention. The problem is that the Talon is so uncomfortable to shoot, it is NOT a natural pointer. I have a Crosman Custom Shop Carbine, that is a beautiful pointer. The talon, not so much. Being perfectly straight, isn’t really the right shape.
Anyone have ideas to improve the Talon’s hold position without raising up the scope? Perhaps a drop shoulder buttpad to raise up the rear. Other suggestions?
A different butt pad helps a great deal. I made one for each of my tanks for a total of 10 bucks or so.
If you don’t like cutting, bending, drilling, and tapping holes, there is a guy on the Talon forum who makes and sells one called the Wokbutt.
twotalon
twotalon,
Do you have a picture of your Talon stocks?
-CJr
No, I don’t.
A simple description…..although you can get as inventive as you want as long as you don’t drill holes in the air tank.
I got some flat aluminum stock from TSC. 1/4×1″. Wider would be better, and could have been ordered elsewhere.
Chopped off a piece to install in place of the factory butt plate. Drilled and countersunk the mounting hole.
Chopped off another piece to be the butt plate. Bent both ends to make it fit fairly well to my shoulder. Drilled and countersunk a hole in the center. Drilled a hole and tapped it in the first piece to mount the butt piece to it. Covered the butt piece with foam tool box padding using contact cement.
Not real pretty, but it works.
So you have a downward extender in place of the original plate with a curved and padded butt plate attatched to it.
twotalon
twotalon,
Thanks! I think I understand what you did and it sounds doable for me ,too.
-CJr
Jumping back and forth between blogs here…
Accurate? If you have a good barrel (there can be bad ones just like any other gun) and you set things up right it will scare the crap out of you.
Do NOT gorilla grip the gun . Hold it nice and easy. You don’t have to go to hold extremes like you do with most springers, but it does not like a whole lot of pressure being applied.
You might want to get a scope level. The ergonomics make it difficult in telling if you are canting or not. I have the kind that clamp on the rail on both guns, and are positioned in front of the scope. I always glance at them with my left eye before taking a shot.
twotalon
bristolview/twotalon,
I have used the scope that has the internal level, plus, I bought an external level that attaches to the scope rail right under of the scope. I wanted to see if the internal level was superior to the external one.
Right now I have the Talon scope on the Talon SS with the external level mounted and it is working just fine. I shoot with both eyes open anyway and it is very easy for me to keep an eye on the level and the target at the same time, however, the internal level is sooo much easier.
The down side is that the internal level needs the illumination on at least low to see it good and as a result I keep forgetting to turn it off and run down the battery. The low level illumination does not distract me while shooting and the reticles are very thin so I don’t get bleed.
-CJr
I am all scoped out at the moment.
I have the BSA tactical sidewheel that I have not tried yet. My favorites so far are cheap, but seem to work well…the centerpoint 4-16x.
I was going to put the BSA on the 97K, but it is a clunky looking heavy thing. Besides the extra weight that may be hard to hold in place, do I really want to add that much more weight to a 97K?
I might try it on one of my Talons some time.
twotalon
I’m also using the Centerpoint 4x16AO. For an inexpensive scope, it really is a fine piece of gear. The image is tack sharp, and the AO adjustment helps to estimate distances (if it’s not in focus, then that’s not the distance the target is at). My only issue with it, is that the eye relief is a bit unforgiving. If not just right, your view will dissapear into blackness, or only a partial view of the crosshairs. When right, the image is bright and clear. My more expensive Hawke is more forgiving, and I generally don’t have that issue at all. Not a major issue with the Centerpoint, just mentioning it for others. Position it right, and it’s a beautiful thing.
Interesting you should mention that. The Talon has prompted me to look at levels. I’ve never had them on any airgun, or felt the need for one. I’ve known about them, but they were never even a consideration. With the Talon however, I can’t easily tell if I am canting or not, and I had a devil of a time leveling the scope on it. Usually, I can eye ball it, but this was just not working. Last night, I started looking at levels, just for the Talon.
PA has this one and it is in stock:
/product/b-square-scope-level?a=307
-CJr
Chuck,
Nice job. Don’t beat yourself up–staining pine is difficult. You need the “Pre-Stain Conditioner” at the least or a different method, such as a tinted finish, which I prefer in that type of case; they will also work in combination, i.e. stain lightly and then finish with tinted varnish. You can get a product called “Minwax Polyshades” that is a polyurethane with stain (actually more of a tint). Even though the can says not to :), the best way to use it is to thin it 50/50 with mineral spirits and wipe on several thin coats, drying and buffing between coats. It will not soak into the end-grain and soft spots the way penetrating oil stains or others (water or alcohol based stains) will. You could also add some of your stain to the “tung oil” (which is more similar to polyurethane than real tung oil) for a similar effect, although it might be a good idea to only take the liquid off the top of the stain rather than incorporating the larger chunks of pigment that settle to the bottom.
BG_Farmer
Please write a book on wood finishing. I will eagerly purchase a first edition. Short of that, if you could write a guest blog on the subject, it would generate thousands of hits… from me alone. Conspire with Frank B. He also has skills and could shoulder some of the load.
I should just cut and paste everything you have written on the subject into a word document. Then I could write my own book, and make more money than Bill Gates and Steve Jobs combined. That would teach you.
SL,
Thanks for the nice comments, but I think you have me confused with Frank and Kevin — those two are the ones that ought to do some writing. Also, check out this kid for some really interesting videos and articles on finishing (etc.): http://thewoodwhisperer.com.
BGF, Thanks for that link. It’s now in my favorites. Think it’ll preclude outsourcing stain?
-CJr
Chuck,
That guy is cool — glad you liked the link. The Intro to Oil Finishes video is must see (that’s my favorite), although the pacing is a bit irregular. You can do it, and you don’t need to outsource; in fact, your pine looks much better than most. If you remember “Trading Spaces”, I used to cringe when they would “stain” stuff, and that was on TV :).
CJr,
Well done. The dremel is one of my favorite tools. A true multi tasker. I really like the variety of dremel rasp bits for carving wood.
Pine is a wonderfully soft wood for carving but you pay the price in the end when you start staining. I hate staining softwoods like pine, birch and fir because the grain reversal is so dramatic. Pine has a high pitch content so it’s tougher than most to stain.
As others have said, applying a wood conditioner to minimize blotching helps a lot in finishing pine.
kevin
To BB and all:
Just pondering here about past product reviews/blogs. The Norica Massimo was the subject of 3 blogs by BB some time ago but… it still has no reviews on the PA product site and maybe 2 reviews on the web.
Did anyone here ver purchase this rifle or get a chance to shoot it or…
For me, no reviews of products on the PA site usually equates to no sales or no interest in the product?
Brian in Idaho,
Although B.B. indicated that he was going to do a part 4 on the Norica Massimo I don’t think that happened. If it did, I can’t find it. Part 3 ended with apparent scope problems since the gun would not group as well as it did with open sights. A window even got shot.
I haven’t heard much about the massimo. I think the 43 pounds of cocking effort and the length of the gun (longer than an R1) put many potential buyers off. Definately not a plinking gun.
kevin
CJr,
‘Fortune favours the brave’ has paid off with the grips you made.They are lovely.
If there is anything more ‘crazy bonkers’ looking than a Target pistol,it is its grips.
Getting the moulding right is a real achievement.
DaveUK
Thanks for the comments guys. After reading them so far, I have identified at least a half dozen places on this blog for outsourcing future stain projects.
Frank B, Thanks for your generous offer. I am interested in the walnut. I am more than happy to pay for any shipping, handling, and stain tips.
Now that was FUNNY! “Outsourcing”
Yup, we are a real bag of expertise around here (after the fact of course)
I’ll do the sanding if BgFarmer does the staining!
CJr,
If Frank cant find the boards, I’ve got some black walnut that I can send out for you. Lemme know if you strike out, Frank.
Derrick,
Thank you very much for the consideration. I am anxious to get back home with different wood and see if my first try was just beginner’s luck. The grips seemed to carve thamselves.
-CJr
Chuck, you’re my inspiration for what I’m doing with reloading: try one step and see if you can handle it. I thought you did a good job, and the stained wood looks all right to me except for a few rough patches. How did you change the appearance for the final photo? You need to upgrade to better wood. Cocobolo seems like the class act for custom grips. In the grip department, I flirted with the idea of simply replacing the grips on my Ruger Single Six for some oversize ones, and satisfied myself that I could switch them out but decided not to in the end.
Kevin, sounds like if I want to a gun show, I will just have to get up and do it like you did.
Reloaders, I have found a powerful ally on YouTube. A lot of people have taken a lot of time to document how to do this. It’s great for people like me, but I’m not sure what’s motivating them. I selected one series more or less at random. The guy began with a lined sheet of paper turned sideways on which he had outlined reloading in four or five steps designated with big stars. He read through this slowly and somewhat hesitantly. When he got to resizing the case, he said that many people complain that single stage presses are too slow. Then, he cranked up the background music and showed himself knocking off numbers of cases at high speed. I think he might have speeded up the footage. Anyway, it’s not exactly the Lyman reloading manual. Ha ha. But I love this guy. He’s exactly what I need, and he’s really cutting the Gordian Knot.
Matt61
Matt61,
Glad you asked. My Harley grip was also a lesson learned. I bought a can of Rustoleum oil based Silver and a can in black latex. I painted the grips with silver first, let it dry for two days, and painted the black on next and left for the weekend. When I got back I removed the masking tape (Scotch tape, actually) and the black latex peeled right off the silver as if it was merely laid on. Lesson: don’t mix oil and latex. Rather than buy another can of black I just used a black permanent marker to color in the black area because I was in a hurry to get the picture out for the blog article.
FredPRoNJ,
I haven’t handled the Harley grip yet. I guess I can expect a Harley tatoo on my palm when I do. I thought about coating the grip in polyurethane to seal the logo. BTW, I have had Tail of the Dragon stickers peel off my windshield, also. I put a piece of that wide clear post office wrapping tape over them and now they are impervious to water and weather. And you have to look really close to tell the tape is on there.
-CJr
Bristolview,
I, like twotalon, have a level mounted on the rail of my Talon SS that I take a quick peak at it to check for canting. Works well. I got mine from PA. Be advised that I had to shim it with a piece of teflon tape. Tip from Boris at PA.
Bruce
One of mine did not set down flat and was tilted. A little work with a file on the clamping part fixed that.
twotalon
Bristolview,
I thought that I posted earlier today about the close shots with the AirForce air rifles and the necessarily high scope mounting that they require. Took a look see and couldn’t find it, probably will right after I make this post. My solution for the close shots is a laser mounted just past the power wheel.
I’m sighted in at about 16 yards on a down hill slant from shooting “bench” to target with the scope and laser. However, when the opossums are eating under the bird feeder they’re only 10 yards from the bench where the scope is hitting about 2 inches high while the laser is spot on. For what it’s worth the laser is about 1 and a half inches above the bore while the scope sits at about four and one half inches.
Bruce
I have a laser for the same purpose. The laser is spot on at close range (10m), mostly for close quarters pest control. The scope is sighted in farther out, following BB’s advice to get a broad range of usable accuracy from an airgun scope. The ‘sweet spot’ where the crosshairs are just about dead on is about 30 meters, slightly below before and after that.
When I feel like reaching out farther, I set the laser to be spot on at the farther distance, like 60 yards. I use the scope to see the laser (the crosshairs are way off at this point) and put the laser right where I want it. Setting the laser can usually be done in about 4 shots, if you’re fairly consistent. I tried it at 100, but I couldn’t see the laser anymore, except for at night but then couldn’t see the target that far away. Might need a higher power laser for that, and I don’t have one of those. Makes some of those long shots really easy, almost cheating. Must be steady…
I’m posting this for someone who sent it to the wrong address:
Greetings Tom,
Just listened to one of your podcasts and I’ve been reading your blog
entries for several weeks now. I have two questions, possibly you’ve
already answered them in the blogs and you can just direct me there.
Background: I’ve been shooting for 40 years and fact is I’m an extremely
accurate shot. With open sights and a rifle shooting .22 LRs I can hit a
spent shotgun shell at ~100 feet most every time. Sooooo, I know
conventional shooting pretty darned well.
Current situation: I had bought an air rifle from Pyramyd almost ten
years ago and after a few days just took the scope off, couldn’t hit the
side of a barn with the scope. Recently bought another air rifle from
Pyramyd, Benjamon NPSS and I’ll be darned if I’m not going to try to get
this scope thing working. I am an ultra analytical/figuring/engineering
person and I can tell you so far working with a scope on an air rifle is
disappointing. Yes, I’ve read your blog posts relative to this five or
ten times – some twenty – and much more and slowly I’m getting the
ability to put three to five rounds through the same hole at 30′, but
then, quickly, the shots will creep away or one of several other
problems will keep creeping up. Believe me, I have much more than two
questions, but these come to mind first now…
Two questions:
1) I absolutely cannot get the scope to stop slipping inside the fully
mounted scope rings during shooting. I’ve watched all your videos, I’ve
cleaned the scope and rings with alcohol and mounted them as-if in a
NASA clean room and torqued them in the exactly right sequence and done
all this with surgical precision and the scope (rings and scope came
pre-packaged) just slides steadily back in the rings. I can start all
over and mount the scope perfectly and within 200 shots it has slid back
until the front ring touches and stops at the front bell. This just
seems like an insurmountable problem. Suggestions?
2) Optical scope adjustment: I can clearly visualize the problem of
having the reticule tube out of alignment with the scope body and center
of the scope lenses. I easily understand the value of having the
reticule tube in the center of the scope tube, more light from closer to
the center of the lenses, etcetara. Question: isn’t it true that if I
optically center a scope, then I absolutely MUST USE ADJUSTABLE SCOPE
MOUNTS in order to not be forced to adjust the reticule tube right back
to it’s EXACT, original, off centered position? So, optically centering
a scope is valueless unless one is planning to switch to adjustable
mounts, right? How could it be otherwise? Just wondering if I’m missing
some obvious law of Newtonian physics…
Thanks for any insights, Tom! – Highly appreciate your time,
Al
Al,
I’ll take a crack at your problems. Let’s handle item 2 first. It’s not critical to first optically center the
scope before mounting but many people do. It’s also not critical if you have to adjust the scope for windage and
elevation and the reticle tube is off center, as you put it. The light coming through the scope won’t be affected.
What is critical is if you adjust it so much that it’s at the end of it’s adjustment range. What happens then is
the spring inside the reticle body is loose allowing the reticle to drift around which will produce your scattering group.
So the first thing to ask is how much have you adjusted the scope? Is it at the end of it’s travel or close to it?
If this is the case, re-center the scope and consider a shim inside the mounting rings to get the scope close to your
point of aim. Shooting high, shim the back ring. Low, shim the front. Many people will use old 35mm film negatives.
Next, did the scope and rings come with the Benjamin NPSS? Did you buy a package from a big box store?
We need a bit more info.
Next, do you know what the artillery hold is? If not, Pyramydair has a good video demonstrating it. Go here:
/article/The_artillery_hold_June_2009/63
Finally that rifle you bought 10 years ago. Whose make is it? Air rifles are notoriously rough on scopes but there are a
couple of tricks we can still pull out of a hat. If your rifle is an RWS, there are special mounting racks by
UTG that will absolutely positively stop scope movement. They use Weaver rings for the scope mount. Another trick is
to get some rosin and use that inside the scope rings.
Hope this helps. Keep coming back here – we’ll all be glad to chime in and help you solve your problem.
Fred PRoNJ
Fred PRoNJ,
Just unboxed the FWB 124D (deluxe stock upgrade). It is pristine. Honestly it doesn’t look like this gun has ever been shot which leads to concern about the condition of the piston seal. It’s probably shot. Absolutely no indication that anyone has ever been inside this gun. Serial number 14993. I’ll chronograph it in a day or two.
kevin
My suggestions…
If the mounts do not have the slip resistant tape, then try a set that does.
If you do an optical center then tie the scpoe back down and take a few shots you will find out pretty fast if you will need exreme adjustments to zero the scope. Attempting extreme adjustments will push the scope beyond positive control limits. It will not work right.
If adjustable mounts are needed, you center the scope and then adjust the mounts to get as close to zero as you can. Only small scope adjustments will be needed to finish up the zero.
twotalon
Al,
Welcome to the blog!
Scope and scope mounting problems are frustrating. I know it will be little consolation to you at this point but we’ve all been there.
If I understand correctly you’re putting the scope that came with your gun purchase 10 years ago onto your new Benjamin NPSS? What scope are you using? What mounts/rings are you using? Are the threads stripped on your scope rings? Is there double sided sticky tape inside your scope rings?
Be patient with us and we will help you figure this out.
As to your second question about optically centering a scope, Yes, you will need adjustable mounts to move your crosshairs onto your bullseye. Once you start to adjust your crosshairs with the elevation and windage adjustment on the scope you’ve screwed up the benefits of optically centering the scope.
kevin
Hi Edith,
! was looking at the Crosman page under manufacturers and noticed that the illustration for the Crosman 1077AS is the same as the illustration for the Crosman 1077. Thought you’d like to know.
Bruce
That’s OUTSTANDING work for a new grip maker, and I applaud you. The only grip I ever made was from Bondo and not pretty.
However, I have to rain on your parade two ways – first, you need to use oak or beech. Preferably oak. And secondly, the main grip halves have to have the grain running vertically, up ‘n’ down, and the adjustable piece has to have the grain running along its long axis. This is how all the commercial grips are made.
That being said, you’ve already shown that you could go into the grip business if you wanted to. Four hours to make a grip means $20 or more an hour. That’s not bad pay, really.
flobert,
Thanks for the grip tips. I will follow your suggestions on my next grip. The grain runs the way is does on this grip because that’s how it ran on the cheapo baseboard piece I bought. Of course, I didn’t know any better anyway.
Any idea why the commercial grains run the way they do? Is is just an aesthetic thing or are there harmonics in the grip if the wrong grain is used?
-CJr
OOPS I meant walnut or beech. The grain direction the way the pro grip makers use it is for strength. You don’t have to worry about harmonics with a pistol lol.
The pro grips are all walnut, and it’s not hard to get. Heck walnut’s a weed where I live, and I have about 100 lbs of nuts drying as I type here, probably gonna collect a few more but …. just good old plain American walnut is the way to go. No fancy burls or anything, just good honest straight grain stuff like they used in Garand stocks in WWII.
Flobert,
As a passing thought – I can understand the grain direction as a strength issue for a rifle stock but it seems like on a pistol grip it wouldn’t be an issue since there is hardly any stress on it. Maybe that’ll be my trademark – Buy Chuck’s grips – “When you want to Go against the Grain”.
-CJr
Haha! Well, I’d still go with grain aligned along the long axis of the part. Just because.
And come to think of it, I remember watching Spas Koprinkov make most of a free pistol grip out of a combination of 2-part epoxy and sawdust.
Nice Job Chuck!!!!!…..The best part is that you made the grips the way you wanted them to be. WTG!!!
ajvenom,
And I’m not done yet! I have some wood on the way from a very generous reader (Derrick) and plan to turn out some more grips. I stripped the grips in the photo back down to wood and am going to resize them to fit me a little bit better.
I shot with them last night and they are still just a little too big but I put 4 out of 6 shots in the bull at 10m – two 10s, a 9 and an 8 on the NRA 10m pistol target. I came away with silver fingers. That paint had three weeks to dry and it still is tacky. So I stripped it off to start over.
I’m anxious to start carving again but already I realize my woodworking equipment needs upgrading. Now there’s another bottomless money pit!
-CJr
CHUCK, YOU DID A GREAT JOB COMING UP WITH A METHOD TO REVERSE THE GRIP. IT MIGHT HAVE BEEN EASIER TO LEARN TO SHOOT RIGHT HANDED? NOW, ABOUT WOODCARVING! IT’S NOT A BOTTOMLESS PIT, BUT DOES TAKE A LITTLE INSTRUCTION AND A LITTLE PRACTICE. HOW ABOUT SPENDING A LITTLE TIME IN SOUTH TEXAS WHERE THERE ARE MANY WOODCARVERS AND A LOT OF INSTRUCTORS, ESPECIALLY IN LATE JANUARY AND EARLY FEBRUARY. YOU MIGHT EVEN GET A FEW TIPS ON YOUR GOLF GAME ALSO? WE WOULD BE GLAD TO SEE YOU DOWN HERE AGAIN THIS WINTER! WE HAVE A SHOOTING RANGE HERE, TOO. CONGRATULATIONS ON YOUR WORK AND IF YOU BRING THE GRIP DOWN HERE, MAYBE WE CAN HELP YOU PERFECT THE GRIP? BEST WISHES. UNCLE HARRY, 11-14-10.
UncleHarry,
Thanks for the kudos. I’m working on two more grips for the same pistol in walnut (as well as the golf grip). I’m tempted to take up your February visit offer pending snow conditions.
-CJr