by B.B. Pelletier
This is going to get a little confusing, because I’m changing things in midstream. Part 1 of this report was titled Testing the Slavia 631 with non-lead pellets, because that was what I thought I was going to do. Instead, though, my Slavia 631 needed attention, and, while trying to fix it, I broke it. I tested the non-lead pellets with my FWB 150 and found them to be so accurate that a whole other test was born. I haven’t done that test yet, but today I’m getting back to the Slavia, which has recently been repaired and returned to service. There’s enough of a story in just fixing the gun, that I thought I would make a report out of it, plus I want to use the Slavia as a testbed for other things in the future and I needed to establish it as a working airgun again.
Confused? I know I am.
What happened
When I used the 631 to test the velocities of the various pellets that would be used in the test, I noticed the rifle was very hard to cock. I believe it took 35 lbs. to cock the gun, which is way out of profile for that rifle. I thought I’d do a quick lube job and see if things would return to normal. Well, they did, but not entirely.
After lubrication, the cocking effort dropped to 21 lbs., which is about where I expected it to be; but while assembling the gun, I had difficulty getting the trigger to work right. Then, during the final disassembly, I lost the small coiled spring that fits between the trigger blade and the sear. The sear is held on a pin inside the end cap, and this spring that fits into a hole in the end of the part helps hold it in place for the trigger to act on it at the right time.
The spring I lost is about half the diameter of a ballpoint pen spring, so it’s really tiny. Nothing in my small collection of spare parts was close. I inquired of several places, but nobody had a replacement. Then, while reading a blog about the disassembly of the 631 on Another Airgun Blog, I discovered there is a second spring that acts as the trigger return spring that I had never even seen. So I thought I had lost that one as well. I didn’t, but the way the blog was written, there was no clue as to where this spring fit or where I should look for it.
So, I switched test guns over to the FWB 150, which proved very serendipitous, because I discovered that non-lead pellets can indeed be accurate under just the right circumstances. But that left me with this broken classic 631 on my hands.
I remembered that I’d purchased the rifle from Compasseco, so I contacted Eric Munson, the son of the former owner, to see if he still had any Slavia parts. He didn’t, because Compasseco had gotten rid of them years ago when they stopped carrying the Slavia line. Then, I asked the right question. Did he have any old broken 630 or 631 rifles laying around? He did, because airgun dealers frequently have piles of guns they never fixed for one reason or another.
To cut to the chase, Eric sent me an old broken 631 that had been cocked for many years, and I was glad to get it. It had the tiny spring I needed, but it had something even more important. In that rifle, I spotted the trigger return spring that was not completely described in the blog I’d read. It’s a permanent part of the plastic triggerguard and stays inside the stock when the action is removed. Sure enough, when I looked inside my good rifle’s stock, there was the spring I thought I’d lost.

Trigger adjustment screw (second from left) is key to the assembly of the rifle.

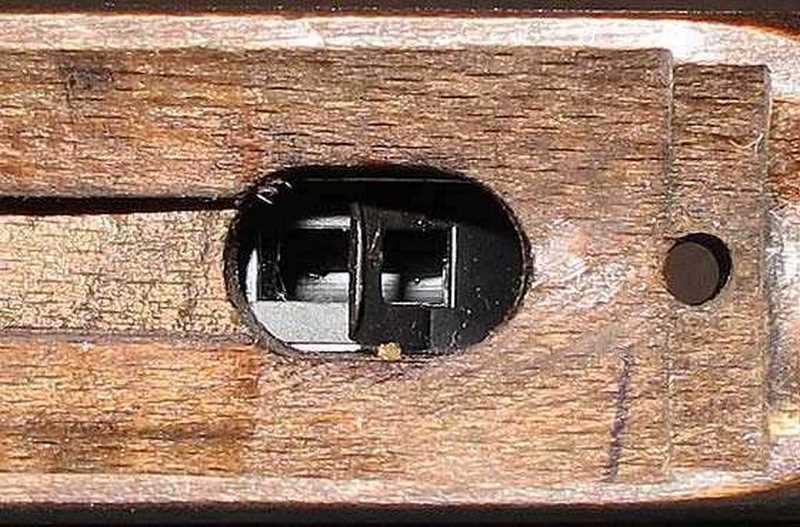
Looking down through the trigger slot in the stock, you can see the trigger return spring that’s captive in the triggerguard. What appears as a square hole in this photo is actually a slot the trigger blade must fit through. There are two flat steel parts that together look like one in this view.

This view shows the trigger return spring better, and you can see how the trigger blade passes through the slot in the spring. Note the screw threads on the left that are part of the trigger-pull adjustment system. These are the key parts that must be assembled correctly or the rifle will not function.
Now, I’ll describe how a Slavia 630/631 is disassembled so the owners who have never done it will be able to follow my description and not make the same mistakes I did. This will not be a astep-by-step set of instructions because, in my opinion, the Slavia 630/631 is not a rifle for the beginner to work on. If you can understand what I’m showing you and telling you, you’ll be able to work on this rifle. If not, please don’t try to take it apart!
Disassembly
The action comes out of the stock by removing three long bolts — two in the underside of the forearm and the rear triggerguard screw. After the action is out of the stock, look down in the stock at the underside of the triggerguard to see the trigger return spring that Slavia also uses as a trigger adjustment. This is the spring that foiled me, and it will foil many of you unless you know where it is. The two photos I’ve already shown will reveal how these parts fit together.
You don’t have to do anything with this spring except to know that it’s there and how it functions. When the gun goes back together, the placement of this spring will determine whether your trigger works or not, and it’s very easy to get it in the wrong place.
The rest of the disassembly couldn’t be much easier. The first step is to drive out the one and only pin that holds the trigger blade. Once that’s done, the trigger blade can be pushed forward and up and will clear the sear, making it possible to remove the trigger blade and coiled spring from the action. There’s no easy way to explain this, but a few careful moments of fiddling with the trigger blade will do it. Be careful not to lose the tiny coiled spring that’s in the front of the trigger blade at the top and in the end of the sear.

The trigger pin is out. The tiny coiled spring that fits between the trigger blade and sear is not shown. The sear is still inside the end cap, held by a similar pin on the left side of the end cap. The long slot in the top of the trigger blade is for the automatic safety button. The piston pushes the trigger out of the way when it comes back during cocking. It pushes the automatic safety button back until a ridge on it cannot allow the trigger to move. The knurled knob at the right of the end cap is the automatic safety.
Once the trigger blade and sear spring are out of the action, thread one of the long stock bolts into the hole at the bottom of the end cap and use it as a handle to turn the threaded end cap out of the spring tube. The barreled action should be installed in a mainspring compressor as this is done, and you’ll need to use a small socket to fit over the safety knob to put pressure on the end cap as you go.

The end cap is slowly being unscrewed from the spring tube. The threaded hole in the knurled section of the cap is where you thread in one of the stock bolts to start the end cap turning. After it gets going, you don’t need that bolt any longer.
The rifle I received for spare parts had been cocked for years, so the mainspring was under full tension all that time. I was extra careful when removing the end cap, but the spring was so collapsed from being compressed for so long that the end cap only came out of the gun by about an inch.
The cocking link on this rifle is a two-piece articulated one that doesn’t use a cocking shoe. Once the action is out of the stock, the cocking link will fall free from the spring tube as soon as there’s clearance. Since this rifle was cocked, it fell out immediately.
The tune
You may recall that I said my rifle was somewhat buzzy as well as being dry. Once it was apart, I could see it had never been lubricated from the factory. That was what was causing the cocking effort to be as hard as it was. I lubricated the mainspring with a product that’s no longer obtainable — Beeman’s Spring Gel. It was less aggressive than their Mainspring Damping Compound, which will subtract significant velocity from any spring gun to which it is applied. Spring Gel never worked well for me in the past, but I thought I’d give it another try, so I slathered it on the mainspring and on the outside of the spring guide. And that was the full extent of my lube job. I could see that the piston seal is a synthetic one, but I didn’t rub anything on it. It seemed oily enough from an earlier application of silicone chamber oil, and I thought I’d leave it that way.

The piston is a solid steel part that’s well-made. The piston seal is synthetic, and on this spare parts rifle the edge of the seal is chipped.
Assembly
Then the rifle was assembled in reverse of disassembly, until we got to the trigger. I installed the small coiled spring and eased the trigger back into its proper place by inserting the other end of the coiled spring into the front of the sear. Then I aligned the holes and drove in the pin that holds the trigger in place.
Next, I installed the barreled action into the stock, taking extra care to “thread” the trigger blade through the trigger return spring that was still installed in the stock. This time, I knew about the spring; and even then I got it wrong a couple times before getting the spring into the right relationship with the return spring. Once that was done, the rifle cocked and functioned perfectly.
Tip
The trigger adjustment screw should not be tuned with the rifle disassembled; because if it’s turned too far out of adjustment, the rifle will not cock. That’s a safety measure in the design of the gun, but it also makes it difficult to assemble the rifle if you don’t know if the problem is where the adjustment screw is set or if you’re missing the correct positioning relationship of the trigger blade to the return spring.
Performance
Since I’d already chronographed this rifle before lubricating it, I had a good baseline against which to compare the now-completed rifle. I knew that the cocking effort had dropped from 35 lbs. to 21 lbs., which is a good indicator that the lube was doing its job, but what about performance out the muzzle?
Before the lube, Crosman Premier 7.9-grain pellets were averaging 589 f.p.s., with a spread from 586 to 593 f.p.s. After the lube, they averaged about the same 589 f.p.s., but the variation was much broader, going from a low of 577 f.p.s to a high of 614 f.p.s. That’s what you get following a lube tune, and it will soon settle back to where it was before. I don’t think there’s been any change in velocity at all.
The buzzy nature of the gun seems not to have changed at all, so I’m still having no luck with the now-obsolete Beeman Spring Gel. However, it did accomplish one thing — the reduction of excessive friction during cocking. That was the goal of the tune to begin with.
The results
Now, I have a rifle that I can rely on, and I’ve scheduled at least one test for this rifle in the near future, so it’s good to have it back. I wrote this report because nowhere have I been able to read about the trigger return spring, and I wanted to document it for all who decide to tune this rifle in the future.

Hahaha I was tracking down some reviews of the Ruger Mark 2 air pistol, made by Umarex, I saw in Wally World today, and one reviewer said, “These new pistols all remind me of cut down Slavia youth rifles”.
I have a Ruger Single-Six now, for some cool Primer Powered Pellet experimentation, but I’ve been too busy! Primer Powered Poopy Pippers all the way to Winch. Monkey Rimfire all in one pistoly, not bad in my book.
B.B.
This blog should be very valuable for anyone who wants to take one of these apart. Looks like the best policy is “keepa you fingers out !”.
Along the lines of PBA….
I have been wondering about the B.C. of these pellets for a long time. I have been planning to check at least one sometime when I get to it.
I have some Raptors left from the time that I bought a pack of each kind that our old Wallymart had. Should be enough for the job.
I got out yesterday morning and tried them in the R7 at 25 yds. A half dozen went into a little over an inch. I did not try very hard, as I only wanted to see if they were accurate enough at that distance for testing. Probably could have cut that group in half if I had tried.
After I got home I had an afterthought that I should have also tried them with the R9 so I could see what difference in B.C. there might be between two different speed ranges. I don’t know if they will go supersonic with the R9.
If they are also suitable at that range with the R9 I will test with that one also. I know better than to stretch it out much farther because I shot some supersonic with the TSS one time. Not pretty.
I will use two chronos. The near one will be the Prochrono and the far one will be the Beta that PA sells. Printer will be running on the Beta. Wooden dowls for the diffusers and a steel safety plate in front of it. I have tested both chronos stacked together and they are so close in readout that the difference is not worth worrying about.
I should be able to come up with B.C. and be able to find the distance that velocity becomes equal to a given lead pellet. I don’t expect to see the K.E. ever matching at any distance because from what little I have shot them, the PBA had a lower K.E. at the muzzle to start with.
twotalon
twotalon,
Your experiment sounds like a good one. My only caution is that what you are attempting has been done before and the downrange chronograph always seems to get destyroyed in the end.
B.B.
Well, even if I had never heard of that happening before (I have) , I know better than to do this without some extra protection.
I have heard about different guns coming up with different B.C.s for the same pellet. Things such as rifling marks, velocity tried, distance used, and air density could all cause error. I don’t expect to get a B.C. that is set in stone…only something close .
twotalon
I am happy to see you got the old 631 back together and in good working order. I have a few things to add if I may.
First, the disassembly of the Slavia 634 is the same as for the 631.
Second, the rifle can easily be taken apart without a spring compressor, even the more powerful 634 can. The first time I did it, I removed the end cap by unscrewing it with the end shoved in the back pocket of some sturdy jeans. I figured this would contain the cap, should it want to go shooting across the room and break a wooden desk drawer divider. I needn’t have worried, as there was very little preload on the mainspring.
Third, when removing the endcap, the sear must be swung up into the cap, or it will prevent it from unscrewing by bearing against the trigger slot.
Forth, it is very easy to bugger the trigger screw when reinstalling it. Mine got severely kinked, but still works OK after I did my best to bend it back into shape.
Fifth, blog reader Milan’s “beer can mod” makes a world of difference as far as the vibration/buzzing is concerned. Simply cut a piece of beer can and insert it into the inside of the piston. This creates a tighter fit, so the spring has less play to vibrate. I painted the outside of the beer can with heavy tar so it would not move around inside the piston. Also leave enough room for the cocking slot. After much evaluation I found Budweiser cans to work the best, as their walls are thicker than most, especially soda cans. (Thanks Milan!)
Sixth, the spring guide can be widened to be a tighter fit inside the spring. I did not perform this step, as my spring guide fit well enough.
Seventh, it is a good idea to polish each end of the piston.
Eighth, there is a spring that bears against the cocking link to keep it seated in its slot, since there is no cocking shoe. It would behoove you to polish the top of this spring, and apply a liberal coat of moly, to make the cocking stroke silky smooth.
Finally, I added a very thin coat of JM’s heavy tar to the mainspring. It was probably unnecessary, but I have two huge vats of the stuff.
I have one question. Would you be willing to sell the trigger guard that came on your parts gun? I noticed yours is intact and mine, like most 631s sold on the used market, is cracked.
I will be following the rest of this series closely. Thank you for the report!
Hi guys !Glad to see a blog about Slavia 😀 Thanks B.B.!
Slinging Lead – your points are valid and well put may i add 🙂 …So you did a beer can tune 😉 ,i am glad because you are satisfied no need to thank me man 🙂 you’re right on the money -there isn’t much preload ,funny but i think that 634 has even less preload then 631 maybe because of shorter spring and shorter piston …
SL,
I was planning to rebuild the parts gun when I find the parts, but I will certainly trade you the triggerguard assembly for your cracked one.
Contact me and we’ll talk.
B.B.
BB
It is really not a big issue. I figured you would have a rifle carcass with bits of meat I could nibble off of like a vulture. My trigger guard has a small crack that does not affect the function one bit. If you are building up another gun, it should be intact. I have more than one Slavia anyway.
SL,
Well, it’s your call. I would be happy with the broken one, as well.
B.B.
If you need yet thicker aluminum, drink a can of Foster’s (or use it to kill slugs) and use that. Those big cans are even thicker than a US tallboy.
hay there im looking for a ceal for my slavia 630.if annyone nose where i can get one plese let me no.
Larry,
Try this place…
B.B.
B.B., okay, I won’t ever try to take a Slavia apart. That is frightening indeed to have a nice rifle out of commission all for the want of a single small part. I’m reminded of the film “My Bodyguard” I think from the 80’s. Some troubled teenager has tried to assemble a motorcycle but can’t find one part which hurts his already depressed mental state. He travels junkyards with a friend who keeps showing him parts which he keeps flinging away. But, then one day, they find the exact right part and it leads to some kind of personal restoration. Too much of a roller coaster to me. Is it possible to get springs fabricated? I keep hearing about custom Maccarri springs. But maybe those are only customized for certain standard sizes.
I have a more mundane question about rifle functioning. While reading Terence Lapin’s authoritative work on Mosin-Nagant rifles, I saw a statement that one should never over oil the chamber and magazine area of a rifle because it could change discharge pressures and be EXTREMELY dangerous. That caught my attention since I like to spray my guns liberally with Ballistol although not right before shooting them. Generally, weeks pass and there is plenty of time for the Ballistol to dry and evaporate. Anyway, what is the story here? How much is too much and what are good ways to prevent problems. Actually, I have always wondered why oil on a firearm does not ignite with a discharge. I know this happens in the barrel for dieseling but why wouldn’t the rest of the lubricating oil ignite leaving your gun wrapped in flames?
Thanks for the info on rearsenaling. I guess the main thing for me is that the gun is put back in proper working order. Your comments about the Russian rearsenaling policies were of particular interest….
Volvo, congratulations on your Marauder. That’s quite the gift. Let us hear about a range test.
Victor, thank you, I was hoping you would comment on the rifling angle problem. You are correct that I’m trying to find the angle between the rifling and the axis of the barrel. At first, I too was wondering if that meant anything since the rifling is a curve and not a straight line. However, if one imagined snipping the barrel open down its length like a toilet paper roll and laying it flat, the curved rifling should turn into a straight line, and it is the angle between this line and the axis to the bore that I’m looking for. As to strategy, the plan now is to find the tangent vector of the vector equation of the helix. Fortunately, I found a long, complicated formula in a book. Then by taking the dot product of the tangent vector with the barrel axis, I should be able to find the angle. If this comes to anything, I will let you know. 🙂
Woodworkers, can you give me a sense of the possibilities for restoring the rather dinged up stock of my Lee-Enfield? I’m guessing that the only way to remedy a depression in a stock is to shave the rest of the stock down. There are some chips in the stock that can’t be remedied although they are not really severe; the rest of the dings are very shallow grooves that are not really measurable even with my new calipers. I guess you would really need to see the stock to appraise it, but any general answer to how one fixes a stock ding would help me out a lot.
Matt61
Matt61,
Stock dings/dents can be steamed out. It’s easier if the finish is oil rather than poly. If you have a hard finish you will probably have to remove the finish to steam the dents and dings up.
I have a wand on my espresso maker that is designed for steaming milk. It works terrific on steaming out dents. If you don’t have access to one of those you can use a moist rag and an iron. Just don’t burn the wood. You want to steam it. It may take several attempts before the dents raise completely. For smaller dents/dings an old trick is to place a SMALLl amount of lighter fluid in the dent then light it. This small flash can raise small dents/dings. Use a SMALL amount of lighter fluid. No matter which method you use the stock will likely be discolored and need a touch up on the finish.
If the dents/dings are numerous you should probably remove the finish, steam all the dents then sand and refinish the stock.
kevin
Matt,
Kevin’s right about steam. I used it to cure some stocks. Another techique is using some (drops) water and 100-watt electric solderer to heat it in place, but first you must try it to get an understanding and steady your hand. A small piece of beech with simulated dents will be ok.
Then let it dry and then use some Balsin Schaftol.
If your wood is beaten up hard – I guess it’ll be faster and more effective to sand it all and refinish it. Ordering a new one works too.
duskwight
Fabricating springs is an essential gunsmith skill, however quite good springs can be taken out of other things. The trick trigger mod for my Marlin bolt .22 is supposed to be to use a spring from a Bic pen instead of the one that’s in there for trigger weight. There are all kinds of modern gadgets that have really good springs in them, intended for thousands upon thousands of cycles. This is talking about coil springs, of course.
Matt61,
You’re original problem statement was correct then. I wasn’t sure what you were trying to get at, but the parallel line that you described intersects the helix. That’s what I missed. Sorry.
Again, f(t) = (x(t), y(t), z(t)) = (cos(t), sin(t), t), and so f'(t) = (-sin(t), cos(t), 1).
If you computed the speed by taking the length of f'(t), you’d see that it’s constant.
The tangent line at f(0) = (1,0,0) is represented as follows,
T(t) = tf'(0) + f(0) = t(0,1,1) + (1,0,0).
It’s a straight line, so at one end, T(0) = (1,0,0),
and at the end of the period, it’s T(P) = P(0,1,1) + (1,0,0).
To simplify, shift so that it intersects the center of the bore, and you get the vector equation,
P(0,1,1).
I believe we want the angle between P(0,1,1) and (0,0,t). For that,
cos(x) = / |(0,P,P)| |(0,0,P| (any value of t would work, so I used P).
Solve for x.
I could be way off, but this assumes that the tangent line is co-linear with the helix curve, after you’ve opened up the roll, as you described. The detail that I left out was what the real derivative would look like, considering the specific period of 9 inches, and the chain rule. For example,
x(t) = cos(t360/T), where T = 9′. Then x'(t) = -sin(t360/T) x 360/T = -(360/T)sin(t360/T).
y(t) = sin(t360/T), where T = 9′. Then y'(t) = cos(t360/T) x 360/T = -(360/T)cos(t360/T).
Hope that helps.
Victor
To paraphrase Jeff Foxworthy:
If you don’t understand Victor’s comment, you’re not smarter than an airgunner 🙂
Edith
Interesting. My inner product notation was not allowed.
Using a dot, ., instead of the angle brackets.
I believe we want the angle between P(0,1,1) = (0,P,P) and (0,0,t). For that,
cos(x) = [(0,P,P) . (0,0,P)] / |(0,P,P)| |(0,0,P)| (any value of t would work, so I used P).
Solve for x.
{caveat: I don’t recall if these worked before}
If you mean < and > (which I keep for getting to use myself), entering them direct from the keyboard gets parsed as HTML markup (invalid, most likely) and stripped out.
You need to type the & HTML entity codes: ampersand l t semicolon and ampersand g t semicolon (to produce an ampersand itself normally requires ampersand a m p semicolon).
Wulfaed,
Makes sense. I can’t remember the last time I tried to type angle brackets, except for documents and code, so I wan’t thinking about HTML. Thanks!
Victor
Cutting and pasting is always a problem for me, when being lazy. The very last equation is off by a sign. They should be,
x(t) = cos(t360/T), where T = 9′. Then x’(t) = -sin(t360/T) x 360/T = -(360/T)sin(t360/T).
y(t) = sin(t360/T), where T = 9′. Then y’(t) = cos(t360/T) x 360/T = +(360/T)cos(t360/T).
Sorry!
Another simple, but missing detail is the radius of the bore, which just adds a constant in from of sin and cos.
{devil’s advocate here}
Is that the radius to the lands, or to the grooves?
Wulfraed,
Probably wouldn’t matter much. I’d imagine that Matt could just as well use the specific caliber.
Victor
Actually, it wouldn’t matter, because Matt wants to know the angle, and lands, versus grooves, would be parallel.
Matt,
Ballistol doesn’t evaporate. It is persistent and remains for years.
Lubricated cartridges will move back easier in the chamber when they are fired, and the 7.62 X 54R is a tapered case, so the backwards thrust would/could be significant. I would dry your chamber and bore before you shoot each time.
B.B.
Never owned a slavia. Just bought a 634 the other night. Should have it in a few days. I’ve heard great things about these so I’m excited.
kevin
Volvo
I wish you a very happy belated birthday! Now take off that cone-shaped hat already, you look ridiculous.
Good to hear you got yerself a Marauder in .25. I will be looking forward to reading your no-holds-barred assessment of it. I tend to take a critical eye to my purchases, so I enjoy your point of view.
I also want to hear about the HW50 when you get it back from Mr. Watts. I am certain it will be nothing short of heavenly. You might even keep it a couple weeks before selling it. 😉
Recent articles on an airgun blog I will not mention [PA Blog] coerced me into purchasing an HW55. Needless to say, its a keeper.
Slinging Lead,
Was your HW55 the one from Carel with the hang tag?
kevin
Link some pictures when you get the HW55.
On a side note I also picked up a 2nd HW50 that is a fixer upper, but don’t think I can go wrong at $130.00. Metal looks very good but the stock is trash, however I found a OEM stock for $75.00 euros – whatever that means. Might be able to double my $$ on this one, or not.
B.B.
A bit of an update….
Tried the Raptors in the R9 and it clocked 1155 fps. O.K. I can shoot supersonic with it.
Also bounced one off a piece of sheet steel that is the same as the safety shield for the chrono. Angle at 45 deg like it is on the chrono. Small dent and a bit of a smear at only 3 feet. No problem.
Ran some experimental numbers through chairgun using the weight and velocity with the R9. BC was adjusted down slightly from the .010 for most of the RWS pellets to adjust a bit for the much lesser weight of the Raptor. Interesting results.
Can’t wait to see what turns up for real when environmental conditions permit.
Will be looking at distance that the speed of lead and PBA are equal, distance that drop is equal, and remaining K.E. at the point that drop is equal. That’s with both the R7 and R9 if the R9 will keep them tight enough at 25.
twotalon
twotalon,
That’s quite an experiment you are conducting. I hope you are documenting it well, because you are formulation a whole guest blog series!
Told ya that you would hit the downrange chrono. Good thing you had that plate.
B.B.
B.B.
Made it out and shot this morning. Looking over data now.
Did not hit the chrono. Did not believe the test group with the R9 on the target. Very tight.
twotalon
BB,
I wish you could talk Pyramid into importing the 631 and 634. They are nice rifles and are not currently imported into the US.
During your tune, what spring lube did you use? I was wondering is you used the white gun grease you said you used on the Diana 27.
David Enoch
Dvid,
I used Beeman Spring Gel. It’s no longer available.
B.B.
Hi,
I heard the Slavia 630/631 absolutely must be lubed up in order to avoid damage to the piston seal because they come absolutely dry from the factory. I’m really new to this and don’t want to disassemble everything and risk breaking something (I’m also not very good with my hands). If disassembly is about required I might have to shift my choice to a Diana 24.
If someone can help be that’d be great.
Tony
Tony,
The Slavia 631 is not the gun to learn on. But it also doesn’t always have to be lubricated, I don’t think. I owned one for 12 years before lubing it.
You can do a lot with the right oil through the cocking slot.
B.B.
Thanks for the prompt answer.
Do you think I, as a (Canadian) newbie would be happier on the 240 Classic?
Tony
Hi Tony, as also a Canadian and owner of a Diana 24 I don’t think you can go wrong with it. There is also the HW 30 S from weihrauch it’s a little more expansive but a very nice shooter too. If your only getting into airguns maybe you could have a look a the IZH-60/61 it’s pretty cheap (around 100$) it doesn’t have the nice wood stock or smoothness of the German rifles but it’s a very nice little gun to own.
It’s really a shame we don’t have the AirVenturi Bronco on our side of the border because it’s an awesome rifle and really hard to beat, especially for the price!
You might get more answers if you posted your question on a more recent blog article, the blog is published every week day (amasingly even on holidays) and there is only a handfull of people checking the older blog articles.
You might also try your question on the Canadian Airgun Forum, most people are nice and very knowledgeable.
J-F
Sorry I forgot to put the links :rolleyes:
Latest blog : /blog//
Canadian airgun forum : http://www.airgunforum.ca
J-F
Tony,
I think you would be happiest with the Slavia 634. From what I hear, it is an excellent air rifle for the price.
B.B.
Thanks for the answer. Unfortunately, I don’t have a PAL so it needs to be detuned. Furthermore, I cannot find any 634s for sale in Canada.
Tony
Ref image three showing the trigger return spring in front of the trigger. I just did a overhaul on my 631, and if the spring is mounted like this the trigger is pushed back to firing position, but if the spring is behind the trigger everything works as it should. What is right and what is wrong?
Vestlenning,
Welcome to the blog.
I took that photo of the gun the way the factory assembled it.
B.B.
Thank you.
“I took that photo of the gun the way the factory assembled it.”
Sorry, but with the spring placed like this the trigger won’t work.