by B.B. Pelletier
Announcement: Adam Crowson is this week’s winner of Pyramyd Air’s Big Shot of the Week on their facebook page. He’ll receive a $50 Pyramyd AIR gift card. Congratulations!

Adam Crowson is Pyramyd Air’s Big Shot of the Week.

This Nelson Lewis combination gun was made in the mid-19th century. It’s .38 caliber and 14 gauge.
A lot of readers have been waiting patiently for today’s report. Although we’re airgunners, we’re shooters first, and many of us appreciate the similarities between pneumatic guns and those that use black powder. Today’s subject gun was made about 150 years ago by a maker of some fame who made sniper rifles for use during the American Civil War. I’ve lived with this gun for several months now and have held it, admired it, considered it and wondered about it. And on Tuesday of last week, I took it to the range for its first outing.
On every TV show where old guns are shown, you’re advised to seek the services of a gunsmith before firing any old gun. They’re supposed to check the gun for safety. Last week, I discovered that I was the one performing that service on this piece.
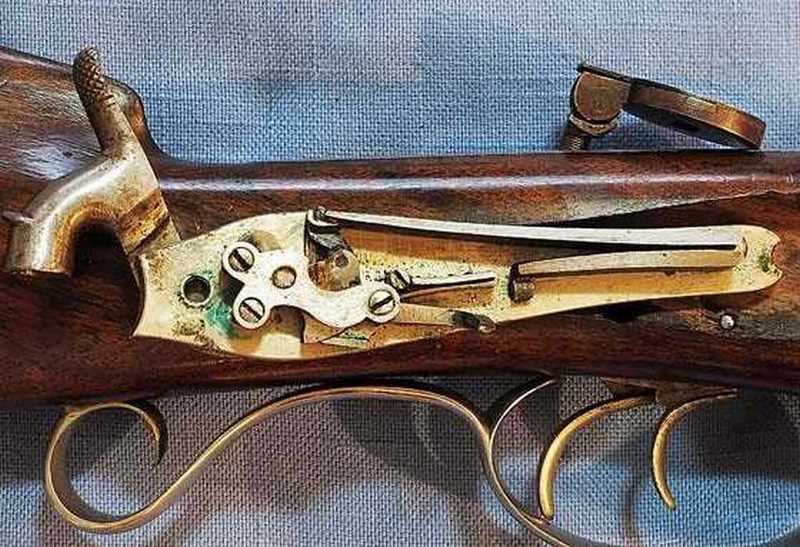
While Mac was still visiting me several weeks ago, we pulled both locks out of the stock and examined them closely. They differ from each other only because one is for the right side and the other is for the left; but, in essence, they’re the same lock. The inletting in the stock is so precise that the left lock has to be “buttoned” into position to get it back in! It fits into an undercut section of the stock and cannot be inserted straight into its slot. A bolt passes through the left lock, through the stock and into the right lock. When tightened, it pulls both locks together in a fit so tight that a razor blade cannot be inserted between the stock and either of the two lockplates.

The locks are not complex, but they are made right and tight, which makes all the difference in the world. This is the right-hand shotgun lock.
The locks are back-action (meaning the hammer spring is located behind the tumbler, so the majority of the lock extends backward — rather than forward — from the hammer) and are remarkably simple in construction. Some file marks are still evident from the time each piece was fashioned by Lewis, who made all his own locks, triggers and barrels. For a short time, I was concerned about the gun having been “gunsmithed” because the rifle lock (operated by the rear trigger) fires with about 2 lbs. of pull and is glass-crisp. It feels too light for the gun, considering the hammer requires about 12 lbs. of effort to cock! But close examination under a 10x jeweler’s loupe shows no evidence of any work other than Lewis’ original job.
The rifle lock is on the left side of the gun, and the hammer on that side was a bit loose when I got it, so one of my gun buddies and I shimmed the square shaft on which the hammer rides with 0.0015″ shim stock. That took up all the play. Now there isn’t a hint of movement.
I removed both nipples and was pleased to see what good condition they were in. Both have tiny flash holes at their bottoms, exactly like they’re supposed to. Often, these holes will be enlarged from the hot gasses and cause greater pressure to flow back through the nipple and against the bottom of the hammer. They seem to be plated with platinum, which was a common touch on the finer guns of this period. The plating allows them to resist the erosive gasses of the gunpowder many times longer than plain steel. These are either original to the gun or are period replacements, and I would think at least the rifle nipple has to be a replacement.

Here you see the bottom of the rifle barrel nipple. It’s clearly in great condition despite its age. Notice that the breech plugs have been shaped into water drains, or “snails,” as they’re termed. They direct any water away from the nipples and also protect the barrel and lockplate from the erosive hot gasses that occur at firing. Much of the original nickel plating has been lost to these gasses.
I shined a powerful tactical flashlight down both nipple holes with the nipples removed to see down the barrels from the muzzle. Both were sparkling clean and shiny. The shotgun barrel, however, is not like any shotgun barrel of today. Instead of a mirror bore, this barrel still has tool marks, both horizontal and vertical, from when it was fashioned. You can see them in the photo of the muzzle in Part 1. I doubt there’s any choke — I can’t see evidence of one.

This photo is very revealing! Notice the graduated gap between the left and right breech plug? That’s not sloppy work, it’s intentional to provide clearance for when the plug shown right in this picture is unscrewed. Both nipples must be removed before the plugs come out. Notice the index marks that align the breech plugs with their barrels. They keep the nipples aligned with the hammers when the plugs are in place.
Then, I did some thinking about when this gun was made and what hunting was like at that time. This gun may have been made before the Civil War. Nelson Lewis made guns from 1843 into the 1880s at one location in Troy, New York. Internet research reveals that the building where he had his gun store and workshop is still standing on the corner of Congress and Church streets. Church Street is just an alley today, but Congress Street still exists, and his workshop has recently housed a small Greek sandwich shop.
It was a very different time
I can’t prove exactly when this gun was made; but as a combination gun, it’s very different from what we think of today. Let’s use the Savage model 24 for comparison. The model 24 is a modern combination gun with a rifle barrel and a shotgun barrel — just like this Lewis gun. The 24 is superposed, where this Lewis gun is side-by-side, or a Cape gun as some would call it. But Nelson Lewis also made combination guns with superposed barrels. A Savage model 24 is a lightweight, handy gun that’s useful for hunting all manner of game. The Lewis gun is also useful this way, but it’s not light!
As I reported in Part 1, it weighs 9 lbs. It’s decidedly muzzle-heavy and would not swing like a modern shotgun. But while thinking about the time period when it was used, it dawned on me that this gun may not have been designed to be used as a “handy” gun in the same terms we would think of today. It was handy because it fired both a single bullet and shot, of course, but I don’t think it was made for shooting birds on the wing.
Hunters in America didn’t always shoot birds on the wing back in 1850. They often shot them on the roost. In those days, game abounded and sportsmanship wasn’t the same as it is today. In both England and the eastern U.S., there were men in small boats called punts, and they were shooting ducks by the hundreds on the water with a small cannon called a punt gun. Nobody thought anything of a lone hunter shooting a few ducks, geese and swans while they were on the ground or the water. Yes, I said swans. Why do you think they called it “swan shot”?
“Shooting flying” is the name given to the sport of wingshooting. The flintlock made it more feasible to shoot a flying bird than anything previous; and the percussion lock, with its instantaneous ignition, coupled with the general improvement in the power of gunpowder at about the same time (1830-1840), made shooting flying gain popularity. But a meat hunter, subsistence hunter or just a plain hunter, wasn’t always interested in shooting as a sport. He was out to get food, plain and simple.
This Nelson Lewis combination gun is no more a subsistence gun than a Dodge Viper is a car for a soccer mom. Yes, it can do the job and yes, it seems to have all the necessary qualifications, but subsistence hunters can and do get along with a lot less. This is a fine sporting gun for the man who has the money to spend and wants something special. Just how special I will now discuss.
Nelson Lewis didn’t make up many guns (if any) on speculation. They were nearly all made to order, because at the price a person had to pay, which was several months’ wages for laborers, customers demanded exactly what they wanted. It’s my belief that the customer who ordered this particular gun was reasonably well-to-do, and he was also a man with very specific tastes. I believe the gun, itself, shows us that.
I’ve now seen six or seven of these Nelson Lewis combination guns in various auctions and on websites, as well as in the book by Ned Roberts, The Muzzleloading Cap Lock Rifle. They’re all similar in size, weight and caliber — with one exception. While more than half of the guns I’ve seen have the lollipop rear peep sight, mine is the only one so far that also has a hooded or globe front sight. That steel hood is there for just one purpose — to protect the thin post-and-bead “pinhead” target front sight — a sight that belongs on a target rifle.

The tiny post-and-bead front sight was meant for the most precise aiming possible with iron sights in the Nelson Lewis combination gun’s day. It seems out of place on a combination gun. Notice the beautiful condition of the rifle’s bore at the muzzle!
Remember — this is a combination gun. A gun that is both a rifle and a shotgun. It’s main purpose is for getting meat of all kinds. It’s not a target rifle, because that would have just a single barrel, double-set triggers and probably a false muzzle for more careful loading of the bullet. It’s not a shotgun, because that would be at least two pounds lighter and not muzzle-heavy. This is a meat gun — pure and simple.
So, why does it need target sights? Who puts a Lyman Super Targetspot scope on a Savage model 24? Yet, this Nelson Lewis combination gun from the mid-19th century has sights that belong on the finest target rifles of the day. Why? What about the gun requires such a precision sight, when it also has a traditional sporting rear sight mounted forward of the breech, between the barrels (see a picture of that sight in Part 1)?
These are all interesting topics to ponder, but they don’t tell us anything about how the gun really works. For that, we’ve got to get real!
Let’s shoot!
When I arrived at the 50-yard range last week, all these thoughts about the gun were rambling around inside my head. Did the owner want a meat gun that was also part target rifle? And, if so, how accurate would it be?
I was about to shoot a gun that was more than a little strange. And this could be the first time it’s been fired in decades! So, as a continuance of my careful examination, the first thing I did was fire a cap on the nipple of the rifle barrel. There was a moment of panic when the caps from one manufacturer proved too small for the nipple; fortunately, the Remington No. 11 caps I had fit perfectly. I’d guessed that the No. 10 on the nipple meant the cap size, and it may well have been a size 10 of a century ago, but today a No. 11 cap fits.
After the cap fired successfully, I loaded a charge of powder into the barrel and tamped it down with a cloth wad. There was no bullet for this shot, as I was still testing the gun. That charge fired perfectly. After that, I did something I’ve never done before. I cleaned the bore with a damp cleaning patch, followed by two dry ones. According to many authors, this is the only way to do fine (accurate) shooting with black powder.

The bore was cleaned and dried after every shot. This practice was universal among target shooters in the 19th century.
Then it was time to load the first ball. For the record, I’m using fresh GOEX FFg powder. You may be wondering how I figured out the correct powder charge for this rifle. It was simple, really. I used an adjustable black powder measure and adjusted it to a little more powder than I use in my .32-caliber Thompson-Center rifle. How did I figure that powder charge? I guessed! Was I right? I seem to have been, because that rifle shot a nice tight 5-shot group at 50 yards its first time at the range.
Black powder works differently than smokeless. You don’t have to weigh each charge. You measure black powder by volumeinstead of weight, and I have enough experience with black powder guns that I won’t overload the gun. The problem may be that I load it too light, but that gets refined the more I shoot. I fill the powder measure to level full, and that’s what goes into the gun. I discovered that I do need a funnel with a really tiny mouth to fit into the muzzle, but I improvised this day with a funnel made from paper.

I used a paper funnel to drop the black powder down the bore of the rifle.
The first patch was laid over the muzzle, and a .375 swaged round ball was centered and pressed into the muzzle with my thumb. I could see this patch was going to be too large, and of course it was. When I started the ball down the barrel with the short starter, the patch closed over the top of the ball and then extended a quarter-inch above it as it was rammed down. That’s way too much patch!

The ball is pressed into the muzzle in the center of a greased patch. This patch is way too big for this ball.

The short starter is used to start the ball down the bore. At this point, the patch material had bunched up around the ball and was fighting the loading effort.
This ball was difficult to ram down until the very end of its travel, at which point I was able to feel the ball settle against the powder charge. It’s very important to always seat the ball on the powder with the same force, so this lessening of effort at the end of the ram was a providential thing. The last step in the loading process was to put a fresh percussion cap on the nipple. I then rested the gun in my rifle rest and settled in for the shot. Once I was comfortable, I pulled the hammer back to the full cock position, making the rifle ready to fire.

When ramming a ball down the bore it’s very important that you purse your lips just right!
The trigger-pull was light and glass-crisp, as noted earlier. That first shot fired with authority. The report sounded sharp, as it should when properly loaded. The recoil was very light and not bothersome to my eye that was very close to the lollipop rear peep. Fortunately, this peep folds forward for storage, so if my shooting glasses contact it during recoil it will simply lay down. I have the same setup with my Ballard rifle that recoils harder, and I always push the rear sight forward a bit with every shot.

Getting set to touch one off.

Crack! The shot is off.
I had envisioned the first shot going to the X-ring, but that’s not what happened. Instead, the shot went wide at 10 o’clock in the 7 ring. Bummer! My thought was that the oversized patch was the culprit, but only more shooting would tell me for sure. Fortunately, I had a batch of smaller size patches with me as well, so I got them out for the next loading. But before that happened, the barrel needed to be cleaned.
The hammer was pulled back to half-cock, and a damp cleaning patch was run down the bore and back out with a satisfying hydraulic pop. This was followed by two dry cleaning patches, the second of which had very little dirt on it when it came out. Then, the rifle was loaded in exactly the same way as before, with the exception that the new smaller patch was used. This time, the ball started easier and rammed easier, though even this patch was still too large for the rifle. Now, before you point out the obvious and tell me that I could have cut the patches down, let me tell you that occurred to me on the range. But I didn’t have any scissors, and a knife makes a poor patch cutter, unless you’re cutting the patch right at the muzzle. I usually do cut off my patches at the muzzle with the patch knife that I had on the range this day, but that can leave scratches on the muzzle — which I don’t mind on my Thompson-Center rifles but wouldn’t think of doing to this vintage gun!
The second shot went to the 10 o’clock position at the edge of the black, cutting the nine ring. That was more like it! I then cleaned and loaded several more times until about the fifth shot. That patch also bunched up from being too large; again, I had a hard time ramming the ball. The shot went out to 7 o’clock in the 6-ring! This demonstrates the importance of a properly patched ball.

The first shot went high and left. Then I changed patches and they started landing in the center of the target, but high. Shot five was a thin patch that got bunched-up during loading and caused unnecessary pressure to ram it down. That shot went wide to the left and low. There are two balls in the same hole at the top center of the target.
I fired a total of seven shots in all, and two of them were fliers from patches that were too tight. The other five went into a group that measures 1.903 inches between the centers of the two shots farthest apart. Two of those shots are in the same hole and have to be examined closely to see that they’re separate shots. Given the difficulties I had with the oversized patches, I think this first session went well. Of course, I’d hoped for better, but this was the first time and there was a lot to be learned.
Seven shots may not sound like a lot, but it took about 45 minutes with the loading, cleaning, picture-taking and lip-pursing. I did notice that I fell into a pattern as time went on; and by the fourth shot, I was loading them pretty much the same every time. Only that one shot (No. five with the patch that got stuck) got in the way of a perfect session.
Cleanup
When I returned home, I cleaned the rifle barrel by removing the barrels from the action and then removing the rifle barrel nipple. I stood the barrels in a shallow tub and poured boiling water down the muzzle of the rifled barrel. The water rushed out of the threaded nipple hole, carrying all the ash and soot with it. The boiling water left the barrels extremely hot, which made any residual water evaporate immediately. When the barrels cooled a bit (but were still very warm to the touch), I ran a clean patch with Ballistol through the bore. The outside of the breech and the nipple were both cleaned with a brass brush and assembled once the bore had been oiled. The barrel exteriors were wiped with a rag soaked in Ballistol.
Getting ready for next time
I ordered some Irish linen handkerchiefs off eBay to use as possible patch material. I thought they probably wouldn’t arrive in time, so I cut down the smallest patches I used at the range this time by holding a nickel over them and trimming around the edges with sharp scissors and lightly oiled the patches with Ballistol. They’re now roughly the same size as the two patches I found in the patch box when I got the rifle. I think the smaller amount of material will allow these patches to load more smoothly (as they are supposed to).
When the Irish linen handkerchiefs arrived, I have cut a strip of linen into nickel-sized patches that I’ve left dry (for the moment). I’ll moisten them with saliva at the range. According to Ned Roberts (of .257 Roberts fame), that gives the absolute last bit of accuracy with a patched ball. That assumes the patches are of the right thickness, and this material seems very thin. We’ll just have to wait and see. At any rate, I now have two different patches to try next time I’m out, and they’re both sized correctly for the balls I’m shooting. A saliva-moistened patch is supposed to have a slight edge in accuracy over a greased or oiled patch. Since saliva can rust the barrel, this kind of patch is used only for target practice, where the gun will be fired and cleaned within minutes. For hunting, an oiled patch is better.
I have some specific goals for next time. One is to get a better-fitting patch so the ball doesn’t have to be rammed so hard. It’s essential for accuracy to always seat the bullet on the powder charge with the same pressure every time. You can do that best when you’re pushing the ramrod down instead of ramming it. I now have patches of two different thicknesses to try, so we should see some results the next time out.
A second goal will be to weigh the powder charge I’m throwing and adjust it to what the vintage books say is the right load. Some of you may have noticed that in Part 1, I referred to the rifle as a .39 caliber, while in this report I’m calling it a .38. The ball I’m shooting is a Hornady swaged 0.375-inch round ball, and the patch does take up some space, so the caliber is just larger than .38. For that reason, I think it should more correctly be called a .38 caliber.
According to Roberts, a .38-caliber ball should use about a 35-40 grain charge, with 35 grains being closer to correct. I’ll weigh the charge I was using the last time out and adjust the powder measure to throw the “right” charge, if necessary.
Why write about firearms?
I can’t do too many of these firearms-only blogs; but since there’s so much crossover between black powder and compressed-air guns, I feel that today’s report contains several good lessons for all of us. Also, since I’m not that familiar with either this muzzleloading gun or with my Ballard, you get to watch over my shoulder as I try to learn something new. That’s useful for any new airgunner who needs to do the same kinds of things I’m doing here to learn about his new airgun.
Have you noticed that I’ve not subscribed to any forums and asked other shooters what they think about this combination gun? That’s because, in my research, I find that most people don’t know very much about guns like this, so they make stuff up or they guess. The same holds true for airguns, doesn’t it? Whenever I read a question from a new shooter about a gun he’s just bought or hopes to buy, asking me what sort of modifications I think he should do to it, I shudder. I’m saying don’t do anything at all until you have shot that gun enough to know it well. Then, you won’t be tempted to make unnecessary changes that might not be reversible. That’s the real lesson in today’s report.
And, now, for something completely different…
In 1948, the Johnson Indoor Target Gun sold for $15. That was a lot of money for an airgun in those days. What kind of powerplant did the Johnson have and what caliber was it? The answer will be in Monday’s blog, but please feel free to leave your answer in the comments.

This really was enjoyable reading! Please continue to give us articles on classic powder-burners, especially black-powder jewels like this one.
You could almost call these black powder guns “air guns that generate their own air”. They seem more like an air gun to me than a cartridge-firing gun.
Les
Hi BB
Top article!
What muzzle velocity can black powder rifles attain?
Cheers Bob
Bob,
I would estimate that this rifle is shooting in the 1250-1400 f.p.s. region.
Just a guess, of course. I should chronograph it sometime.
B.B.
I am happy to see that the BSOTW Adam Crowson seems to have all of his digits intact despite the cheap Chinese underlever. His right thumb is not visible, but it looks like it is probably still there. He appears to be shooting the Industry B3, also known as “the amputator.” Safety first, Adam.
Morning B.B.,
Absolutely top shelf. I felt like I was at the range watching you load and fire your Nelson Lewis gun, buttoning the locks in the stock–amazing.
Bruce
BB, varying the powder charge can make a big difference in your accuracy, I’m sure you already know that. My .36 cal flintlock shoots best with 35 grains of 3F Swiss Black Powder. By best I mean a ragged hole at 25 yards. Other loads are around 1 !/2 inch. BTW, Swiss powder is hot and burns clean. I can fire five shots without cleaning and still get this level of accuracy. I also use T/C bore butter as a patch lube. When I do clean the barrel on the range, I use a 50/50 mix of Ballistol and water.
Mike
Mike,
Thanks. You have confirmed my load data.
I have bore butter, but the vintage shooters used bear oil for the best lubrication. I can’t get that, so I thought I’d try Ballistol, which is safe for consumption.
B.B.
B.B.,
What a wonderful article. Elegant piece of history that still has it’s mojo.
Did I miss your “boner of the year” confession this week?
kevin
Kevin,
Nope. Didn’t get to it yet.
B.B.
Not being that experienced with black powder, I learned new stuff today.
I do have a related question. I know most “purists” insist upon black powder and there are others who prefer pyrodex type powder. This is something that can be argued back and forth forever, I am sure. My question relates to the preformed charges. Are they usable with a side lock or are they only usable with the in lines?
Fascinating & very cool. Thanx. On/off topic Q. Could the lip thing be the “secret ingredient” of masterin’ the artillery hold? Y’all have a great weekend.
Another great read BB!
At first I thought I was looking at an old airgun then I remembered what it was.
I enjoy these types of post. It is really neat to see how they made these rifles by hand.
I am not sure if I will be able to make the show tomorrow or not. I have a bunch of running around to do. I hope you have a fun show!
David Enoch
I’ve been scarce but I just wanna say: B.B. You are my gun hero. You have so danged much *fun*, wether it’s the newest, bargain-plastic-but-cleverly-designed toy, or one of these beauties that took about a month of labor to make, you have FUN.
Other than a little recreational sniping with my beloved Daisy 880 which still wears the Crosman “Targetfinder Superscope” (well named since you can indeed actually find your target in the thing, a Unertl, it’s not) I’ve not been doing a lot of gun stuff. I’ve been busy. Work has again found me, this time laboratory work that’s kinda neato and also a big aggrivating and tedious. It pays well, though. No, not Br Ba stuff, more like … think smog testing for smokestacks. And bakeries. And so on. So sometimes the stuff I work with smells like a machine room and sometimes like snack cakes.
haha wether …. that’s a ram that’s been neutered. Got a bunch of wethers running around here. I meant whether.
BB,
I’d say given all the variables that you made a pretty good start, taking the 5 “good” shots as a group. Probably lots more range visits to get it where you want it. Make sure the ball is big enough — I’m still confused by the whole .38 vs. .39 caliber spec.; if land to land is really 0.39″, 0.375 ball is probably not going to shoot well as you want, and you may need more like .380, .385 or even .390 (if you don’t mind using a mallet — and no, I didn’t check to see if any of those sizes are available :)). You can also save yourself a lot of trouble by figuring out the groove depth — if it is in the 0.008 or less area, probably try a relatively bigger ball and relatively thinner patch (e.g. 0.010″-0.012″ or so), but if 0.010 or deeper a thicker patch may give better results (usually does in modern barrels). In offhand match shooting PRB’s, 0.005″ under bore size ball and 0.020″ patch is fairly common; bench shooters tend to go to bore or even over-bore sized balls. Ballistol may work as patch lube (I never had any, just on the principle that many Ballistol users talk like cult members !), but if not, try spit or the Hoppe’s #9 BP patch lube/powder solvent (NOT the normal #9). I sometimes use 50/50 mix of 90% alcohol and Murphy’s oil soap, also — that is pretty common mix. Track of the Wolf sells Mink Oil that is supposedly pretty good, also, but that is more of a hunting lube. The list goes on and on. What usually makes the difference is how wet or dry the patch is with whatever lubricant you are using. If you are going to wipe between shots, keep the patches on the dry side — just a spray or two on the patch (if not prelubed), or really squeezed out. Finally, try some 3Fg — Swiss if possible — it often works much better than 2Fg in small bores, and I also use it in my .50 most of the time. I have an adjustable measure with a funnel on top, and I can give you a link to one like it if you want? I won’t worry about the weight of the charge, just make sure I’m using the same measure the same way every time. Unless you get way beyond the pale into triple digit charges, one or two grains isn’t a big deal like it is with smokeless in terms of safety, and it is often hard to tell the difference in 5 gr. increments on larger calibers.
I think you are going to like this one — contrary to the old saw, it is sometimes the relatively (initially) inaccurate rifles that are most interesting and teach use the most!
PS. You might put together a bracket that you can clamp to the range bench to clean and load more easily. Put a carpet scrap under the butt of rifle if you don’t want it scratched.
PPS. Many of the top shooters use teflon patching — I have some in strips if you want to try it (I can probably afford a stamp!). I haven’t used it much because it builds up between shots and teflon is a known bad chemical — may be why I am not a top shooter. Requires spritzing with water and cutting at muzzle, also.
BG_Farmer,
Thanks, but like you I think I’ll stick with traditional materials for my patches.
B.B.
BG_Farmer,
I think I’m pretty close on the ball size right now, because these won’t roll down the barrel on their own. The rifling grooves look to be about 0.004-inches deep, so that’s what the patch needs to fill.
Years ago I had an original .45 muzzleloader that I shot with patched balls and got one-inch ten-shot groups all the time ay 50 yards. I didn’t know to wipe the bore in those day, so I wonder how much better I could have gotten it to shoot.
I’m hoping to put ten into one inch next time out and if I do the next move will be to the 100 yards range. But this is just the beginning. I want to design a short greased bullet for this rifle that will enable me to shoot groups at 200 yards. They did it in the 19th century and I don’t know why I can’t do it today. I just need the right bullet.
Good tip on the carpet square for the butt.
I’m making a powder funnel out of a cartridge case and that will go with me next time. I own one of the powder measures with the funnel attached, but I don’t like the looks of it. I like the little expandable measure I’m using right now. I am putting together a case of tools that are just for this rifle, so the next time I go to the range, things should be under a lot better organization.
Regarding the Swiss powder, I will get some, but all the old references say to use large-grain powder instead of small. They say 2 F is as small as you should go with this caliber.
I must say that with the cleanup routine I now use, my black powder rifles clean much easier and faster than my smokeless powder guns!
B.B.
Easy cleaning is a good sign of bore in good condition also! One question that has come up in historical discussions is whether the granulations and “energy levels” are the same for powders over time. Many think not. Some reliable authorities seem to think that Swiss is closer to the finer sporting powders available at the height of the percussion era, and that 3F is closer in granulation to their 2F. Which is to say — Roberts certainly knew what he was talking about, but you have to factor in differences over time. It doesn’t seem so crazy if you compare modern Swiss or Schuetzen 3Fg to Goex 3Fg (or 2Fg to 2Fg) — definitely can see the difference in grain size (Swiss is finer), and you can feel the difference when you shoot as well. Swiss 2F might be worth trying as well.
I agree on the teflon in principle which is why I have so much unused teflon patching, but if you change your mind, I’ll be happy to send you a couple rolls.
BG_Farmer,
That’s good info about the different powders over time. I know that Swiss is recommended by everyone and if I had a way of getting some easily I definitely would. I’m going to the Dallas gun show tomorrow and Sunday (got a table) so I’ll look and see if there is any there. Probably not, though, since it is classified as an explosive and has to be handled in a particular way.
B.B.
One more thing and I’ll shut up. I like to leave the nipple on at least for a part of the flushing/cleaning, as it will take the fouling out better than cleaning the nipple separately. Once I started doing that, I found the nipple orifice was clear and clean as a whistle when I took it off. In fact, I got to the point where I simply left the nipple on and only removed it about once every month or so to clean/oil the threads. Fewer chances to cross-thread and or leave residual fouling in the nipple (which can attract oil and lead to blockage. Remember I was shooting that caplock at least 1x/week, sometimes more. If you only shoot once a month, that is a factor.
Greetings B.B. and Airgunners. This has to be another fave. blog of mine. I can tell by the length and amount of detail, that you enjoyed this one too. I can’t help but marvel at the detail in these old guns. All done with what we would call “crude” hand tools. The gun makers of this period sure tried to achieve perfection.
Bye the bye. I just received an HW77k in .177 yesterday. Literally right out of the box, I shot 8 out of 10 shotgun shells at 23 meters with open sights. I suppose the guy who sighted it in has the same eye as me. I think I will leave the scope off for now. I love the sights on this gun. Mainly because you can move the back sight the length of the scope grooves. This sport just keeps getting better and better.
Caio — Titus
Titus, what is the advantage of being able to move the rear sight…to make way for a possible scope? – john
John
The HW77K is an under lever rifle. The rear scope is mounted in the 11mm scope groove. When I pulled it out of the box, the rear sight was mounted as far forward in the scope rail as possible. One advantage is you are able to lengthen the distance between the front and rear sights, theoretically making the gun more accurate. I find when I move the rear sight back a couple of inches, ( it has up to 6in. of travell) the rear sight becomes clearer. Making for a sharper sight picture. This was a problem I had with my break barrels. I always thought the front sight on the HW77 was too large and clunky. However it is one of the sharpest sights I have on any of my guns.
I hope this answers your question, John.
Caio–Titus
That should read “The rear sight is mounted in the 11mm scope grooves”. There is no scope on the rifle.
Titus
John. I should have addressed the rest of your question in my first massif. Yes, due to the length of the scope grooves on the HW77k, it would be possible to mount a scope as well as keeping the rear open sight on the rifle. However, I believe it would only be possible to use the scope. Unless you had a scope mount that is a see through , allowing you to see the front and rear sights. I believe they make such a sight, however I don’t see it being too practical.
Titus
Titus, thanks for that. When my cataracted lenses were to be replaced with synthetic implants, I was offered the option of having a near-vision focal length in one eye for reading and far in the other. I opted for far in both and wear trifocals but my new airgun hobby makes me wonder about that choice, not for me as my old vision is still a slave to the scope, but for others.
john
Just got back from the Windsor, CT show a while ago. Lot’s of interesting rifles and guns and tons of pellets, Tasco scopes (someone must have hijacked a truck), two guys promoting bench rest air rifle competition (big, big bucks invested in the PCP’s and the rests – they weren’t fooling around), a beautiful FWB 150 with a stock that looked like it came from the dashboard of a Bentley, IZH 60’s and 61’s, BSA Meteors and Comets, a Diana 25, a Hakim that sure looked like an M1, Charlie the airgun sealer (you know whom I talking about, BB) who seals Crosmans while you wait and Kevin H. selling some re-manufactured Crosman air pistols – the 3576 WRM (I believe it’s the Colt Python knockoff).
What I found most interesting is a fellow from MIT selling a plastic eye aperture that sticks to your glasses by surface tension. He has one for pistols and one for rifles. It’s called “eyepal” and for $30 I bought it. I’ll let you know if it improves my target scores. As I don’t think PA sells any aperture sights, I’ll list the website if anyone’s interested in a cheap aperture – http://www.eyepalusa.com
Oh, Kevin H. was selling Japanese (?) wad cutter pellets in .177 – at least I think they’re Japanese – so I bought a “tin” even if they do come in a clear plastic container. We’ll see if any of the target pistols or rifles I have like them.
Fred DPRoNJ
Fred,
Sounds like a good show. I’m at the Dallas Arms Collectors’ show through Sunday, and this time I met a lot of folks who know about airguns.
Keep us in the loop with that eye aid.
B.B.
Fred DPRoNJ,
Do you know if the guy who seals Crosman sells seals? My brother has an old Crosman Shiloh model pistol made between 1981& 1985 it is a co2 gun and the front seal where the co2 cartridge seats is cracked. No parts available from Crosman. I have a faucet washer that is the same diameter even to the hole in the center but it is to thick ,I am going to try sanding it down but if that doesn’t work I would like to find the correct one. Thanks
Shaky,
I don’t know if he does. Typically the seals used on Crosman and Benjamin and others can be replaced at your local NAPA store. Bring the seal down (not the gun – they might get nervous) and see if they can match it up. Otherwise, try this guy:
Fred DPRoNJ
Had a good day at the range today. We had a practice for the Ruger Rimfire Challenge that will be run here in September. The 25 yard stage for pistol and carbine went smooth and fast. But the “Target Rich Environment” stage needs work. It’s 20 small knock down targets at 10 yards to 70 yards. The targets are steel rabbits and crows and squirrels, oh my! They are all life size. Yes, this one will need some work! Good Fun!
Mike
That Nelson Lewis really makes me want to do another bp kit. Dang it, BB! Making me want to get another stinky ole bp gun…. Did a .54 cal Hawkin back in the 80’s that turned out well. What’s a good kit these days?
/Dave
/Dave,
It all depends on how much you want to do. There are places that sell top-grade parts where you can buy the best of everything and do a lot of work yourself. And there are ready-made kits. I think Thompson Center makes a nice ready made kit.
B.B.
/Dave,
Like BB said, you can build just about anything you want. If you really get the bug to build one, e-mail me at bgfarmer0_at_gmail.com, and I’ll give you all the help I can and can point you to some useful sites/references. There are some neat kits for all sorts of rifles, but they aren’t all equal either in terms of quality or ease of assembly, and if you want to start with a blank and some sheet metal, the possibilities expand again, both for making exactly what you want and for going horribly wrong with a bunch of expensive parts! Since you have built or assembled one before, you are probably competent to do quite a variety of kits and/or “parts collections”.
Wow! Wonder article and the photographs are just fantastic:) the methods, instructions and all have been described easily in a simple manner:)