by Tom Gaylord, a.k.a. B.B. Pelletier
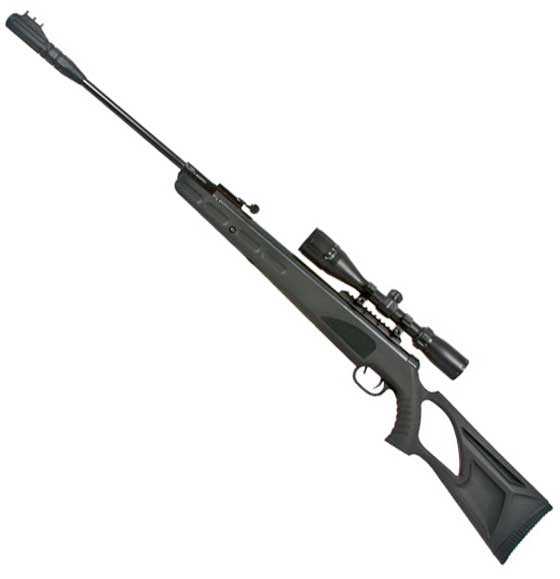
Umarex Octane gas spring combo.
Today’s report is a guest blog from blog reader DMoneyTT. He promised to show us how to fine-tune the Octane trigger, and he’s provided some good photos to go along with his article.
If you’d like to write a guest post for this blog, please email me.
Over to you, DMoneyTT.
Umarex Octane trigger job
by DMoneyTT
As the cost and availability of firearm ammunition continues to keep many shooters from getting adequate trigger time, scores of shooters are turning to airguns to keep their skills honed. Often, new airgunners will be tempted to put down their hard-earned dollars on a rifle offering the highest advertised velocity. Airgun marketing tends to focus on this aspect of performance over all else; but experienced shooters know that accuracy is paramount, and it takes more than just a good barrel and powerplant to deliver tight groups. Proper fit and trigger control are critical considerations when attempting to extract the maximum potential from any rifle.
It’s no secret that the Chinese-manufactured airgun market has seen unparalleled growth and their products are steadily closing the gap between these affordable rifles and their more precise, yet costly, brethren manufactured in Germany, Russia, the United Kingdom and the United States (to name but a few). Many times the differences in quality of manufacturing may be ironed out by the end user. It’s not beyond the skills or tools of the average shooter to dramatically improve the performance of a budget Chinese airgun.
For the shooter who desires all the power of a magnum springer and wants the accuracy to make good use of the velocity but doesn’t want to spend a lot, there are a few good choices. In my humble opinion, the best of these is the Umarex Octane combo. I picked one up several months ago, and it’s been a real joy to plink with and should be excellent for hunting small game, as well. The only downside to this excellent rifle is the trigger-pull. Out of the box, the pull on my rifle registered almost 10 lbs. Others have reported slightly less, so I may have started with an abnormally high pull weight to begin with. There was very little creep (which is a result of minimal sear engagement), and the break was quite crisp. So, a trigger job was necessary, and lessening the pull weight was the only task required.
I would like to say that this does take a steady hand, and careful attention should be paid to the work done on these tiny parts. Any work you decide to do on your rifle should be done with care to maintain the original parts geometry, and it’s always a good idea to carefully test the rifle after any work has been performed. I suggest reading this article before beginning any work to decide if this is within your skill set.
Note from B.B.: Do not work on your gun’s trigger if you do not already have experience working on airguns or are not 100% confident that you can properly disassemble and reassemble the gun and trigger. If you decide to do any part of this trigger tune, you will void the gun’s warranty.
The necessary tools are few.
You will need:
• An Allen wrench that fits the forearm screws.
• A large Phillips screwdriver
• Some paste-type lubricant (synthetic open-gear lube worked well for me)
• A fine wet stone (300-600 grit is preferable)
Optional:
• A Dremel (or any other rotary tool) with a grey rubber polishing wheel may be used on contact points other than the primary sear and secondary sear interaction point because it’s too likely to round edges.
• A vise to hold the rifle while performing the work.
• Small needlenose pliers or hemostats.
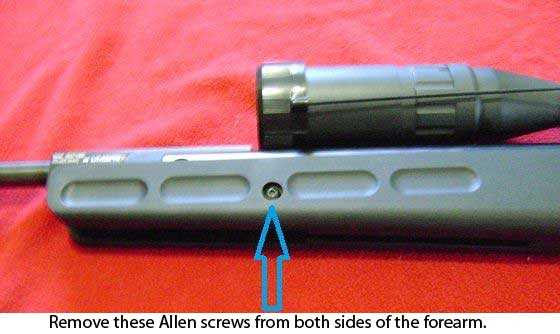
So, let’s begin! Start by ensuring that the rifle is not cocked or loaded. The next task is to remove the stock from the rifle so the trigger group can be accessed. Use an Allen wrench to remove the two forearm screws that attach the action to the stock.

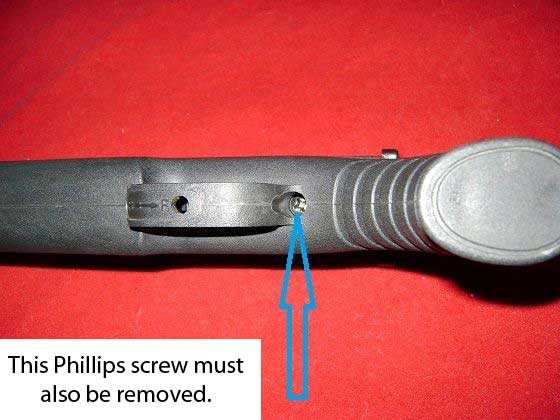
Next, a large Phillips screwdriver is used to remove the screw found behind the triggerguard.
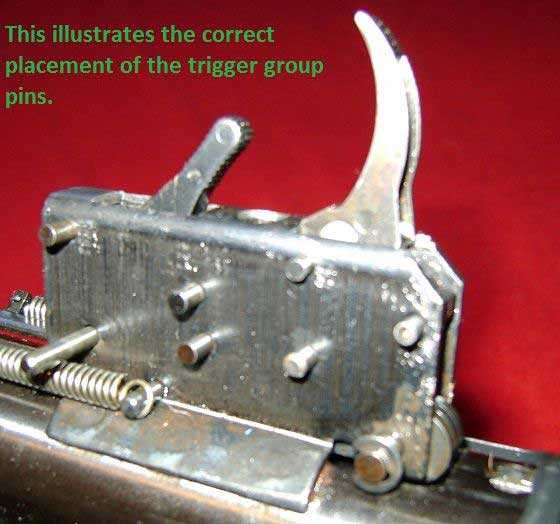
The action can now be removed from the stock. It’s helpful to hold the rifle directly upside down, as the trigger pins fit very loosely and will fall out if the action is tilted to either side once the stock is removed. It’s wise to do all the work over a flat and clean surface that will easily allow dropped parts to be seen and recovered. I chose to mount my action in a vise to allow easy removal of the stock and to gain access to the components of the trigger group. It’s certainly easier to work on the rifle if both hands are free.
Here is the correct placement of the pins in the trigger housing.
Each pin will now need to be removed, and the associated component will need to come out with it. I find that hemostats are very helpful for those with large hands like mine. To help organize the parts, it’s advised to lay them on a white sheet of paper according to their position as they’re removed.
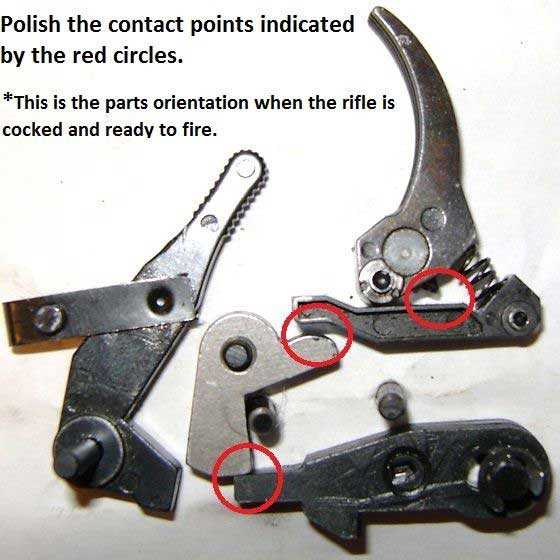
To illustrate the internal layout of the parts, I assembled a jig to hold the pins in the same position they are within the trigger housing. Notice that the shorter leg of the V-shaped sear spring rests against the secondary sear. This is important to reproduce when assembling the trigger group.

These parts are shown upside down. In the rifle, the trigger blade would be on the bottom of these parts.
Now that the components have been removed from the trigger housing, warm soapy water should be used to degrease all the parts. All contact points between the parts should also be deburred and polished. These areas are circled below in red. I first used a fine (500 grit) whetstone to debur and smooth any rough surfaces. I then polished these parts with a very fine (1000 grit) whetstone. Remove as little metal as possible to get the desired mirror finish and be careful not to round any of the sharp edges. The goal is to make the parts smooth and shiny so they’ll slide against each other with minimal friction but not alter the shape of the parts.
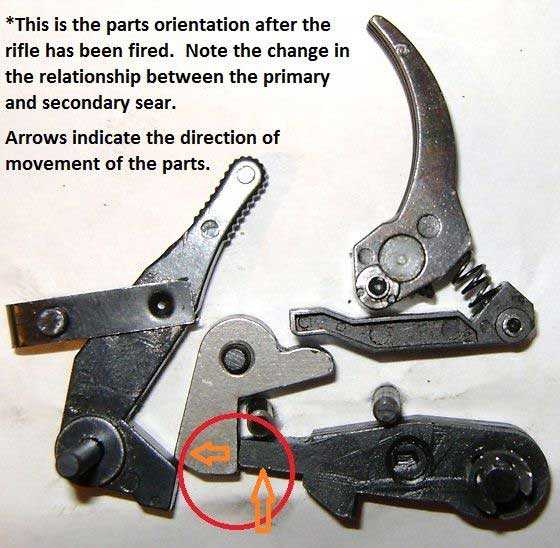
Like the previous photo, these parts are also shown upside down.
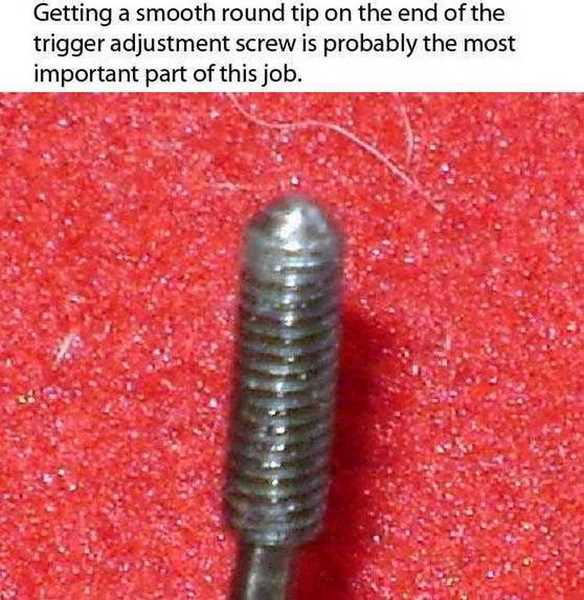
Perhaps the most important part to refinish is the trigger adjustment screw. It comes from the factory with a very sharp point that digs into the tertiary sear where it touches. This galls the metal, and there’s significant drag produced when attempting to pull the trigger in its stock configuration. Simply removing this grub screw with a small Allen wrench and rounding and polishing the end that contacts the tertiary sear will reduce the pull weight by 2 or more pounds, depending on the severity of the galling.
I chucked this screw into my drill and spun it against my whetstone until it had a nice, smooth ball end instead of a sharp point. It should look like the image below when you’re done.
If you are not confident enough to tackle this full trigger job, the trigger adjustment screw can be removed from the rifle without any other parts being removed. That allows you to round and polish the end and install it in the trigger to realize a vastly improved trigger-pull with little work involved.
The adjustment of this screw has very little effect on the pull weight or quality because it allows adjustment of the first stage only. This first stage is not a true first stage because the sears do not move as the trigger travels through this stage. The trigger return spring is just being compressed, much like a Gamo or Crosman trigger. Feel free to adjust this screw to whatever position you prefer. There’s no set rule except to not adjust the screw so far in that it eliminates the first stage. That will result in an unsafe rifle that may cause a bear-trap incident (where the piston releases without the trigger being pulled, allowing the barrel to snap shut unexpectedly).
Assembly of the trigger is fairly straightforward and is the reverse of disassembly. The use of a thick paste-type lubricant on the bearing surfaces of the parts will help decrease pull weight as well. I use Mobile One synthetic open gear lube, but most any paste-type lubricant should work. My Octane trigger group was bone-dry from the factory, which certainly contributed to the very stiff pull weight. Use the pictures to help install the parts and pins in their appropriate locations. The hemostats will come in handy again at this point. I installed washers to remove slop from my components but would not recommend it. The difference is hardly noticeable, and it makes assembly much more difficult.
The sum of these modifications should get the trigger-pull down to around 4 lbs. and make it much more smooth and consistent. After averaging the pull weight from 5 measurements, my trigger has settled down at a 3 lb., 2 oz. pull. It’s possible to go slightly lighter with some modifications of the secondary sear geometry; but because of the required precision and the possibility of dangerous results, I suggest stopping at this point. A 3.5-lb. trigger is quite good for a magnum springer and is ideal for accurate plinking and hunting. I know that my groups have improved dramatically, and I’m enjoying the fruits of my own labor when I feel a crisp trigger-break and see targets fall. I hope this helps you get the best from yourself and your rifle.
Please post any questions, comments or tips you have. I’m curious to see what you think.

Extremely well written and it explains things much better than my rush job comment did, I can’t wait to hear and see what bb’s groups do after he does his trigger up. I know that mine has performed so much better after the little bit of work I put into it.
Michael,
B.B. has the gun on loan from Pyramyd AIR. He can’t do the trigger tune on a loaner.
Edith
Thank you Edith,
I was not aware he picked this one up as a loaner. Hopefully he figures out what is throwing his grouping off i know in his hands we will see what this airgun is truly capable of.
Unless it is introduced as “my XYZ” or otherwise stated to be a personally owned model, it is safe to assume it is a review copy supplied by PA (especially if it is a fairly new model) and expected to shipped back.
What holds trigger assembly on barrel mine seems to move
If you leave a little flat on the trigger screw you can feel the trigger break better. When it hits the flat it feels like a trigger stop. Kind of like what is in the trigger guard behind the trigger on a Marauder pistol. It kind of gives you a positive stop feel on this type of trigger.
And that is what is probably giving the trigger job on this gun the the biggest bennifit of reduceing the preasure on the trigger.
But yes nice article.
Though it is very unlikely that i will ever get my hands on one of these rifles to fettle with, i do however find the way you described the trigger tweak so easy to understand. Hats off to you for one of the best guest blogs i have ever seen, others have been amusing and well enjoyable but yours really cuts the mustard. Straight to the point with superbly illustrated diagrams, if only i could write my blog like you have written this one i would be one happy anarchy beaver.
All The Best and TTFN
Wing Commander Sir Nigel Tetlington-Smythe
Sir Nigel,
I must agree! This tutorial is so well presented that it looks easy to do!. I can’t do it on the test rifle, because it’s borrowed and I can’t ruin the warranty, but if this rifle were mine, I would do this in a heartbeat.
B.B.
Bravo! Well done! You have done such a great job with this that I am tempted to buy one just to try it, and I do not even want one of them!
You have set a pretty high standard for guest blogs now.
Many thanks DMoneyTT, technical writing & pics that would put many manufacturers to shame. I have kept the pics for future reference.
Great blog. Love the pics and step by step instructions. A few days ago I helped a friend mount and sight in the scope on a Hatsan 125 Sniper with the quatro trigger. Nice, well built gun but the trigger pull felt like a ton. I tried adjusting the pull weight as per the manual but it made no noticeable difference. Having learned to shoot on my brother’s Diana 27, I find myself comparing the trigger on all these newer guns to that of the 27 (my first love ).Needless to say they all fall short.
Pete
An excellent tutorial!
Thanks for a good tutorial, DmoneyTT! Nicely done!
/Dave
This seems like quite a bit of work to a new rifle. I’d have expected this to be done during the manufacturing process. When I get a rifle brand new that requires me to do this much to it I consider the rifle as poorly made and I try to get rid of it or I simply toss in in the closet of cheap forgotten guns.
poorly made is a harsh judge considering the rest of the rifle is sound and has no issue that’s like saying having to put a depinger on a marauder makes it trash. Only took me a half hour start to finish it isnt much work at all if you do buy one and decide it’s not worth it ill take it;)
DMoneyTT,
Congratulations on an extremely excellent guest blog which has raised the bar to a new level. Makes us wonder if you are a technical writer or teacher by trade.
John,
I don’t know how to compute the cost of doing all the hand fitting of these trigger parts and what it would do the retail price of this air rifle, but I assure you that I’d rather do it myself and pocket the difference. Perhaps B.B. would give us his estimate on how that would impact its retail price.
Bruce
Bruce,
They need to finish some of the trigger parts better. I haven’t examined them to see how they are made, but that determines what it will cost to make them smoother. Hand-finishing is out on a rifle at this price point.
For example, if some of the rough parts are made by wire EDM, they can slow down the cut, and they can also put the job on a better machine. Either or both options may be possible — or neither one.
Tumbling, alone, won’t do it. And there is no money for even a quick hit on the buffing wheel.
They could look into making the parts by a different process, but that often takes a capital investment that most companies aren’t willing to make. Right now what DMoneyTT has shown us may be the most cost-effective way of doing the job.
Of course in a Value Engineering review they could take that single adjustment screw and refine its manufacturing process to get 80 percent of the benefit at a very low cost. That would be the Six Sigma approach.
B.B.
I’m in the home stretch of nursing school. I must admit that I am an awful forum junkie for airguns, firearms, and cars. I’m glad I can contribute for once, considering how much I’ve learned on this blog. I read every one of B.B.’s write-ups feverishly as soon as I can get to it.
I design and engineer manufacturing equipment and tooling and the issue of final part quality is something that’s poorly understood by those who don’t deal with it on a production basis. That’s perfectly understandable, as it’s a very complex thing.
In this case, the big challenge is the low volume of parts produced for a niche market. Globally the market for airgun manufacturers is worth about $300M and employees less than 1000 people. That is muddied since most airgun manufactures also sell their own ammo and they don’t break sales down by categories so ammo sales are part of that $300M.
That sounds like a lot, but it’s actually pretty amazing that there are more than just two or three manufacturers. That’s not much money to go around, especially when you consider that a lot of the expense is related to purchasing the fasteners and other bits that make up the guns. The trigger adjustment screw, for example, is not made in house. That’s an OTS part made by some manufacturer nobody has ever heard of. Same with any springs and gas springs/pistons and any seals or gaskets. By the time you’ve bought those things in the small quantities you need you’ve spent a chunk of money.
And you’ve still got to build the gun. If you want the finished product to be at anything resembling an accessible price point the parts have to be made as quickly as possible to free the machines up for other work.
There’s no way to include high resolution inspection on a per part basis. You’re going to get random inspection that’s very likely done by the machine operators themselves, not inspection specialists or full on metrologists. The costs would be astronomical at the production level. You think they’re going to make an extra run because the pivot hole in the sear is slightly oblong? Or there’s a burr on it? They’d be out of business next week. I guarantee you I could take a $300 retail gun and do nothing but a part by part inspection and push the production costs well over $500, and that’s just going to tell you what’s out of spec. Fixing the root causes and dealing with the rework are entirely different things.
Inexpensive, low volume things like mass produced airguns only have to do what it says on the box. Here that means if you cock and load it and it shoots when you pull the trigger it passes inspection. If you want more than that it’s available, but are you going to pay for it? Probably not.
The media hasn’t done anyone any favors when they run stories like the Ford Pinto fiasco could have been prevented with a $0.50 part or Samsung could have used non-exploding batteries for just $3.00 more. There’s a lot more involved and the costs run into the millions really quickly. Unfortunately, that’s still true with low volume things but low volume producers rarely have to cash on hand to accommodate those improvements that “only” cost $0.75.
Irritable Badger,
(If) you are new here,… welcome to the blog. Thank you for your insight into quality. I work in quality, so I can relate to many of your comments.
For your information, very few people will see this post. I saw it because I use the “Comments RSS” in the upper right of the page. It shows (any) new post, no matter how old the blog.
Post on the (most current topic/blog) and many people will see your comment. Off topic is frequent and really welcome. Many good, informative things are discussed daily that are off topic.
A real good bunch here and hope to hear more from you,………. Chris
I am new here, thanks for the welcome and the info!
I noticed the old date of the thread, after I was about 2/3 done writing it… I decided it was too late to back out 🙂
I’m also new to airguns and in my lurking on many forums it seemed like this one was probably the friendliest. You’ll see more of me for sure.
IrritableBadger,
Welcome to the blog 🙂
I reiterate what Chris said about posting on the current day’s blog. I too was a quality professional for over 40 years before retiring in 2011. I’m sure we will have some interesting discussions regarding quality, or lack there of. So you’re getting into airguns? There’s more to learn about them than you might think. The folks here can really shorten the learning curve though.
Thanks Geo!
Discovering the depth of the airgun topic was what got me hooked. I’m looking forward to learning more!
DMoneyTT – Very nicely written with great photos.
Very well done! I hope we will see more of your work/ I have saved it on my PC in case I ever own that model. Thanks
DMoneyTT,Nice job.I like the way you cover the pitfalls so we can avoid them .You make it look very plausible for most any one.
I have to laugh at RidgeRunner’s comment as I find myself agreeing with him.This makes me went to get one and do the mod. but I have 3 rifles that are similar so I don’t need one.
My comment for you and others to consider is that this may be a good place to use “Air Venturi Metal-To-Metal Paste 1oz.” PY-A-3498.This is out of stock till late this month but this stuff works well initially and then should work into the metal so that the trigger could keep improving with use and time. I’ve used it and a little goes a long way.I can’t comment yet on how it improves my triggers or linkages over time because I recently used it …but I’m optimistic.
Again,nice job and Thank You.-Tin-Can-Man-
I’ve used Moly before with good results on firearms. I might have to give the stuff you mentioned a try on the Octane. I’m pretty happy with the pull, but being a target shooter and not a hunter, I wouldn’t be upset if it broke a little lighter. I would probably stay away from the secondary sear/primary sear contact point, but it would probably help with the galling from the trigger adjustment screw. Thanks for the heads up!
I would like to add my congratulations to DMoneyTT for a well thought out blog. I understood each and every step, thanks to the excellent pictures with written text. You have set a bench mark for all others who follow with a guest blog. I won’t be owning a Umarex Octane, but I think the instructions should apply to most other rifle triggers. Thanks again.
Ciao
Titus
Thanks for the compliments everyone. I want to give a huge thank you to B.B. and Edith for letting me submit this guest blog. I feel very honored to get to do something like this. I was a little worried that it would be hard to read, or the pictures wouldn’t cut it. I really hope this will help those with Octanes to get better results. This rifle is just way too much fun to have a poor trigger. I tried to cover the basics without going too crazy. The basic principles will work on most trigger groups, but honestly, the Octane trigger is pretty well designed other than the sharp trigger adjustment screw. It’s just tough to have a light trigger with a 25 ft. lb. gas springer. This trigger design would probably be amazing with half the spring pressure being exerted on it. It doesn’t have much creep at all, which is a major plus. I also used some vice grips to slowly bend the trigger blade a little straighter, as I prefer a straighter blade so I can get good contact on the tip of the trigger. Getting good purchase low on the trigger blade gives a little more leverage, and makes the pull a bit lighter.
Anyway, I shot the Octane a little today. The chronograph shows a 10 shot average of 902 fps with a standard deviation of 3. This rifle is settling down very nicely.
Oops. I should have pointed out this was using Crosman Premier Hollow Points averaging 14.37 grains.
Good write up. I wish I had been able to find this a couple months ago. I fell in love with my Octane but the trigger kept getting worse. I’ve done many trigger jobs but this was my first on an air rifle. Air rifles are scary due to the fact that they cannot be dry fired. I always slam the butt of a cocked rifle against the ground after assembly and doing this loaded is something I can’t recommend anybody doing. I spent hours on a few attempts to doctor this assembly, I got the safety in backwards once, I installed a temporary nylon bushing that limited sear engagement(do not attempt, there’s still a hole in something in my shop that I can’t find), I polished parts, and pounded brass washers to shim parts and wasted a bunch of time. Anybody interested in improving their trigger should follow these directions and I’m sure they will be happy with the results.
Did the washers help you much? I experimented with shimming everything, and it did not help nearly as much as I expected. It was just a little more consistent, and a LOT more trouble to reassemble. I was lucky enough to have a very short sear engagement right out of the box, but it sounds like others are having different experiences. I found it interesting that Paul Capello tested the rifle at a little over 4 lbs. I also noticed that he complained of the trigger barely having enough travel to break. I suspect he was either missing the adjustment screw, or it was backed out too far. It would explain the much lighter pull, as the trigger contacts with more leverage without the screw (at least on mine anyway) and has less drag. Unfortunately, it also may not even be able to fire without the screw in use. Mine will not fire with the screw backed out beyond engagement.
No shimming didn’t give me any noticeable improvement to pull weight or anything but eliminating some slop in the trigger and it didn’t even do that great a job with that. Currently the shims aren’t installed and my trigger is doing great without them.
I should mention, the reason I used pictures with the trigger components upside down is that when working on the rifle it will need to be upside down. I thought it would be easier to look at the pics when assembling/disassembling the rifle if they were laid out in the same orientation that the rifle would be in.
In your opinion, would this gun be nearly the same as the Ruger Yukon Air? I kind of prefer wood stocks. Thanks, Bradly
Just a simple comparison of this Octane trigger to the Hatsan Quatro puts the Hatsan trigger way ahead in quality,and workmanship. And the 125 & 135 Hatsans are in the same ball park $$$ and power. In my opinion the Octane trigger looks crudely built. Read somewhere that the pins fall out of the trigger when the rifle is removed from the stock. Anyhow great article for those who have to work on this trigger. Thanks for the good work .
I purchased the Ruger Yukon air rifle and have found that, save for the wood stock Ruger uses (which IMO is very, very nice!), it’s trigger group is identical in every way to the Octane parts pictured here. The trigger on my Yukon is not terrible, but I will be checking the adjustment screw for galling and probably polish the tip as shown here.
The primary sear engagement on the gas piston will be left alone for the time being, until I put a few rounds through it and develop some wear marks on the engagement surfaces, giving me a clearer road map to what will or won’t require polishing. I choose to address sear engagement surfaces very, very carefully.
My thanks to the authors and publishers for sharing this information!
Thanks again for putting this together. I’m putting my trigger together again right now and I can’t find my little piece of cardboard with my Assembly notes. It saved some top notch swearing being wasted on an audience of zero.
Ver dang it I’m bad at following instructions. Is anybody absolutely sure this assembley diagram is correct?
Just finished this… didn’t polish the trigger adjustment screw nearly as much as you did but the job went great. I tried to adjust the safety because of slop from the factory… DON’T DO IT. I had to readjust the U shaped spring steel 3 times to get it to work correct. Whetstone, milspec oil, loctite all the screws holding the action to the stock and be patient! My trigger pull dropped drastically from stock (didn’t measure it yet, but it is much smoother as well). Thanks for the walk through!
Yeah, I tweaked my safety a little too, but I left it out of the write-up because it was such a hassle and I figured most people would just break theirs in with use. Glad you got good results. If you want to go a step further, I added some info below that cut my previous pull weight by more than half. How does 18 ounces sound?
I’ve been shooting my Umarex Octane for about a week.I’m guessing that my trigger pull weight was 6-8 #’s from the factory.Too heavy for my use,but it worked ok.Last night,I worked on the trigger and I test fired the rifle today. I measured the trigger pull weight with a RCBS Ohaus spring pull scale and it breaks between 20-24 ounces with a clean break and a very minute amount of creep.
I am happy with the trigger,but I am having trouble with the accuracy at 25yds. I have tried RWS Superpoint and Superdome pellets,but my groups are not acceptable …. ~2.5″ . I pulled the scope off today and tried the iron sights and the groups were similar as the scope. If I look down the bore from the breech,I can see that the SilencAIR internals appear to be closer casting a shadow at the 6 o’clock position.I am thinking that their might be an alignment problem with the baffles causing my accuracy problem.
Have any Octane users had a similar problem ? Has anyone removed the SilencAIR from the barrel?
Thanks,Barry
Hi Barry,
I have been getting pretty stellar accuracy from my Octane. My best groups are with crosman premier hollow points. My 10-shot groups usually range from 1/4″-1/2″ at 25 yards from a rest. At 50 yards my groups are usually a little over an inch depending on the wind. The rifle is easily more accurate than I am offhand. I would suggest trying crosman premiers and see how it shoots. My rifle hasn’t been ammo picky at all though, so it makes me think something is awry. I would think that several pellets through the tube would make short work of any plastic baffles that may be in their way, but if you have a bad crown it would destroy the accuracy. I have been hesitant to remove my “silenceair” to check the crown because the rifle is shooting so well, and because I think it is designed to be tough to remove. However, there is an allen screw to secure it, so maybe it will remove without much effort. If so, I will probably mount one on other rifles given how effective it is. I hope you have good luck with the rifle. I have found mine to be my favorite all around plinker, and I’m sure if I decided to go after some game it would do the job nicely. Let us know what you find.
I don’t know if anyone is still watching this thread, but I just hit significant pay dirt in my quest to perfect this rifle. I was happy with my original trigger job as described, but after looking over the trigger group for more improvement, I realized that it was as smooth as it was going to get. The only way to get a better trigger was going to be by increasing the mechanical leverage. So, I drilled a new trigger retaining pin hole about 3/16″ forward of the center of the previous trigger pin hole. I had to take a little metal off of the tertiary sear so the trigger would fit without contacting it. I also had to inlet the stock just a bit for the trigger pin to clear the stock in its new forward position. I also bent the trigger blade until it was straighter so that it was a more comfortable reach and a straighter pull. The result is an 18 ounce trigger that is just as safe as the trigger was from the manufacturer. Why Umarex didn’t do this from the start is a complete mystery to me. Maybe they should hire me to straighten their triggers out. Anyhow, thought I would share. Happy shooting guys.
I’d be interested in seeing pictures of the most recent mod if you take the rifle apart again… sounds impressive! Thanks for keeping us updated on the thread!
I, too am very interested in seeing pictures of the new pin location, and the changes to the sear. I completed the original mod this week, and really like where the trigger ended up, but would still like it to be a lighter pull.
Ok everyone, I did the “second” version of the trigger job above, and it works, but I wouldn’t recommend it. The gains in trigger pull reduction were minimal, and it took a LOT of work to get everything relieved to the point that proper clearances were achieved, and I’m still working out the spring geometry and tension between the trigger spring and the tertiary sear so that the tertiary is tensioned enough to return the sear to its correct location to allow the gun to be cocked after you shoot. Currently, the ability to recock the rifle is intermittent unless I put the safety back on “safe” after each shot. If I do this, everything lines up and you can cock the rifle with no problem. The best gains that I achieved were in polishing the sear contact points and the trigger spring tip to as close to a mirror finish as I could. I also lubed the contact points with a TINY amount of waterproof bearing grease. I’m sure there are better lubes to use, but it was what I had on hand and knew it wasn’t going to hurt anything. I’m sorry, but I did not take any pictures while I performed the work, and at this point, I’m not taking the rifle apart until I get more lead through it and settle it in and get it zeroed.
Just bought said gun and trigger pull on mine is very hard also. Just the thing I was looking for, thanks for the great hands-on article and pictures. I will try the trigger screw first.
On taking out this screw, on the card attached to the trigger guard there it states “do not adjust screw in excess of one full revolution clockwise or it may cause air rifle to malfunction”. My question is do you have to could the revolutions when taking it out, and then putting it back?
Thanks.
DMoneyTT, I finally could not take the heavy trigger pull on my Octane, .177 anymore. I could not get a decent group at 40 yards.
Yours is very informative, but after looking a trigger pull problems on UTube, the gentleman had what I think is the cure. The bottom of the sear (hook) is latched onto the gas piston and if this part is rough like his was, you will have a problem. Mine did not look like his and my parts actually looked good, but I stoned them like you said, and I also stoned the bottom of the sear at the hook. Whether the stoning to where you indicated or just the bottom sear stoning helped, I don’t know but my trigger pull is now 5 lbs. 3 ozs. with 3 pulls and measuring with my Lyman Digital Trigger Gage.
Shooting after this at 24 yards, my groups were noticeably different and tomorrow or so I will try and zero it 40 yards.
If it was not for you with your great pictures and details, I probably would not have taken it apart.
B.B. I’m ready to install the leather seal in my QB-36 after soaking it for over a week , I know not to put it in dripping but how much should I dry it off?
Reb
Just blot it with a paper towel and you should be fine. You’re gonna be relying on the oil that it soaked up – not the oil that’s dripping off it.
Reb,
Do what Vince says. Just put it in.
B.B.
Done! it does fit considerably tighter too! Thanks guys!
Reb
Thank you very much for putting up this info…. I had to reassemble the trigger housing…if it wasn’t for you I would be up a creek without a paddle….
I have had this Umarex Octane for 3 weeks now, a few days ago I went to cock the rifle the screw behind the trigger guard come out and landed on the floor, the stock lifted off , I took off the two front screws and lifted the stock off, a few pins came out of the trigger housing, I had to reassemly the trigger parts, one pin either it was on the secondary sear or the one to the right of the sear was bent and this was after 3 weeks of firing 600 pellets, just wonder in time will that pin get so bent out of shape would it interfere with the firing, or cocking of the rifle.
I shot into a phone book that had 1,000 pages at 6 inches away, the pellet went right through the whole phone book. I like this rifle alot, Id say this is one of the most powerful pellet rifles out there I made a pellet trap of which the back is thick sheet metal with an inch of duct sealant, it made a deep hole into the duct sealant. The rifle is long and heavy but it packs a wallop. After so many pellets 600 and knowing how to hold this rifle I am now getting excellent groups about the size of a dime at 50 feet away of which I shoot indoors.
A very well laid out description with pictures…For myself and those who know, this trigger IS one of the best as far as design, pivot points etc. This trigger can be modified in many various ways for those who truly want a custom trigger…For a pellet rifle, I could not ask for a better trigger design…And throw in the price of the rifle vs other brands, theres no way in heck you can beat it…
For those finding this article now, the Ruger Yukon, and presumably the Ruger Air Hawk share this trigger setup. The Yukon parts are better castings and it has a one piece primary sear rather than multiple sheets riveted together. I stoned and polished all three sears and the trigger screw and the trigger is significantly better. The above pics show all the contact points to concentrate on. Stone the surfaces until most of the grooves and imperfections are gone then polish with a buffing wheel. Assemble according to pics and you are done. Very few tools needed. I can’t blame the factory as this type of stuff is what doubles the cost of a gun but there really isn’t a good excuse to not do this yourself and maximize the potential of these guns. To live with it and yet complain means you really shouldn’t be buying these budget guns.
I have shot 3000 pellets through my .177 Octane now but the trigger pull was so awful when I first got it that my finger was sore. I polished and rounded the end of the trigger adjustment screw using a dremel tool to hold and spin it against an oiled fine stone. This made a world of difference in accuracy and consistency with the trigger.
Now I have another problem. The trigger adjustment screw would back out after a dozen shots. When I checked it closely I could see the threads were damaged and stripped the thin tapped part out of the trigger.
I plan to cut off the original trigger adjustment screw and keep the rounded polished end. A new larger diameter set screw with newly tapped threads in the trigger should hold it in position. Is there a better way to do this?
I cannot use the Octane until I fix this issue. Thanks in advance for any advice.
Chaz
Chaz,
A different way that’s not necessarily better is to put a nylon plug in the stripped screw. That makes it a Nylock screw and that might hold it in the hole.
Another way to do the same thing is to severely stake the threads of the stripped screw, so they bite into the threads of the hole.
B.B.
Thanks BB, I cut a thin strip from a plastic wall anchor and jammed it into the stripped hole and forced the original allen screw into position. It held for 30 rounds but still needs a retainer screw.
It appears that the nylon bushing in the trigger is the main threaded part; is that correct?
The original allen screw is metric M3x.5 3.0mm diameter 51 threads per inch.
I plan to buy the tap and allen screw in M3.5x.6 which is 3.50mm and 43tpi.
Do you know if the newest Octanes have a better trigger? This is a hard hitting accurate gun if the trigger was not so poor.
Chaz,
What I know about the Octane triggers was told to me by the Umarex USA marketing manager. He said they know the early triggers’ pins were too loose and they did something to stop them dropping out, but the basic design of the trigger remained the same.
As for the screw sizes, you are ahead of me.
B.B.
Depending on just how bad… You might get away with a drop of LocTite…
(Probably Blue — I think that is the one that can be undone without using a blow-torch)
Baron, Thanks for your suggestion. I already tried the blue loctite and the allen screw pushed itself loose in 3 shots.
Chaz
This is my first REAL air rifle. I was so happy and impressed with the power OMG! and after 30-50 rounds it does get quite enough to shoot in my back yard with close neighbors.
Now, about the worst trigger I have ever had!
I was ready to take mine to a gunsmith and pay $80 to $100 (on a $200 rifle) to do what ever it takes to fix.
THANK YOU for this post! I found it though your blog
My trigger was over 10 Lbs and the worst gritty feeling. I thought this would go away after 50-100 rounds but didn’t.
I took the “two stage” screw out, it was obviously galling, and used my drill with 1,000 grit Emery cloth. Then re-installed with some lube on the tip..(Note, mine is a Phillips not Allen head)
AMAZING difference!!!!!
now feels like 4 LBs max
This made the Octane a pleasure to shoot
I couldn’t be happier to have stumbled upon your post. I have been researching airguns to replace my crosman repeatair due to lack of stopping power, and found that this one has the perfect perks for the price point I decided upon.
I am eagerly awaiting this mini project! I will try to remember to document the process, maybe some before and afters.
Thank you for the very detailed and well put together article!
Glad to see that folks are still finding this write-up useful. I have continued to shoot my Octane more often than any other rifle I own. I actually just picked up a second one to shoot with open sights, or possibly equip with an aperture sight.
I noticed that on the newer Octane the trigger pull is much lighter. Mine measures about 5 lbs and I haven’t done a thing to it. Obviously it will still get the works, but it isn’t nearly as heavy a pull as my first Octane had. The adjustment screw is also a phillips-head screw instead of an allen. It may be that I just got lucky with a nicer trigger, or that Umarex is making some overdue improvements. I would love to see/hear what kind of groups you guys (and gals, hopefully) are getting out of your Octanes. For the most part I get 5/8″ -3/4″ groups at 25 meters, with some occasionally tighter and some a little looser. Crosman premier hollow points have consistently shot the best from my Octane, but if any of you are having success with another pellet please turn me onto it. This rifle is still such a blast!
I am very new to air rifles (had my octane a week!) and have just completed polishing up the trigger pieces. As you describe DMoneyTT, the new rifle had a trigger with the Philips screw and didn’t seem too heavy. I did the trigger job anyway as anything that helps me has to be good!!
The primary sear is different to the one above in that it doesn’t have the cast look too it and isn’t as rough (similar to the tertiary sear (one that trigger contacts) so there may have been a change in manufacture. Still have to watch those slippery pins though. The primary sear does have a line running down the middle that I polished off with stone, 1000 grit wet & dry, 2000 grit wet and dry, then brasso for a good finish. I tickled up the contact between the secondary sear (silver bit) and the primary sear while I was there in the same way. HUGE difference in the pull weight.
Thanks for the pics – even a thick fingered guy like myself can tackle this with a little patience and your info.
Jed, I’m glad to hear that you are new to air gunning, and are already willing to tackle trigger disassembly and modifying your air rifle. I think I enjoy tinkering with my airguns almost as much as shooting them. How are your groups with your new Octane? I picked up a few as gifts when they were being sold cheaply as refurbished units, and found that none of the new ones I bought are as accurate as my first one. I took all my Octanes (5 in total) out today to see which one is the most accurate. I set my rimfire trap on top of a fence post that is 28 yards from my muzzle when I’m at my picnic table that I use as a bench. I fired eight 5-shot groups from each rifle and then found the average group size. My original Octane (that I used for the write-up) produced an average of 0.46″. The next best saw 0.75″ groups, two got 0.81″ groups, and the last groups an average of .89″. If I average the 5 guns together, it looks like the Octanes, as a whole, group 0.74″ at 28 yards. If we do the math, it comes to 0.66″ groups at 25 yards. My first Octane blows that number to bits at 25 yards, but it seems that a fair expectation of a new Octane in .22 should be 0.75″ groups at 25 yards. Now, I found my original Octane loved CPHP’s so that is what I used in all my Octanes, but it is quite possible that my worst-grouping Octane might be a tack driver with a different pellet. Just a thought.
DMoneyTT, I want to thank you so much for your trigger parts pictures. I did your trigger upgrade yesterday and it probably saved my Octane from the dumpster. The original trigger was so horrible it made my finger hurt.
So much better today thanks to your fine detail. I know my warranty is now invalid but desperate times called.
BTW my Octane .177 kicks so hard it has ruined two scope reticles in two years. Umarex replaced both for me.
This great article was written a while ago I see. I am wondering if I can send my Octane, or just the action, to you for service. I would be ready to pay for the service and work of course.
stuball56,
Welcome to the blog.
You are responding to a guest blog. I didn’t do that work, someone else did. But I don’t work on airguns, either.
Sorry,
B.B.