by Tom Gaylord, The Godfather of Airguns™
Writing as B.B. Pelletier
This report covers:
• What color temperatures mean
• Digital cameras changed everything
• Using light
• First, a look at the lights
• How the lights are used
• Light is a key element in photography
I’ve been asked several times to describe the kind of lighting I use to take my pictures. I’ll show you what I use. I’ll also discuss what to do and what not to do with incandescent lighting.
Today, I’m going to show you some uncropped pictures, so you can see what things look like before I clean them up. That may be the most instructive thing in this report.
What color temperatures mean
Light is seen by a camera in a variety of hues called color temperatures. The cool temperature tones are the blues and whites, while the warmer tones are the yellows and reds. This is stated as a Kelvin temperature number, but that’s not something you have to remember. Just remember that bluish-white colors are cool and reddish-yellows are warm.
Back when we used film, we bought our film in temperature ranges, too. There were cool (daylight) films and warm (tungsten) films, and we matched these to the light we expected to use. Sometimes, we had to correct the available lighting with filters. If we were using a warm (tungsten emulsion) film with tungsten (incandescent or indoor) lighting, the picture came out pretty close to what the eye saw — the whites looked white and so forth. But if we used tungsten film outdoors in daylight, everything tended to have a very bluish cast. And daylight films used in tungsten light tended to look yellowish-orange. We used gel filters over the lens to correct for this.
There are other types of light that cause problems, as well. Fluorescent lights cause a greenish cast to the image. Digital cameras usually have settings that can be selected to correct for the lighting — or you can set them on automatic and the camera’s software does all the work. I usually let the camera do the work unless I want a certain effect.
I will not get into reciprocity failure, which is the change in the film’s response to light the longer it remains exposed. I’m mentioning it only because we have several photographers reading the blog, and they may want to touch on the subject. Suffice to say that because film relies on chemistry, things are not as straightforward as I’m reporting. There are many subtleties to consider. Film photographers had to look at more than just the light source and the type of film being used; they also had to consider the exposure time and how that particular film changed as the exposure increased.
Digital cameras changed everything
Digital cameras changed the way all of this works because they have software to compensate for things like exposure time and color temperatures. As long as your camera is set to automatic, the computer is handling everything and you get the best image possible, meaning the image that’s the most neutral. But sometimes that’s not what you want. Sometimes, it’s important to see detail more than it is to see the correct color. Edith and I disagree on this all the time. I always go for maximum detail, with the result that you may see a black airgun with a golden or even whitish cast. She values color fidelity over detail and will correct my images to the right color at the expense of losing some finer points. [Note from Edith: I don’t see any reduction in finer points, so that means I’m right!]
Allow me to show you how this works. The following two images were taken with the same light, but different camera settings.

In this image, I let the camera filter the light for me by using the automatic setting. There was a little daylight coming through a window and a lot of reflected incandescent (tungsten) light shining on the subject. This is a neutral exposure.
For this exposure, I set the camera on daylight. It thought the light on the subject would be daylight; but since it was mostly tungsten, the image has a yellowish-orange cast. Same amount of the same light in the same position — just different camera settings.
But even at that, I can get finer details with a digital camera than I can with a film camera. And Edith can often correct the color balance in Photoshop, so we often both get what we want. I won’t get into that (correcting images) today, but we did look at it to some extent in the last report.
Using light
Your natural inclination is to shine light directly on the subject, but that’s usually wrong. Doing that gives you shadows behind the subject and bright spots (called specular highlights) on the subject. Sometimes, we want shadows and specular highlights for artistic reasons; but when you want to see details, they’re not desirable.
Reflected light is more diffuse. Like the light on an overcast day, reflected light seems to come from all directions and causes no shadows. It’s perfect for showing details. In fact, before I learned how to use interior lighting this way, I took most of my pictures outdoors on overcast days, or I took them on bright days, but in the shadows where sunlight couldn’t reach my subject. I’ll now show you how I use reflected light.
First, a look at the lights themselves
I use a Tota light. Tota is a brand name of the Lowel company that uses quartz bulbs of various strengths. I use 500-watt bulbs in mine, and they last for many years. The Tota light fixture has side reflectors called barn doors that allow me to concentrate or scatter the light as I choose.
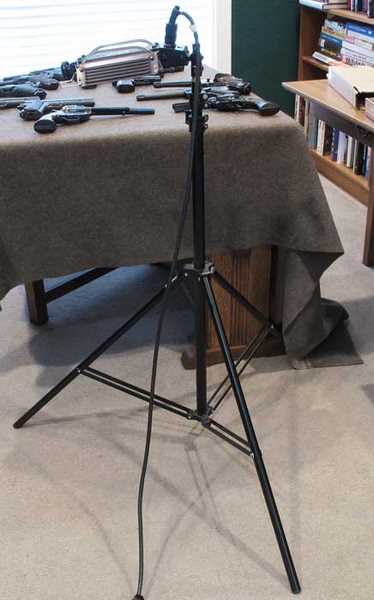
This is one Tota light fixture standing in front of a table full of guns.
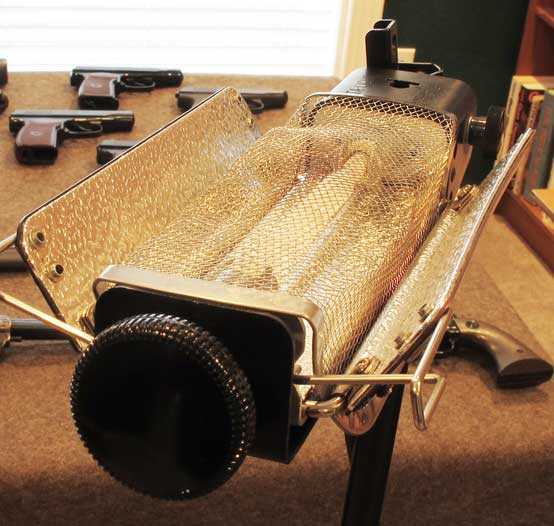
This is the Tota light fixture turned upside-down. It’s jointed to turn in all directions. The barn doors are the flaps on either side of the central fixture, and here they’re closed. There’s a screen over the bulb for safety in case of a bulb explosion.
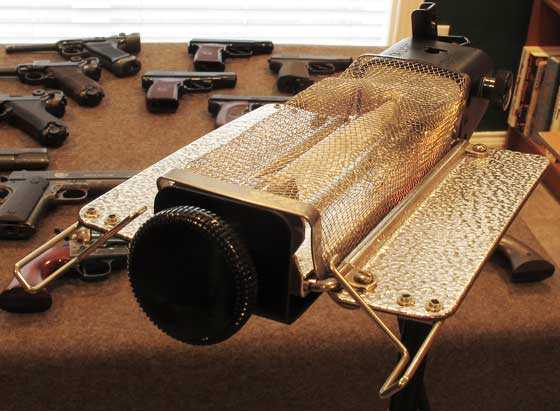
Here, the Tota light barn doors are open to scatter the reflected light wide.

I have extended the Tota light to 7 feet and am bouncing it off the white ceiling. Objects on the floor below will receive scattered light from this. If I wanted the light on the subject to be even more diffuse I would not put the light fixture this close to the ceiling.
How the lights are used
I can use one, two and even three lights, though I’ve never used more than two in the 16 years I’ve been doing this. Since the light is scattered, you don’t need many sources. I normally use one light because it creates fewer problems.
Remember “painting with light,” which I wrote about in another 3-part photography series on this blog? That was a tip I described to you in 2008, where you use very little light over a long exposure to get light on all the places it’s needed. A small $10 tactical flashlight can do the work of $1000 worth of studio lighting, as long as time is factored in. I also showed you what specular highlights are in that report. You can do the same kinds of things with indirect lighting to enhance the effects. Let me show you what I mean.
In two of the next pictures I’m not cropping out anything. You’ll see my feet, the tripod’s feet and various other things in the frame, along with the subject. Several of you asked about this, so I thought I’d show it to you today. The point of the next photos is to show how you can paint with diffuse reflected light like a Tota light and make one light fixture do the work of many. These pictures were all taken using the reflected light you see in the last picture, above.
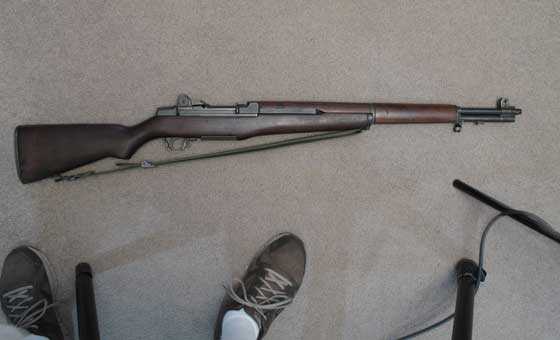
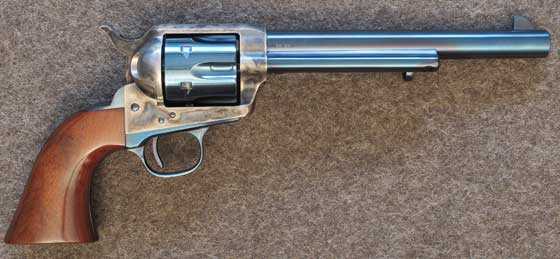
I’m using a single Tota light reflected off the ceiling for this shot. The Garand is illuminated more toward the front of the gun, leaving the butt dark and featureless. Those are my feet, the tripod’s feet and the Tota light’s feet in the image.
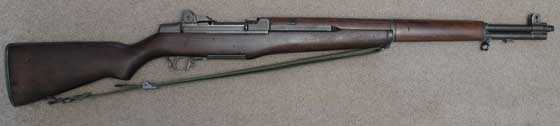
Here is that same image cropped, with the Tota light leg Photoshopped out. If this was going in a report, I might put the rifle on a 45-degree angle to make it larger, and knock out the background to make it stand out. But the butt would still be dark, and fixing it would take a lot more work.
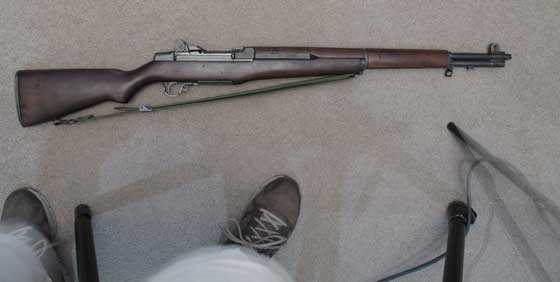
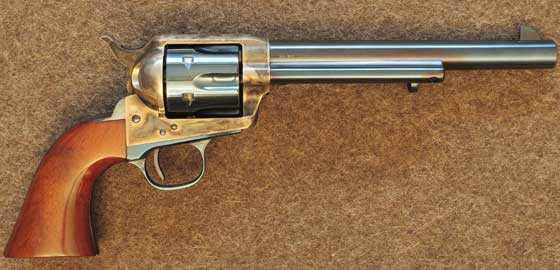
Same image but I moved the Tota light during the 1/2-second exposure. You can see the blur of my pants legs and the legs of the Tota light stand. The rifle is lit more evenly.
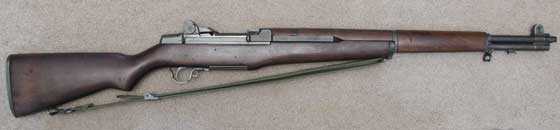
Here, I have cropped the photo with the more even light, and I’ve gotten rid of the Tota light stand’s leg. Notice the butt has some light on it in this image. This will need less work in Photoshop to look good.
I’ve shown you two images with subtle differences in this report. Because of the limitations of the internet (72 dots per inch resolution), I can’t show these differences in their finest detail. But if I were to make the rifle 13 inches long at 300 DPI for a magazine, you would see a much greater difference between the two photos.
Light is a key element in phtography
Product photography is the art of making things appear in images as though you’re seeing them in person. Light plays a huge role in this, and I hope today’s essay has shown you how you can use indirect lighting to your advantage. Tota lights are not expensive, but you can do everything I’ve shown here with common quartz shop lights that you buy at a hardware store.
One of the best images I ever saw that used this technique was of the interior of a dark church. The photographer went in at night when there was no light and simply opened his camera’s shutter. Then he walked around the room firing a camera strobe about a dozen times in different places. The resulting picture looks like the church is illuminated with dozens of bright lights that can’t be seen. The photographer painted that large room with light!

It is very difficult for me to take pictures of things like airguns at my house during the day. I have lots of windows and skylights and always get highlights. At night I have had difficulty with my lighting, but had not thought of the quartz lights. I might have to give them a try this evening if I have the time.
It probably would not hurt to get some software also. Kathy has been wanting some for some time now anyway. With her birthday coming up, I can use that as an excuse. “Look Dear, I picked you up Photoshop. Happy Birthday!” 🙂
Thanks for this additional “photographing airguns” information. You are letting your readers in on some valuable insider tips.
Many years ago, Ray Sasser (Dallas Morning News outdoor editor), was writing a story on IHMSA big bore handgun silhouette shooting and my 10 year old daughter, who had just shot the first 40 X 40 for a girl junior. He was photographing my dad who was at his work table, reloading cartridges for us. All Ray had was the strobe on his camera, which would have resulted in very harsh light for the picture. He took the strobe off of the camera and held it against his forehead and bounced the light off of his skin. The resulting photograph was a very softly lighted and appealing photograph.
Thanks, BB, I’ve been waiting with bated breath for the next installment! The Tota lights aren’t unreasonably priced, but were still out of my price range as I was wrapping up my Winchester MP4 photos. I ended up getting a cheap Cowboy Studio 85W kit, and still had to get better bulbs (LimoStudio 85W) than what was included. And it still could be brighter. If I was doing it over again, I’d have forked out more for a single Tota light and bulb, and added a second as soon as I could.
Great job, again. I learn something new with every blog post. You should wrap up this updated series with some Photoshop basics: cropping, brightness and contrast, and the the stamp tool and wand. Photoshop Elements gives a pretty good bang for the buck for those who can’t afford the full version. My #1 tip here is that while Photoshop is fantastic, you still want to start with as perfect a photo as possible for best results.
HiveSeeker,
If anyone is planning to buy Tota lights, please consider this:
Tota lights get really, really, really hot. You shouldn’t move them while they’re hot.
One of the lights mistakenly fell over while still hot — the carpet is partially melted in that spot where the light kissed it for just a few seconds.
If you have young or rambunctious kids and/or pets, make sure the Tota lights can be left undisturbed while hot and cooling off.
Regarding Photoshop tutorials, you may be interested in this page: http://www.photoshopcstutorial.com
I’ve used those tips more than once to create some interesting effects. Very useful site.
Edith
Whoops — posted my response without picking the “reply” button, so it ended up on the main thread…
Edith
I just checked out the link and that’s exactly what I need. That should definitely help me understand photoshop better. Thanks.
Thank you, Edith. When I was shopping around, the Tota product warnings were a little scary, as was BB’s mention of the exploding bulb screen! Though I still wish my bulbs were brighter, they’re fluorescent and are not very warm.
Thanks for the Photoshop link. My wife’s a regular Photoshop guru, so she’s my “tech support”. Anything I know, I learned from her!
Tom, I think these blogs on gun photography are so great. But I have to confess, I am not completely satisfied with the pictures I sent for the Rossi blog. For the next part of it, where I hope to send pictures of the trigger mechanism, I am particularly worried that I will be able to capture all the details.
Let me ask you something: the combination of white fluorescent light with yellow incandescent light can bring any benefits? Let’s say, a rooftop fluorescent light combined with an incandescent bulb in a table spot light?
Fred_BR,
Daylight fluorescents and incandescents are far apart in color temperature. They will fight one another. Put the camera on automatic.
Most digital cameras use light better than film cameras, so you can get by with less light than you think. My friend Mac filmed the U.S. Declaration of Independence through glass using 3 foot-candles of light in the U.S. National Archives Rotunda and got a picture that is worthy of being printed. He used the same camera I used for today’s report.
B.B.
Any photography grade stand light is going to be hot (even the special “full spectrum” flourescents will get warm — I have one but never put it into a socket; the bulb is almost a foot long, and 5-6 inch diameter… Something like 150W [remember — this is a flourescent, and they normally run 1/3 to 1/4 the wattage of a tungsten bulb for the same light output).
I have a pair of quartz-halogen photo lamps in storage; I never used more than one at a time as putting two 600W lamps into a bedroom with no air flow would be insane. Setup can be seen: http://home.earthlink.net/~baron.wulfraed/mugshots.htm#pointers (scroll up) Even with a 600W bulb bounced off an umbrella about five feet from the subject the exposures required a tripod (1/20s or so at f4.0). I keep saying I’m going to buy a set of Alien Bees (a pair of 800s and a 400, or some such combination). Even though the studio strobes don’t really put out that much light (I think the 800s are really the equivalent of a 400W bulb for a 1 second exposure), they dump all that light in a small fraction of a second (1/500s or shorter)… Presuming a linear response, 400W@1s would be equivalent to 1600W@1/4s, 16000W@1/40s (you see where this is going).
BB
So bouncing the light off the ceiling spreads the light out more which should eliminate bright spots on a metal surface of a gun. Is that right?
And I do have a couple of those halogen lights that have folding tri pod legs that are adjustable from when I was working on cars all the time. They should work then I guess.
And my new phone has flash options (set on auto), focus and exposure adj. (slide to adj. as needed), panorama view (which is off right now) and HDR which is set in auto.
What does the HDR do or mean? And if I was to use the halogen lighting I should probably turn the flash off or leave it in auto I guess. And when I was checking what the focus and exposure adjustment did it basically made the picture on the phone screen become brighter or darker. Brighter would be more exposure then I suppose.
And photoshop is something I haven’t used but want to learn more about. I know I messed with the options they have on photo bucket and for me its real easy to make my picture look worse. I guess the only way to get any where with that touch up stuff is just use it and practice or is there some basic rules to follow. Maybe photo bucket should be a blog in itself.
I know too many questions at one time. But dog gone it I got in my mind that I’m going to be able to take good pictures when this is over with. But I’m sure they will never turn out as good as yours BB.
GF1,
There was a time in 1994 and ’95 when I couldn’t take a picture to save my life! I avoided them at all cost in the newsletter. I hired a photographer to photograph my R1 for the book.
Then I bought books on photography and discovered that most authors cannot write. They had helpful hints that the authors could not get out of their heads and onto paper.
Then I met Mac and everything clicked. By the time I met him I knew how to do everything wrong, so what he said made sense — it was the opposite of all I had been doing.
Yes, you have it almost right about reflected light and yes, those work lamps will work, but even then you may get some specular highlights on the subject. You have to play with the placement of the lights. That is what a digital camera lets you do — move the lights around while you watch through the viewfinding screen.
HDR? I haven’t got a clue. Go online and look up the manual for your phone.
I’m glad to hear this has helped.
B.B.
BB
I noticed that on my other phone if I would move the phone in different positions and the object also that it would change the quality of the picture that I seen on the phone screen.
One of the things I noticed with my new phone is that the focus and exposure adj. allows me to get closer to a object and make it stand out more and look much sharper on the phone screen. So I think I will have more luck with this phone and its more like my wife’s digital camera.
I think I will be on the right track now anyway but I need to just start taking some pictures and experimenting with the lighting and camera adjustments.
And I just looked at the link above that Edith posted and maybe the photoshop wont be so much of a mystery to me now.
And of course I’m getting something out of it. I get something out of every blog you right everyday. 🙂
Now if I could get my fingers to to type the same thing I think.
It should be every blog you (write) everyday.
GF1,
HD=High-definition. It takes up a lot more memory, but it’s worth it if you’re taking pictures that need to show detail. I don’t use HD if I’m just taking pictures of the cats. I DO use it when I take pictures for the blog (yes, I’ve done that before).
Edith
Edith
I should of known that. My gosh everything is HD now days.
I will have to take a picture of the same object with the HD on and another with it off to check and see how good it works with my phone camera.
And that should sharpen up the picture and bring out the details a little better I suppose. I hope it helps because with my past history of up close picture taking I need all the help I can get. 🙂
In Photography, HDR means “High Dynamic Range”. HDR is a method for processing several images taken a varying exposures. I use http://www.hdrsoft.com/index.html
to get photos like this: http://hornerbuck.smugmug.com/Photography/Gordons-Top-Ten/8554187_XhGTXm#!i=563436691&k=34dt58B&lb=1&s=L
Gordon,
Magnificent images in both links. I can’t even come close to anything that good!
Edith
I like how the chamber pot adds it’s sense of realism to help remind us of the not so finer things in our lives!
Gordon,
That shows the difference between a picture-taker and a photographer. Excellent!
B.B.
Hi, folks. HDR techniques can also be used on single images, particularly when shot in RAW.
-Jan
Jan
What does that mean?
Gordon Buck,
Your Plantation Bedroom photo is a true work of art. It’s beautiful.
G&G
Thanks to all for the compliments. That particular HDR image is by far my best work. I’ve not used HDR procedures for photographing airguns — a bit gaudy sometimes.
These days, there are cool running LED photo lights – some are even battery powered. The LED lights tend to be weaker than the older tungsten type lights. Shiny surfaces are tough. The trick is to have the light source appear to be larger than the object being photographed (like when BB bounces the light off the ceiling). In the case of air rifles, the rifle is relatively large. I’ll bet that air rifle product photographs are made using several lights with large “diffusers”. For example, a large bedsheet might be placed between a strong but small light and the rifle. The light actually “lights” the bedsheet which softens the light to the rifle. But the simplest approach is to wait for a cloudy day and do the photography outdoors.
GB thanks for that info.
I will have to try the white sheet and also the cloudy day trick.
High Definition though is defined in terms of TV resolution: old NTSC being 720×480, “full HD” is 1920×1080. In photography terms, that’s still LOW resolution — 1920×1080 HD is only 2megaPixel (which is also the resolution of a high-quality 4×6″ print). Early web-cams and cellphones were NTSC or just a bit higher resolution. Pretty much any phone can now produce HD — even my nearly 2year old Blackberry produces 2560×1920 resolution in camera mode.
As my earlier post indicates, I suspect the “HDR” means in-camera High Dynamic Range processing.
High Dynamic Range is (originally) a scheme that uses two or more shots of the same scene, done under varying shutter speeds (the intent is to get a shot where the highlights are blown out, but the shadows have lots of detail, followed by a shot where the shadows are solid black, but the highlights have details, and then maybe a few where the midtones have details). Using 16-bit color (I think), processing then masks out the non-detail regions and blends the images together. Finally, a remapping is done to distribute the color detail into what an 8-bit color image can support. The remapping is where some odd effects can come in, as the dynamic range begins to look unnatural.
Hear ye, hear ye!
Pyramyd AIR is now stocking single-shot trays for the Benjamin Marauder air rifle in all 3 calibers:
/product/air-venturi-single-shot-tray-fits-benjamin-marauder-177-cal-air-rifles?a=5315
/product/air-venturi-single-shot-tray-fits-benjamin-marauder-22-cal-air-rifles?a=5316
/product/air-venturi-single-shot-tray-fits-benjamin-marauder-25-cal-air-rifles?a=5317
Edith
Edith
Thanks that is definitely good to know. I got the Crosman trays in all my Marauders. I got mine back when they still made them for all 3 calibers. So that’s good to know.
And I totally believe in the single shot tray’s. I just made that one for buldawg out of a piece of derlin and it turned out way good. His guns a .22 cal. gun so I should wait to see what he says after he gets it. But I shot about 3 fills on my Hatsan which is .177 cal. with the tray and it did make a difference in the groups the gun shot. They were fore sure better groups than what the clips produced. And I was able to go to the 25 shot per fill that my Hatsan gets verse’s having to stop at 20 shots because I didn’t want to shoot a half a clip.
And one more thing about the trays you just posted. What are they made out of. The picture almost makes them seem like its a type of hard foam of some type. Which I don’t think they would of made them out of that. But do you know if it says anywhere what they make them out of. But anyway that’s good they have them available for all the calibers. I think the only caliber that Crosman makes now is the .177 tray for the Marauder.
GF1,
When I first saw the pictures, I told Pyramyd AIR that they look like they’re made of styrofoam and painted black :-\
I’ve asked them what they’re made of. I’ll let you know what they say.
Thanks,
Edith
Edith
Ok thanks.
Edith,
Looks like a very high density plastic to me.
G&G
Maybe someone there saw my comment about using a 3-D printer, and is printing these things on demand…
Wulfraed
Don’t think that is 3-D printing. The stuff I have been checking out about 3-D printing seem to have a nice surface finish. The finish on them air venturi trays is terrible. I think that they are probably plastic injection molded. I may be wrong but to mass produce other than the 3-D printer. I don’t think anything else could put out enough volume of parts other than injection molding.
My tray that I made for buldawg is slick. All the surfaces on his tray were done with a #4 center drill, a .240” drill and a1/2 carbide end mill. All on a Bridgeport. Even the angle I put in the ramp of the tray so the pellet will roll down to the probe area. Its not a flat tray like some of the trays that are being produced right now. And I left the wall higher than the pellet on the left side of the probe. That way you load the pellet from the right and it cant do nothing but locate in the probe area of the tray. The other flat trays that are made today could allow the pellet to fall out of the left side of the tray if the gun is tilted to much to the left. No way that can happen with the tray I made.
Thank you Edith, I thought they stopped making them permanently and was looking for answers. Awesome heads-up!
I forgot to say the .177 will also fit the Crosman MAR177 AR15 upper conversion kit:
/product/crosman-mar177-ar-15-upper-pcp-conversion-kit?m=2703
Edith
Nice collection of lookalike air pistols on the table in the background of the photo with the Tota light. Future article or blog ?
Robert,
I’m staging my display tables for the Ft. Worth airgun show on Sep. 6. By putting the guns together I can write interesting signs for each set. This is the first of three displays.
B.B.
I believe that BB has accidentally revealed his biggest photography secret: More guns! I’m getting started on that immediately.
The one in my 953 seems to be made of the same Hycar rubber as the Crosman pump cup seals and works well I wouldn’t wanna try milling that stuff though,I think the Delrin or maybe Nylon type plastics would be easier to work with.
Reb
Reb
I have to machine rubber pads at work on the Bridgeport for different things and they are various shapes and sizes.
You know what we do. We put them in a freezer over night and machine them the next day when they are still frozen. Just like machining metal or plastic once the rubber is frozen.
That sounds like it oughtta do the trick!
Gunfun
I just checked the tracking on the tray and it is in Birmingham as of 5:14 pm today and is now in transit to me in the Anniston post office so I will have it tomorrow.
I cannot wait now to be able to try the metal mags out and see if they are accurate in the hatsan. I sure hope so because they will definitely be a deadly pellet if there are accurate. I so hope they are because turkeys beware if they work as good as I hope they will.
The ringing in my ears is back to a low level that I can deal with finally, but being in bed all day means I cannot get to sleep now. I wish it was 2:30 pm tomorrow already cause I would have the tray to keep my mind of the tinnitus.
Let you know tomorrow haw they shoot.
Buldawg
buldawg
Good I hope you do get it tomorrow. Hopefully before the rain sets in.
And I hope we got the tolerances right for your .22 cal. gun. I just hope it fits your gun the same as it fit mine. And tomorrow we will for sure know if they toleranced the .177 and .22 cal. guns the same in the clip area. And remember I opened that dimension to .240” in the tray where the pellet sets in the probe area. I think it should be a smooth transition for your gun.
Now I will be thinking about that all day tomorrow and waiting to hear from you with some results. First if it fits and functions. Then the accuracy stuff.
Gunfun
I know it will be here tomorrow because when it is in Birmingham I always get the items the next day.
I have all the confidence that it will fit perfectly and work just as good, I am like you now I will be chomping at the bit till the mail runs and I can get my hands on it to try it out and doo some shooting with it.
You will know as soon as I have some info to report.
I guess I will stay busy drilling and taping my end cap for 2240 conversions to keep my time occupied and be able to test both the hatsan and 2240 at the same time.
Its not supposed to rain here much tomorrow just slight chances but is going to be hot and humid. It will be Friday or Saturday when I go to machine my 853 barrel for the 177 2240 so next week will be busy testing and I have some 10,5 CP for the 177 to test with also.
Will let you know as things progress.
Buldawg
buldawg
OK good deal. I hope I can make my tray tomorrow. Or at least get started on it. I definitely like the idea of having the single shot option.
And I don’t know if you seen it or answered already over on the blog about “Things you need when you by a PCP” when you were talking about the swaged bullets/ammo/pellets. But read the comment I left you over there.
And I got to be hitting the sack. Got to get up at 7:00 am with the kids in the morning. But talk to you tomorrow.
Gunfun
Yep I got your reply to my post about the swaged bullets in the 2240 blog and left you one as I was going to bed also.
I just checked the tracking on the tray and it is out for delivery so I will have it today.
Got to get busy on my adjusters now but will let you know when it get here and how it fits later this afternoon.
Buldawg
buldawg
I will be waiting to hear from you.
Gunfun
I texted you at 1.58 pm today because the rain that I had said was done did not listen and the power went out right when the mail came so I sent you a text.
I got the tray and it fits like a glove and the metal mags just drop in like they were meant to be there. I got to shoot it once before the rain went sideways and ended my shooting session. Hatsan could not have made the tray any better because it is a perfect fit. I would have sent you a post earlier but we had to go get the grand son from school because his mom has got strep throat so we will have him until Monday.
I just got your reply to my text.
I am getting ready to shoot some now as the sun is back out so I will get you some more and will talk to you later tonight.
Buldawg
My camera is digital but it’s around 10 years old. When I take a picture I normally need to create my own filter by taping a doubled over piece of paper to the flash or I get a really washed out picture. It might not be right to do and I’ve probably horrified somebody into cameras but I adapt and overcome. It works so that’s what counts to me.
I bought a Motorola Razor HD because of the better camera and video quality but have trouble using the HDR especially in florescent lighting. I usually take multiples with different settings to get the best picture/airgun-video. Another great aspect is it has a built in editor so I can modify pictures to make them better, that has saved quite a few pictures so far…
I’ll try this one more time. I’m playing “BB” here. This fellow posted this plea to a blog that was 8 years old. I told him to come to the current blog but this is what he needs help with:
Gene Says:
August 19, 2014 at 7:07 pm
My best friend who is dying, had a Buzz Barton BB gun when he was a kid. He always talked about it. I have found a rifle to give him, but I cannot find a sight tube. I wand to give it to him for Christmas.
At almost any price, can you please help me find a sight tube ?
Thank You. Gene Small Albany, Oregon
Hopefully, he’ll come to this blog or if anyone can help, he posted on the Buzz Barton blog from 2006
Thanks for doing these blogs B.B. they are very helpful although I can only do so much with my phone camera and no lights. We all want to be proud of our airguns and show them off. Your sharing of this info shows what a good guy you are.
Thanks again,
Mark N
I’m going to risk annoying Tom and probably Edith by correcting a glaring and ongoing error constantly and continuing on every website dealing with any object short of the Grand Canyon and the pyramids. (Note the spelling. 🙂
This would include any object with straight lines (like say, a Garand) or any three-dimensional object (like say, a portrait of your high-school senior.)
Ever wonder why the Garand doesn’t look as good in the picture as it does in real life? Ever wonder why the teenager (or anyone else) doesn’t much like the (budget) shots you took, saving them a few bucks not spent on hiring a pro for this non-reproducible moment?
( Reminds me of the time I muffed a wedding and had to reshoot the wedding the following Monday. Everything went okay on Monday but I had to get Saturday’s obligatory soused Uncle drunk again just make it look real.)
The key here is understanding perspective. Not meaning to be overly critical of Tom’s otherwise supurb product photography, but he’s using a lens that’s too wide and he’s too close to the subject. Just getting “everything” in is neither correct nor acceptable. Careful analysis of the Garand photos shows both the butt and the muzzle not only rendered unnaturally too small but each as a quarter view receeding off into the distance showing side views when the should be showing a proper frontal (or more properly, plain) view.
Historically, old line photographers taking pictures of linear subjects, (like say, graduating seniors) learned to wrap their subjects around the camera using chalk marks and a rope attached to the camera tripod to keep the subjects at the same distance. But you can’t do that with a Garand. They’re straight and nothing the photographer can do is going to change that. Even photoshop will not make it right.
We’ll come back to why your graduating daughter hates the pictures you took later, but it amounts to photos taken with a normal or wide-angle lens will make the point closest to the lens disproportionately large.
That means your hyper-sensitive teenaged daughter won’t forgive you for making her nose look way too big until she’s 42 years old.
Fortunately, it’s an easy fix. Zoom the lens of your incredibly inexpensive point & shoot as far as it’ll go,
and step back about twice as far or more until evereything you want is in the pic is in. If you have an incredibly expensive DSLR, do the same. If you’re using the incredibly archaic Minolta SRT101/Nikkormat FTn/Canon FT-QL with the 135mm F2.8 lensed film camera that the guy at the PX in 1969 promised would last forever…do the same.
Physically move back and zoom in. Sorry to say, that may also mean adding another extension to the former garage/rec room.
But hey, we all must make sacrifices to our art, right?
103David
I remember the chalk marks and rope for some reason. I think it was when my dad was taking pictures and maybe it was my earlier school year photos. I can’t place where exactly I remember that from.
103David,
Ouch! Do I hear Mac laughing? 😉
B.B.