by Tom Gaylord
Writing as B.B. Pelletier
Part 1
Part 2
Part 3
Part 4
Part 5
Part 6

Diana 45 is a large breakbarrel spring rifle.
This report covers:
• Barrel must go on
• Piston into the tube
• Piston liner and cocking shoe go in
• Install the barrel
• Install the trigger
• Install the barreled action in the stock
• Quick function test
Barrel must go on
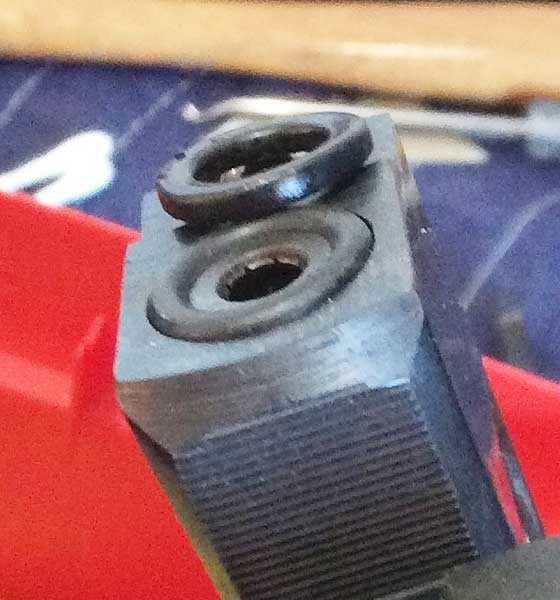
I’ll pick up where I left off in the last report. To assemble the parts, the barrel has to go on the spring tube. During disassembly, I’d noticed during that the breech seal was flattened and hard, so it was replaced before anything else was done. It’s just an o-ring with a steel spacer underneath, so the old one was pried out and a new one was pressed into the groove.

The old breech seal is out and the new one is in.
Now, the barrel goes onto the spring tube. This is necessary because I’ll put the barreled action back into the mainspring compressor to assemble the gun, and the barrel needs to be on for that. The cocking link that’s connected to the baseblock on the barrel must be connected to the sliding piston shoe at this time, or the parts cannot be assembled. So, a number of things must happen in sequence.
Piston into the tube
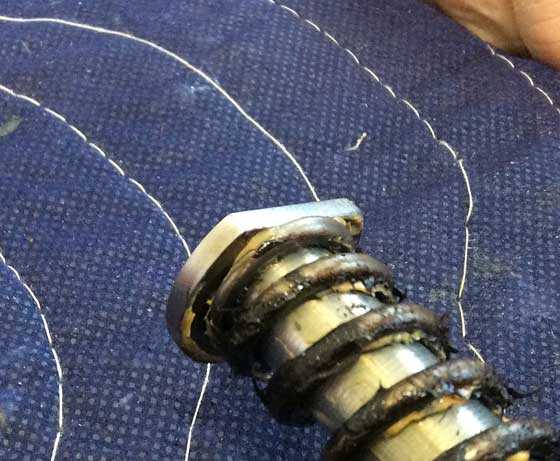
First, the piston goes into the spring tube. The buttons hung up on some cutouts in the spring tube and had to be forced past them, which sliced off a portion of one button. Fortunately, no great damage was done. Those cutouts are the reason that I don’t think a circular piston ring of Delrin will work in this rifle.

The inside of the spring tube has several cutouts that caused problems when installing the piston. Once the buttons were past them, the piston slid smoothly and was still very tight in the tube.
Piston liner and cocking shoe go in
Once the piston is in, the piston liner and cocking shoe go in. Now, you’ll see why I lubed the liner.

Remember this part? It’s smaller than the cocking slot in the piston, so the black piston liner is what holds it in place. During assembly the shoe goes into the piston. Then, it’s raised to this level, and the piston liner is slid underneath it.
To install the piston liner and cocking shoe, the shoe needs to go on top of the liner as the liner slides into the piston. The shoe doesn’t fit through the spring tube cocking slot without tilting it sideways, so do that and then level it out when it’s inside the piston. Pull it up so it’s stopped by the spring tube cocking slot. Now, slide the piston liner into the piston until the front edge of the cocking shoe is above the piston liner. Once I got the liner started, I held the shoe in place with a screwdriver as I pushed in the liner under it. The greased liner came in handy at this point.
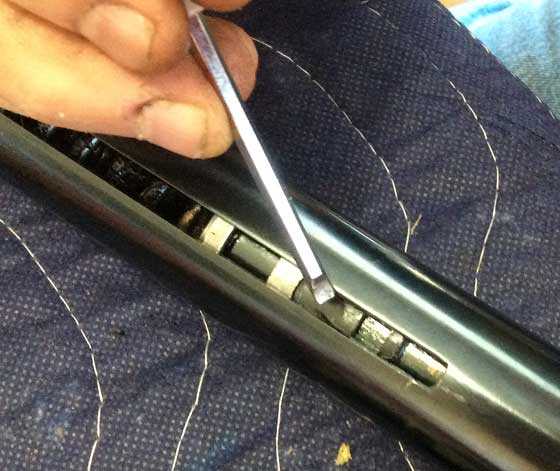
The cocking shoe is held in place by a screwdriver, while the piston liner slides underneath.
If you were confused by my description of how to install the cocking shoe — good! I hope you never have to do it. This procedure is like building a ship in a bottle and is one of several reasons why I do not recommend the Diana 45 as a first-time airgun tuning project.
Next, drop in the washer that goes in the end of the piston liner. Push the lubricated mainspring into the liner and piston. The spring will seat the washer square at the end of the liner. Now, we can connect the barrel again.
Install the barrel
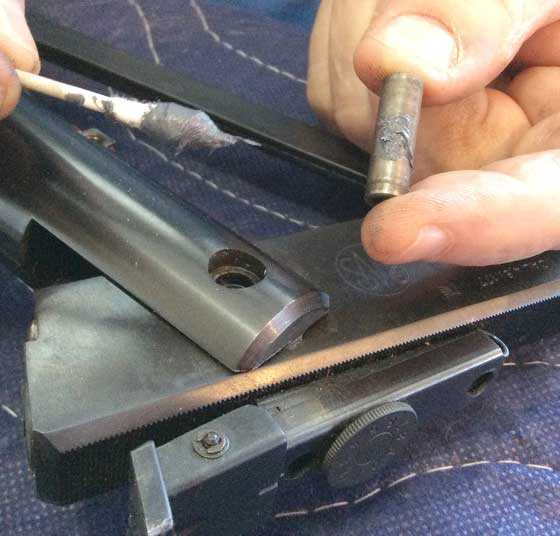
The first step is to connect the free end of the cocking link on the barrel to the cocking shoe. They just fit together without fasteners, but the fit is very tight. Once together, they won’t come apart — once the barrel is fastened in place.
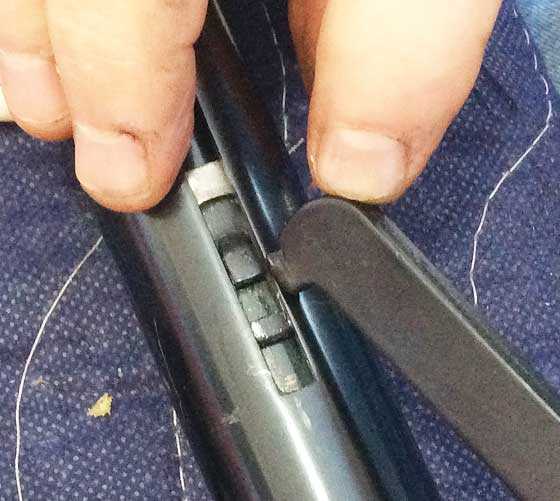
The cocking link has a notch on the end that locks into the cocking shoe.
Once the link is locked to the shoe, you can move the barrel so the pivot hole in the baseblock aligns with the holes in the action forks. Before slipping the baseblock into the forks, coat both baseblock washers with moly. That holds them in place during installation, and it also lubricates the sides of the baseblock when the barrel pivots.
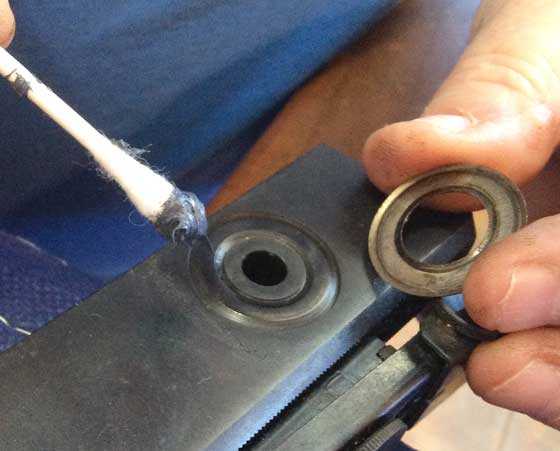
Lube the baseblock washers with moly and install them in the block. Remember — each side has a different shape!
Now, lube the pivot bushing and slide it into the pivot hole
Lube the pivot bushing with moly and slide it into the pivot hole.
Now, the pivot bolt gets lubricated with moly. Most breakbarrel guns don’t have a pivot bushing. The pivot bolt serves as the axle on which the barrel pivots. There’s no special advantage to having a separate bushing like this, but it does increase the number of parts you have to deal with and makes the gun more complex.
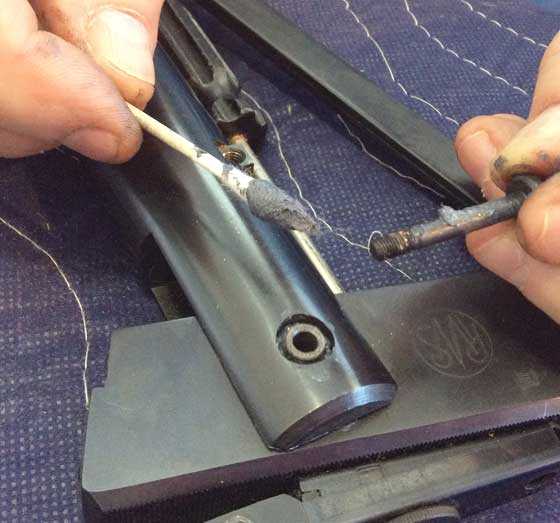
Lube the pivot bolt with moly and slide it through the pivot bushing.
Screw the pivot nut onto the end of the pivot bolt and tighten the bolt. When the barrel stays in any place in its arc, the pivot bolt is tight enough.
Screw the pivot bolt nut onto the pivot bolt threads. Now, tighten the bolt until the barrel stays where it’s put.
Install the trigger
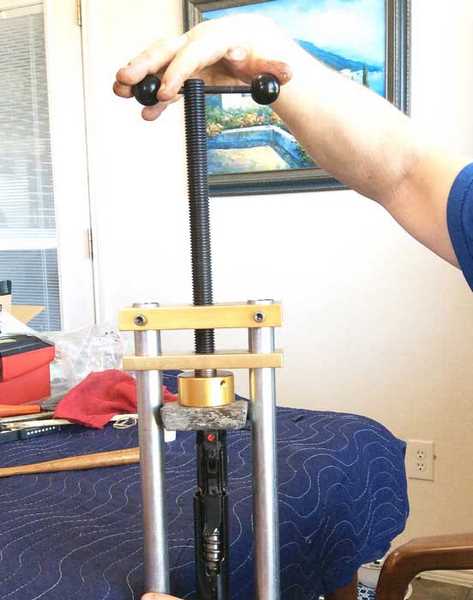
The barreled action is now put into the mainspring compressor, and the compressor is adjusted to center the action. That way the trigger group can be pushed straight into the spring tube.
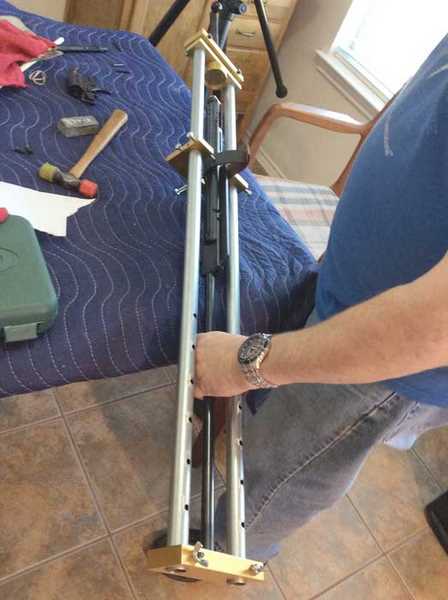
The barreled action is installed in the mainspring compressor.
Two things align the barreled action in this mainspring compressor. First — the barrel presses against an aluminum bar that has a raised spot in its center. The raised spot enters the crown at the muzzle of the barrel and holds the gun centered when it’s under spring tension.
The other alignment feature is what I call a bridge. On this compressor, the bridge is a set of 4 bolts whose tips are adjusted to hold the spring tube in perfect alignment with the screw ram of the compressor. That way, the thrust force on the trigger group is aligned with the spring tube, and the parts go together straight. I use a heavy piece of leather to protect the finish of the spring tube.

A thick leather belt section protects the spring tube from scratches made by the ends of the centering bolts.
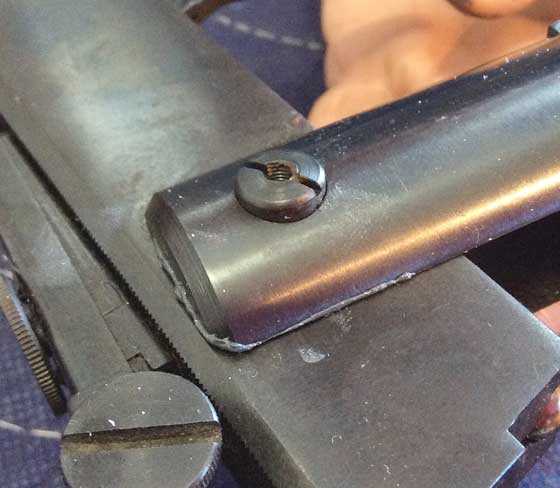
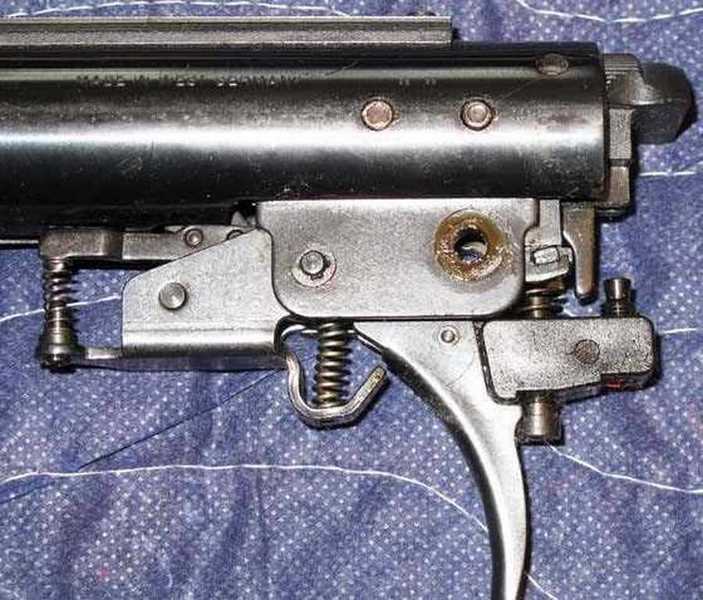
The final step is to install the trigger group. When this is done, pay attention the the flat on the base of the spring guide. It aligns with the bottom of the trigger group and keeps the guide in place. If you don’t align it, the gun won’t go together. Another “ship-in-a bottle” maneuver!
This flat on the rear spring guide must be aligned with the flat surface of the trigger group.
The trigger group with safety bar is installed in the compressor. I use a lead block in the compressor to keep from marring the plastic of these parts — mainly the safety bar.
Now, the compressor screw is wound and the trigger group enters the spring tube. The goal is to align the two crosspin holes that we saw in disassembly. Use a strong flashlight to confirm alignment of the holes, then press the rear pin through its hole first. There’s a leaf spring inside the safety bar, and this pin opens that spring for the front pin to slide in.
When I say “press” or “slide,” I really mean to tap the pin with a plastic hammer. These pins do go in easily, but the spring tension inside the safety bar takes a little forcing to get them through. This is yet another “ship-in-a-bottle” maneuver.
These 2 crosspins in the spring tube have to be knocked back through the spring tube and trigger. Put the rear pin in first to open the spring for the front pin.
Install the barreled action in the stock
The last pin that goes through the trigger assembly hasn’t been put back yet. First, drop the barreled action into the stock and press it down until the hole through the side trigger assembly aligns with the holes through the stock. It helps to align things with a slave pin or a pin punch. When the holes are aligned, drift the last pin through the side of the stock.
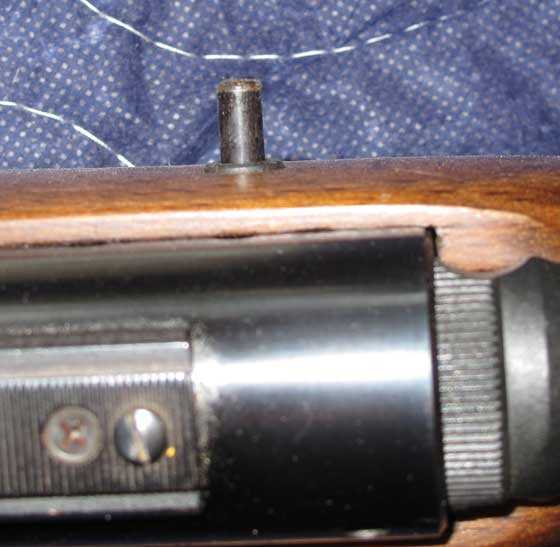
The crosspin that holds the barreled action in the stock is drifted back through the trigger group and stock.
Finally, tighten both forearm screws and the job is finished. Or, is it?
Quick function test
I can’t tell you how many times I’ve reached this point, only to discover that the gun would not cock for some reason. Maybe the new mainspring was coil-bound (too long when fully compressed to allow the sear to catch the piston), or maybe one of those several “ship-in-a-bottle” maneuvers was done wrong. Whatever the case, you aren’t finished until the rifle can be cocked and fired without incident.
I did cock the gun and everything seemed fine. Then, I fired it, and it did shoot as it should. There were 3 detonations at the beginning, then about 25 shots that dieseled to the extent that I could smell the burning oil. After that, the rifle settled down and acted like it had before the tune — except it is noticeably smoother.
I would like to tell you that this rifle no longer vibrates when it fires. That was the goal of this tune. But alas, it still does vibrate. The amount of vibration is about half what it was before the tune. And it has been going down since I started shooting. It was at 75 percent in the beginning. I have hopes that it will continue to smooth out as it breaks in, but I doubt it will ever be entirely free from vibration. As of now, I’m attributing that to the leather piston seal. I think this design has passed the point at which a leather piston seal is able to function smoothly. Or, perhaps, the Diana 45 is a design that cannot be made perfectly smooth.
In the next report, I’ll chronograph the rifle so we can compare it to what it was doing before the tune. I didn’t want more power, but I do want to know where the gun is at this point. This is where I’ll end things today.
One last thing. I hope this report has convinced you to NOT take apart your Diana 45! That was the purpose of all my “ship-in-a-bottle” remarks. This is a complex spring piston rifle that would not be ideal to learn on. But if you must do it, I hope I’ve shown you all the tricks to the job.

BB,
With a good spring compressor I would take one on, but alas, I have none.
Thanks for these reports. Even if we do not tear our toys apart and try to “fix” them, there are many tips and tidbits we can glean along the way to help us keep our toys working properly.
I guess because the leather seal requires oil to remain supple, it does limit the power level at which these can be used. I use a light silicone oil for my seal on my BSA. I have a good little quantity and it seems to work great.
The original manual says to lubricate my seal with a couple of drops of oil every 50 shots or so and also if it has not been shot for some time. I question whether it really needs it that much, but I do like to give it a couple of drops every couple of months. I guess if it was shot as much as some were back then, it might need lubing a bit more often.
RR,
Until I started slathering on lithium grease, all my leather seal guns needed frequent oiling. Now they shoot and shoot without a drop.
B.B.
Uncle would you please help me
I have diana airgun 45 all parts are working quite well infact gun,s acuracy is also better
But the issue which i face is that my gun brakes the spring i have lost three springs that broke…wh
Joseph,
I don’t know if you can import an aftermarket spring for an airgun into India, but the Brits have several that won’t break. The Diana springs are too hard and they have a reputation for breaking often.
Try John Knibbs:
https://www.airgunspares.com/store/department/67/AIRGUN-MAINSPRINGS/
B.B.
B.B.,
Thanks for another excellent set of instructions and shared wisdom on this project.
So, if it ain’t broke, don’t fix it. But, if it is broke, we now have an excellent and complete set of instructions to follow. I am looking forward to your test results.
Morning B.B.
RidgeRunner I second your thoughts on his spring compressor and wonder who made that well designed piece of kit. I appreciated the ship in the bottle warnings.
Mr. B.
Mr. B.,
I worked with Dan Bechtel, the owner of B-Square, to design that mainspring compressor. He based it on the compressor I designed and wrote about in the R1 book.
B.B.
Great report BB!
Quite a bit that I did not understand, but the one that I am not too embarrassed to ask, is; When do you use Moly and when do you White Lithium grease?
Thanks again for a great series of reports! Can’t wait to hear how it shoots…..
Yogi
Yogi,
Welcome to the blog.
I use Moly when there will be metal to metal contact and possibly high friction or a great load. Lithium is for the leather seal — to keep it soft and pliable. I also put it everywhere the lubrication needs are lower — as in not so much friction or pressure.
B.B.
Nice report BB. Since I don’t have a spring compressor I sure would not take one down. That goes for most other airguns too. I will do some simple work on them but leave the more complicated things to the experts. I have done a fair amount of work on firearms but this is a whole different world.
Mike
Mike,
Here are condensed instructions of how to make a mainspring compressor from my R1 book:
/blog/2006/07/spring-gun-tuning-part-3mainspring-compressor-continued/
B.B.
Hello BB
If memory still serves me, I recall your B-square spring compressor listed in the “accessories” section of one of the on line airgun dealers I frequent here in Canuck land. This would be about 6 years ago when I first started getting serious about shooting adult airguns. Of coarse I hardly gave it a second glance as I had no intention of taking one of my airguns apart then. Fast forward 3-4 years, when I started taking then apart to properly lube the various internal parts. Many times I wish that B-square spring compressor was still available, especially for my HW80. I have a hand made version that is barely adequate, so I’m glad to see you have provided instructions for making a proper spring compressor.
I’m looking forward to seeing the results of the Diana 45 tune. Also, I admire the way you show us in detail the various stages of break down, and assembly. Just a few more reasons I read this blog every day with my morning tea.
Ciao
Titus
Titus,
Yeah, I remember when we were trying to sell the R1 books, everyone thought $22.50 was too much to pay. But about a year after they were all sold, I had people pleading with me to sell them one at any price.
The time to buy something is when you see it.
B.B.
One of the best responses I’ve seen. Prophecy.
Two biggest human motivators are:
Fear of loss, i.e., something has gotten away from me.
Desire for gain, i.e., I can profit.
kevin
BB,
Many (if not all) steel main spring airguns has a piston head with a rubber-like seal at the end. Doesn’t this slows down the piston upon firing compare to the old FWB 300S which has metal piston rings like a car’s piston?
Joe,
If, by “rubber-like” you mean a synthetic seal, then yes, a lot of airguns today come with them. But they have nothing to do with slowing the piston. That is done by the air the piston compresses. That’s why metal piston rings work just as well.
B.B.
B.B.,
Can you please list a few air guns that you would recommend for someone wanting to learn the basics of disassembly, tuning and reassembly?
Thanks for all you and Edith do for the community.
Jon
Jon,
The TX200 Mark II is probably the easiest to disassemble. But it also doesn’t have to be tuned.
Most Weihrauch except the HW95/Beeman R9 are relatively easy. The HW underlevers are more complex.
B.B.
Thanks B.B.
What inexpensive guns should I keep my eyes open for at garage sales, flea markets, pawn shops, etc.? I’ve never done a disassembly/tune/reassembly so I’d like to start with some relatively inexpensive things in case I mess something up.
Jon
Jon,
Inexpensive and easy to disassemble are pretty exclusive things. Look for Dianas (other than the 45) and Weihrauchs and Beemans (but not the Chinese-made guns). The worst are BSAs and Chinese-made guns, though some Chinese guns mimic Dianas and should be okay.
B.B.
Will do.
Thanks again B.B.
B.B.
I bought a Crosman Vantage as a project rifle I thought it would be a good first tune since it was inexpensive, (paid about $68.00 for it). You don’t mention any Crosman’s in your list so am I looking at turning this gun to junk if it try to tare it down?
Also thought of trying to tune my Ruger Air Hawk since it is a clone of the 34 and Vortek now has a tune kit now.
Oh thanks for the plans for the spring compressor I’m going to head to Lowe’s and pick up to parts tomorrow 🙂
David
David,
These are both Chinese guns and I don’t care to tune Chinese guns as a rule. They have too many burrs and are often oddly sized, which makes them a challenge to get right. I stick with the guns that have more standardized parts like Diana, Weihrauch and so on.
B.B.
Hungarian Relum Telly’s are probably one of the easiest guns to tare down and work on imo
Thanks James. I’ll keep my eyes open for those too.
Thanks B B
I wish that your efforts could have eliminated the vibe, I really like my rifle but eliminate the vibe and the shooting experience will be much more enjoyable, on par with the very best of springers.
I am not as eager to tear mine down given the complexity/gain. It is both accurate and powerful at the moment.
I have not seen any other tune info on the netscape, I wonder if there is anyone else out there who has successfully tuned the vibe from one of these?
I am hoping a few hundred shots will further smooth things out.
Thanks again!
Rob,
Thanks. I haven’t seen any other tunes posted, either. I’m sure many thousands of tunes and rebuilds have been done.
I think if I had known how complex this rifle is, I would have had second thoughts about going inside. Although I will say that everything is straightforward. You have to do the right things at the right time, but it isn’t like taking a Haenel 311 apart.
B.B.
While we’re on the subject of all things springer,something that I’ve found it’s just as important as the artillery hold for great shooting is to pull the trigger with the tip of your index finger not the middle of the first joint. My shots stopped drifting to the right when I did that. It’s amazing how shooting an airgun regularly can help correct 40 years of bad shooting habits.
Brent,
That lesson also applies to shooting many handguns for the same reason.
B.B.
To whom it may concern,
To begin with, I do not own a Diana 45, but I can’t imagine the Germans designing a piston for an airgun in which the leather seal could not be readily replaced. Some have said that there is a cross pin in the piston somewhere behind the swaged area. I would strongly recommend looking for this before doing anything else such as grinding or milling of the piston tube in order to release the head (maybe). Sometimes a cross pin can be hard to spot. This would be the logical place to start if indeed one exists. If it comes out, it can be driven back in or even replaced, no harm, no foul. It sounds to me that this is a five piece assembly, with a cross pin literally being the “key” to disassemble it.
If you cannot detect the presence of a cross pin visually, there is a product called Spot Check. It is comprised of three chemicals, a cleaner, a penetrant and developer which will identify any cracks or anomalies in the metal and outline them. It is a chemical version of Magna Fluxing.
P.S. To those of you who were going to tear the assembly apart, replace the oil impregnated piston seal and then weld it back together, what do you suppose the heat transfer from welding is going do to the new seal?
Bugbuster
Bugbuster
That’s why might or tig welding would need done.
It uses Argon gas to cool the part as your welding.
Suppose to say mig or tig weld.
Gunfun
Tig welding would be best as it keep the heat much more concentrated in a smaller area so there would be less distortion from the heat, but you got to have an experienced Tig welder to be able to lay down a stack of dimes to be good.
BD
Buldawg
I tig and mig weld at work all the time.
😉
Gunfun
Well then you don’t need to find one then do you. I tried to learn while at Harley and my problem was I could never focus in on the puddle fast enough before it was a lake with a huge hole in the middle so I was just never any good at mig or tig welding unless you like bubble gum welds now those I am an expert at .
Just got email from Lloyd and he is pressurizing my tubes tonight and if they hold till Thursday I will have then Saturday for 120 so they are paid for and should be here by Saturday .
I am like a kid in a candy store as I get my other Titan tomorrow and my disco/hipac tubes Saturday and I am going to put my firepower back together today and call Gabe and see if he wants to make the trade for the 2240 regulated bottle gun.
I just got way to much going on all at once it is making my head spin in a good way.
BD
Buldawg
I had a small wire fed mig welder at home put it wasn’t cooled with Argon.
The mig and tig welder at work both have Argon. Definatly better than the one I had at home without Argon.
And as far as heat goes the thinner wall if the tube would absorb the heat quicker than the big piece of metal that the piston head is made out of. So it wouldn’t get as hot as the tube. And the thinner the metal is the more you have to leave time for cooling so you don’t warp the thinner metal.
That’s like if I use a cut off wheel at work on the surface grinder. The part that I have clamped in the vise will not be hot. But the part that I cut off and is laying on the magnetic grinding table will burn right through a shop towel like a hot iron.
And that’s another reason why the seal on the piston head should not get damaged if the piston head was welded to the tube.
Gunfun
I have a Lincoln 140 mig welder here at home and can do ok on 1/4 inch thick metal or more but if its thin like 1/16 inch then I just burn holes thru it as I said I cannot focus in on the puddle fast enough to keep from burning thru the metal.
In Tig welding you can concentrate more of the heat on the thicker piston than on the thin tube so that it will not distort the tube as easily.
Yea the piston head could easily be welded back on without any damage to the leather seal just make sure it has not been soaked in oil or lubed before the welding as it will catch fire. Welding gloves are made of leather so they don’t burn easily so the seal should not either.
BD
Buldawg
Yea I got rid of my wire feed I had at home.
I guess I welded with the one at work to many years and got use to the Argon whatever it may do. Because I sure couldn’t get the same results with the one at home that didn’t have Argon.
But I still got my trusty oxygen and acetylene kit.
Can’t let that go. Put to many quarter panels on cars before I knew what a mig or tig welder was.
But yes there should be no reason for the heat from tacking those 3 places to transfer enough heat to hurt a leather seal if its dry like you say.
Gunfun
The Lincoln mig welder I have here at home has the gas hookup with it as well and I have everything but the bottle of Argon to hook to it and the argon keeps any oxygen from being able to contaminate the weld as oxygen will cause air pockets and oxidation to form on the welds.
I took classes at Harley to learn to weld so I know what is required but my eyes just do not cooperate to allow me to weld worth a darn.
But I will keep my welder as I have some friends that can weld good and when I need something welded they only have to bring themselves as I have the welder and equipment to do the welding.
BD
Buldawg
I try to not weld anymore if I can help it.
Trying to protect what I got left of my eye sight.
gunfun
I know just what you mean as I tried some welding at Harley after my cataract surgery in both eyes and I did not realize how much the cataracts were acting as sunglasses by shielding my eyes from bright lights so the first time I tried to weld even with the helmet it was like looking directly at the sun through a pin hole in a piece of paper.
So no welding for me either anymore not that I was any good to start with LOL
BD
Buldawg
Cataract surgery will be something I will need comming up. Hopefully not real soon though.
Not looking forward to that either.
Gungun
its not that bad you are out of work one day and right back to go the next day and it is a world of difference from being 20-225 and 2- 215 in my eyes to now 20-20 in both eyes.
It take 8 ,minutes per eye and their is no pain just a little pressure and discomfort, for me the worst part was needing glasses to drive and see far away and taking my glasses off to read or work on the PC typing and then after the surgery I can see far away perfect but need magnifying glasses to see anything closer than my arms length so I have magnifying glasses at every place in the house of the right power so I can see what I am doing at that place like at my PC I have one pair at the desk I pay bills I have another pair and at my air gun work table another pair and then a last pair out in the garage so I can work on stuff out there .
BD
GF1,
Actually, your above reply did not sound right to me and i did a little research. There are six different gases which can be used with MIG and TIG welding, Argon and Helium can used in both. MIG can also use Carbon Dioxide and Oxygen and TIG Nitrogen and Hydrogen. These are called shielding gases, which are used to shield the weld from air which can cause porosity, splatter and other unwanted effects. If two or more of these gases are mixed in the proper ratio, it can actually greatly enhance the quality of the weld! NONE OF THEM HAVE ANYTHING TO DO WITH COOLING THE PART BEING WELDED!
Bugbuster
Bugbuster
Think about the last part of your comment.
“If two or mor of theses gases are mixed in the proper ratio, it can greatly enhance the quality of the weld.”
To produce a good quality weld the heat has to be right for both metals you are welding together.
And its true I’m sure about the info you searched and read. But here is what I know and not what I have read.
If I run out of argon when I’m mig or tig welding I know immediately that its going low and getting ready to run out.
First I see it. The puddle of weld will get brighter in my welding lens/face shield I wear. Next I can actually feel the heat increase by my hand. And yes the next thing that will happen is I start getting more splatter.
And I know if I weld and forget to turn the Argon on the metal will start to discolor to a blue black color around the puddle. When the argon is on that blue black color is not on the pieces I weld. And when the metal starts to change colors that means it’s getting hot.
That all sounds heat related to me. Call it what you will. All I’m saying it is what I know I have seen when I mig and tig weld.
I got a oxygen acetylene welding and cutting torch at home and use it at work. And that is what you have to watch when you braze is the metal discoloration. You’ll warp sheet metal real quick if you don’t pay attention to how hot your getting things.
GF1,
What you say makes sense, in the absence of Argon or the other shielding gases, the quality of the weld will suffer due to the inter reaction of the undesirable gases present in air . It would be akin to trying to stick weld without flux on the rod which serves the same purpose. I AM NOT A WELDER but I know some damn good ones. Also,I am well aware what can happen when thin sheet metal (especially) or even thin plate for that matter is over heated, even sandblasting can seriously distort it if the metal is thin enough, such as automotive body panels. Hopefully, we are on the same page now.
Bugbuster
Bugbuster
I do believe so.
🙂
I think the cooling effect is due to the absence of oxygen. When the gases are not present oxygen gets into the picture causing the increase in temperature. Am I correct in believing this?
Siraniko
And I do believe you are right.
The Argon is a shield.
Bugbuster
Also forgot that you would only need to put the weld in a small spot in the 3 places that were milled out.
The weld would have to be strong enough to hold when cocking. The spring would try to push the head out of the piston tube that you are attaching it to.
When the gun is fired the piston head would try to push into the piston head tube.
So it wouldn’t take much welding to secure the head.
GF1,
I fully understand the dynamics of tension and pressure in this application, what I don’t know is how the piston is held to the rear when cocked. Is it held by the cylinder portion of the piston or the rod inside it? It will make a difference, over time and use. In my opinion, it would be best to leave the swaged head alone and after some careful measurements, machine the piston head off and replace it with a more conventional leather or synthetic seal as you have already suggested. The only fly in the ointment is the hardness of the metal in the piston head, it may be drillable with a solid carbide drill, but, since taps are not carbide (at least I am not aware of any), it may be impossible to thread!
I am amazed that someone who reads this blog has not weighed in on this, surely, someone has done this before, and it should not be this complicated to replace a minor but very important expendable part. As I said initially, the Germans build great products and I believe everyone is missing something here.
Bugbuster
Bugbuster
When the gun is cocked that is when the spring is compressed. That is when there will be pressure on the head that is when there will be the greatest chance for the most pressure to be on the head of the piston.
I don’t understand how you don’t think that it is.
And I’m very sorry to say that I drill and tap hardened metal almost every I got to work.
Yes I use a carbide drills and yes taps are high speed steel. And yes I promise you I tap threads in hardened material. I’m not talking case hardened either. I mean hard steel.
Bugbuster
Oh and the rod usually latches. The spring is basically pushing against the piston head.
I think I miss understood your question.
GF1,
Yes you did. This was the information I was looking for, thanks! In my post, I should have said compression rather than pressure, my mistake, it was a poor choice of words.
In all likelihood, I doubt that any metal in a piston would be as hard as two that I had encountered years ago which were new OEM John Deere parts. They were harder than Woodpecker lips, trust me. One was a hardened sleeve that I tried to tap, uh uh. The other was a tie rod end and the carbide drill wouldn’t touch it. I was attempting to drill a small hole in it so that it could be greased with a needle tip.
Bugbuster
Make sure to pull seal off before welding.
Has anybody seen the new economy pellets from Predator.
They are called PDG pellets and come in the popular choices. Like dome, hollow point, pointed and wad cutters.
$6.99 on most for 500 pellets. Some cost more or come with less. Looks like they come in .177 and .22 caliber.
Gunfun
yea I saw the PDG and am thinking of getting some of those 22 caliber Bombs and Destroyer pellets as the Destroyer are just about identical the Eley magnum pellets I found a few months back that the hatsan loves.
The only difference between the Eleys and the Destroyers is the Eleys are 30 gr and the destroyers are 26 gr just like the bombs and they are real cheap.
I am even thinking of trying some of the round headed 177 pellets as I have four tins in my cart right know but am waiting to see if the 40 likes the CP 7.9s I have coming.
BD
Buldawg
Oh yea I forgot about the bomb pellets.
Preditor brand pellets tend to be pretty good pellets. So I’m going to keep my eye out and see if anybody tries them all and see what they think before I buy some.
Gunfun
yea I am looking at the destroyer pellets real hard as they are just a 4 gr lighter pellet than the Eleys I found that my hatsan shoots at 850 fps with 48 fpe so they are some powerhouses and I know they are accurate to 35 yards but have yet to test at fifty . The JSB 25.xx gr pellets shoot right at slightly over 900 fps in the hatsan so those 26 gr destroyers should be real close to the 900 fps mark as well and if they are as accurate they will be my hunting pellet of choice as spring turkey season is very close and I got 115 acres all to myself to hunt them on.
BD
Buldawg
If you get any of them let me know what you get and how they work.
Gunfun
I will do as it may be awhile with my tubes being ready and paid for and those 7.9 pellets I just bought plus the other Titan my money for pellets is run dry right now.
BD
Buldawg
I think I’m going to be in the same boat for awhile after this move.
About 98% sure were going to get that house in the country. Going to make final decision tomorrow. But everything looks like a go to me.
Things have been falling right in place for some reason.
Gunfun,
I hope you get the house. I’m real happy for you. Nothing like the country and no neighbors up yo’ butt. Good luck.
I see you going BIG bore next,..in fact,…I can see it now,…” The other day I was out shooting my tuned super cannon and was getting 1/2″ groups at 150yds”……… 😉
Chris, USA
It will be great we are aproved. I just got to sign on the line.
Its what we want. But you know how it is like when you sign. You want to but you keep thinking what if. Then the more you think you start doubting.
But then I think back to when I was a kid growing up on my dads farm. And then I realize it is what I want. And my wife and kids like it. We go camping here and there in the summer and my younger daughter says dad it will be just like camping all the time put the house will be close buy to go to the bathroom. I said yep your right about that.
And yes I’m definatly interested in a big bore.
And wouldn’t that be cool if that could happen. But you now me I would give it my dardenst to try to make it happen.
🙂
The 1/2″ group at a 150 yards that is. 🙂
Gunfun
Its pretty much the same for me since I now have a hearing date for my SSD and will have the boxed 7.9s today as well as my Titan .
I just got email from Lloyd that one tube held 2000 psi overnight and second one is pressurized and if it holds they will be shipped tomorrow and I will have then Saturday.
I hope you get good news about the house in the country so you can start the ordeal of packing up to move, but once its done you will be much happier I am sure . And since its only a few miles away the packing does not have to be as intense as if you were moving cross country.
Hope it all goes well as I am off to the wife knee doc to get her another lube job in the knee so it slides instead or grinding.
BD
Buldawg
I dread thinking about the packing and loading and then the unpacking and unloading.
But yep when its done and over it should be enjoyable out there.
Gunfun
I know that all to well even though its been 15 years since I have moved and luckily I had a bunch of weak minded and strong backed friends that were easily bribed with all the beer they could drink after the moving was over so it went better than expected.
I know when it all done and over as you said you will be much happier there and it will be a much better incentive for me to convince the wife we need to come see you since you will have a pool now. LOL
BD
Buldawg
As I said before if your traveling this way you better stop by.
And then you can try out some of my guns too.
Gunfun
Your address is already in the trip planner so not to worry we will make it there before you know it especially when the wife hear you have a pool that see can sunbath by and take a swim to cool off. You will be shooting some of my guns as well because I will be traveling with them or at least as many as I can get in after the wife put all her stuff in the car. it may be better to take the truck as it will carry a lot more guns.
BD
Gunfun
I went out pawn shopping with my friend that’s wife just passed and got me a Centerpoint 4 x 16 x 40 AO/RG scope that is a 150 dollar scope for 30 bucks and it has the locking turrets that when you get it sighted you turn the locking knob and it prevents the turrets from being accidently hit and moving out of zero and you can also loosen a set screw and rotate the turret caps to the zero setting after it is sighted in and secure them with the set screw at zero.
I was needing a scope for my new Titan so it will fit it perfectly and the battery for the red/green illumination is still good as well. Happy camper for sure as its looks just about brand new.
BD
Buldawg
The wife and kids are already bugging me the first thing I got to do is get the pool up and running.
But yep we can have a heck of a time out there shooting.
Gunfun
Yea the wives can sun bath and we can shoot till we are seeing double.
BD
Gunfun,
Chrony and a can of Pred. Metal Mags on the way. Plus 3 new pellets.
On the 499,..per P.A.,..”Daisy does not have all the parts to build ’em”,..for any one interested,…thus the back order status.
Chris, USA
Good you can let me know how the .22 caliber metal mags do.
I just wish they made them in .25 caliber.
That would be a nice combination for my .25 caliber. Marauder with the single shot tray I have in it. Plus the fpe that it produces would put the hurt to some coons and ground hogs.
Gunfun,
Got the chrony and 4 new pellets plus another can of 15.89 JSB’s.
All I can say is the Pred. Metal Mags look “staight up wicked”. As nice of finish as any pellet I got. We’ll see.
Of course, I will test them all and put em’ through the “Splat-O-Matic” test as well.
Surprised you did not “weigh in” on the “Splat-O Matic” and pellet weighing and head measuring talk between Buldawg and I. Got an opinion an any of the 3 ?
Chris, USA
You guys were going to town so I was just listening.
But I think its called splatology if I remember right when BB and others was talking about it.
But I do want to know how the metal mags do. I got the .22 caliber LGU and the FX Monsoon that’s .22 caliber also.
Matter of fact. Can you tell me the overall legnth of the metal mags so I can see if they will fit the Monsoon’s magazine. And I guess I can look and see how many grain they are. But if it says on the tin let me that to if you could.
Gunfun,
.426, of which is part of a .120 tip. Pictures do not do ’em justice.
My test is not “splatology” in the traditional sense. It is a controlled test. Repeatable and easily measured. No gun.
While it does not tell you the hardness, it does give you solid results on the pellets you have. (amount,%, height reduction, under a given weight, at a given distance)
Ever weigh or head sort?
Gunfun, 17g, ooops, sorry
Chris, USA
Thanks for the metal mag info.
I did sort for head and skirt and weighed about a year after I got back into airguns.
What I found was that when I found a gun that was shooting a pellet with good group results that when I did the sorting of the above mentioned things. That I got good results if I sorted or if I didn’t sort.
Where I noticed what made the biggest difrence in groups. Was when I bought a few tins of pellets with different head sizes of the same type and brand of pellet.
In other words I got the better groups when I found the right pellet fit to the guns barrel.
Pellet weight didn’t seem to matter as much as pellet fit did back when I was trying to figure what made the most difference in my guns.
The best I can say is sort and shoot groups then shoot from the same tin unsorted pellets and see if your group changes enough to matter to you.
GF1,
Pyramyd AIR is unsure if they’re going to stock these, but Airgun Depot has them now.
Edith
Edith
Thanks and that’s how I found out about the PDG pellets.
I get their emails.
And again. I wonder how good they really are.
Gunfun,
Ran outa’ room above. Yes, you are right,…shoot and see.
As it turns out, the pellets I have shot are at the bigger end of the offered head sizes in that brand.
As for sorting or random,…and shoot same,..my guess would be that those have the (tightest tolerances) on weight and head size. Just a guess. But do they?
Will play with the chrony this weekend.
Think about lead softness/hardness and any impact on shooting.
Out’a here, catch up with you on a cuurent post! 🙂
Chris, USA
I stopped weighing pellets because that didn’t seem to make as much difference as pellet fit made.
And if I’m testing pellets now days in a gun. I shoot from the tin as is. If they ain’t grouping good or I get some shots good and some not with the main group I will measure them for head and skirt size. If they are consistent to each other then its probably head and skirt size to small to engage the rifling.
But if the head and skirt size is varying if I grab a handful and check them. Then I probably won’t use them pellets. If the head and skirt size varys then more than likely so will your shots.
I like to feel the head engage the rifling with a slight drag when I load the pellet. I can pretty well tell how that pellets going to shoot by the feel of how it loads.
So for me and what I have seen with my guns is fit seems to make more of a difference than weight.
Again that’s me. Other people may have encountered other results.
A very inexpensive spring compressor can be made with a 8 or 10 inch C clamp with the fixed end cut off.
Then get a 2 by 8 about 5 feet long and draw a line in pencil down the center lengthwise and , drill two 5/16″ holes on the long side of the C clamp after cutting off the fixed leg and thread the screw all that way back to the end of the threads into to place the pushing end just a couple threads from tight against the threaded end. Then place the C clamp on the board with the threaded ram inline with the pencil line you drew down the center of the wood with the pushing spindle just about 1/2 inch over the end of the board so the you will have 90% of the length of the spindle to use to compress the end of the gun when it is screwed all the way out to the other end of its travel.
Then mark the two points in the wood where you drilled the two holes in the long side of the clamp to align with those holes while keeping the clamps screw inline with the center line down the wood. Then secure clamp to the wood with some 5/16 bolts and some washers between the clamp and the wood to elevate the clamp about 1/4 inch above the wood.
Then screw the clamps threaded ram all the way out to all but about two or three threads and that should give you approx. 6 to 8 inches of travel with the clamp depending on if you used a 8 or 10 inch clamp. My self have used a 8 inch clamp for any spring gun I have done yet and have not run out of threads to relieve the springs tensions.
Then lay the action of the gun on the board with the removable end almost against the head of the ram as you may have to make a piece of wood or plastic to fit over or clear a safety lever of other protrusion on the back end of the spring cap. This will give you the point where you will need to use two pieces of 1 x 2 two screwed into the wood near the front of the action on either side of the action to keep it from moving sideways when releasing the spring pressure if you are doing a break barrel I always take the barrel off first so you can make a piece of 1 x2 piece of wood to fit inside the fork and screw it to the board with a hole thru the block of wood to place a punch, bolt, screwdriver any type of pin thru the pivot hole of the action to hold the front of the action in place and prevent it from moving forward or sideways, then screw the two 1 x 2s cut earlier on either side of the action at about 2 or 3 inches back from the fork to provide even more support for the action from moving while releasing spring tension.
If you are doing a fixed barrel gun the its basically the same and the reason for a 5 foot piece of wood as now you will cut u shaped pieces of 1 x4 or 2 x 4 which ever you prefer so that they can be placed over the action to act as a bridge that when screwed to the board holds the action in place from moving sideways or up and then cut a block of would to screw into the board right at the end of the barrel for it to rest against while applying pressure to the action to relieve pressure and remove the spring retainer pins or unthread the retaining stud.
And there you have a safe homemade spring compressor that should not cost more than 20 bucks at most to build if you have to buy all the materials, as most of you should have some scrap lumber laying around and at most may have to buy the C clamp and some drywall screws in a length of three to four inches. .
BD
BB– I have several old airguns with leather piston seals. I could put lithium grease in a syringe and inject it through the port with a long needle, or I could keep putting a few drops of silicone in every few hundred shots. Which method do you think is the best one? Thanks, Ed
Ed,
I would try the syringe idea. Anything to keep that seal moist. I don’t think you can over-oil it, but start with a little grease and build gradually.
B.B.
That’s exactly what I was thinking! Most of the lithium greased I’m familiar with break down rather quickly and become a rather lightweight oil.
Hi everybody…
The discussion here got me thinking… The piston ring solution the old FWB rifles use seems to be a pretty rare thing. Any idea why this is? It seems like a very simple and reliable solution.
I could imagine that it might require very high precision parts with tight tolerances that are expensive or difficult to manufacture (a leather or rubber seal might be slightly more forgiving).
Any ideas?
Kind regards,
Stephan
I am in awe. It must be nice to be able to do things like this. But disassembling my 1911 gives me plenty of satisfaction.
Matt61
I had to laugh at myself while reading today’s report. I felt like the husband who’s wife is telling him about the latest “odd noise” coming from her car.
“It’s broke again”
“What is?”
“You know, that (watcha-ma-call-it) you replaced last weekend”
“What sound is it making?”
“Well,.. the same, except now it’s doing a (ca-ching, ping, ping) thing when I hit the gas”
“That doesn’t help”,..”You have to be more clear !”
“You know,..that (grrrrr, whomp, ping, ping thing” !)
You get the idea. While maybe clear and familiar to a “tuner”, much of it was Greek to me.
But that is ok. I learned some things and got a general idea of the insides of a gun, be it a more complicated one. Plus, some grease tips and correct applications.
Chris
I been there too many times. I posted a response in the wrong place because any of it sends me into a spasm.
twotalon.
Chris
No…..NNNNNOOOOO…..NOT the “it made a noise” thing !!!! Or “it’s not running right ” thing.
NO ! NO! NO!!!!
I can’t stand it !!!!
NOT AGAIN !!!!
twotalon
Yeah,..you got it. That round (thingy) that’s the size of the (candle) on the coffee table. You know, it was (shiny) with all the (pretty) colored wires hanging off of it and that (tooth pick) looking thing sticking out the side. 😉
I smile, 🙂 and think of Edith,.. a woman that probably knows more about airguns than any woman on Earth.
God willing, and around long enough, I will learn enough to do my own 1st. “tune”. 🙂
Chris
Is your wife blonde and ADHD too ? Maybe this is just a woman thing. Mine has proven herself ready for a job in D.C. more times than I can count.
And I would be a millionaire if I worked in a car repair garage with women only customers.
We start with the muffler bearings …..plus labor.
twotalon
No wife,…= more $$$ for “toys”. Nothing against ’em. Past “picks” have been more “nuts” than any guy I ever knew.
Single and happy, but, keeping my options open. Besides,…how many ladies you gonna’ find that’l let you keep a pistol range and a rifle range, (opposite directions), set up in your living room, dining room and entrance hallway 24/7?
Chris
My wife let’s me keep a few guns in her storage closet. Guess I’m lucky.
Chris, USA
My wife and kids shoot indoors with me.
I guess I’m lucky.
🙂
TT
I have replaced more muffler bearings than I can count oh and I forgot how to count also.
BD
Chris
Made it to 60 before I got married.
Wife lets me shoot a lot and does not mind if I kill things. But she is a dingbat.
twotalon
Nice report B.B.
I wonder if the buzz could be a function of the way the stock attaches to the action? But maybe you’re right and it will settle in nicely over time.
I’m a bit surprised you didn’t attempt to de-burr the cut outs on the comp tube. I usually try to hit those areas with needle files and/or sandpaper. I never button the piston real tight though.
Question about sizing and fitting a piston seal if I may. (And I am mainly asking about synthetic sealed pistons). Some seem to like a piston that just falls in the compression area when the tube is tilted vertically. Some want it to hold but move easily if you give the tube a shake. And some like it even tighter. Do you have any opinions on the matter?
And one of these days I’m going to lube up one of my leather sealed guns with the lithium grease. I have a Hy-Score 807 in mind.
Thanks again,
Mark N
Mark N.,
In my tunes pistons with synthetic seals don’t move in the compression chamber under their own weight. I like ’em tight.
B.B.
B.B.,
I know this is offtopic, but I have a question about the now discontinued Crosman 1077 AirSource adapter.
I’ve just converted my 3 month old 1077 to run off of bulk-refillable paintball CO2 bottles with a custom adapter. It connects to the gun like the airsource kit did, just a tube that engages the face seal attached to a screw on cap. Where it differs is instead of a valve at the end of the threaded cap, it’s a quick disconnect for a paintball remote line.
So my question is this; Did the Crosman adapter have some sort of regulator between the CO2 bottle and the fill tube? Was there any sort of mechanism to let the CO2 expand into gas, or was it pretty much a straight shot all the way to the gun’s valve?
I’ve noticed my remote line and 12oz tank connected, the gun actually recoils under repeated fire with a matching power increase, which is great, but I’m somewhat worried there might me liquid CO2 recondensing inside the valve, potentially damaging the seals.
Am I overthinking this, or is there something fundamentally different between the Crosman adapter and my CO2 hookup?
Any input would be greatly appreciated!
-Brendan P.
Brenden,
There is never a regulator in a CO2 system. CO2 is a self-regulating gas. So your gun is a straight-through affair, as you expected.
B.B.
Thank you!
I just got a fill station and scale for my 20# tank, so I’ve got some shooting to do! Loving every bit of it so far.
Again, thank you for the help,
-Brendan P.
Chris,USA——a person, a woman (Edith) that knows more about airguns than most men and women period! Semper fi!
B.B.,
I have a request for you. Would you consider reviewing the new Diana 340 N-TEC in .177? Preferably one of the full size models – or whichever you can get PA to send you.
Thank you.
Jim M.
Jim,
You must have missed it, but I have said several times that I will test a 340 N-TEC wen they become available.
B.B.
B.B.,
Sorry, I had not seen that. Glad to hear it’s on your list!
Thank you!
Jim M.