by Tom Gaylord
Writing as B.B. Pelletier
This report covers:
- Military primer crimp
- Almost done
- Seating primers
- Lee Loader
- Summary
There was a LOT of interest in this report on reloading — more than I expected. And, believe it or not, I’m not finished discussing case preparation. Last week I offered to teach a man who attends my church and his son how to reload and said we would make 100 .223 Remington/5.56mm cartridges in the process. Well, that was cool, so I took my own advice and tumble-cleaned about 120 cases to get ready. Then I read the headstamps on the cleaned cartridges and saw a big problem. Most of the cases I had cleaned were military ones that I collected from my range after the local sheriff’s department went through qualification training. They get military ammo through government channels; I believe it is less expensive for them.

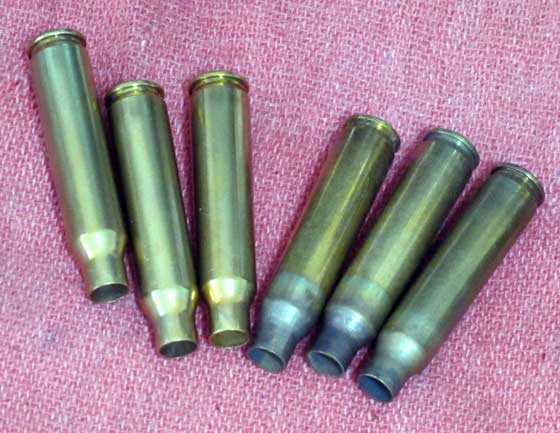
Cleaned cases on the left. The discoloration at the neck and shoulder of the uncleaned cases on the right is from the annealing (softening by heating) process the case undergoes at the factory.
The military specifies a crimp on the primer of all their rifle and machine gun cartridges. The M1 Carbine round is the only American military rifle cartridge I know of whose primer isn’t crimped. The crimp is to hold the primer in place during full-auto fire, so it doesn’t fall out and jam the gun. It isn’t a large crimp, but it’s enough to prevent new primers from being seated in the case. You can try, but I guarantee you — you’ll mess up the primers, if they go in at all. If you are going to reload 5.56mm cartridges, you need to remove that crimp.
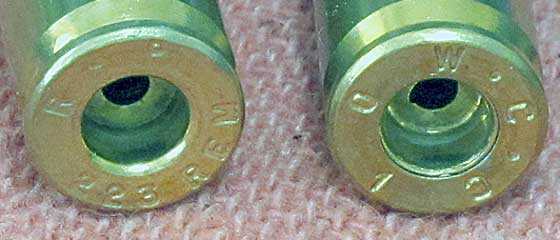
The 5.56mm cartridge on the right has a crimped primer. That’s the indented ring you see around the primer pocket. Although the primer has been removed, that crimp is still in the way of reloading a new one. The commercial .223 Remington cartridge on the left has no crimp, as you can see.
To remove the crimp you can either swage out the metal (push it out of the way) or you can ream it out (cut it out). I have swaged hundreds of primer pockets in the past and it is a long, slow process. Reaming works just as well and takes about a third of the time. A primer pocket swaging machine costs $130+. A tool to ream the pocket costs about $17. It’s faster and cheaper to ream. Do the math.
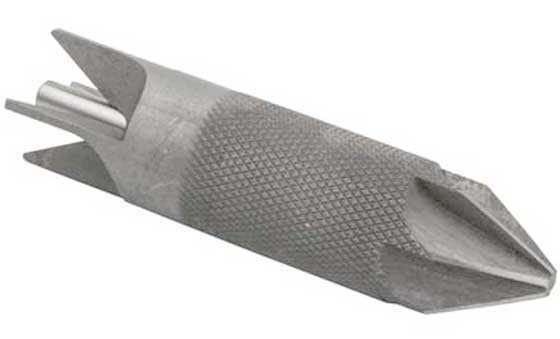
This cartridge case deburring tool will also ream the crimp out of a military primer pocket.
I haven’t addressed cartridge case deburring tools yet, but I will in the next report. Removing military primer pocket crimps is just another handy thing they do. The nice thing is their blades are set at the perfect angle to remove the crimp without damaging the rest of the primer pocket.
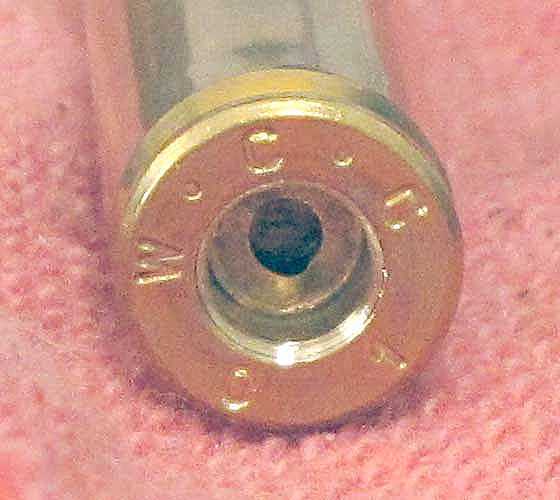
Three twists of the cartridge case deburring tool in less than 10 seconds removed the primer crimp without damaging the pocket. This is the same case that is shown with the crimp above.
Once the crimp is removed you can put primers into the case. Most reloading presses have attachments for this, but in my experience they are not very accurate. I had a heck of a time putting in primers with my RCBS Rockchucker. In fact the only press that’s ever allowed me to seat primers correctly is the Forster Co-Axial press. They are the absolute most precise single-stage reloading presses ever made. However, with an MSRP of $528 and a street price of $350, they are very expensive.

The Forster Co-Axial press is the most precise single-stage reloading press around. It’s expensive, but it does good work and it seats primers like it was made to!
Almost done
The case preparation is almost finished. I have already deprimed the cases, so they could be cleaned. Now we can use the reloading dies in the press to resize the case to fit into a standard rifle chamber. With a semiautomatic rifle like the AR-15 resizing is important, Since the cases will be fed into the chamber rapidly they have to be smaller than the chamber into which they are loaded. The base of each case is the point of greatest concern. Another die opens the case neck to accept a new bullet. Another die seats the bullet and the final die crimps the neck around the bullet to keep it tight during handling.
Seating primers
As I said before, once the primer pocket is ready (cleaned and de-crimped) you can seat a new primer. I have used many different reloading presses to do this over the past 50+ years and none other than the Forster Co-Ax was suitable. What I have used for the past 40 years is a hand primer press like this one from Lee. It’s not perfect but once you get accustomed to how it operates, it goes fast and is relatively reliable.

The Lee Auto-Prime hand-operated primer press is more precise for seating primers than a single-stage reloading press.
I’m now going to address a different type of reloader that some of you have mentioned in your comments.
Lee Loader
I have been teaching you how to reload with a single-stage press that uses reloading dies. I would call that the conventional way. But there is a simpler way. The simplest reloading setup is the Lee Loader. It costs less than $30 and is a great way to break into reloading. I referred to it in Part 1 without mentioning it or going into detail, but so many of you mentioned it in the comments that I feel obligated to cover it now. Instead of a reloading press you use a plastic-tipped hammer to drive the cartridge into and out of the reloading dies and to seat the primer.
This 47 second video shows how it works: