by B.B. Pelletier
Spring gun tuning: Part 1
Spring gun tuning: Part 2 – Building a mainspring compressor
Happy Birthday, USA!
Today, I’ll finish the mainspring compressor with details, dimensions and important tidbits.
The plank
The plank has to be long enough to accommodate any spring gun held between the vise and the tailstock. I used two 2″x8″ boards, one on top of the other, but the top one isn’t as long as the bottom, which has to could accommodate the vise. Look at the side view to see what I mean. The bottom board is longest (mine is 58″).
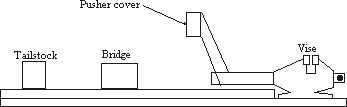
The view from the side shows how the vise fits on the plank.
The pusher cover
Make a wooden cap to pad the steel pusher ram of the vise. The wooden cover pushes against the end cap of the gun or against another pusher adapter that reaches inside a gun. For a BSA rifle, use a dowel to reach inside the mainspring tube. Cut a wide slot in the center to reach past a retaining pin. As you work on different airguns, you’ll create special tools to accommodate them.
The bridge
The bridge is three pieces of wood attached in a U-shaped pattern. It covers the gun laying on the plank and is held to the plank by long bolts. Make it wide enough for any gun to fit through it. Use pieces of wood inside the bridge to shim the gun tight once the bridge has been tightened to the plank. If the plank is 8″ wide, make the bridge almost as wide. Align the vertical attachment holes with the holes in the plank (see part 2).
The tailstock
Make the tailstock as wide as the plank. Stack three pieces of plank board to make the tailstock and position them with the edge of the grain toward the vise. The muzzle of the gun pushes against the tailstock, and the end grain cushions best.
The headstock/tailstock relationship
The headstock and tailstock accommodate a spring rifle action between them. When you disassemble the rifle, the headstock ram is pulled back (away from the tailstock) several inches to relax tension on the mainspring. Then FWB 124 and HW 77 need the most travel (about 4″), so factor that into your building plans. When you assemble those rifles, the ram must be allowed to travel the same distance in the other direction. It’s bad when you almost get a rifle disassembled, only to discover that your compressor won’t let you put it together because it doesn’t have sufficient travel.

finally, instructions i can follow!
my rifle has a strange endcap, in that it looks like a rounded one with the bottom half cut off. i’m not sure on how to cut the block for this- perhaps a router? if it isnt cut properly, will the end cap slip off and send the spring flying?
also, how much force will it have to withstand? i definatly dont want the tailstock ripping out of the base!
thanks
dm20,
My guess is that your “end cap” is plastic. If so, it isn’t really an end cap, but a decorative cap that does nothing but cover the end of the tube. You probably have a gun that requires some sort of probe to reach inside the mainspring tube and put pressure on the base of a spring guide that’s held in place by one or two crosspins. Probably one.
The force of the mainspring will be somewhere up to but not over 150 lbs.
I guess I’ll have to show some typical mainspring retaining methods before we dive into our guns.
B.B.
I hope to get a response since this is old blog. How would you compress the spring on an Anschutz 335 because of the very narrow slot that exposes the main spring?
Al
Al,
Welcome to the blog.
Why are you comprerssing the mainspring?
B.B.
B.B.,
I would hazard to guess that his endcap is a decorative plastic and the mainspring requires some sort of probe to reach inside the mainspring tube and put pressure on the base of a spring guide that’s held in place by one or two crosspins.
I think that is his question.
Siraniko
Thanks for your reply B.B. and Siraniko. I did more research on compressing the mainspring for removal and I got that figured out. I have another question/concern. I am replacing my leather piston seal with a moly seal, identical to this one: http://vortekproducts.com/ourstore/Diana-Piston-Seal.
In part 10 of your step by step spring gun tuning instructions, you mention spreading a thin coat of moly grease on the walls of the compression chamber. Is that process still required using the moly seal? I don’t recall your instructions mentioned the different process with different piston seals.
Thx
Al
Al,
My guess is no, you don’t need moly with that seal. But why not just call Tom Gore at Vortek and ask him? He will tell you.
B.B.
BB,
Do you know where I can buy some synthetic seals for a TF99? It can be in a case lot or sold as singles.
sav300
sav300,
Wouldn’t Compasseco have them? They are both the importer and the brand name holder, so they set the specifications for the rifle.
B.B.
Is the next article in this series available?
All 13 parts of this series are available.
Go to the current blog and type Spring gun tuning (the title of the series) into the search box on the right side of the page. That will locate Part 13 which has links to all the earlier parts, just as this part links to the earlier parts.
B.B.