
Spring gun tuning: Part 1
Spring gun tuning: Part 2 – Building a mainspring compressor
Spring gun tuning: Part 3 – Mainspring compressor continued
Spring gun tuning: Part 4 – Let’s disassemble a gun!
Spring gun tuning: Part 5 – Powerplant disassembly
Spring gun tuning: Part 6 – Disassembly completed
Spring gun tuning: Part 7 – Disassembly of other spring guns
Spring gun tuning: Part 8 – Disassembly of other spring guns, continued
Spring gun tuning: Part 9 – Cleaning and deburring
Spring gun tuning: Part 10 – Lubrication and reassembly
by B.B. Pelletier
Time to install the barrel. Lube the thin thrust washers with moly as well as the sides of the base block where they ride. That helps to hold them in place as you install the barrel. Connect the cocking link on the barrel to the sliding link in the piston, then carefully work the base block back between the arms of the mainspring tube. To get the base block aligned with the hole through the spring tube arms, the cocking link has to push the piston backwards, which is why we haven’t installed the end cap yet. You’ll have to realign the thrust washers on both sides after the base block hole is aligned for the pivot bolt.

The long cocking link is connected to the sliding link in the piston and the piston was pushed backwards to allow the base block to align with the holes in the spring tube arms. The pivot bolt passes through the left side of the gun. Don’t forget the two thrust washers!
Now, install the rifle in the mainspring compressor, allowing room for the end cap. Slowly compress the spring. As the end cap threads approach the mainspring tube, it’s important that they line up correctly. You can move the end cap in the headstock by small amounts to make the alignment. And, if you use the B-Square mainspring compressor shown here, you can also adjust the position of the barreled action. When the end cap enters the mainspring tube, start turning the cap to engage the threads. You have to gradually increase tension on the compressor as the two parts thread together. When the threads engage and the cap begins threading into the tube, continue to keep tension on the cap with the compressor. Don’t stop until a significant portion of the threads are engaged.
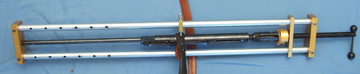
This is the entire barreled action in the mainspring compressor.
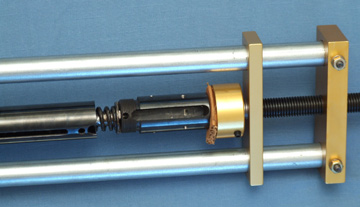
The end cap is under slight compression in this picture. As it comes closer to the mainspring tube, you have to make positioning adjustments to align the screw threads.
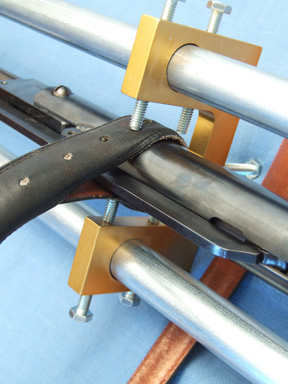
The bridge of the B-Square compressor has five bolts to finely adjust the position of the mainspring tube. Notice the leather belt I am using to protect the rifle’s finish. No precision here!
There will be more postings to finish putting the gun together, but tomorrow I want to give you a final report on the Remington Genesis rifle. I think I have some good news for Genesis owners.

b.b.
its the mendoza guy again…
i’ve put at least 100 rounds through it today and well the dieseling hasn’t slacked off at all. it doesn’t seem to diesel worse. i’m sure you have shot guns that have dieseled bad. i was curious to know about how many shots uusually it takes for a gun to stop dieseling. like does it stop before it breaks? or am i goin to have to get it tuned? i know all guns aren;t the same but any info would be great.
irrelevant, but its pretty accurate once i got the scope centered fairly well and it tears pretty big holes in a soup can at 25 feet
Brian:
Are you sure it is actually detonating? Is there smoke coming out of the barrel with each shot? Is there a truly loud sharp crack/bang with each shot?
B.B. is much more knowledgable than I so I will gladly defer to him, but I have personally not seen a gun detonate for more than a few shots, never more than ten.
Air guns are a little noisy in normal operation. A spring gun shouldn’t make your ears ring, but they do make a distinctive easy to hear noise when fired.
It still appears that you are having fun however! It still amuses me that these guns will rip through a strong steel can.
Ehrich
Brian,
Assuming the sharp crack is still there with every shot, your gun is still detonating. The smoke, by itself means just a diesel and not a detonation.
If you have some silicone chamber oil, you might try putting a drop through the transfer port. I know that sounds like adding fuel to a fire, but it’s more like using an explosion to put out an oil fire.
I did have a similar problem with the Remington Genesis, which I will report on tomorrow. It was fixed by shooting LOTS of the largest, heaviest pellets I could find.
B.B.
BB,
Maybe I missed it, or you call the compression tube something else. The tube the piston goes inside of. What do you use to lube the outside of the compression tube. As it slides inside the gun. I consider it the action of a spring airgun. I have a HW77k.
I have 85% molly for the piston & piston seal. And Almagard 3752 for the spring. The gun came with a clear grease on the outside of the compression tube. Compression tube upper left in pic. Since it shows through the loading port. I really don’t want to put molly on it. It’s messy.
Thank You,
Ned
Ned,
I’m sorry but I don’t understand what you are saying. I will keep reading it today and see if I can make sense of it.
B.B.
B.B.
Ned is talking about the outside of the sliding compression chamber .
My 97K came with a thick clear grease on this part . Is this what they call “clear tar” ?
I use just a little oil on my 48 and 97K now.
tt
TT,
Thank you! Now I understand.
Yes, oil is fine. No need for moly here as there isn’t any advantage.
B.B.
Thank you Twotalon,
That is correct, the sliding compression tube (chamber) with the cocking hole on the bottom. Piston inside, spring inside the piston. Piston & compression tube are assembled now & I plan on using clear tar from ARH. On the outside of it. And putting a small amount of molly in the gun’s cocking slot. After the compression tube is in the gun’s action.
The picture I tried to attach to the 1st post didn’t make it. Here is one to make it clearer.
Thanks,
Ned
Ned
You will eventually get some small scratches on the outside of the compression tube . It won’t look as pretty as it came from the factory.
I keep a small nylon washer in the breech when not using my 97K . The underlever is not latched .
I found that continuous pressure on the breech seal will cause it to start leaking . When this happens, it will start to smoke and accuracy goes out the window. Velocity spread also increases.
It takes some shooting to get the smoke to stop and accuracy to return after changing the breech seal.
If you are getting too much vibration, a Vortek kit does a good job of fixing it . My 97K was a buzzing demon with the factory parts. Still buzzes a little with the Vortek, but nothing like the factory setup. It resembled the sound and feel of an exploding junk yard.
tt
Twotalon,
Thanks for the nylon washer tip. My HW77k is only a month old. I am only changing the piston seal for a harder one from Air Rifle Headquarters. My gun has no vibration at all. I think Weihrauch has updated their assembly line. My gun had no burrs inside it & was smoother (less machine marks) then ones in gun tuning write ups. I have read.
BB says use Almagard 3752 LE grease on the spring to keep it quite & moving freely. Air Rifle Headquarters sells heavy tar to quite noisy springs. But it does slow the piston down some.
Thank you,
Ned