by Tom Gaylord
Writing as B.B. Pelletier
Here is a unique guest blog. Remember that readers are always welcome to write a report for this blog.
Today’s report is the first part of a guest blog from reader Benji-don. He shares his experiences with an Apache-Fire-Ball-Texan multi-pump pneumatic air rifle that his son brought to him to fix.
If you’d like to write a guest post for this blog, please email me. Over to you, Benji-don.
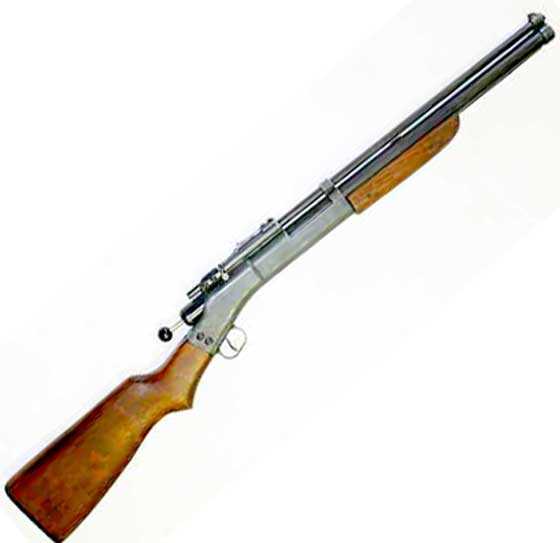
Apache-Fire-Ball-Texan: Part 1
by Benji-don

Apache-Fire-Ball-Texan multi-pump pneumatic air rifle.
This report covers:
- Description
- Where it came from
- Is it worth fixing?
- Where to start?
- Time to put it back together
- Missing parts
- Exploded View
- Parts List
- How it works
- Summary
- Editor’s note
Description
The Apache-Fire-Ball-Texan I have is an early single shot version. Apache airguns were only made in 1948 and 1949 in Southern California. Overall length is 36.5-inches and the barrel is 20.5-inches. The best I can measure, the twist in the rifling is one turn in 16- to one turn in 18-inches, or maybe a little more. The rifling is so shallow I can not get it to grip a tight patch on a cleaning rod. Since it was made to shoot round balls, it could be slower than one turn in sixteen inches.
The stock wood looks like walnut to me. My rifle weighs 5 lbs. 15 oz. It is a multi-pump .24-caliber air rifle that also has a smoothbore barrel insert to shoot BBs. It is all-metal and wood except for the seals and the plastic butt plate. The barrel insert is also steel and screws into the muzzle end of the barrel. The breech and barrel band are made of pot metal. The Blue Book of Airguns has a more thorough description of the company and their history.
Where it came from
My son Andy picked this air rifle out of the garbage at his friend’s house. I think it belonged to his friend’s grandfather.
Andy brings things over for me to fix up every once in a while. He brought over an old 1928 Caterpillar Twenty tractor about a year ago, I told him, “No!” on that one. It’s still in the driveway though. I have three old tractors I am still using that need repairs. [Editor: We need to find out how I can get that Caterpillar 20 from you. It’s a very historic and valuable California tractor!]
Is it worth fixing?
This air rifle looked like it came out of the garbage. The front sight blade was broken. The back notch sight was missing. The breech bolt handle was broken. The hammer cocking rod and knob were missing. There was house paint splatter all over the gun and there were vise jaw marks on the receiver and the barrel band/pump pivot bracket. And there was no back-pressure when pumping. The gun did not look like anything worth fixing, and it was ugly. There was a wood stock and forearm though.
There were no identifying marks on the gun anywhere. Initially I thought it was a Crosman 100-series pellet rifle. Then I made the mistake of looking in the Blue Book of Air Guns and discovered that it was really a .24 caliber Apache-Fire-Ball-Texan single shot, and it had a barrel insert to shoot BBs. I became curious and decided to take it apart to see how it worked. Soon the situation came down to either the gun or me. I was not going to stop until I found out what was inside.
Where to start?
I removed the front pump pivot pin along with the front barrel band/pump pivot bracket. The pump assembly came right out. I was surprised to see a brass cone inside the pump cup seal. Maybe I would get lucky, I could tighten up the cone against the pump cup until it expanded the seal into the compression tube. That was a good design feature. After removing and cleaning the pump assembly I soaked the pump cup in automotive transmission sealer. By trial and error the brass cone could be tightened against the cup until there was a good seal. I put a few drops of Pellgun oil in the compression tube and put the pump back together. With every pump there was air coming out of the barrel. I let it soak overnight with some more oil. The next day was no better. Now I had to decide if it was worth spending more time on the Apache.
I worked on taking the hammer spring retainer off for a couple of hours. King Kong had installed with a pipe wrench! I could see the jaw marks. I put the breech block in my vise (with padded jaws), and resorted to using a pipe wrench myself, because a strap wrench did not provide sufficient grip. It worked, and now there are some more marks.
To get the exhaust valve body lock nut off I had to build a tool to fit over the valve stem guide. An old 5/8” socket fit over the valve stem guide. I ground down each side on the open end — leaving two blades, one on on each side, to engage the lock nut. Once the lock nut was off I could not see any way to get the valve out. Then I found a setscrew holding the valve body that is accessed through a hole in the bottom of the breech block.
I decided to look on the web, to see if there were any parts diagrams. There were none I could find. I did find a picture on JG Airguns by John Groenewold, of a disassembled Apache pistol that helped some. I also read that the exhaust valve body had to be pushed out using a dowel through the check valve port. It is not threaded like the Benjamin/Crosman valves, so it can easily be pulled out. There were some hints online that the compression chamber and valves could be driven out the breech with a dowel in the compression tube. I am pretty sure the compression chamber in my Apache rifle is soldered in place.
After a couple of days soaking the valve in penetrating oil there was still no movement. It was time to get tough again. I put a 3/16 dowel against the check valve stem and gave it a good whack with a hammer, it did not move. Next I gave it a good blast with a propane torch and still could not move it with a gentle push. Ok — grab the hammer again. Parts went flying in all directions! It is scary looking for parts in a workshop full of junk when you don’t know what parts you are looking for. I found a spring, exhaust valve, check valve and the valve body.
Well, now it was getting interesting. There were a couple of #8 birdshot inside the valve body. Earlier I had found a .177 pellet stuck in the exhaust port. I cleaned up all the dirt and gunk, and then soaked the exhaust valve in transmission leak stop. When I put it all back together it still leaked out the barrel and who knows where else.
Time to put it back together
The check valve was a brass disc with a small rod that fit through the intake hole in the compression chamber. There was no seal material on the check valve. The compression chamber is also brass, so how was this supposed to work? I had a seal from the paintball shop that would fit over the rod on the check valve but the surface of the compression chamber was pitted and looked corroded.
I cut off a piece of ½ inch dowel and screwed a piece of all-thread into one end to attach a drill. Once on the drill, I sanded down the dowel until it just fit inside the compression chamber. I glued emery cloth on the other end of the dowel and tried to polish the check valve seat of the compression chamber. It turned out that the check valve seal was stuck to the compression chamber. I tore it out with the modified socket I used to loosen the valve body lock nut. I was then able to polish the check valve seat with the emery paper on the end of the dowel. After reassembly the valve was still leaking.
I forgot to remove the set screw on disassembly and ruined the check valve trying to get the valve body off with a dowel and hammer. Not the first time I have screwed up! Now I needed a new check valve. I cut the stem off a Benjamin 342 exhaust valve and chamfered the hole in the compression chamber to fit the new valve stem shoulder. Next I put the exhaust valve in a drill press and polished the seal with 800 grit sand paper. Then did the same for the valve body exhaust valve seat face. After tinkering with the valve parts quite a few times I was finally able to get it to seal and not leak. I pumped it up and let it leak off quite a few times before I was able to get it hold air. Now I leave four pumps in it and it seems to be ok.
Below is a picture of the dowel with emery cloth on the end to polish the inlet/check valve seat, and the socket I cut to fit the valve lock nut.
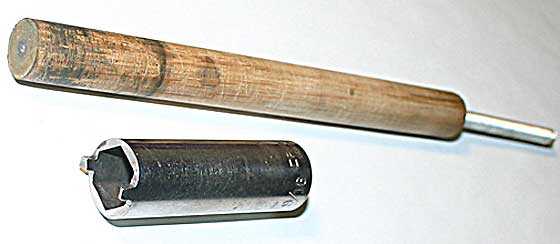
Dowel with emery cloth on the end to polish intake valve seat and shaped socket for valve body lock nut.
Missing parts
I replaced the broken bolt handle with a machine screw. The front sight is a piece of common steel washer material trimmed and JB-Welded to the pot metal barrel band. A rear sight from a Benjamin Model 342 fit the machine screw locations from the original sight. I used a plastic knob from the hardware store and a bolt that fit the threads in the hammer. I cut the bolt to what was a useable length and cut threads on the other end to fit the knob.
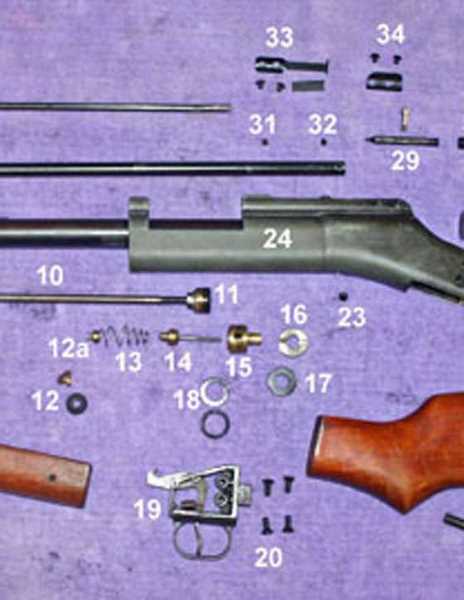
Exploded view
Below is an exploded view picture (actually three overlapping images) with the old and some new parts.
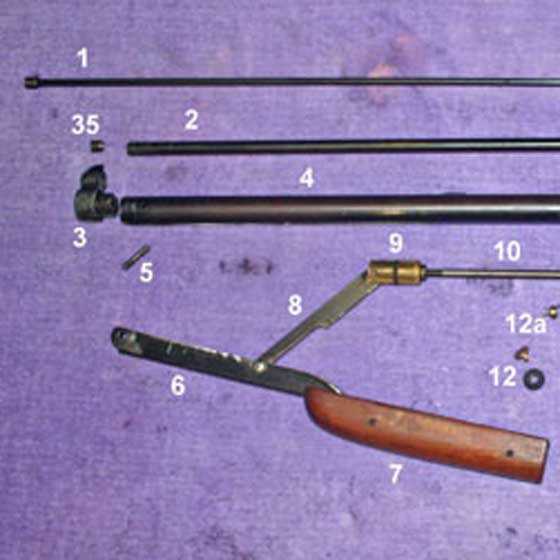
I cut the parts picture into three images that overlap, so you can see the parts better — Ed.
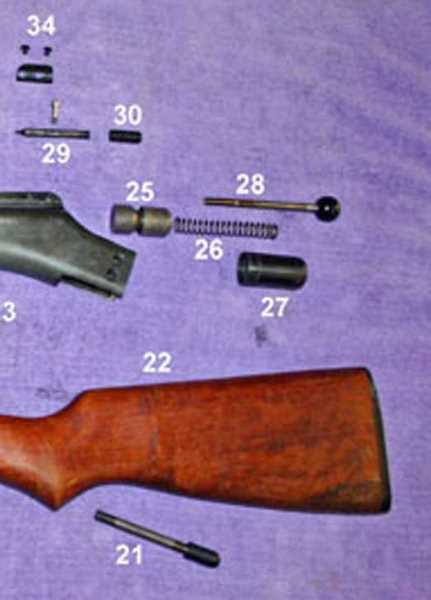
Parts List
1. Insert barrel .175 cal.
2. Barrel rifled .24 cal.
3. Barrel band, compression tube plug, front sight
4. Compression tube
5. Pump pivot pin
6. Pump lever
7. Pump lever handle – fore stock
8. Pump lever link
9. Plunger guide and felt washer
10. Pump rod
11. Pump head and pump cup
12. Inlet valve and seal – original
12a. Inlet valve from Crosman 342 exhaust valve (stem trimmed)
13. Valve spring
14. exhaust valve
15. Valve body
16. Valve body lock nut
17. Valve body gasket between valve body and lock nut
18. Valve body gasket between valve body and compression chamber
(old top new o-ring bottom)
19. Trigger assembly
20. Trigger assembly screws
21. Stock stud and cap nut (screws into trigger assembly)
22. Stock
23. Valve body set screw (also alignment pin)
24. Breech block
25. Hammer
26. Hammer spring
27. Hammer sleeve
28. Hammer cocking stud and knob
29. Breech bolt and handle
30. Breech bolt sleeve
31. Barrel set screw (also alignment pin)
32. Barrel set screw
33. Rear sight (from Benjamin 342) and screws
34. Bolt lock cam and screws
* Compression chamber not shown
How it works
Before we get to the testing, let me tell you about some of the features of the Apache Fireball Texan. It does not have a safety but does not need one. The way the trigger and hammer interact is very clever. The gun has a half cock that allows the exhaust valve to seat so the gun can be pumped up. Half cock also locks the trigger under a lip inside the hammer. If the gun is bumped, the hammer knob is hit, or the trigger is pulled the gun will not fire when on half cock.
The bolt does not cock the hammer. The hammer is cocked using the knob attached to the hammer with a stud/bolt. To load the gun the bolt must be used. The knob is used to cock the hammer. Not a very efficient process. [Ed. That was a common way for single-shot air rifles to work at that time.]
The hammer, stud, and knob assembly make for a heavy mass striking the exhaust valve stem. Although heavy, it does not seem to give much kick when shooting the gun.
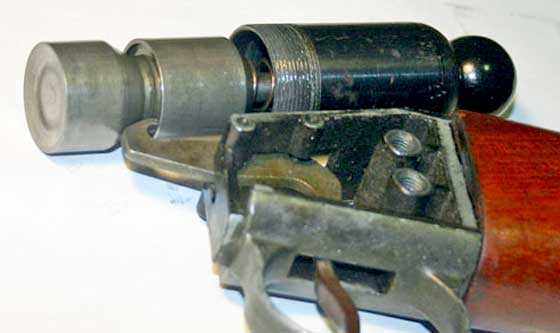
This shows the trigger sear locked in the hammer when on half cock.
Summary
After almost a year of off and on work, the Apache – Fire-Ball – Texan air rifle no longer looks as ugly to me. I guess all this time has given me a little bit of affection for the gal. Maybe not enough to hang in the living room but it does start a conversation when I bring it out.
In the next report I will do some velocity and accuracy tests.
Editor’s comment
This was a fascinating look at the insides of an air rifle few have ever seen. I’ve seen them at airgun shows, but this is my first time to look inside. Thank you, Benji-don.

Thanks Benjidon x2…..one for saving a really neat piece of American airgun history from the abyss,and one for taking what must have been a good bit of time to document and share the journey.
I believe I would have lost faith when the unknown parts scattered in the garage and mingled with all the other escapees! Looking forward to reading the rest for sure.
Benji-Don,
Thank you for that fascinating look inside. I too enjoy tearing into something to see what makes it “tick”. And, as was the case with your air rifle not working at the onset, what other choice was there? Nice job on all of the pictures and text. By documenting things in such a way, the World now has a reference for anyone else encountering one in the future. Looking forward to the shooting phase of your report/adventure. Fine job! 🙂
Good Day to you,.. and one and all,.. Chris
Benji-Don,
Very interesting article on a gun I could care less about. But very well explained and articulated!
Your knowledge and skill are remarkable! How you made that tool from the socket is beyond me…I thought sockets were made with super duper hardened steel?
How do you know so much about pneumatics? When all is said and done, and the rifle is shooting well, what is the PSI in the air reservoir?
Thanks for an interesting article,
Yogi
Yogi,
The best way to work on a socket this way is with some kind of grinder, using an abrasive wheel. This is a common tool to make for vintage Benjamin repairs.
B.B.
Got a Helluva good story regarding the Apache Fireball/Texan I have but it will wait. For the moment, lets just say I’ve had it for about 60 years, it’s gone through Hell and I’m amazed that it has survived all that it has. Right now I could use some information and help getting the old girl up and running again.
I disassembled the rifle with some help of a machinist friend of mine who made a couple of parts for me including the bolt handle and a couple of internal parts. It seemed like it wanted to pump up but wouldn’t hold air for more than a few seconds but in that time it would “pop” when the trigger was pulled so I thought I’d do a restoration on it.
I’ve repaired and re-finished the stock with 5 hand rubbed coats of tung oil and instead of painting the steel parts, I rust blued all of them and then polished the zinc alloy receiver/breech block and front barrel band/sight to an almost chrome finish. Sure does look nice but it don’t work.
So here’s the problems. I can’t find anything to replace what I think is the leather cup for the pump head and I can’t find anything to replace the felt band that fits around the brass plunger guide nor can I find the various gaskets/seals needed to repair the valve body itself.
HELP!!!!!!!!!!!
What did you use for the parts I mentioned and how do you keep the brass plunger from binding in the tube it rides in? Will the felt ring cure that problem?
Any help would sure be appreciated and my twin nephews are waiting impatiently for me to get it working. (Part of the long story of its history)
Thanks in advance for any help and guidance you can provide.
RAPH
RAPH,
Thanks for your story. This is exactly what this blog is about.
B.B.
Yogi
As B.B. said I ground it to shape. I used a bench grinder on the first one that was a short socket. And then used a cutoff tool for the long socket you see in the picture.
My first pellet gun was a Benjamin 312 multi-pump when I was 8 years old. I have been taking them apart ever since. I also got some good advice from a couple of local gunsmiths that work on air rifles and by reading this blog.
Thanks
Don
Well, I guess I left my comment to the wrong person. Not surprising since I didn’t comprehend who it was that actually wrote the article about the Apache Fireball rifle. Mea Culpa.
Since I have realized my mistake, please take the time to read the comment I left for B.B. Pelletier above.
It’s a great old air gun and I’m glad I’m not the only one that has one and has had issues with it. I sure would like to get the old girl working again.
As I said, I have a great story regarding its history and would be glad to share it with you guys when the time is right.
Sorry for the screwup. Am I forgiven?
RAPH
RAPH,
Got it. Absolvo te.
B.B.
RAPH
Not a problem, If you are getting some air at all with the pump It may be adequate with some good lubrication. I would recommend using Crosman pellgun oil if you have it. I would have to look again but I am fairly sure my pump seal is synthetic. If you have a leather seal someone may have made it. Anyway oil it good and it will be good enough to get the gun working for now. The felt out of the older Benjamin 3xx like the 342 used felts similar but a little smaller outside diameter than the Apache but may work. The felt is not critical to getting the gun working just keep the pump tube oiled well.
If the pump is binding I may be that it just needs some oil. It also could be that the linkage is worn and no longer the correct dimensions. If that is the case you will need to make new piviot pins and or sleeves for the linkage to return to the correct dimensions. Make sure there are not burrs or rough spots on the pump or the pump tube and you should be ok. It will still work even if it binds a little just need to take a little extra care in pumping.
Ok here are the two seals in the valve that need to work, both the intake and exhaust valves are critical. The other critical part is the valve body gasket number 18 above. The other parts normally will not keep the gun from working maybe just not optimal.
The intake valve is held against the pressure chamber by the spring that also holds the exhaust valve shut. The brass plate with the pin in the center sets against the end of the pressure chamber with a gasket over the pin. The pin points towards the muzzle of the gun. I found a gasket at a paint ball gun shop that would work. make sure the face of the brass disk is polished smooth around the pin so the gasket will seal. Also make sure the end of the pressure reservoir where the gasket seals is smooth. That is where I used the dowel with some fine emery paper epoxied to the end. It made the brass face on the pressure reservoir shine looking with a flashlight to be sure all is clean and no corrosion so the gasket will seal. See part 12 above.
The exhaust valve is not something that I found a replacement for. Try to make it work. Otherwise you will need to have one custom made. Maybe your machinist friend could make one. First polish the face of the valve body where the valve seal hits. I put mine in a drill press and used 800 grit sand paper to polish it. Do the same for the valve itself put the shaft in a drill press and polish the seal with 800 grit paper until smooth.
For the valve body gasket I used an o-ring instead of the original flat sided gasket. It took a couple or more tries to get it sealed.
If you get those two valves and the valve body seal fixed the gun should work.
If the exhaust valve is leaking you should feel pressure pushing the pump handle back up when you pull it a little away to start the next pump.
If the exhaust valve is leaking you should hear air coming out the barrel.
Some folks have put their guns under water to see what is leaking. I have not tried that but it should work.
Another trick on the seals I learned on this blog is to use some automotive transmission seal softener it has worked if the seals are still in one piece and solid.
Let us know how it works out. If you have more questions let me know. Parts are not available for this gun so you need to be creative or find a good air gunsmith willing to work on these old guns.
When you post your story of the gun put it on the most recent blog post so others will see it.
Wow!!
Thanks a million B.Don!
I have a couple of other projects going right now, one being restoration of a WWI military M-1917 Winchester/Enfield 30-06 rifle so the Apache is on the back burner for the moment. I will, however, get back to getting it done soon. I’ve printed out your instructions and put them in with the Apache in my safe.
I do have a great story as to how I acquired the Apache (I was about 9 years old) and have some pics of it assembled after the rust bluing and polishing was done. I probably should If you can tell me how to post pics here, I will write up the story and post the pics to go with it.
Also, I don’t know how you shot the pics of your repair as described in your very informative story but I took the liberty of “stitching” the three photos together and added the parts list below the finished photo for anyones further use. Let me know if you would be interested in my posting it here.
Again, thanks a million for the information! Can’t wait to get my M-1917 done and get started back on the Apache!
RAPH,
The gun needs the hammer put on half cock or cock so it releases the exhaust valve so the gun can be pumped up. I figured you knew this but wanted to make sure.
Don
Forgot a couple of things in my last reply to you.
First, thanks for the info on how to charge the gun. It’s been so many years that I forgot how to actually get it pumped up. That could have been part of the problem.
Second, do you know of anyone that has one of the BB tube inserts for sale or where I might start looking for one?
Third, it’s not the pump itself that is binding, it is the brass plunger guide with the felt(?) ring around it that is binding. The ring itself was shot and I have no idea what could be used to fill that gap in the plunger to keep it from binding up. The linkage itself is in pretty good shape, pins, bushings etc. are all within tolerance, not wallowed out or worn excessively. I was just wondering what you may have used as a replacement for that ring.
I know they’re probably non-existent at this point in time but I thought you might know.
Again, Don, Thanks for the info.
Yogi,
I would guess the psi in the reservoir would be about 800 psi or maybe a little more. Some one else may have a better estimate. If I take it apart again I will try to get enough measurements to do some calculations.
Benji-Don
Benji-Don,
Thanks for this awesome report! I am glad you were able to save the old gal. Maybe she is not as pretty as she once was, but at least she can still cook.
Now this is the sort of blog entries i really love, it’s just a shame that i’ll have next to zero chance of finding an Apache multi pump in the UK. But at least the knowledge is out there now, well done that man.
Sir Nigel,
So says the man who lives where Relum Tellys and Webley Mark II Service rifles abound! 😉
B.B.
True. You can pick up a Relum Telly almost anywhere in the UK, i found my 1st one in a rubbish skip. However i would almost sell my soul to get my hands on a Webley Mk II, especially a 3rd or 4th variant.
Best wishes, Sir Nigel.
I really like the composition of that final picture.
With that angle and lighting, it perfectly illustrates the half cock, even the ridge and hook interface preventing the trigger from being pulled.
Belgrath04,
I agree. I thought that was a very good illustration of the text.
Pictures like that inspire me to do better when I photograph.
B.B.
Benji-don,
Excellent report on the Texan. I am fascinated with the Apache airguns; there is little information on them online and your report will be a valutable future reference.
I am currently restoring a Fireball Pistol and getting the valve body out was a pain, too. Ended up soaking it with break-free for three weeks and then driving it out. The pistol also has the same half-cock safety feature.
My Apache rifle strings vertically and I think the cause was the steel BB being inserted and removed and thus wearing the barrel at the muzzle. It is like a tight-fitting cleaning rod and an illustration of why you should clean from the breech if possible.
Looking forward to the next report!
Paul in Liberty County
Paul,
Thank you for inspiring me. I took a photo of a nice Apache pistol last week and was toying with including it in this report. I will put it into the next part at the end. The pistols looks somewhat different from the rifle, because of the odd shape of the pump lever.
B.B.
Paul in LC
The report for me was a lot of work, what B.B. does in a day took me over five full days to complete. Take pictures and do a report on your pistol if you want to. Many of us love the reports on old guns. For every picture I used there were 10 or 20 that were not very good. With the digital cameras even a blind squirrel finds a nut once in a while.
Benji-Don
Benji-Don,
I can relate to your learning struggles. I am currently learning electrical, electronics, computer usage and navigation, and photography, all at once. The internet has been a blessing as there is some great tutorials that will quickly make you an “expert”,… if one is willing to learn. Most day’s I feel like I am in Kindergarten. I am getting it though and am surprising myself on an almost daily basis. Hang in there. You did good,.. even if it did take a bit longer. 😉 Chris
Chris U
Who was it said “When you stop learning you start dying”. It sounds like you still have a very active mind. That is the best thing a person can have.
I am still learning but seem to be forgetting more also. Especially with computers. I was up on most computer stuff and even did a lot of programming, but that was 30 years ago. Now the grandkids are way ahead of me.
This project was a challenge but I feel good that I was able to get the Apache working with some simple tools. I ask many questions and combined little bits of information that I could put together each step of the way.
Don
Benji-Don,
Good advice. The learning is all job related with photography being the least of it. Electronics is like trying to learn a second language. Computer usage too. My background is mostly mechanical,.. hands on. It is fun to learn. I had forgotten. Let’s just say that I should have applied myself (a lot) more in school. I’ve had the TX200, 499 and Marauder all apart and approached it the same way you said,.. lot’s of questions and homework. As for forgetting?,… even though I am mid 50’s,.. I can relate.
I had one more thing to say,… but it has escaped my mind! 😉 Chris
Great report Benji-don!
Now there is a rifle that has seen a lot of abuse. That you got it to hold air is amazing! Looking forward to reading the next part.
You have me all enthused to get back to my Crosman 101 refurbishing project.
Hank
Vana,
The Crosman 101 and the Apache have much in common. I think the Apache folks copied much of the parts or at least the Ideas from the 101. I have never seen inside the 101. Let us know how it works out.
Don
Don,
Agreed, the Crosman and Apache rifles are very similar in design. Here is a link with some great pictures of the insides of a Crosman 100/101…
http://ricksshop1.blogspot.ca/2013/09/crosman-101-reseal.html
Hank
Benji-don,
Great report. I’m looking forward to the next one. I really enjoy the reports on restoring old air guns. I doubt that I will ever have a chance to acquire an Apache Texan but if I do this will be a great reference.
Jim
This was a very good read and it is noteworthy that the Apache was a round ball shooter and apparently rifled to shoot them. I’m looking forward to the tests on accuracy and velocity. We could use an accurate modern .25 or .30 cal commercially available RB MSP air rifle today. The advantage of being able to maintain ,adjust /replace parts, and most of all, manufacture your own ammo by casting them would be welcomed by me . Currently I’m using a Crosman 118 CO2 gun that shoots .22 RB as accurately as pellets that I tweaked and restored , but it is CO2 which is a poor choice in the cold climate I live in.
Robert,
Long time, no hear from! Welcome back.
B.B.
Yup, still read the blog but have had problems with the connection so no replies for quite a while now. I can install an electric service and wire your house, but computer /internet issues piss me off and I have to just walk away… . I liked this article today because it reminds me of the times I ‘ve worked on the vintage stuff like this and marveled at just how simple they were . I imagine some Nebraska farm kid tearing one down to get it working with some small parts replacement using stuff from the junk bin in the farm shop. That, and the tractor reference. I have and fix my own tractors too.
Great job, Benji-don,
You really put some heart and soul into getting that old gal working again.
This well-written report wets my appetite for the velocity and accuracy testing. =)
Thank you.
take care,
dave
Benji-Don,
the highest compliment, in my mind, I can pay someone is to call them a craftsman who repairs broken parts or fabricates parts to replace the broken part. A “left-handed” compliment is to call someone a “parts changer”. That is, they change parts until the problem is fixed. You sir, are a craftsman. Well done and I like your dry, self-deprecating humor you have used in this blog. Indeed, looking for parts that you are not familiar with amongst a roomful of parts is scary.
Fred – no longer from NJ
Benji-Don
Nice article and interesting gun. I like that it’s a pumper and the bigger .24 caliber. I really wish that one of these air gun makers would produce a modern .25 caliber pumper. I would probably buy it just cause they made it.
An excellent report on a very rare item. Keep it up! That’s great stuff.
Benji-Don,
Great blog. You must have a pitbull mentality to keep at that gun ’til you got it fixed, especially since you had no assurance that it would even pay off in the end. Looking forward to Part 2. After all that effort I hope it shoots 1/4″ groups at 25 yards at 700 fps. 🙂
Anyone know a source for a breech seal for one of those 1980s chinese underlevers? Dug mine out the other day and the seal crumbled. Part of it was in the transfer port and the rest was stuck to the breech so I couldn’t really even tell what it was shaped like originally. It looked like it was made of dried up wheel bearing grease (I know it wasn’t but that’s what it looked like). Got it working by pushing three 1/2 OD x 3/8 ID orings into the breech block/transfer port/sliding thinggy , but I’d like to fix it proper.
Halfstep,
Two possible sources. First, try Pyramyd AIR. They bought Compasseco, the company that imported most of the Chinese air rifles.
Second, Mike Melick at Flying Dragon Air Rifles. (Mike in Iowa).
B.B.
Astounding. This is what will happen to my Crosman 1077 when I throw it away. Some ingenious person will find it and have it running perfectly. A .24 caliber rifle that shoots round balls is not my idea of a fireball. But there is something to be said for aggressive marketing, and maybe the velocity tests will surprise us.
It also reminds of an obscure film, called The Guest, which I can recommend based on a YouTube clip. A bereaved family that has lost a son overseas in the military is visited by a mysterious stranger who claims to have known their son. He proceeds to move in and alter their lives in surprising ways. When a young boy in the family is bullied, he takes him to a bar to confront the bullies as a group. Setting up at a nearby table, he buys sexualized drinks for the women and Cosmopolitan cocktails for the men while also ordering a “fireball” drink for himself. This is a drink that combines a Bloody Mary and cinnamon schnapps. When the inevitable confrontation erupts, he’s throws his fireball right in their faces on the way to a complete rout.
Slinging Lead, thanks for your good wishes. You are right that many newcomers may not know the full benefits of the blog network. When Duskwight heard I was sick, he sent me this amazing pair of socks straight from Russia which look like armor. He has also set me up with a lifetime supply of parts for my IZH 61 without which I would be in real distress. Derrick keeps that rifle in fine shape for me. Blog reader Victor has invited me out to his 600 yard shooting range and will give me some of his Olympic level shooting tips as soon as I can get out to see him. There’s much more than this, and of course there is the Godfather of Airguns who is available at airgun shows…
Matt61
It’s like the old saying. “One man’s junk is another man’s treasure.” A while back I was given a old Marlin Model 75 .22 rifle. The owner said it was just junk and didn’t work. Well, the addition of a correct action screw, front and rear sights, and a magazine tube it works just fine. The fix cost about $40.00 dollars. It’s nothing fancy but it does work.
Mike
halfstep—I fixed mine with a faucet washer from a hardware store. I had to enlarge the hole a bit to keep the washer from splitting when I closed the action and the washer was forced onto the tapered barrel breech. It,s not my idea, I saw it on the internet. ——–Ed
This was a most excellent guest blog Benji-don. It was very well written and meticulously documented. I salute your persistence in getting that baby to hold air. It takes a great deal of patience to put something like this together.
I think BB owes you a day off.
What a great old rifle. You are providing inspiration and instruction for those
I am trying to find the dimensions of the mi-shot ammo tube. I believe the tubes were clear plastic, not the red and black cardboard. Thanks.
Booboo,
Welcome to the blog.
If you want to know the caliber of the Apache, I think it’s .24.
B.B.
I wanted to find the dimensions of the clear plastic tube itself not the shot. Thanks.