by Tom Gaylord, the Godfather of Airguns™
Writing as B.B. Pelletier
Part 1
Part 2
Part 3
Part 4
Part 5

Hakim is a large, heavy military trainer made in the 1950s by Anschütz.
This report covers:
• A very complex air rifle
• Let’s get to it — removing the stock
• Barreled action out
• Trouble!
• Call Otho!
• What was wrong?
• Wow — that’s a lot of work!
• What I found
Today, we’ll take apart the Hakim air rifle and see exactly how this rifle is put together. As you’ll remember or gather from reading the past posts, this Hakim is in very good condition, but it’s also very buzzy when it fires. I wanted to find out why that is and to correct it if I can.
A very complex air rifle
The last report was almost a month and a half ago. The reasons for that are many. First, the Ft. Worth airgun show took up a lot of my time in the interim. But more than that, a Hakim is fairly complex, and they don’t come apart as easily as many spring-piston air rifles. It isn’t that they are difficult to take apart. On the contrary, they’re very straightforward. But where some guns come apart in 9 steps, a Hakim seems to take 39 steps. Those numbers are just made up for illustration, but the comparative complexity is true. You’ll see that today.
Let’s get to it — removing the stock
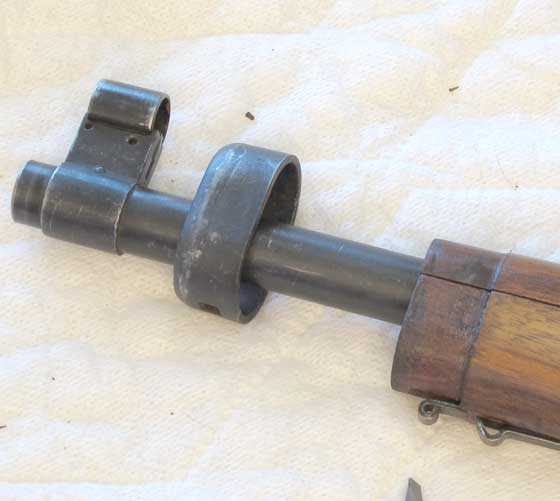
The first step is always to ensure that the airgun is not cocked or loaded. Since a Hakim can be loaded through the tap independent of cocking, this involves checking both conditions separately. Next, the stock has to be removed. The Hakim stock is in 2 pieces, the main stock and the upper handguard. To remove the upper handguard, the nose cap has to come off first. That’s the metal cap out at the end of the rifle that holds the upper handguard to the forearm of the main stock.

The nose cap is held in place by a spring-loaded keeper. Push it in with a screwdriver tip and ease the cap forward.
Next, the metal band that holds the rear of the upper handguard to the forearm has to be loosened and slipped off the gun. This band also holds the front sling swivel and is a bit tricky to install, again, because of the spring tension that keeps the legs apart where the bolt goes through.
Remove the bolt that holds the metal band together and then slip the band off the stock.
Next, you have to remove a crossbolt that runs through the stock. Many military rifles have such a bolt, but it’s strange to see one on an airgun!

Remove the crossbolt from the side of the stock.
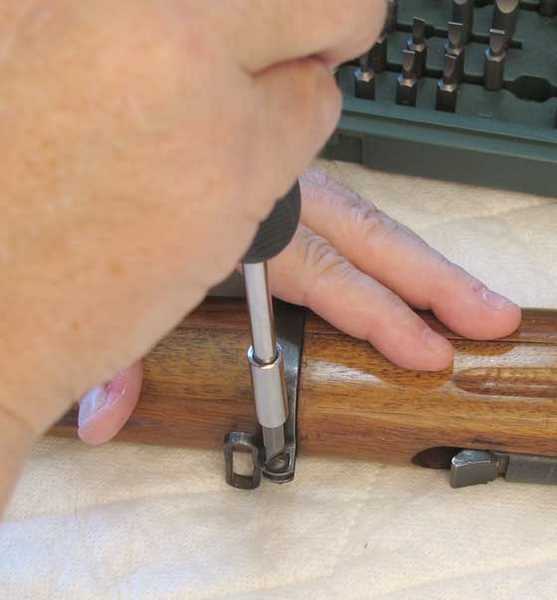
You aren’t finished, yet. It’s time to remove the two triggerguard screws. Unlike many spring-piston air rifles, both of these screws hold the barreled action in the stock. Both have to come out. There’s no special order to this, so I removed the rear one first.
Removing the rear triggerguard screw.
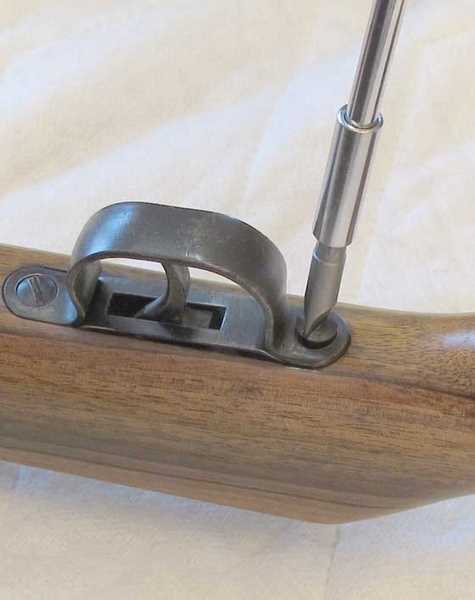
Then, I removed the front triggerguard screw. This screw is anchored in a special threaded boss that serves a couple purposes you’ll see in a moment. When this screw is out, the triggerguard and triggerguard plate lift out of the stock. Now, the barreled action comes out of the stock, but not until you unlock the underlever because the end of the lever needs to be slid back a couple inches into the stock’s cocking. If you don’t do this, the stock will crack at the point that latch tries to force its way through the slot.
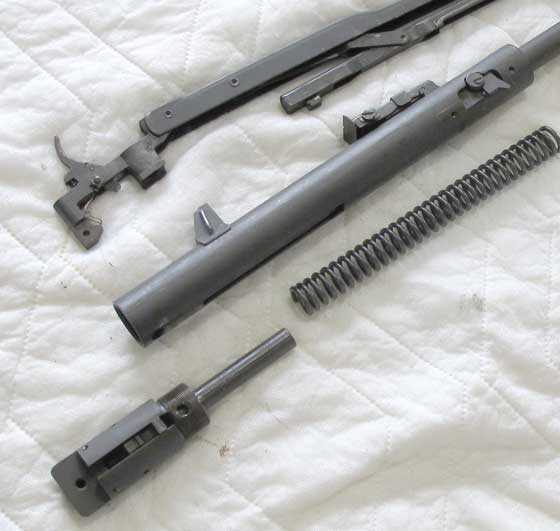
Barreled action out
Now that the barreled action is out of the stock, you can begin the disassembly of the action. The first step is to separate the underlever mechanism and trigger unit (they’re one assembly) from the action.
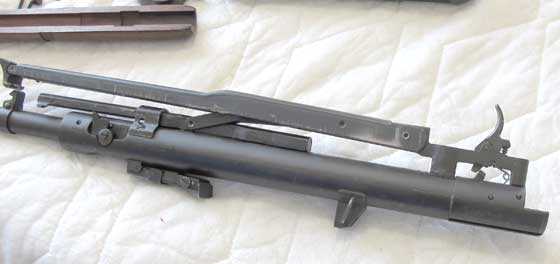
The barreled action is out of the stock. Now, to remove the underlever and trigger mechanism.
Trouble!
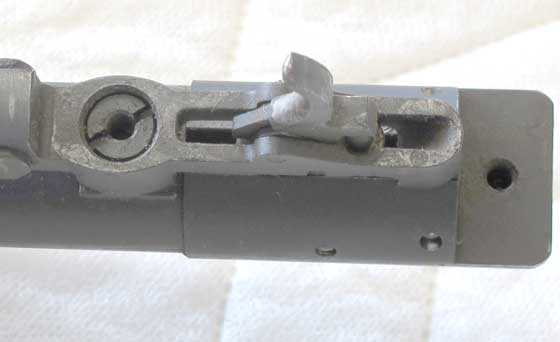
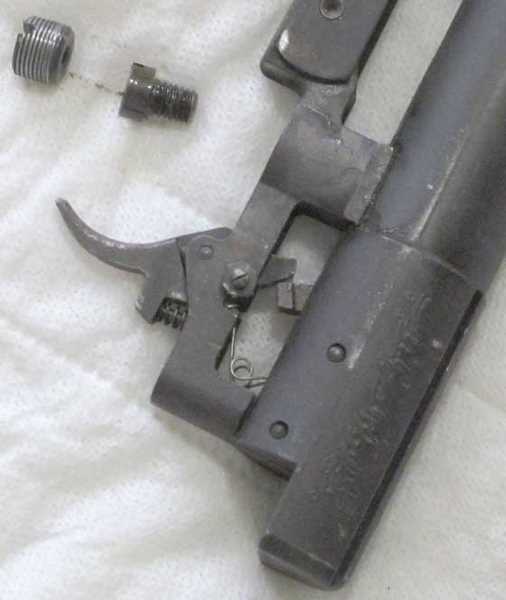
This is where I encountered a problem that added a week to this job. The first step is to remove what appears to be a large screw that’s just forward of the trigger. It’s actually a threaded bushing that does 2 things. It acts as a locking screw for the real screw that holds the underlever and trigger assembly to the action, plus it has a threaded hole in its center for the front triggerguard screw.

The trigger assembly and the underlever are held to the action by a screw in a post in front of the trigger. There are actually 2 screws in that post that must be removed. The top one is both a locking screw and a screw anchor for the front triggerguard screw.
On the left is the threaded bushing that is both an anchor for the front triggerguard screw and also the locking screw for the real screw that holds the trigger/undelever assembly to the spring tube.
This screw usually easily comes out of the Hakim, but this one wasn’t budging. I tried an impact screwdriver and broke the bit. Then I soaked the bushing in Kroil (a penetrating oil) for 2 days and still nothing. Then I soaked it in carburetor cleaner for another 2 days on the advice of someone I know. Still nothing.
It seemed like the last person inside the gun might have epoxied the bushing in for some reason, so that bond had to be broken. I tried heating both the screw and the post red hot (at different times) with a torch, but nothing moved. I would go out to the garage where the action lay several times each day and try to move the threaded bushing, but nothing was moving.
Call Otho!
Finally in desperation I did what Edith assured me always works — call my buddy Otho. Otho was an airframe and powerplant mechanic for the U.S. Army and afterwards for general aviation for many years. He has overcome mechanical problems of all kinds over the years. And he had a suggestion for this one. We needed to put heavy downward pressure on the screwdriver whose bit fit the slot exactly, and then turn the bit with a long lever.
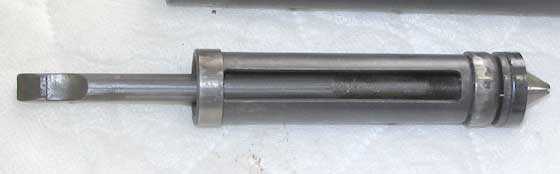
So, we chucked the barreled action in a vice on my drill press table and inserted a lathe center in my drill press. Otho had a special screwdriver blade that has a center hole in the end of the handle, and he ground the bit to fit the screw slot exactly. Then, I pressed down on the screwdriver with the drill press while he turned the screwdriver bit with an 18-inch crescent wrench. The screw broke free immediately, but remained so tight that we had to keep this technique up until the bushing was almost out of the hole.
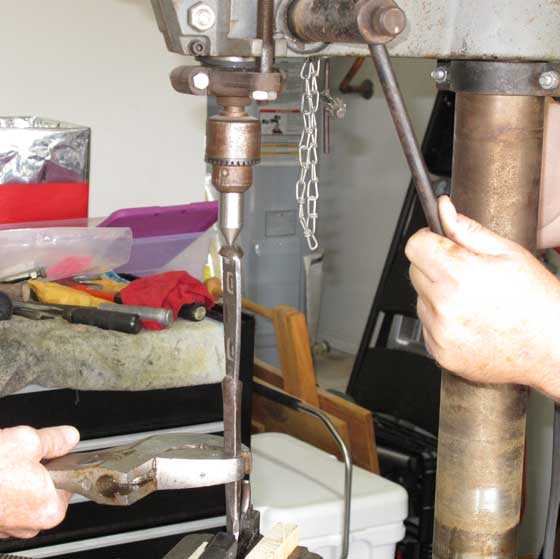
I am bearing down on the screwdriver blade with the drill press spindle while Otho turns the screw with an 18-inch Crescent wrench.
What was wrong?
I wondered why this bushing was so tight in the hole, and an examination of the threads revealed the reason. It was stripped! This appears not to be the correct bushing for a Hakim air rifle. It appears to have been made by a machinist — possibly a gunsmith — and the threads are not correct for the hole.
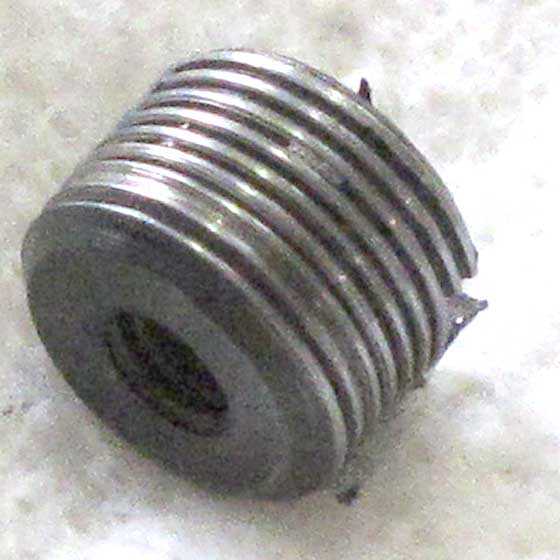
The threads on the bushing are completely stripped. No wonder it was so hard to turn!
From other indications I’ll mention, I can tell that whoever was inside this air rifle did not know how to tune a spring-piston airgun. He was probably a machinist or perhaps a gunsmith. His work was good — other than this bushing — but there’s a complete lack of understanding of airgun lubrication.
The bushing is threaded incorrectly — and most likely is the closest American inch-pattern thread size rather than a metric size. It turns out that the bushing uses a non-standard metric thread that’s finer than a screw this size would normally have. Whomever did the work probably got as close as he could with an American die and then said he wasn’t ever going to take the gun apart again, so it didn’t matter if it wasn’t an exact fit. It wasn’t going to come apart!
Miraculously, the threads in the post that this bushing screwed into are in perfect condition. So they’re made from much better steel than the bushing was, which is a miracle in my favor. With the bushing out, the disassembly could resume and proceed on schedule — after an extra week of downtime.
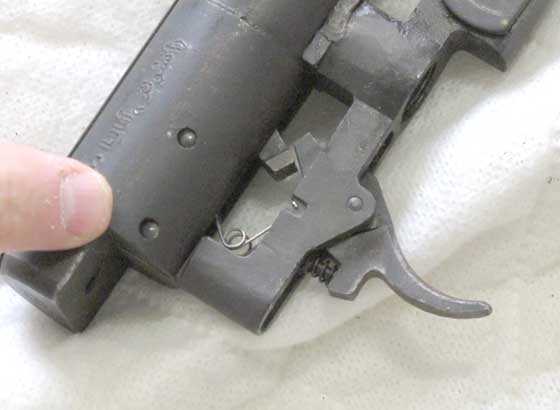
Beneath the bushing lies the real screw that holds the trigger/underlever assembly to the action. It was also tight. Once loosened, it came right out as it should.
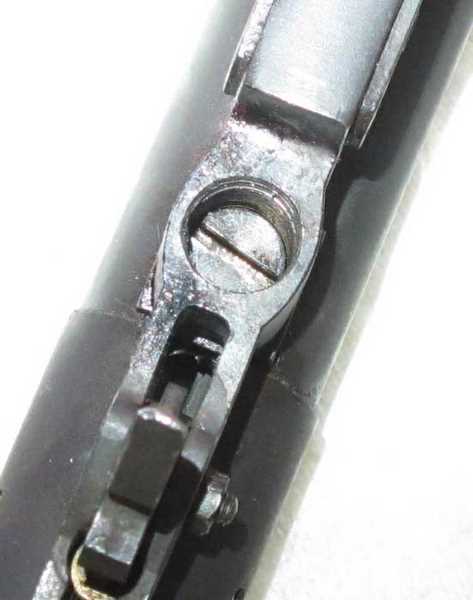
The real screw is beneath the threaded bushing. Once the bushing is removed, this screw can come out. Then, after a few more steps, the underlever and trigger mechanism can be separated from the action.
With both screws out, the underlever assembly is almost ready to separate from the spring tube.
Once the screw is out, the underlever mechanism is nearly loose, but still held to the gun by a guide, which has to come off, and one crosspin. Two more screws and the guide comes off the gun. Now, there’s just that crosspin to remove.
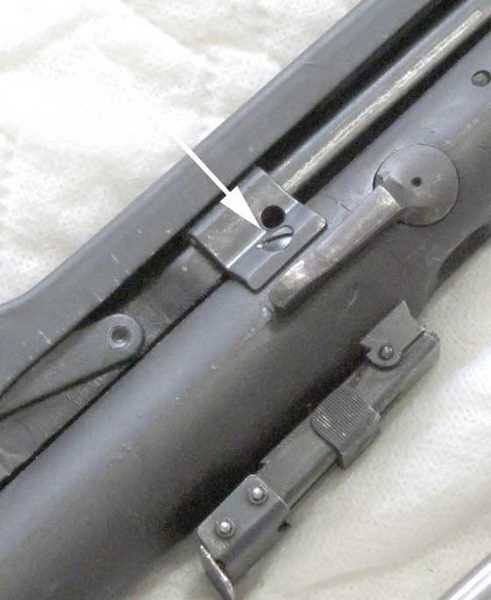
Remove both screws (one on each side) to remove the underlever guide.
When the guide comes off, the underlever and trigger mechanism can almost be separated from the action.
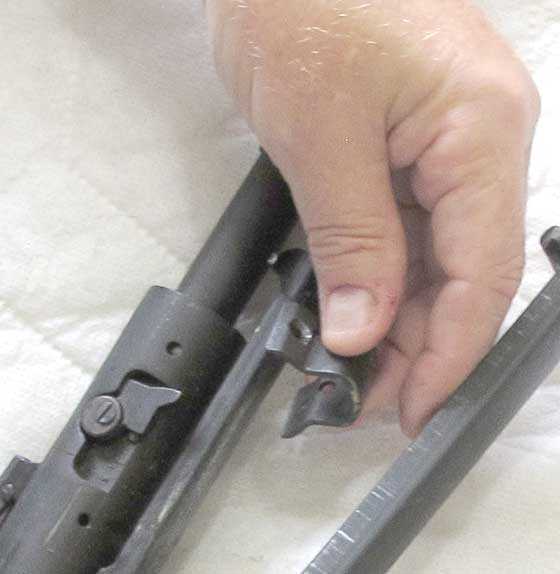
One last step is to drive out the pin that holds the trigger mechanism to the action. There are 2 crosspins in the end cap, and the rear one is the one that has to come out. The front one is for the sear and doesn’t hold the trigger to the action. Once the pin is out, the mechanism is free to be separated. To separate the underlever assembly from the action, you have to slide it forward until the flared end of the cocking link reaches a cutout in the spring tube and can be removed.
The rear pin must come out for the trigger mechanism to be free of the action. The front pin holds the sear and can stay where it is, unless you want to see the sear for some reason.

With the pin out, the underlever and trigger mechanism can be separated from the action/spring tube. I removed both pins because I wanted to look at the sear.
Wow — that’s a lot of work!
Like I said earlier, the Hakim is a complex air rifle. There are a lot of steps to disassembly, but now we’re at the point where things go quickly. With the underlever and trigger mechanism off the gun, the end cap can be unscrewed from the spring tube. If the mainspring is the correct one, all tension will relax just as the end cap reaches the end of its threads. No mainspring compressor is needed for this rifle when the correct mainspring is used. This rifle had what looks like a brand-new Hakim mainspring.
When the end cap comes off the gun, the mainspring can be pulled out of the tube. And the piston can be slid out of the spring tube, completing the teardown. The rifle is now disassembled as far as it needs to be for a gun cleaning and lubrication.
After unscrewing the end cap (the sear is still inside the cap) the mainspring comes right out.
The piston can now be slid out of the gun.
What I found
Every critical part in this rifle appeared brand-new and in perfect condition. And every part was also bone-dry. This is why I know that the person inside the gun last knew nothing about spring-piston airguns. The rifle cannot hope to function when all its moving parts are so dry.
In the next report, I’ll describe everything I saw inside the gun and what I did about it. I’ll also tell you what I did to the gun to fix the situation, and how it all worked out. I’m not trying to tease you by stalling. This report has simply grown too large.


Bb
This is a very through review/ teardown that give some good pictures of all the parts and their fitment and operation as a whole. That incorrect threaded bushing was removed just as I would have tried to do it by being able to apply enough downward pressure to along with a screw driver blade that fit very tight in the slot to get it to turn, the heat would have done good only if the bushing was rusted or epoxied in place. I am just glad it came out and with no damage to the threads in the action tube.
Is the seal on the piston a hard plastic or rubber or is it a steel type of ring seal as it is hard to tell in the picture from the reflections.
I look forward to your cleaning and rebuild article to see how you lube everything the correct way as I believe I am doing it right when I do spring guns from what you have said but being able to see it in pics will make me more confident in my own practices.
Don’t keep us waiting to long.
Buldawg
Buldawg,
I will tell you about the piston seal in the next installment.
B.B.
BB
That’s what I thought you would say.
Got to keep us in suspense.
Buldawg
Buldawg,
I will have to defer to the man on the scene, but I would put money down that it is a leather seal on this one. That was pretty typical until “recent” times. If you keep them properly lubricated, leather seals work great. The FWB300 has a metal ring for a piston seal.
RR
I have no problem with leather as that is what my B3-2 has and it works great after I soaked it in oil per BBs suggestion, it lets you know it is oiled every shot with a little puff of smoke out the barrel.
It just looks a little to shiny for leather, but then if it is as dry as BB stated it could be highly polished making it look shiny like rubber or steel. It just has to much reflections to be sure and BB is not giving it up till next time.
The piston head reminds me of the valve and piston setups in the newer crosman pumpers.
Buldawg
buldawg
Did you get your other nitro gun yet?
Gunfun
It is out for delivery today so I should have it by 3 to 3.30 and am eagerly waiting for it so I can have some fun shooting it and the Benji and get RDNA some number on both of them.
Buldawg
buldawg
Did they deliver?
Gunfun
The problem with cars like your SRT4 is they are to much fun to keep your foot out of it, but at least four bangers still get better mileage than V8s. though my old 64 goat did pretty good at 18 mpg around town and 22 on the highway with no computer controls .
I got my nitro venom but did not get a chanced to shoot because we had to go take care of some family business that came up and had to be taken care of right away. Got it all took care of and will be shooting both nitro guns tomorrow to decide which one I want to keep and which one to resell. I really like the venom and it looks to be just about brand new so I am happy with its appearance and condition. I am afraid that I will like them both and end up keeping both of them for awhile anyway. My whisper still has not sold I don’t think as I just got home a little while ago and have not checked to see if there are any bids, if it does not sell I am going to send it back.
I got to get some numbers to RDNA tomorrow on the 177 nitro to compare with his as I said I would.
I will let you know more tomorrow as I am wore out and going to bed early for once so talk to you tomorrow.
Buldawg
buldawg
Keeping both nitro guns ain’t a bad thing is it.
I would like to know how they shoot also. Talk to you tomorrow.
Gunfun
So much for getting to bed early as this blog is addicting and getting many friends that I want to reply to.
No keeping both guns is not a bad thing especially since one is 177 and the other is 22, I just have to get a better scope for the 22 as it is only a 4×32. The 177 venom is a 3x9x32 but neither are AO scopes so shooting in my back yard you do not get a real clear picture with either of them. I am also running out of corners and nooks to stand then up in because my gun cabinet is full of firearms and I one hanging gun rack that is full and no more wall space for more racks. I could have worse issues I guess.
I am going to get the scope on the venom in the am and probably go to wally world to get a cheap set of mounts for the Benji as it did not come with mounts but it has a very nice feeling GRTIII trigger.
The whisper still has no bids and has 1 1/2 days left in the auction so I have to check if it is going to cost me shipping to send it back if it does I may just lower the price to cover my costs and not have to lose money sending it back.
If the Venom is as smooth as the Benji and the firepower then it will be a keeper and may be used to do the field hunting until I can proof test my hipacs for a while as I don’t want to have a leak develop in the middle of a match.
So I think I am finally going to get off the PC and go to bed, talk to you in the AM.
buldawg
buldawg
Try turning your magnification down on your closer shots with that 3-9x scope that doesn’t have the adjustable parallax. That will usually sharpen things back up.
I want to see how your nitro guns go. I may just get one for some fun shooting in the back yard.
And I did shoot my pcp guns along with the spring guns Sunday in the wind. I wanted to see what they all did in the high wind we were having after the results I was getting with the spring guns I told you about. The guns that were shooting the faster velocities were the ones that stayed closer to the poa. The slower velocity guns were the ones that drifted away from the poa and that was with either the 10.3 JSB’s or the 10.5 box premiers. The .25 cal. synthetic stock Marauder was the winner with the 31 grn. Barracudas. The 25 Mrod acted like it wasn’t even windy. But I will say this that my .25 synthetic is shooting kind of hot for the still as shipped factory tune. Its shooting the 31 grn. Barracudas around 900 fps. So I’m sure that helped with the wind. I was going to tell you that but kept running out of time today.
Gunfun
Yea I have the scope set a 4 power and it is pretty clear its just when you are used to being able to adjust the focus perfectly for our tired old eyes a non AO scope just is not as easy to see out of.
I got some chrony result for RDNA posted over on the NGX page of the 3 spring guns and the only differenced between the coil spring and nitro 177 guns is with the 10.5 CP the nitro shot them 40 fps faster than the spring gun with 840 and 800 respectively, but the pellets were a tighter fit in the barrel of the nitro gun so I think that accounts for the 40 fps difference. the 7.9CP fit about the same between the 2 guns and gave the same 940 fps numbers.
Yea the heavier and faster the pellets the less the wind has time to affect their trajectory. Sounds like you had some good shooting time in the wind. and it allows you to develop your aim for different conditions you encounter when shooting.
Buldawg
buldawg
So are the nitro guns keepers?
And it was fun shooting in the wind.
Gunfun
Yes right now they are keepers and I think I am actually going to swap the 177 nitro action into the firepower stock because the weight difference is about 3 pounds and I think it would be easier to shoot the nitro gun in the synthetic stock . The firepower stock is just a little narrow at the front and fits my hands better.
I like the trigger in the 22 cal as it is very well adjusted with a nice length first stage and a very predictable second stage release. I have just got to do some swapping of scopes so that I have my Hammers 3x9x40 AO scope on the 177 nitro gun. The hammers scopes are magnum air rifle rated and comes with a one piece mount with scope stop pin and it has held up very well on my spring gun and it also has a mil dot reticle ( not a half mil dot ) that is easy to sight with.
So I am keeping them all right now and just getting rid of the Gamo as it is just to cheap feeling. I really don’t know haw they sell there gun for so much unless the fancier one are better feeling and shooting, but my first impression is not a good one in the quality and appearance department.
Buldawg
buldawg
Good. Glad you like the nitro guns.
And I’m with you on the Whisper.
RR
Since you mentioned the FWB300. Did you get to do your mini-sniping your were talking about?
No. Mrs. RidgeRunner had other ideas for what I should do with my time.
RR
I know how that goes.
I checked out that mini-sniping page and thought that was awesome, the visual comparison of 3/4″ at 20? or whatever yards being equivalent to 29″ at almost 1400 yards was a great image to show the type of shooting you can do with airguns and how challenging and fun it can be. Little microcosms of ballistic bliss…
RDNA
Yep. Cool stuff. We save the plastic bottle caps and use them.
RDNA
What is a microcosm. It sounds like your putting two words together to make one word mean something. Right?
Am I really getting that old? I can’t even understand English anymore. 🙂
Gunfun, a microcosm is a miniature representation of a larger concept, like a puddle having a food chain in it, or mini-sniping representing a warfare scenario on a smaller scale.
RDNA
I just searched it while you were posting. And its true. You can learn something new everyday. 🙂
BB,
That is a very interesting shaped piston head. I can see where that design could greatly reduce the volume of the transfer port while still providing a robust action assembly. Does the tip extend into the loading tap? I doubt such as that could possibly allow for an instance where damage could occur, but it would also reduce the residual volume.
RR,
I will tell all when we get to the next installment.
B.B.
That’s what he said…
Tom,
“The 39 Steps!” It is one of Alfred Hitchcock’s very best from his early, pre-Hollywood career! Starring Robert Donat as a Canadian tourist in England who gets caught up in an espionage caper, it’s one of the 100 greatest films of all time and probably the inspiration for Hitchcock’s legendary narrative term/plot technique he called “maguffin.”
I believe it is in the Public Domain and all over the internet for free viewing. I HIGHLY recommend it.
Michael
B.B.,
Great report. can’t wait for part two. Are you going to do a tune on the trigger??
Pete
Pete,
Wait for it!
B.B.
Hi BB,
I enjoyed the detailed blog. Good job again with the pictures. Tell Otho and Marsha I said hi. I never thought of using a drill press and a screw driver together like this. I will try to remember that one.
I have found that PB Blaster is the best penetrating oil I have ever used. I know it wouldn’t have helped this time but it is really good stuff.
This blog makes me wish I had bought that fiddle back Hakim from Larry.
David Enoch
David,
If you are serious about that Hakim, email me and I will put you in touch with Larry. He lives in Houston.
B.B.
Amazing to see that after over half a century bubba never laid his hands on this gun. Sourcing or making a replacement for that bushing has to be one of the easier pieces on that hakim.
Piston and spring look new. Are parts hard to source for these hakim’s?
kevin
Kevin,
Original parts are pretty hard to find. I have made a lot of simple replacements, such as a Diana piston seal for the Hakim seal, and I have seen some others as well. Springs are the easiest, though this one is original.
Maybe someone has a stash of parts somewhere, but it’s not me.
B.B.
B.B.,
So what you’re saying is that you got lucky with that vintage hakim considering the condition of most parts?!!
Speaking of getting lucky with a vintage airgun……..
1,056,90 EUR = $1,356.98 US Dollars. 210 bids! What am I missing?
http://www.egun.de/market/item.php?id=5070873
kevin
Kevin,
A similar gun in the box with all the same accessories was offered but didn’t sell for $450 at the Ft. Worth airgun show. Maybe the box wasn’t as nice, but the set was equivalent.
B.B.
It sounds like it was really a good thing that I did not go to that show. I have seen pictures of and read commentary about quite a few things I would have wanted to bring home with me.
Apparently there are a lot of Germans with a lot of money to spend on toys.
BB, I have been reading your report on the Beeman C1 (parts 1,2,3). Is there a part 4? I knew a machinist who used a drill press to tap holes. The idea is similar to what you did. Ed
ed,
It appears that part 4 was promised but never done.
Edith
Ed,
Yes, that seems to be the case.
B.B.
Do you still have the C1? Did you ever fix it? Will there ever be a Part 4?
Inquiring minds want to know!
RR,
I sold the C1 years ago.
B.B.
RR,
I bought that C1 from BB at the Roanoke airgun show and I still have it. The barrel pivot pin (plain pin, no pinch bolt) is worn enough to allow the barrel to wobble and kill the accuracy. I have a new pin but I have not been able to get back to it yet (too many other projects…)
BTW, a friend from work just loaned me his new in the box (still wrapped in plastic, never fired) Haenel 310-4 to play with. Since it is almost 40 years old the original grease is probably useless and a teardown and lube may be needed. Good thing Vince already has a multi-part teardown on the 310.
Paul in Liberty County
You just had to tease me, didn’t you?
Zimbabwae ed
If you want the tapped hole to be perfectly straight and centered in the hole you just got done drilling on that drill press or mill it is the only way to tap the hole and it also why any quality tap and die set will have the taps with a center drilled hole on the opposite end from the threading end. You can either use a drill center or a drill bit of the right sixe chucked in the press to apply pressure to the tap and keep it centered while you turn the tap with a wrench or put the tap in the T handle and use the center or drill bit in the centered hole in the end of the T handle. It is the best way to tap a hole if you used a drill press or mill to drill the hole to start with. And BBs and Othos use to remove that screw bushing is just another way to utilize equipment you may have at hand for different tasks than what they were originally designed.
I use my drill press as a mill for light work although it is not designed nor do I recommend doing it unless you know the dangers as I had a end mill hang up in a piece of work on my drill press because I was cutting to much at once and it stopped the shaft from turning and bent the shaft which I was lucky because a drill press chuck is only a press fit on a tapered end of the shaft and has no screw or bolt holding it on the shaft. it could have thrown the check with the end mill in off the shaft and in to me which would not have been pretty. Drill presses are for downward pressures only not side loads like mills are designed for and that is why a mill uses a draw bar that pulls the chuck/quill up into the head of the mill by means of a threaded shaft so that the check or quill cannot come loose under side loads.
Buldawg
buldawg
We power tap on the Bridgeports.
We center drill our hole and then use the correct drill for the thread minor diameter.
After that we chuck the tap up on the shank of the drill not the square on top off the tap. We tighten the chuck by hand as tight as you can get it.
Put the Bridgeport in low speed and set the rpm as low as it will go which is 60 rpm on our Bridgeport. Put some tap magic lube on the tap and in the hole then turn the spindle on.
Come down and touch and it will make contact then feed itself. You can even do blind holes that way that don’t go all the way through the material. You watch for the tap to stop spinning and slip in the chuck then just flip the switch to reverse and it will back the tap back out. That is the truest way to tap square.
And I use the Bridgeport and lathe to get broken bolts out all the time. I don’t use easy outs. I drill a hole in the bolt then cut off a piece of allen wrench that the points are bigger than the hole I drilled. We chuck the allen wrench up then use the arm on the Bridgeport to press the allen wrench down in the hole that was drilled in the broken bolt. While holding the arm down. And have the Bridgeport in low gear and the lowest rpm. Flip the switch in reverse for a second while holding down on the Bridgeport handle and it will drive the broken bolt right out.
Gunfun
When I took the machinist class at Harley the instructor told us about doing that but he was not a fan of doing it like that so we never got to try it. In a manufacturing environment like you work in every little time saving step you take makes a bog difference in the end.
We were in more of a test environment so speed was not an issue and actually it was a hindrance because if you worked to fast you may miss something of significance that could make a big difference in the end product or assembly processes.
I have never thought of using the mill like a huge easy out like you do. I have drilled holes in broken bolts and hammer in a torx bit or allen wrench like you do and use a ratchet to get them out.
Most of the time I cannot take my work to the mill or fit it in the mill to do it like you do so I basically do the same thing only at the bike or car or whatever it is that needs the screw or bolt took out of. I have also found to have good success with drilling the hole just to the point of getting into the threads of the hole and then use a punch ground to a sharp point on the edge of the radius of the punch face and use it to fold the screw in on itself so that it can be worked up out of the hole with a magnet or small pick, it usually does not damage the threads beyond being able to be still used as long as it is not a high load joint. If it is a high load joint then you just put in a helicoil or timesert, I much prefer a timesert myself if at all possible.
Buldawg
buldawg
We don’t do production work in the tool room as we call it where the manual machines are.
I’m usually fixing a piece of machinery that broke or making a part for a machine. Its usually not a rushed situation when I’m do that type of work. We can have it back up and running quicker than the part can get sent out or a new or rebuilt piece getting sent to us.
And I have done exactly the same things you talked about when I have to work on the machine out on the production floor. To me the keyserts are the best if you have to stay with the same size bolt. Thats we call them anyway. Otherwise we drill and tap to the next size up bolt. It just all depends on the situation.
And yes they already know what happens when you try yo rush something. Usually what I’m doing there is only one chance to do it right.
Gunfun
Yep its the same with me ,its either a keysert/timesert or drill up one size and tap to, next size.
I will only use a helicoil on a no or very low load fastener joint.
I bet you can fix a part of a machine way faster and cheaper than getting a new part sent to you.
With fixing stripped holes there is generally only one chance to get it right without ruining the part so that it is no longer useable.
Buldawg
buldawg
You can’t believe the things that made or repaired throughout time.
We also got a big electric drill that has a12″ by 12″ magnetic base made into it. We use that out in the shop alot. Amazing what can be done if you got the right tools as has been said before.
Buying used has always been about paying less for someone else’s problems.I’m glad Otho was able to help you get it apart without doing any damage to the receiver threads. I used to have the same problem breaking bits with an impact driver, that’s when I bought my bits from Snap-on, they would still break and I had to wait until he showed up to have them replaced but they were free.
Reb,
In my mind, Otho can fix anything. He’s incredible and sees things others cannot see. Even if others say something can’t be fixed, I don’t believe it unless Otho says so. It’s a privilege to have him as a friend.
Edith
Good man! I’ve tackled some projects that I’ve heard would never work and sometimes they’re right. but if it can be fixed it usually just requires more effort than some people are willing to put forth. I really liked the drill press idea, I’ll remember that one! Kinda the opposite of my spring compressor.
Anything can be done with the right tools. I believe that and try to have any tool I’ll ever need and all my neighbors come to me when they can’t do something and its always a case of needing the specific tool for the job. Two of em are mechanics and still borrow tools from me just about every time they’re working on something. It makes me feel good, I don’t know.
RDNA
Sorry I did not get any chrony numbers to you today but the wife and me had some family business come up that had to be took care of right away so I only got home a little while ago. I did get my 177 nitro venom today so I will get you some numbers tomorrow for sure.
Its the same way in my neighborhood with tools as I have 45 years worth of tools accumulated from being a mechanic and have just about every standard tool there is and most in doubles and triples, then also special tools for GM and old Datsuns as well as for Harleys and KZ 900 and 1000s. I was taught from my first job as a mechanic by the owner that a good mechanic asks to borrow a tool once and if he has to ask twice then he needs to buy one for himself and that is how I have worked and made my living by having the right tool for the job to make it easier and faster so that I could make a better living.
I will talk to you tomorrow with some numbers.
Buldawg
We use the Bridgeport at work for stuff like that and also to tap holes.
And I’m betting your gun wont buzz no more after you get it lubed up. And it seems to be a pretty straight forward teardown. I like the fact that no spring compressor is needed.
Neat trick, BB. As an old time motorcycle rider that cut his teeth on Japanese bikes, the Phillips head screws were forever stripping (the heads, not the threads) so we always used impact drivers. As the screws were a mild steel, I never broke a bit. On the Harleys I had, we used a chisel and a ball peen hammer on recalcitrant or stripped screw heads, the original Harley wrench and screwdriver (sorry Bulldawg but we did!). Years later, we discovered that Japanese screw heads were designed to a different standard – JIS and when I finally acquired a set of JIS screwdrivers, what a difference! They fit those screws perfectly unlike American Standard Phillips head screwdrivers. Now almost everything is hex head so my Allen wrenches get used the most.
Fred DPRoNJ
Fred,
I bought that impact wrench to work on Honda heads, and yes, I took off the large Harley nut with a hammer and chisel. As I recall, you got 6 chances before it was time to buy a new nut! What we did to save the cost of a large wrench!
B.B.
BB
Shame on you to.
Buldawg
Fred DPRONJ
No, you didn’t take a hammer and chisel to a Harley LOL. You would be surprised at the amount of fasteners I have chiseled out from my years at Harley. I actually got very good at removing broken screws out of various parts of a Harley as they vibrate so much that it is inevitable that you will not have a broken screw or ten over the lifetime of ownership. What matters is that you get it out and are still able to make a effective repair whether it requires a helicoil or a timesert to repair the threads back to usable condition is all that matters.
I much prefer a timesert to a helicoil myself as it is a much better and permanent repair for the threads of a hole than the helicoil, but sometimes a helicoil is all you can get to work and they are much cheaper than a timesert.
All the fasteners on my Harley and kawi are either allen head or hex head, and yes those original jap phillips heads were not a standard American phillips style head. Thats why the came with those cheap tool kits that always seemed to get lost.
By the way a Harley engine is designed to be at a 52% balance of the rotating assembly due to the 45 degree angle of the cylinders and that is why they vibrate the way they do. It is the best percentage of balance that keep the motor from self destructing itself within the rpm ranges they run in and also why they are limited in the max rpm they can turn safely to be at a max of 7000rpm for highly modified motors. If you want it to live for more than 10 to 15000 miles you do not go past 6000 rpm, Only full out Harley drag bikes go up to and above 7000 rpm but they are also rebuilt every few runs.
Buldawg
I’m with Edith. When I have a difficulty, I contact Derrick. The Egyptians seem to be fond of complicated gun mechanisms. In this respect, they are off the pace of their ancestral geniuses who built the pyramids. The longtime mystery of how they moved the enormous building blocks over sand was recently solved. They just watered the sand in front of the blocks which reduced friction enough to slide the blocks. There is a clear picture of this in some engraving. Things have obviously gone downhill since.
Ridgerunner, one of my fears of kayaking is getting rolled under water. To get power in your strokes, which is my real interest, you need to push with your legs. In the Olympics, you can see the paddlers working their legs back and forth against a footrest. In a recreational kayak, you apparently adjust pads up against your legs to transmit force. if you roll over, there’s a complicated technique with the paddle to pull yourself back over. But what if you don’t know this technique? You would have to work your way out of the padding to swim free. The .357 magnum wouldn’t help in that situation and it would be a ridiculous way to go. On the subject of gun rights, I have discovered a movie called Hot Fuzz which I’m eagerly awaiting. It’s about the most heavily armed senior citizens that you have ever seen who are outfitted with shotguns, semiauto pistols, Sten guns, sniper rifles, hideout guns up the sleeves and swords. Just my kind of film.
Buldawg, it sounds like this was not on your mind with your water sports. Sounds like your parents had more to worry about than a curfew, and your lucky that farmers only loaded their guns with rock salt. Did they ever hit? I understand that the salt really burns. I’m reminded of a movie where a kid is at a police station where the police are showing him a tape of a wild car race he was in which ends with a spectacular crash. He asks the policeman if he can get a copy, and the guy flips out. 🙂 It would be fun if you knew you would survive it all.
Gunfun1, the .17 HMR sounds like fun but surely there are disadvantages associated with the small fast round. These would be expense, stability in the wind and barrel burning. I would suspect the last in particular.
I’m back shooting again after a month of layoff! I believe I have lost a foot or so in distance from my 5 yard range, but the experience is mostly the same. My guns are still sighted on target. The working range means that my lighting is working. Its another lamp billed as daylight which looks fluorescent but apparently is really like daylight. So the yellow, indoor light is what was unnatural. I find that the new light doesn’t tire me at all. Now, I’m noticing how white natural sunlight really is.
Matt61
Matt,
The Hakim trainer was designed and built by Germans. The Hakim firaerm was designed by Swedes and built on Swedish equipment, with Swedish advisors.
B.B.
It is called the Eskimo Roll. I never could get the hang of it, so I stuck to canoes and rafts.
Matt61
They are around 16 dollars or so for 50 of them. I don’t use mine for plinking. Well maybe on occasions. And I don’t believe I have seen any barrel burning. Do you mean discoloration of the metal on the barrel or just the powder residue?
Matt61
I never gave drowning a second thought because as I said I would have to be unconscious to drown. I never thought about my parents worrying about me as I was ten feet tall and invincible back then LOL. Luckily we never got hit with the rock salt as I am sure it would burn like getting table salt in a cut only way worse. My best friend and me would have been those kids that asked for a copy of the video, but in my day there were now video cameras in cop cars. The whole reason for taking the chances we did was for the adrenalin rush you got from doing it and surviving.
buldawg
Just found out that my back injury,way back in ’94 wasn’t just fractured vertebrae but also my sacrum and pubic Ramus( usually occurring in elderly women but in my case it was a ’84 Ramcharger rolling on top of me). That explains the pains I’ve suffered ever since.I just hope they’ll help me get it fixed this time around. It’s not looking very promising at this time.
I posed this question to I think Buldawg, but has anyone modified the breech of a springer, bored it opening it up a little so the pellet slides in and is forced into the rifling when it starts moving?
Ain’t that what the FX smooth twist barrels are about?
Reb
They are a smooth bore all the way to about 2 or so inches from the muzzle end of the barrel. That is where the rifling twist starts. That’s the smooth twist. They still have a lead in chamfer like normal barrels.
I think what RDNA means is make the lead in chamfer longer so the pellet would be easier to load and be seated in deeper in the bore. I guess kind of like deep seating with a tool.
Maybe I’m mis-understanding the question though.
That’s exactly what I mean, any velocity gains or losses are secondary to wanting the pellets to engage the rifling the same way every time. Pushing them in by hand and them getting marred or unevenly placed is an annoyance to me, I hate feeling them go in back and forth or rough at all. This puts them in the same place, aligned with the bore with no marks. I think it will have velocity benefits in that the skirt is getting hit and expanding almost simultaneously as engagement, if not beforehand.
RDNA
I replied over on the APX pump. Check it out over there. Thanks.
Hi, folks. Rookie airgun maintenance question for you. I have a lovely old Walther LGR Universal. My routine after I finish shooting is to wipe down a gun with a Ballistol (or maybe silicone) soaked rag. Do you veterans think I should do anything special with the stippled areas of the LGR? Like maybe avoid oiling them up so they stay grippier?
Thanks,
Jan
Jan,
I never touch stippled areas on a gun. You seem to already know that a lack of too much oil will keep them grippier. The oil from your hand will be enough to keep the wood conditioned. Even when finishing newly stippled areas I thin the oil dramatically.
kevin
Thanks, Kevin!
G’day BB et All
Thanks for the detailed look inside the Hakim. I found it interesting they use the same threaded end cap as the HW80/Beeman R1, HW77/97, and the venerable HW35. I find this system quite easy to work on excepting when it comes to line up the dovetails. Because of my poor eyesight, I use the rear sight from an HW77 to make sure both dovetails are lined up. Evan if it looks like the dovetails are lined up, you may still feel a “bump” when you slide the sight along the joint. I wait with interest to see the type of piston seal the Hakim uses.
By the way, if you just left the threaded bushing out, would there be any detrimental effect concerning the screw underneath.? It seems to me the bushing is there as an extra assurance 9to make sure the screw stays tightly in place. I’m sure someone will show me the folly of my thinking. Of coarse that is the beauty of this blog.
Ciao
Titus
Titus,
The bushing is also where the front trigger guard screw threads into. It pulls double duty.
I haven’t started reading the comments yet, but…
I am not happy with the current [read more] scheme…
At least, not for the /current/ day blog entry… It just adds another tedious page delay/load for anyone who regularly reads the blog each day.
It makes sense for the subsequent historical blogs, but not for the current installment.
Wulfraed,
Here are our choices:
1. 7 blog excerpts on the home page.
2. 7 full blogs on the home page.
Either way, you’ll have to click to read/make comments. We currently have the 7 excerpts. Yes, you have to click to read more, but you’d have to click to make comments if we had 7 full blogs on the home page (which is how the blog used to be set up). So, we’ve added that click up front and taken away the need to click to make comments. Same number of clicks, but we’ve moved the click.
Apparently, about half our blog readers are on mobile devices. Having 7 full blogs on the home page (which we used to have) was not mobile-friendly. Nothing is set in stone, and Pyramyd AIR is still reviewing things.
I appreciate your input. I encourage everyone else to comment on the new setup. Do you find it user-friendly or unfriendly? Please be specific about what you do/don’t like.
Thanks,
Edith
I normally read the comments via an RSS collector (Firefox Sage) and use “open in new tab” to get the message for a reply.
But opening the URL for the “current day’s blog” only to have to hit a “read more” link is rather unfriendly; in my view.
While not web-service expert (my forte has been number crunchers on “main frames”), it seems to me that having an exception for the most recent blog should be easy…
Insert {today’s} blog text
loop for date in today-1 to today-6
insert {date’s} blog extract
end loop.
rather than the apparent
loop for date in today to today-6
insert {date’s} blog OR insert {date’s} extract
end loop.
{The only web pages I maintain are static — and it is time for me to update the Bestiaria convention pages}
Wulfraed,
I’ve forwarded your comment to Pyramyd AIR.
Thanks,
Edith
You don’t need to thank me — I’m just the “grumpy cat”* of this subject…
I need to thank you for the actions you’ve taken.
* How the mighty have fallen… since “Baron Wulfraed” is a Vargr (granted, Traveller Vargr are genetically modified, but the root word is European for Wolf)
Little PSA, the gamo point sight they’re selling at wally box, total crap, it only 13 bucks, but should be able to SEE through it! Overly reflective, ultra dark optic and an overly bright point creates a completely obscured sight picture. Maybe one specific set of conditions you’ll actually be able to see anything at all. It was a shot in the dark… pun intended.
RDNA
Did you mean BSA instead of PSA? You ended up getting one. Did you take the scope off of your 1377?
No no, psa, public service announcement, as in I wasted my 13 bucks so you don’t have to, lol. Its a gamo, says for airguns and airsoft, shoulda just said airsoft. The fixed 4X is going right back on. Out tonight at my friends woods at his house with the blaze, seen a rabbit but don’t want to kill them, the roof chewin squirrels are the main objective, ruining his roof so we get to pest em.
RDNA
Oh ok. And I think that 4x scope should be a nice scope for your 1377.
And I know what you mean about them roof chewing squirrels.
BB
I don’t know if you made another screw yet to replace that stripped out one you had trouble getting out but thought I would make a suggestion.
If you do have it made with a screwdriver slot don’t have the slot go all the way out to the threads or have the diameter of the screw smaller than the threads where the slot will be made. Then the slot can exit on both sides. That way the screwdriver slot will not contact the threads.
I’m thinking since the screwdriver slot was making contact with the threads that is also possibly is a reason the threads got stripped.
Just thought I would throw that out there so it doesn’t happen again.
GF1,
Otho is looking at using the original screw and cutting it smaller to fit the hole. The threads in the gun were not stripped and are still very sharp and clean.
B.B.
BB
It sure did flatten the thread on the screw though. Do you know what metal they use on the gun? And is it common practice for them to heat treat or case harden the metal on the gun.
They did something right with the metal on the gun if the threads with stood that screw. But I guess maybe they made that screw out of something soft like cold rolled steel possibly. Maybe Otho should make that screw out of different material or harden it after he reworks that one.
GF1,
The bushing only needs to serve as the anchor for the triggerguard screw and that doesn’t take much. Cold rolled steel will be fine.
B.B.
BB
That’s true but doesn’t that trigger guard screw help anchor the stock to the action. Its got to be taking some of the force from the cocking effort I would think.
Maybe that’s what happened to the original screw that they tried to replace. Maybe it finally gets wore out and starts getting moved around.
I recently bought a Crosman 1077 pellet rifle. When I shot it a few times, it didn’t seem to have much power. I shot at some cans and plastic jugs from 20 feet. I tried again another day, and the gun would not expel the pellets. (I do hear it “firing”.) So, I replaced the CO2 cartridge. The gun still does not expel the pellets. When I remove the clip, it is full. Should I replace the CO2 again? Is a seal perhaps leaking?
Any ideas?
Aubrey,
This article might help you stop the gas leak:
/blog/2014/04/airgun-lubrication-gas-guns/
Edith
Aubrey are you sure the co2 cartridge was pierced thoroughly?
Aubrey,
I answered this where you asked it before.
B.B.