by Tom Gaylord, a.k.a. B.B. Pelletier
Several readers asked for more of my photo lessons recently. I won’t shower you with them; but after looking at some firearm and airgun websites, I see this is needed.
Today, I want to discuss the one thing that trips people up more than any other aspect of photography — the use of a flash. I always laugh when I watch the Super Bowl, seeing tens of thousands of fans way up in the stands shooting pictures on the field with their flash strobes going! Someone once told me they do it because it is impossible to turn off the flash on some cameras, so I think there’s also some misinformation floating around out there.
I’m talking about modern digital cameras, including the ones that come on smart phones these days. There are some circumstances when the use of a flash is mandatory, but if you do it right the results can be surprisingly good.
Watch your angle of incidence!
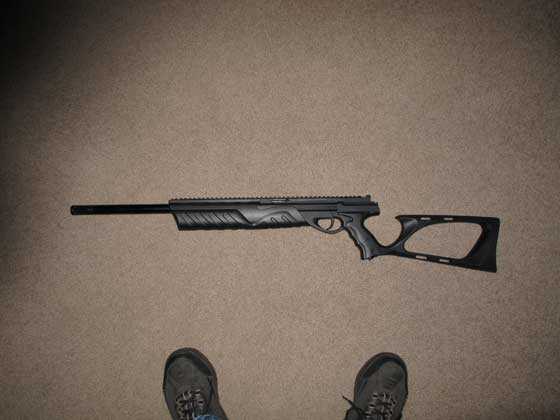
In other words, do not hover your camera directly over the subject, thus allowing the light from the flash to bounce straight back into the lens. If you do, what you get is a burned-out bright spot in the center of the image that drops rapidly to very dark toward the edges. It’s especially noticeable when you’re photographing a long gun.

Here’s the whole image taken with the flash directly over the subject. You can see the light fall-off easily here. Of course, the subject is also less well-lit at the extreme edges.

Here is the same image cropped. It looks better; but now that you know the light is falling off at the edges, you know there’s less detail than there should be.
When the flash is angled on the subject, the darker subjects will show less detail. What’s really happening is that the background is also not as exposed. The raw image may not look as good, but there’s more detail in the subject to be pulled out by software.

Here, the picture was taken from beneath the subject. The light from the flash reflected away from the camera lens, allowing more of the dark subject image to show. It doesn’t seem to have as much detail in this view.

This is the unretouched enlargement of the last picture. More detail is seen, but there’s a lot more that can be pulled out.
Photoshop
In Photoshop, I can take the image…which has more light on the subject…and bring up many more details because they’re actually in the image. Other photo processing software may not have the same features, but often there are ways of pulling up more detail, as long as they’re in the original image.

This is what a simple Photoshop adjustment of light can do for the image. See how much more detail is visible?
But that’s not all you can do. You can also shoot this picture from the top, rather than the bottom of the gun. Shoot it angled and see what happens. You might see even more details when the image is put right-side up.

Here is the entire image shot from an angle above the subject.

This is the same image enlarged and cropped.

And here the light has been adjusted and the image flipped around in Photoshop. I know the center of the gun looks too light, but by doing that I can also bring out many details at the extreme ends that would otherwise be hidden.
Don’t shoot a dark gun on a light background!
Nothing wipes out the image of a dark gun faster than using flash with the gun against a light background. Your digital camera does not possess all the image processing software that’s in your brain. It thinks you want to see the light background instead of the dark gun, so it underexposes the image.

The light background told the camera to underexpose this image.
The trick is to push the flash to as bright and long-lasting as it will go. The camera may argue with you that you’re losing detail on the background, but the dark subject will show more detail. Most cameras do allow the control of the flash to some extent. You just have to learn how to use it. It’s probably in one of your software screens.

In this image, I’ve manually set my flash to 2 full stops above the normal range, which is as high as the camera will go. The viewfinder warned me the image wasn’t right, but I got more detail from the subject, which is all I wanted.
Better still, shoot dark guns against a medium or darker background. Then, the camera won’t underexpose the image and more detail will be seen.
Flash on bright subjects
If flash is difficult with dark subjects, is it easier when the subjects are very bright? Not really. However, things do change and you need to be aware of what happens.
Just as you don’t want to shoot directly overhead on a dark subject, you also don’t want to do it with a bright subject. It overexposes the bright subject and washes out all the detail.

Don’t shoot from directly above a bright subject.

On the other hand, an angled shot isn’t the answer either.

The answer is to make a slight angle and also decrease the flash. Then, process the image better.

Once the light is adjusted in Photoshop, there’s plenty of detail on the bright subject as well as the dark one.
Summary
Of course, you never use flash when you don’t have to. A tripod and long exposure is always better, if you can do it.
Say — what about those phone camera shots I promised you? Well, I’m out of time, but here’s one just for thought. It was taken without flash outdoors and is large enough and sharp enough to be published in print.

I took this photo of a S&W .44-40 Frontier at the gun range with my iPhone. It’s actually 300 dpi and 9 inches wide!

Yes — seeing flashes going off in the stands at a sports event (or even from the audience of a school graduation) is rather humorous.
* the built-in flashes of cameras (even expensive SLRs) are only designed to provide FILL-IN on daylight shots (to reduce the dark shadows under eyebrows/noses/chins/hat-brims) in a range of 7-15 feet.^
* the built-in flashes are close to the axis of the lens; this results in essentially straight out and straight back lighting — no shadows to bring out details
* flash or no flash: the camera exposure system assumes the /average/ of the scene is ~18% grey (the average human palm comes in at ~36% grey, or one stop brighter). So a small dark object on a light background will be underexposed (the camera sees a lot of light and reduces the exposure); conversely, a small bright object on a dark background will be overexposed.
– Without flash, and presuming a camera with true Manual mode, if one can frame a grey card (which is an 18% grey) so that it fills the field of view, under the lighting the subject will be under, one can “half press” the shutter button under “P” mode, and take note of the camera selected aperture/shutter combination. Then going to “M” and dialing in the same combination should give a proper exposure for the subject.
– Flash mode is more difficult, since built-in flash is not controllable on most cameras (even in “M” mode, the camera may try to control the flash). A shoe flash with manual power controls can give some chance — you’d have to shoot the grey card with the flash set to some fixed power level, and examine the final exposure settings.
– The most precise is to use a fixed (manual) flash power level AND an incident type flash meter sitting on the subject and aimed at the lens. Hopefully a meter that can be programmed to ignore any “preflash” (at one time TTL flash metering used a sensor that read the light bouncing off the film, so there was no preflash — but digital sensors are so reflective that lenses need anti-reflection coatings on the inside, and flashes do a preflash at low power to compute the flash needed for the actual exposure… Not to mention red-eye reduction modes)
+ the dome on an incident meter translates the light hitting it (and the subject) into the 18% grey reference… whereas a camera meter is reading light reflected by the subject and that is affected by the subject’s own albedo.
* Shoe flashes can often be tilted to bounce the light off a white ceiling. This does two things: the “area” of the light source becomes larger — fuzzier shadows rather than knife edge; and changes the angle of the light relative to the camera.
^ shoe-mount flashes have more power. My Canon 580EX-II is rated for 58 meters with an f1.0 lens at ISO 100. Canon no longer sells an f1.0 lens but… With an f4 telephoto that flash is still good for 14.5 meters at ISO 100. If ISO 400 gives reasonable image quality, the range becomes 29 meters, or close to 100 feet! {Modern SLRs can produce sports-page quality at ISO 1600 or higher — ISO 1600 gives you nearly 200 feet, or the width of a football field from the lower rows of seating). And a “pro” level f2.8 telephoto can extend that distance. Of course, the subject needs to be equidistant — a subject split between 20 feet and 50 feet will either underexpose the 50 foot, or overexpose the 20 foot.
I find photo’s like this often gets helped by a flash diffuser, simple opague piece of plastic a little ways in front of the flash, mine is usually a piece of milkbottle with a hole cut in it to fit on the lens, but a piece held in place by a hand also works… just not in front of the lens 😉
My wife is photography wizard in our house but she has very little Patience teaching me the ins and outs of it, so it’s really nice to have some advice on how to achieve some splendid results without having to go to the missus. Thanks B.B. for a very informative article, and I’ll also have a go at Shakes suggestion as I’m a great believer in reusing plastic milk bottles, they also make great guitar plectrums.
TTFN
best wishes, wing commander Sir Nigel Tetlington-Smythe
B.B.
I think a lot of people would not have seen much problem with most of your pics if you had not pointed out what was wrong and what caused it. There are some that I would accept for a “fast and dirty” shot if that was all I wanted, but there are some that I would not have accepted at all.
There are a lot of times I will take several shots with a slight change with each one, then pick the one that is best. Then it’s time to see if I want to doctor it with software. I may not really like the best I get doing it this way, but as long as I get what I consider “good enough” for the intended purpose I will let it ride.
For some reason I was not expecting flash photography. I have seen plenty of examples that almost anyone would have to admit are REALLY bad. Of course some pics can be made deliberately bad to hide things.
twotalon
TT,
You have described how I generally take pictures, too. All I am doing here is explaining why I do some things, so people won’t have to experiment so much.
Yes, flash is usually poor for most detail shots, but something you have no other option. If the light is poor and you don’t have a tripod or steady rest, flash may be the only way to take the shot.
B.B.
B.B.
Halogen work lights can do the job at times. You need one or two and enough outlets for those power sucking buggers. Then maybe something to bounce the light around with.
twotalon
TT,
That is how I light most of my shots. This report was just for those times when the lights aren’t available.
B.B.
O.K. B.B
I get the “picture ” now.
Doing what you can under poor conditions with bare minimum equipment.
twotalon
You are dead right about natural light. Another trick is to shoot from the shadow side of the gun, like your last picture. Shadows define an image, not light! 🙂
Another trick is to have a light which you can dim on the shadow side to add small highlight so emphasize the reflective gun metal. A simple $10 house light will do.
I really enjoyed your shot show report. Thanks again.
BB,
Many gun auction sellers would to well to heed your advice in this (and previous) photo-related posts. There are just too many dark, muddy pictures out there.
I have had my best results by taking gun pictures outside, under the trees using a medium-gray blanket for a background. No flash is needed and I usually set the camera to manual and overexpose the shot to get more detail. Overcast days work the best since there is no strong, direct light. The downside is limited time and being at the mercy of the weather.
Paul in Liberty County
Edit: “would do well”…
Paul,
That is a great way to take good pictures. Lacking that, you can also bounce a powerful quartz work light off a light-colored ceiling and get the same soft light on the subject. I use a 500-watt Tota-Light shined straight up at the white ceiling to take most of my indoor shots.
B.B.
BB,
a past blog you did on how to take pictures for selling on websites really came into “focus” this past week. I was perusing Gunbroker for pricing on a M-1 Garand (hope to buy one this year) and came across one seller’s offer with photos completely out of focus. Two photos were displayed, one of the entire rifle and one of the top of the action. Details were non-existant. So were the bids on that rifle despite the seller’s claim that the rifle was “as new”. The next ad, located below with numerous, sharp photos ended up selling for $770. At last check, still no bids on the out of focus ad.
Fred DPRoNJ
Fred,
People just don’t trust a picture that is out of focus. They think it’s done intentionally to deceive. Sometimes it is, but more often the guy with the camera doesn’t understand that he cannot hold the camera steady for an exposure that takes a quarter of a second or longer. This is where the use of flash helps, because it automatically makes the exposure a fast one. Of course if the person is ignoring the camera’s warnings that he’s too close to the subject, then nothing can be done.
B.B.
Check our the Civilian Marksmanship Program (CMP). The last time I looked, M-1 Grands were still available. It is a bit of work to qualify but it is a lot less expensive.
Mike
Thank you, Mike. I do qualify for the CMP and will probably go that route but in the interim, I wanted to gather info on pricing and availability and perhaps find that “diamond in the rough”. Perhaps someone on this blog …..?
Fred DPRoNJ
I have one I purchased from them in the early 1980’s. It was called the DCM (Director of Civilian Marksmanship) back then. It was like new, it had been totally rebuilt and put into storage. I still have it, still use it.
Mike
Tom,
On a whim I followed your “Who Writes This Blog?” link expecting to read something about you and/or Edith. I didn’t see anything useful there, just a list of all the posts back to 2009. Is this still under development?
-Chuckj
Chuck,
I just checked it and the link seems to be broken. Edith will check it in a few days, but she is sick in bed at the moment. She caught something at SHOT that has her down. It’s probably just a bad cold.
B.B.
Chuck,
Yes, this has been a problem. If I’m not logged in, I get a blank page. I assume you’re logged in and get that listing. When I’m logged in, I get this text (which I wrote some time ago):
Tom Gaylord has been an airgunner for over a half-century, but it was the Beeman company in the 1970s that awoke a serious interest in airguns. Until then, all he knew were the inexpensive American airguns. Through the pages of the Beeman catalog, he learned about adult airguns for the first time.
In 1994, Tom started The Airgun Letter, with his wife, Edith. This monthly newsletter was designed to bring serious reports about airguns to the American public. The newsletter and Airgun Revue, a sister magazine about collectible airguns, was published from 1994 until 2002, when Tom started Airgun Illustrated – the first American newsstand magazine about airguns.
Tom worked for three years as technical director at AirForce Airguns, the makers of the Talon and Talon SS precharged air rifles. Today, he writes about airguns and firearms for various publications and web sites. He also makes videos, and you’ll find short clips embedded in some of his artices on our web site.
Tom is a consultant to Pyramyd AIR and writes the Airgun Academy blog (under the name of B.B. Pelletier) and is the host of Pyramyd AIR Waves, a monthly podcast.
Since I have administrative privileges on the blog, it’s showing me the correct text. I’ve asked PA’s IT department to make this link available to anyone who clicks on it.
Thanks,
Edith
Hi Edith … would you mind if I direct an email message directly to you? It’s not Blog material, I think.
RWS,
Edith is sick in bed right now. She will read the blog later this evening or tomorrow.
B.B.
RWS,
Sure. Send it to edith@pyramydair.com.
Edith
Edith,
Get well soon.
kevin
If you are running a temp. see the doctor! Get Well!
Mike
Edith
Get to feeling better. Have that bald guy make you some soup.
SL,
He’s bringing me food and holding on to my cell phone so I can get some rest. I’ve never been hit so hard that I couldn’t work thru it. I understand that a lot of people at Pyramyd AIR have been hit by the same thing. This version of the flu is really hard to shake, although I do feel marginally better each day. At this rate, it could take another week before I’m back to normal (or what passes for normal for me 🙂 )
Edith
B.B. –
This post looks like it could help a lot of people who are trying to get acceptable shots with the gear that they have. I have my own studio and shoot this kind of stuff for a living, yet I still find that I shoot a lot with my compact camera as well. When shooting with my pocket camera while using a flash, I do find it helpful to stay near the outer reaches of the flash range in order to let the light spread as much as it can. For most cameras, that would be about 15 feet. The bright spot in the center is still there… just minimized. This is pretty hard to do while shooting straight down, even standing on a chair or ladder, because most ceilings just aren’t high enough. For me, the best results come from propping the subject up against a backdrop of some kind, and shooting across the space at it, rather than down on it. This means zooming in to fill the frame, but even that looks better, as it doesn’t distort the subject as much as a wider angle shot.
Just my two cents worth.
Regards,
– Jim
Jim,
Using the zoom as you describe works very well. Combine that with outdoor “diffuse” lighting against a greyish background (rocks or ricked up firewood work well), and anybody has a pretty good shot at a usable picture. I’ve been working on my skills photographing longrifles — at least airguns aren’t usually 5-6 feet long! That will show field curvature pretty quickly if you are too close!
Also, for detail shots, the same setup is an alternative to macro worth trying.
Jim,
That’s a good tip! I used to have to do that when I shot long guns with an RB67 and a 90mm lens. I had to get really far back from my subject. I built a slant board that had movable pegs and could be covered with fabric to shoot the long guns. It worked well, but the day I got a wide lens for my Nikon FM2, I gave up the RB altogether.
B.B.
B.B. –
Film? Yeah, those were the days.
– Jim
BB,
Thanks for planning to do a blog on aiming lasers and dot sights. I do not own a gun vise, just a bench vise that could be padded for holding a pistol.
Adjusting a dot sight and a laser to register at POI sounds simple, but the problem is holding the gun in the exact position it was when the shot was fired. I would probably be setting up the pistol for a range of fifteen feet. I have room in my basement to do this, if I knew how.
Les
Les,
No vise is required and it is not hard at all to sight in either a laser or a red dot.
Tomorrow.
B.B.
B.B.
A very useful blog! Thanks!
duskwight
Pretty cool the way that your photo progression shows those 2 top slots on the buttstock. Thanks for the hints, BB! 🙂
/Dave
Here’s further proof that there is a fundamental connection between shooting and photography. And if you’re trying to sell something online, good pictures are indispensable. Much of my buying is based on photos.
Victor, thanks for the advice about psychology, but here the plot thickens. I was trying too hard to work on fundamentals as opposed to results! I seem to have lost the path to my magnificent sneering indifference where I would perform the best, but at least I’m reminded of my goals.
Goatboy, who’s Sir Nigel? He sounds like a man who could have owned a Lee-Enfield.
On YouTube, I found another point-of-view about where the wind has most effect on a long-range shot. David Tubb, greatest competition shooter of all time says near wind. Nancy Tompkins master 1000 yard shooter says far wind near the target. They can’t both be right can they? Now we have another opinion to break the tie. This comes from a video about the instructors of the U.S. Army sniper school. These guys have even more riding on their shots than the competition shooters, so you would think they know their wind values. And their opinion about the distance where the wind has greatest effect? … In the middle! …
Saw Zero Dark Thirty last night. Not a bad film. So, it is possible to work through bureaucratic indifference. And after seeing the final raid, I feel better about my helmet-mounted bike light.
Matt61
I presume you mean a cross wind… Though experiment time:
On a long range, the projectile velocity will have dropped near the target end. This means a wind gust (not a steady wind) of “n-fps” spanning “m-feet” has more time applied to the projectile per unit distance of the trajectory.
Near the muzzle, velocity is highest, so that wind of “n” has less time per unit distance.
Summary: near the target, with a slower projectile, the wind has more time to push it to the side by some amount.
Near the muzzle, the wind doesn’t move it as far to the side — but consider that a 1/4″ deflection in the first 100 yards may mean a 2.5″ deflection at 1000 yards. The same wind at the far end may cause a 1/2″ deflection in the last 100 yards.
It probably comes down to the ballistic coefficient of the projectile, with the related velocity difference muzzle vs target. The less the velocity loss over the time of flight, the more a gust near the muzzle will drive the deflection.
Matt61,
In addition to the basic fundamentals (finding your natural point of aim, a good grip where the sight line-up with your arm so you don’t have to twist your wrist, ignoring your wobble (area), causing the gun to go off without disturbing your sight-alignment, and follow-through, etc.), there’s also the timing (between 3 and 6 seconds max), and detecting whether or not you are relaxed during shot execution.
Knowing all of these things is not enough. You have to deliberately practice until you know how to shoot ONE shot perfectly. My advice is that you shoot 10 shots, then take a 20 minute break before shooting another 10 shots. In fact, if you can afford a 30 or 45 minute break, then even better. Sometimes we solve our problems during a break. But chasing a bad experience may enforce the wrong lesson.
Victor
Tom,
Thanks for this article. Need all the tips about photography I can get.
Lots of stuff online but I don’t know anyone but you that has perfected photography skills in taking pictures of guns. I don’t have big problems with taking photos of people or landscape but getting the details out of a well blued gun are difficult.
Angle of incidence is a great tip. I’ve been allowing the flash to bounce back directly at the camera. You taught me several things today.
kevin
B.B.,
What a timely article. I was just looking at used Anschutz rifles last night and found that picture quality tended to correspond with the quality of the gun. Pictures of rifles in good condition were taken with great care, while rifles in poor condition were photographed poorly as if to hide something. In one case, the seller provided pictures that didn’t show (actually covered) damage, and yet they mentioned it.
Victor