by Tom Gaylord
Writing as B.B. Pelletier
This report covers:
- I learned how to sharpen a razor!
- Confusion reigns supreme
- I didn’t know…
- Setting the bevel
- The spine is the key
- Electrician’s tape
- All stones remove metal
- What does it look like?
- First success
- Stropping
- Can you shave with a knife?
- It takes time
- Summary
If you have followed this series you know I’m doing this to experience how it feels to be a new guy at something. That way I can write better for new airgunners. Or, at least that’s the thought.
I learned how to sharpen a razor!
Since the last report I have finally learned how to sharpen a straight razor. And my way is unlike any of the three ways I told you about last time. Oddly, however, it is very close to the way a certain custom razor maker sharpens the blades he makes. I watched a 37-minute video he made, showing the making of a straight razor, start to finish, including sharpening and shaving to test it. I actually watched several blade-making videos and all of the makers sharpen like I do, more or less.
Confusion reigns supreme
Now that I know how to sharpen a straight razor I can definitely see that the subject is confusing to almost everyone. When I read so-called “How to sharpen…” articles now I am able to evaluate them because of the little experience I have had. I can tell you — most of what is written about sharpening straight razors is wrong, and reads like the writer never actually did it himself.
I didn’t know…
…what I didn’t know, when I started this report! Just like a beginning airgunner, I did not know what to believe and what not to believe. I watched videos and read reports, and had to guess at the parts that were left out. I tried a vintage Dubl Duck Wonderedge straight razor that had a great reputation, but it cut me and pulled hairs (after I “sharpened” it). Then I bought a brand new Dovo razor. I thought all I had to do with this one was strop it and shave — surely a manufacturer would not let something go out the door that wasn’t perfect?!!! Yes, they would! We see the same thing with airguns, don’t we?
It wasn’t until I shaved with a razor I got on ebay that the seller guaranteed was shave ready that I got my first pleasant shave. It was about a month into the experience, and I was accelerating things faster than any new airgunner normally would. That razor shaved me very close without a single nick. I was getting the hang of shaving by this point in time, but also I finally found a good blade. I befriended the seller and we now converse all the time.
Setting the bevel
The other glaring error in the body of knowledge is a lack of detail in what is written. They dance around the most important parts, never actually describing them, but referencing them — as though their readers obviously understand. “Well, everybody should know that!” In layman’s terms — Then, in step two, a miracle occurs!
The single most important part of sharpening a straight razor, or anything that has a sharp edge, is the setting (establishment) of the bevel. That means getting the angle on both sides of the blade (if the blade is sharpened on both sides, because some aren’t) the same. This has to be done mechanically — which means doing it in such a way that you can’t easily make a mistake. I will now show you how that is done with a straight razor.
The spine is the key
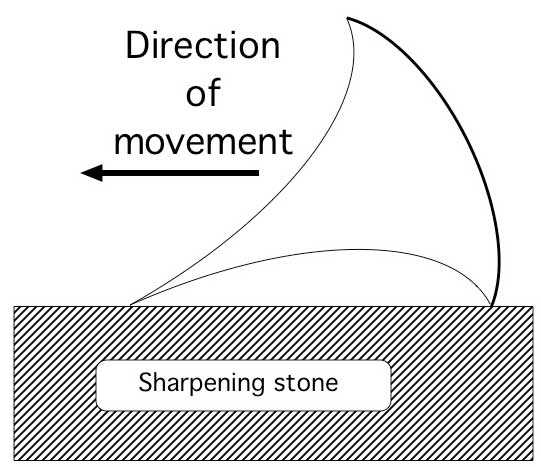
I showed you in Part 1 that the razor’s spine and edge both touch the hone and that maintains the edge’s angle to the sharpening stone. In case you forgot, here it is again.

The angle that the spine holds the edge against the stone is intentional for setting a bevel on both side of the edge. The angle shown in this drawing is exaggerated.
There are a couple problems with this approach, though. First, the spine will also wear as the razor is honed. Over a century of use, which means 100-200 honings, the spine will wear a flat on both sides. This changes the angle at which the edge is held against the stone.
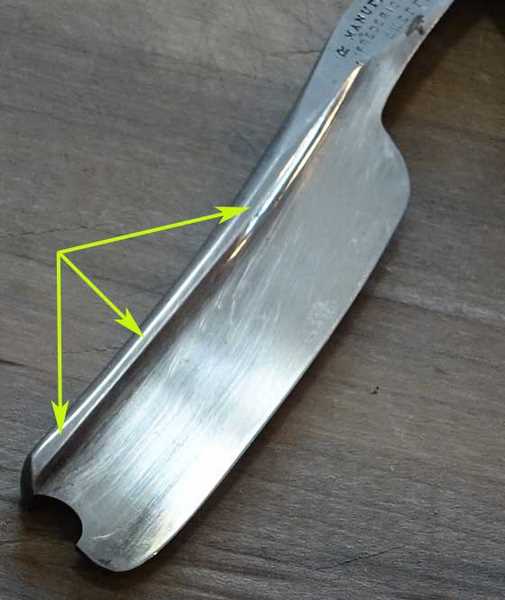
A century or more of sharpening has worn a pronounced flat on both sides of this razor’s spine.
Electrician’s tape
To prevent such wear, a strip of electrician’s tape is placed over both sides of the razor’s spine before sharpening. If the blade requires it, more than one strip of tape may be used. I have some blades that need 6-8 strips! When I watched the videos of blade makers they all used tape on the spine of their razors and all of them sharpen with the same water stones I talked about in Part 4.
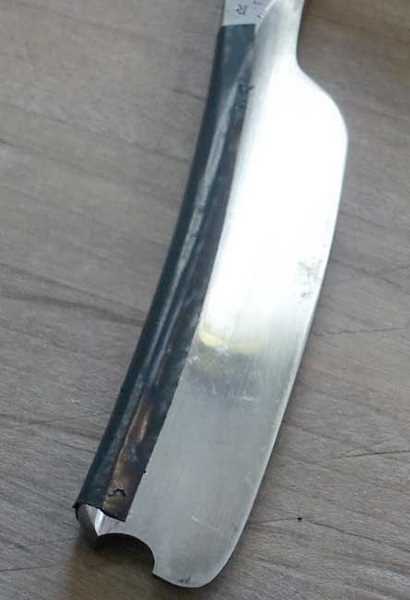
Electrician’s tape both restores the spine’s width and prevents further damage during sharpening.
Some guys pay $25-40 to have their razors professionally honed and they live without them for several weeks while this is happening. Other guys shave only twice a week because the straight razor irritates their skin. I shave every day without irritation (any longer). Shaving is something I really look forward to each day. I have fairly sensitive skin, so I can say with confidence that if the blade is really sharp, the shave will be smooth.
All stones remove metal
I have read in many places that, up to about 5,000 grit, the stones are removing metal from the blade and the stones with finer grits are only polishing the metal. That’s rubbish! All honing/sharpening stones remove metal. It’s just that when the grit becomes finer than 5,000 it’s extremely difficult to see the tiny scratches left by the stones. So I bought two powerful magnifiers. One is a 100X illuminated magnifier that really gets me close to the work. Unfortunately I find this one too difficult to use. Looking through it is like trying to watch a horse race through an astronomical telescope.
The magnifier that does work very well for me is a 20X pair of illuminated jeweler’s loupes attached to glasses frames. They leave both hands free to hold the subject. You cannot see the image through both lenses simultaneously like a binocular microscope, but with one eye you can see all the detail you need. I bought them directly from China for under $5, shipped. Had to wait a month for delivery, but now that I have them they are my best magnifying tool.
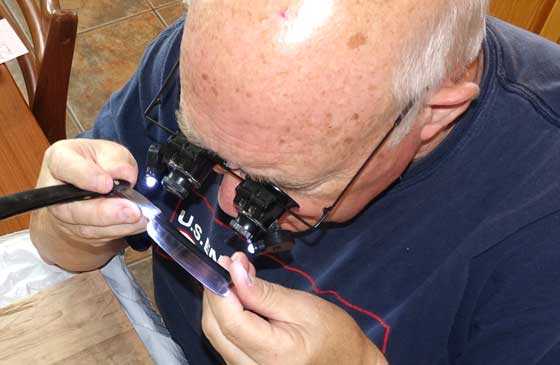
As corny as they look, these illuminated magnifying glasses really work and are my best magnifying tool.
What does it look like?
You are all curious to see what the edge of a razor looks like, and reader Vana2 sent me some fascinating images to share with you. These next two were taken at his work.
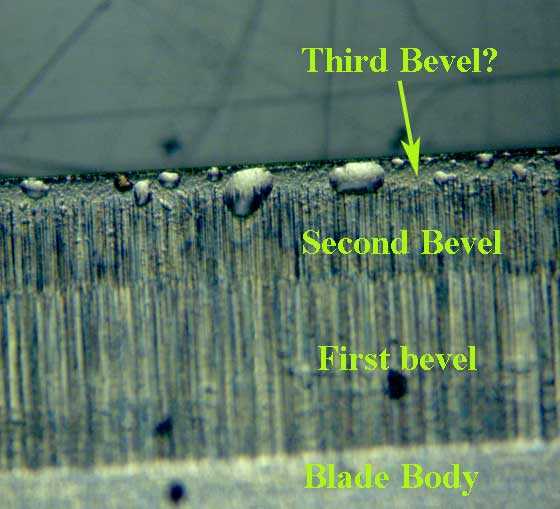
We are not sure of how much this image is magnified, but I think it is at least 500X and possibly 1,000X. This is a double edged razor blade that has never been used. I think those are water droplets on the edge.
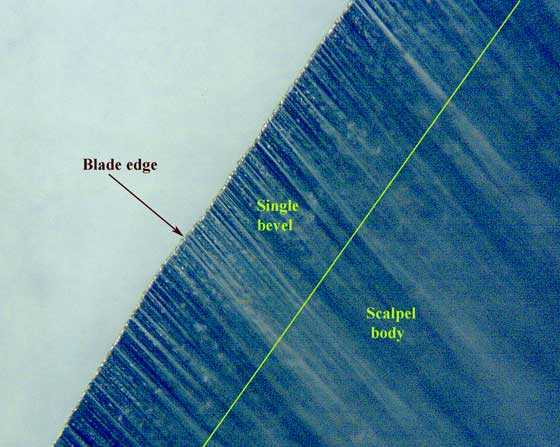
This disposable scalpel has a single bevel polished to a mirror finish. But at this magnification (same as last photo) the finish shows scratches.
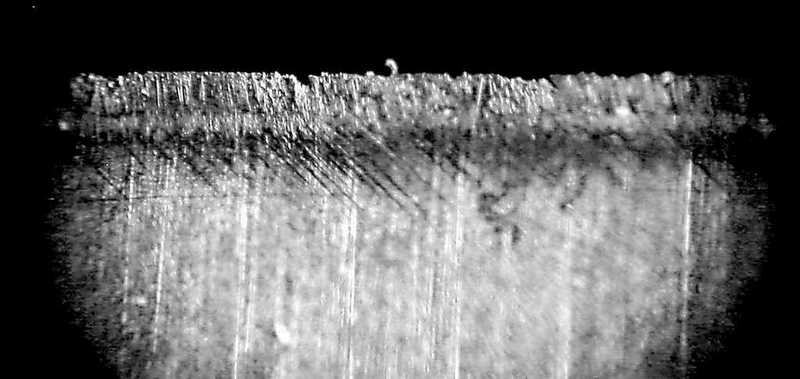
Here is a damaged straight razor blade shown at perhaps 50X.
First success
I succeeded in sharpening the first straight razor I tried, once I used my own method of sharpening. And that blade is a wedge with no hollow grind, which is one of the hardest blades to work on. But with a lot of electrician’s tape on the spine, I made the job mechanical and kept at it until I had a bevel on both sides. It isn’t a perfect bevel, but the razor shaves as well as any I own. I set the bevel with a 1,000-grit water stone. Then I progressed through 4,000, 8,000, 12,000 and 20,000 grits.
After the 4,000-grit stone it was impossible to see any new scratches on the bevels. What I saw was the scratches were disappearing. First they turned to an even satin (at 8,000) then they started to shine (at 12,000). Twelve thousand grit is where more honers and razor makers stop, but my new internet friend suggested that I go to 20,000 grit. That stone set me back $338 and had to be ordered from Japan. But after three weeks I had it. When the blade is honed on that one, it shines like a mirror. The stone is still removing metal and it takes 5 minutes to dress it flat after the work is over, but the result can easily be seen on the razor’s edge.
The shiny bevels are the result of a 20,000-grit water stone and stropping. This Swedish blade that I bought for very little on ebay is now my favorite razor. It’s so sharp I can back-shave my neck with it!
Stropping
Like honing, I discovered a wide variation of instructions on how to strop a razor after each shave and after honing. They range from only resting the weight of the blade on the strop as it is moved to bearing down with some force so the strop that’s pulled tight will bow deeply where the blade is. You have to strop either after or before each shave, because the thin edge of the blade needs to be aligned straight ahead. Your whiskers are about as tough as copper wires of the same thickness and one shave will put the edge of a blade askew.
I tried all ways to strop and discovered that putting almost no pressure on the blade is the best way to do it. If you bear down as you strop, the sharpest blade will grow dull — because you are rolling the fine edge. But you can strop that blade again with very light pressure and the edge will come back. It doesn’t break off; it just rolls over.
With a freshly honed blade I strop 25 times in each direction with a cloth strop coated with chromium dioxide paste. Then I wipe the blade to remove any of the paste and follow that with 25 times on a dry linen strop, followed by 50 times across a supple leather strop. After each shave I strop with dry linen and leather again.
Can you shave with a knife?
The short answer is yes, you can shave with a knife. But the knife needs to be just as sharp as a straight razor blade. We saw a man sharpen a ceramic knife blade (which I thought was impossible before seeing it on You Tube) and then shave his face and head with it. So it is possible.
Reader FrankBpc is very interested in sharpening and told me he had sharpened some common steak knives razor sharp. He sent me a package with some things to show me what he could do and one of these knives was in in. That knife will pass the cutting a hair test for sharpness. So I shaved with it.
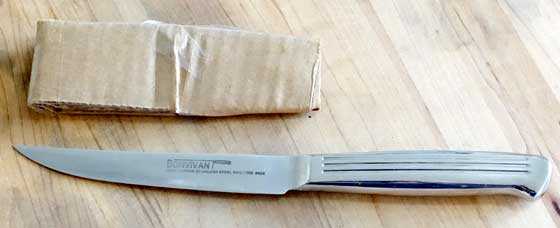
This is the steak knife that FrankBpc sharpened to razor sharpness. It will split hairs!
I prepped my face in the same way I would to shave with a razor. It did remove whiskers, but it didn’t shave me as smooth as my better blades. It was perhaps as good as my Dovo or my Dubl Duck. For a cheap steak knife, that’s pretty darned good!
It takes time
When I started this report I saw a video done by Geofatboy at Shave Nation that said it was going to take some time to learn to shave with a straight razor. He said it could take up to 100 shaves to get good at it.
At first I shaved as far as I could go with the straight razor, then switched to a double edged safety razor to finish the shave. I was shaving with my Dubl Duck that wasn’t quite sharp enough, though I didn’t know it at the time. Then I received my George Wostenholm razor I told you about and the first shave was nearly perfect. That taught me the difference between a razor that was shave ready and one that wasn’t. I still used a safety razor to trim the places that were hard to get, like under the neck, but the rest of the shave was with the straight razor..
At this point I have shaved about 55-60 times and I am getting better. I no longer nick myself with each shave. And I can now shave without looking in a mirror. I’ve gotten so used to the feel that shaving is almost automatic. This morning I shaved against the grain (back shaved) under my neck with a straight razor. That is the last place I needed the safety razor and now I no longer do.
I’ve discovered that the design features I like in a straight razor can be found in blades made in Sheffield, England from 1820 to 1900, plus a few other European countries during the same timeframe. All of the features I like are not being put on straight razors today, so I’m giving a lot of thought to making a straight razor for myself. Talk about an engrossing subject!
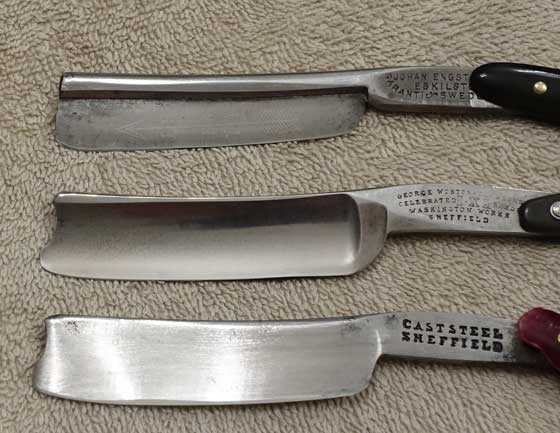
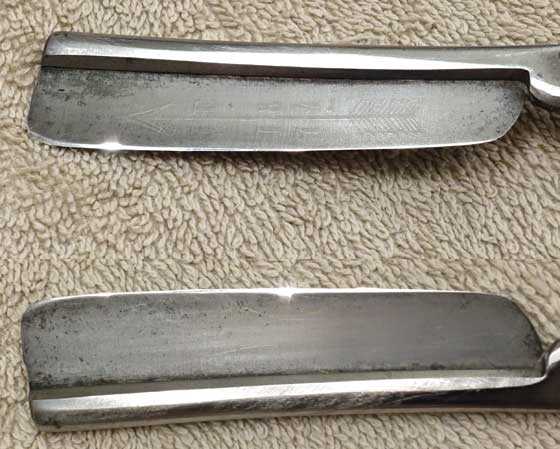
My three favorite razors. At the bottom is the first one I sharpened. It’s a wedge and I got the bevel wrong, but it’s still a wonderful blade. Next is the Wostenholm that I bought on ebay. It was the first razor that didn’t nick me and shaved super smooth. At the top is a Swedish blade that is now my favorite. It’s edge is perfect. Note that all three blades have the rounded point that I like.
Summary
There is a lot more to tell. I haven’t told you the details of how I sharpen a blade yet.
The shape of the blade (as seen from the side) has a tremendous impact on how well it will work — at least for me. So does the blade’s profile — wedge, half-hollow grind, full hollow grind etc.
Also I have learned to shave with the razor in either hand. In the beginning I thought that would be impossible, but I can now do it without thinking. At this juncture I can say it was harder to learn how to shave with a straight razor than it was to learn to sharpen one.
I have also ventured into safety razors and the sharpening of their disposable blades. And I bought a Rolls lifetime razor that reader Zimbabweed told us about in Part 2 — just to experience that.


$5 loupe and $338 waterstone. You are a man with his priorities right!
With all due respect, I do not see what in any way this report has to do with airguns. Not trying to be rude but I wish I’d written in four reports ago.
Your article is the first thing I read every morning so I’m kinda disappointed. Still with you though. Thanks, Jim
Jim.
This report has very little to do with airgunning. As I mentioned at the start of each one of these reports, it’s my way of exploring a new hobby so I can feel what it’s like to not know much about a subject.
For example, I have people who still argue with me about the artillery hold. They say it’s too difficult — they don’t want to learn it. Well, fine, but don’t expect to shoot small groups with a springer! That is a fact, but how do I explain it so that a new guy can understand it and also appreciate how important it is?
So I took on a new hobby to see what it feels like to be on the other side. I saw how confusing advertising can be (everything is superior) and I also saw the benefits of a good video. There aren’t very many good videos in airgunning yet (there are a LOT of bad ones), but I now know what’s needed.
I know there are many readers who feel the same as you — that I should stick to the subject. That’s why I spaced this one a month from the last one.
Know the discussion we had on crowning a barrel a couple years ago? Well, wet shavers talk about shaving lather the same way — is a natural fat soap best, or do you want to use one with a glycerin base?
I’m sorry to disappoint you, but exploring this subject is putting me more in tune with the new guys and I’m going to continue to do it. I’ll leave plenty of space between reports though.
B.B.
BB:
I have thoroughly enjoyed your adventure in a “tech” field unknown to you. I understand the desire to re-experience the foibles and mysteries of a new endeavor. It keeps one sharp to rudely hack away presumptions of competence and start over again as a mere novitiate!
I have been fascinated by your journey, in particular, because one of my road bicycling friends is an engineer for Crescent Mfg, and they make fine blades and other heavy-use blades for medical and industrial practices. Gary deals with the grinding and honing wheels and the complex numbers of production integers that affect the cutting edges. Feed speeds, coolant flow, wheel speeds, wheel hardness and controlled fracture of the matrix/crystalline structure, steel composition and others about which I am sure I am ignorant must be factored by Gary to produce fine edges.
It has been fascinating to talk with Gary on long rides about the challenges he faces not just with materiel, but getting dyed-in-the-wool “experts” to stop doing failed and obsolescent methodologies and learn to THINK about their processes in a multi-axis way. It is much like what you instinctively set out to do with your straight razor adventure!
Your column has been one of the more refreshing things I have avidly read and re-read in a long, long time. It’s about more than the razor; it is about personal growth and challenging one’s own limitations (in the case of a razor, so one isn’t bloody!). The article combines the technical aspect as well as the personal – learning to NOT be a holocaust sacrifice to the gods in the morning!
I don’t have the will to try the straight razor, but I have found Harry’s Razors, and they are superb. This on-line razor company (now also in Target Stores) did much the same kind of journey is rejecting the usual and coming up with a new marketing concept AND buying a German company that produces the “Gothic Arch” edge. I really like their product but remind them that their edge and steel is so long-lasting that they will go out of business!
When I discovered their “Gothic Arch” really works, a convex and tapered ground edge I then saw that the Derex “slack belt” sharpening system produces the arch on knives. I purchased one of their Ken Onion Sharpening tools and lots of sanding belts, and have gone through a similar learning process to yours redressing hollow-ground to Gothic Arch edges. It took patience and time, but I have been able to put edges on very hard complex steel that I could just never accomplish.
Thank you, Mr. Gaylord for a wonderful series. It has been, by coincidence of my interests, I suppose, just an extraordinary journey. Keep up the adventure.
Lance
Lance,
Wow! Your comment reads like a blog!
I’m glad you understand why I’m doing this — to strip away the preconceptions, as you say.
I didn’t mention this yet, but that “Gothic Arch” is called a “smiling blade” in straight razor circles. It’s one of the things I look for in a blade.
I’m aware of Harry’s Razors. They are capitalizing on the current move back to wet shaving. Nothing wrong with that. Anything that works is worth the effort.
B.B.
B.B.,
Simply fascinating. You seemed to have arrived at the summit of your journey. Maybe you have the final 2% to further perfect. Not to mention,.. all in the span of just outside 2 months. I liked all of the illustrations and thank you to Vana2 for the nice pics.
Without doubt, I hope,.. you will be doing a final report on the sharpening. If there ever was a time when a video would be highly preferable, this might be the time.
Good day to you and to all,… Chris
Chris,
When he makes his own razor and it is as good or better than any he can buy, he has reached the summit.
BB,
So much of this can be applied to knife sharpening. I have a knife that I am in the process of resetting the bevel. I messed it up a while back and it has never been truly sharp since.
Whenever you try to learn something new, it can be very difficult at times to sort out what is pertinent. Once it was difficult to even find information, but now we have the issue of so much we have to dig through and determine what is real.
The saga continues! I’m forced to use an electric razor (sorry, B.B.!) because using a real razor turns my morning into a horror slasher flick. I think the biggest social change I’ve seen in my lifetime is the ready availability of so much information on this thing called the World Wide Web, no matter how obscure your topic. And a video can really help explain a book’s worth of information. “May you live in interesting times” certainly has come to pass.
Vana2,
Enjoyed the microscope photographs. What type of work do you do where they have a digital microscope lying about? I’ve actually been looking into them for some insect collecting related work.
Hi HiveSeeker,
I retired last month and been enjoying the unusually good fall weather 🙂
The company I worked for tests the integrity of the tiny copper plated holes in printed circuit boards. These holes carry the electrical signal between the layers (think: Plywood) and if one fails then the device (cellphone, radio, etc.) stops working. Knowing that the printed circuit board was properly made is very important.
We would run tests and do micro-sections to see/confirm the method of failure so that the fabrication process could be adjusted .
Yeah, we have some very fancy equipment.
I am into entomology as well – mostly to do with my fly tying and fishing. I’m just doing some experiments on preserving insects as “models” for my flies. Have had some good results using UV-cure resin. Message me if you want to discuss this off-line.
Hank
Hi Vana2,
VERY interesting, I wondered if the digital microscope was circuit board related. My wife used to program assembly line robots and a microscope would automatically check the boards for defects. She’s actually interested in ants–hence the microscope research.
Fly tying can be super involved too–that would have given B.B.’s razors an even run for their money methinks.
Hi HiveSeeker,
The equipment we designed would thermally stress a coupon that represented the structures/geometries on the PCB. The number of thermal cycles the coupon survived was an indicator of how well the PCB was made. Interesting stuff, often we were testing technology that was at the extreme edge if manufacturing capability. We had some equipment that “see” the grain structure in the copper.
Ants are fascinating creatures – as long as they stay out of the house 🙂 We have several species ranging from the 2mm red ones up to the 15mm black carpenter ants. The other day I captured a 20 mm bug that I think is a queen ant. I need to do some searching to see if I can confirm what it is.
I use a 1.5 diopter “jeweler’s” head set (got it from Lee Valley Tools) when I tie small flies and find that it shows good detail with a reasonable depth of field and focal length for most use. I am thinking about getting a “pocket microscope” for higher magnification…
https://www.amazon.com/Kingzer-Jeweller-Magnifier-Microscope-Handheld/dp/B00J2JRGOS/ref=sr_1_40?s=industrial&ie=UTF8&qid=1508848656&sr=1-40&keywords=inspection+magnifier+light&refinements=p_72%3A2661618011
The fly tying is fun and relaxing. I tie named fly patterns for practice and to learn a new technique but with a few exceptions I only fish my own patterns. Ants are particularly effective patterns as they are readily available to the fish.
Hank
B.B.,
When I saw the photo above of the damaged blade at 50x, I cringed. I felt my face might start to bleed spontaneously!
Michael
Michael,
I have shaved (or tried to) with blades that, while not that bad, had similar damage. My Dubl Duck had it.
B.B.
“…reads like the writer never actually did it himself.” This was the most insightful but critical comment to me. As a relatively new entrant, this becomes the greatest threat and maybe the hardest to discern on the web. I find myself creating and using informal and untested filters as I read/watch. I find some sources more riddled with this problem than others. Thanks for capturing my dilemma in this sentence.
Jumpin,
Believe me — I have suffered through a lot of reports and comment that were written that way! In fact, I reported a whole book that reads that way. I’ve since discovered that some people don’t have the same problems that are common to most. In shaving, it’s their tough skin. They don’t have to prep their faces because nothing can cut the leather on them.
But most folks, like me, have tender skin that needs to be prepared.
B.B.
That answered my question, I wanted to ask if you still have to prep as much given a keener edge. My skin is pretty tough apparently and I do little prep.
I ruined many an edge from poor stropping. It took me many moons to figure that one out! An edge can go from nice to just ok in 5 incorrect strokes, and to no go in about 15!. I wished you wrote these articles 12 years ago! I am glad you discovered the secret of antique blades. They are my favorite shavers.
I can never ever get as fine an edge on the “modern” blades as much as I can the ancient ones.
I use a dry black Arkansas stone for the final polish. Works great but takes a lot of patience. i know I’m there when it will easily cut armhair by running the edge parallel suspended above the skin.
Rob,
What a huge lesson I learned about stropping! I rolled the edge on my two favorite razors learning it.
Yes, the Sheffield blades and some heavier Japanese blades definitely shave with less tugging. However, I now have put an edge on several deeply hollow ground blades like my new Dovo, and they do shave very well. They aren’t as smooth as the heavier Sheffield blades, but they are just as sharp . I am back-shaving with all of them now and no nocks.
In the next report I will describe in detail how I sharped the blades. My way seems much faster than any other I have read. I sharpened 4 blades from setting the bevel to sharp in 1.5 hours Saturday.
B.B.
B.B., Gunfun1, Decksniper and Chris USA,
A final mini report on my experience with the Gamo Recon Whisper, Gen. 2.
It was misting yesterday, so I shot at a two-inch round spinner at 22 yards instead of paper. I decided the heavy and somewhat creepy second trigger stage (the first stage is smooth and light) was my biggest accuracy issue, so I “choked up” on the grip and trigger, positioning the trigger just past the first knuckle crease so that it was at the middle pad of my trigger finger butting up against the crook of the final joint. This gave me a great deal more leverage on the trigger blade than I had previously.
Because this is also a low-powered and lightweight rifle, I moved the butt-stock into my shoulder and my off-hand backing up to the trigger guard. Then I applied an “anti-artillery” hold and gave the air rifle an all-around snug grip.
I hit the spinner 16 out of 20 shots, pretty good for me. I walked up to the spinner and saw that all my hits had landed on the bottom third of the disk, so I adjusted the scope up three clicks.
I shot 20 more times and hit the spinner 18 out of 20 times. An examination of the spinner this time showed that the hits were mostly in the middle of the disk. At 22 yards I hit a two inch spinner 85 percent of the time, which I find encouraging. Next weekend I’ll try my 1.5 inch spinner.
(I did try a few looser holds yesterday with the new trigger-finger position, but I did not hit the spinner once with any of them.)
Michael
Michael,
You’re going to enjoy tomorrow’s report!
B.B.
Michael,
That is sounding very good. I am always willing to try something new, and have,… but in the end,.. it is what works for you and your gun. Best wishes on the 1 1/2″!
“anti artillery” huh? That’s the one where you try to take out the enemy’s artillery positions,… right? 😉
Chris,
I guess an anti-artillery hold could also be called the A-10 Warthog hold!
Michael
Michael
I like the way you did your sighting in. That’s pretty close to how I sight my dot sights in.
And as far as the trigger finger position and the loose hold goes. It sounds like your getting the feel for different holds.
That’s the trick. Find out what works for you.
Michael
Could be your trigger is so bad it causes extreme rifle wiggling during release. So much so that your strangle hold more than offsets the benefit of an artillery hold. Would be interesting to know if your rifle’s accuracy potential is so high, a custom trigger job may be worth the cost. However I do own a Stoeger ATAC .22 I believed preferred a strangle hold pulling the far end of forearm against my shoulder. I am changing my thinking and coming to the conclusion that this rifle doesn’t care how I hold it. Just maintain the point of aim until the pellet is long gone. I should point out that my rifle demands a large head diameter. I use FTT 5.54 mm or greater. My Pelletgage stops at 5.54 mm.
I normally use the middle pad of my middle finger to squeeze a trigger due to familial tremor. Whatever works!
Decksniper
Decksniper,
The hold is firm, not really a strangle hold.
I don’t doubt that the trigger stabilizing benefits might be greater than detriments produced by a firm hold. A trigger tune might help a great deal, but this is, after all, a $90 air rifle. Also, I, too have hand tremors, so even if the trigger were light and crisp, a firm hold steadies my hands, another ingredient in the accuracy recipe.
Michael
You’re a braver man than me Tom! Great series and photos, BTW if anyone is interested, I got a call from my local FFL yesterday. If any of you have a spare 15 grand and don’t mind waiting, there’s a very cherry MP40 looking for a home! I’d buy it myself but the wife would probably shoot me with it (all 32 rounds!!)
Kevin in CT
Maybe now that Jack has a clean shave Jill will stop by and we can have another “Teach me to shoot” article!
Pc6Pilot,
I have wanted to write one for a long time. But it’s about shooting that flintlock and I haven’t had time to spend learning its ways.
B.B.
B.B.,
These five blogs have gone a long way to explain why I failed at sharpening knives and broad heads. I had to either buy pre-sharpened or pay someone. I have both knives and broad heads I purchased in the ’70s, so I can try again with new information.
Regarding the dot sight, I have quickly discovered that there is a big difference between mounting on on a rifle and a hand gun, at least using my hand gun (the original Crosman .357, the one the Vigilante replaced; I realize the .357 wasn’t designed for mounting sights but the available sights are feather light and fit nicely in the groove). I want to investigate this further When I shoulder a rifle I am more stable and I can control the dot more precisely. I will have to study up on using one with a hand gun.
~ken
Ken,
Please keep us updated on this.
B.B.
Hi BB,
The double-edged blade in the photo was clean, dry and right out of the dispenser.
After seeing the contamination I ran my finger along the edge a couple of times to see if those “nodules” could be wiped off but they didn’t move. I guess that those “bumps” are particles of metal being re-deposited off of a dirty grinding wheel/belt back on to the blade. These blades were considered “good enough” to sell.
The fine saw-tooth edge on the scalpel is awesome – it is purpose-ground to cut tissue! You can see that more attention was given to the finishing.
When I hunted big game I did my own butchering and had knives with different bevels and edges for specific jobs. A fine saw-tooth edge is the best for cutting meat where a smooth edge works better for filleting off the silver-skin (sinew).
Really enjoyed this series BB, I love diving into a totally new subject/hobby.
I just started researching watercolor painting, invested $50 in some basic materials and having an absolute blast learning the brushes and mixing colors – I might even try painting something some time 🙂
Happy Monday !!
Hank
Hank,
Oh, painting! Please don’t go there. I followed Bob Ross and even painted several canvasses. My painting is about on par with my woodwork.
B.B.
Sorry BB – too late LOL!!
I used to watch the “Happy Painter” William Alexander on his “Magic of Oil Painting” series on TV. But it has always been watercolor that attracted me.
Hank
Hank,
William “Magic White” Alexander! Ah, good times.
Michael
Hey Hank,
if you live in or near Chicago, my daughter runs a franchise called Pinot’s Pallette. They teach water color paintings and entertain individuals, couples and work groups (those morale boosting exercises you and I don’t have to put up with anymore). The more wine you drink, the better your painting looks or so I’m told. My painting ends at rooms, decks and houses and I do as little of that as possible being retired as well.
BB, finally got my answer on those magnifying pieces you ordered from China. Glad I waited for this report before ordering anything. I really enjoyed this series and while I don’t intend to switch to a straight razor, I am greatly enlightened on sharpening blades. Like an accurate rifle, only a really sharp knife is interesting, imo.
Fred formerly of the DPRoNJ
Hi Fred,
I live in a swamp just outside of Perth, Ontario – ’bout an hour west of Ottawa. OK, so it’s really a 50 acre spring-fed beaver flood but it sounds way more cool if I call it a swamp 🙂
Rooms, decks and houses – yep do that. Thought I would try some artsy stuff. Figure that I will call my “paintings” abstracts and if somebody with a good imagination actually recognizes the subject then that would be a bonus!
Fred, I was thinking about getting a couple of magnifiers to help me identify the spores from wild mushrooms. Would you mind posting a link to the ones you are looking at – thanks
Hank
Hank,
I have a handheld magnifying glass that illuminates (no idea of power but not strong – use for looking at very small print as on maps), a headband with multiple magnifiers of up to 2.6x at 12 to 8″ focal lengths and a small, 10X handheld loup. I was looking for something stronger and think BB’s jeweler’s glasses loups might be the answer. AT $5, I won’t regret if they turn out not to be what I’m looking for. I’ll search Amazon and see what is available but I have no link to post. Yet.
Fred formerly of the DPRoNJ
Here they are:
https://www.amazon.com/Greenery-Repairing-Magnifier-Eyepieces-Magnified/dp/B012I1FF8A/ref=sr_1_22_a_it?ie=UTF8&qid=1508798520&sr=8-22&keywords=20x%2Bmagnifier&th=1
I ordered mine from China and paid a lot less.
B.B.
Thanks BB!
Why are they called straight razors? All the blade edges appear to have a slight radius along their length, straight as opposed to a curved razor? Or straight meaning bare blade?
Codeuce,
The razors I have shown have slightly curved blades because they are the ones I like. There are plenty of straight razors with straight blades, as well. Those are the ones I don’t care for.
B.B.
A face that is as smooth as a baby’s bottom AND just as sensitive?
Kevin,
Yep! And whiskers that are semi-tough. It’s not the best combination.
B.B.
B.B.,
LOL!
Doesn’t do a thing for me but I must assume most women love it.
kevin
Great article B.B.! Although I confess to be scared about replacing my very safe disposable multi-blade thingy with a straight razor, I am thoroughly enjoying the series. Which brings to mind, and building on the previous comments from Hank, that there are as many proper sharpening techniques as sharp tools in use. A straight razor, a chef’s knife, a dressing knife, an ax, etc. all should be super sharp to do their job right, but in quite different ways. Perhaps material for a future blog?
Henry,
To be honest, I never intended getting into shaving with a straight razor when I started this series. It sort of happened when I realized that was the only way to test the blade edge. I was using an electric razor at that time.
Wet shaving is so much better and closer than anything an electric razor can do. I shaved with a safety razor for the first 20 years of my adult life, but switched to electrics for the convenience. Now, however, after experiencing a straight razor shave, I will never go back.
B.B.
BB and Fellow Airgunners
It’s the time when I do a lot less shooting, and more harvesting, and preparing food from my garden. I too have had to learn the most efficient method of sharpening a keen edge on my knife blades. As you explained in your blogs on shaving with a straight razor, it’s far easier to cut yourself with a dull, or unprepared blade rather then a sharp one. I’ve also learned over years of trial and error, buy the best blade you can afford, as they will hold their edge longer.
Using my handmade knife as I chop peppers, tomatoes, and other vegetables, is truely a pleasure, and not a boring chore.
Thanks for this off topic blog, as I could relate to many of your sharpening dilemmas, as well as learn a few sharpening tricks as well. Another few days of food prep, and I’ll be back shooting. My range is only about 10 meters from my garden, and the wife refuses to garden if I’m shooting. Safety first is what my dad drilled into me when I received a bb gun for Christmas when I was 12 years old.
Ciao
Titus
Fascinating. So sorry to hear that the 100X microscope didn’t work. I’m not exactly sure why not because unlike a horse race, the blade is not going anywhere. So, while it may take awhile to find the right magnification, you can be certain to get there. What in the world did Vana use to take those pictures? An electron microscope? Those remind me of the pictures used to compare razor blades with sharpened stones from the prehistoric era which prove that the stones were even sharper. Maybe B.B.’s next project will be to sharpen stones like something from Clan of the Cave Bear. The photos also remind me of Grandmaster Frankbpc’s comment to me that sharpening the blade by moving it away from the edge will lay the teeth of the blade flat. I had to imagine what these teeth looked like, but there they are in Vana’s photo for all to see.
I’m glad that I saw the demonstration of the electrician’s tape. I had somehow visualized the tape as being applied right next to the edge, not at the spine. For a knife does the tape still go on the spine? This method seems to me to reproduce the tool I bought from the beard-shaver John Juranitch which attaches to the spine and maintains a fixed angle between the blade and the stone. But unlike his device, you can modify the tape to fit the shape of the blade. I haven’t had a chance to try this out as I have been otherwise occupied…
I had another epic range day over the weekend. This time the star of the show were my two archery bows which I fired for two hours. In imitation of the razor sharpening series, I got to thinking of how archery helped me understand guns. For one thing, I have succeeded in turning the bow into a rapid fire instrument. I was inspired by the Hungarian expert who held the spare arrows in his front hand and could string and fire them fast enough to hit thrown targets in rapid succession. I can’t do that, but I did recreate something that I dreamed up while playing Cowboys and Indians as a kid. Back then I imagined releasing the arrow, continuing the motion to grab another arrow from the quiver, then moving forward to string the arrow, draw and release all while keeping the bow upright. So, the hand follows a big circle. I could sort of do it to the extent of reproducing the feel of my IZH 61 which has few equals for high volume shooting.
The IZH 61 has been so great that I have generally scoffed at power in airguns; my 5 yard range is another reason. But while using my 60 pound longbow, I got to experience the allure of power. Thwacking those arrows into a paper target attached to hay bales was mighty satisfying. Not only was the power gratifying, but I got a better appreciation of flat trajectories. Looping trajectories, such as you get from an AK in 7.62X39 for example, tend to have limited distance, but I had supposed that within that distance, you should be able to be as accurate as your gun allows. However, it became very clear with the archery, that looping trajectories make the holdover more difficult. I notice the difference with the AK even in transitioning between 50 and 100 yards. And not only does the accuracy degrade between distances, but it also seems possible that a looping trajectory might magnify the deviations in aiming at the same distance.
I also got more insight into my ongoing quest to reproduce the lost mechanics of the English longbow archers of the Middle Ages. The one bit of physical evidence we have is that skeletons of these archers have left arms that are greatly enlarged. (Enlarged bones are correlated with intense physical activity so the extremely robust bones of Neanderthal men match people who were fighting rhinoceroses with spears.) I had been puzzled about this since I had supposed that the right arm for drawing the bow would be under more stress than the left. However, after shooting my longbow for a period of time, my left arm started to really hurt. It is the left arm that directly resists the bending of the bow, and with a sufficiently heavy bow, even the slight angular difference between the arrow and the line of the left forearm creates huge stresses. It hurts at 60 pounds, and you can only imagine what it was like to draw 180 pounds. The mysterious body mechanics would have to alleviate it, and I think I’m on the right track. The weight of the body, by means of a forward step, generates momentum which is then redirected upward by raising the bow. Then gravity is used by dropping the bow down to a level while somehow throwing the chest forward to assist spreading the arms sort of like the way Steve Reeves as Hercules pushed apart two pillars that he was standing between. But I’ll never know since shooting at such a light weight at 30 yards would have been child’s play for the English archers.
I’m also separated from them by a lifetime of practice. Part of me longs for the time to practice and get good at this, but on the other hand, it would leave your arms of different sizes and look a little weird. Maybe something like this.
https://www.pinterest.se/pin/365002744771372232
With my guns, I was horrified that my M1 started jamming again! It’s like a recurring horror movie, like IT. But I also discovered something else. In the decade of torture that has gone into this, I seem to have developed what the Navy SEALs call the “porthole effect.” This is a state in their brutal training where the mind becomes displaced from the body as if looking at it through a porthole and all the cold and discomfort simply don’t bother them anymore. I seem to have reached that with the M1. On the bright side, my surplus ammo worked fine. I just don’t seem to have the gas adjustment quite right for my handloads, but it is in there somewhere.
Amidst all of this, I’ve noticed that it is my Russian guns, my Saiga and my Mosin sniper rifle that are cagily creeping up to be some of my very favorites among my military guns. For one thing, they are utterly reliable. They not only never jam, but they never even come close. And while not the best made or the most accurate, they are so close as to eliminate any meaningful difference in those areas. The scoped Saiga can shoot about 3 MOA which is not that far from the Mosin sniper, and shooting offhand, the difference between them and the other rifles disappears altogether. I’m reminded of an after-action report by a German officer on the Eastern Front. He said that on appearance, Russian tactics made no sense, you would find that not only did they work but that they were the best possible means of achieving the goal. Some of that seems to have entered into their weapons as well.
Matt61
Matt,
Yes you can put tape on the spine of a knife. But to get the right angle for the edge you need about 12 degrees elevation. You can’t put that much tape on. So better tape on something that will stay constant and that you don’t care if it gets rubbed a bit. Maybe a bamboo chopstick?
B.B.
You mean tape a chopstick to the spine? Okay, I get the idea. Thanks. This reminds me that I saw the Jackie Chan film, The Foreigner, last night, and I can highly recommend it. The Kung Fu is actually not the emphasis. It is the ingenious mechanical innovator who will rule the world.
Matt61
Hello Matt61
I’ve always admired your eclectic taste in weapons, modern, and ancient. However, it is airguns, and archery that I can relate to. We’ve had a few discussions on archery, and I was interested in your observations concerning the left arm becoming larger then the right over time. I’ve only shot my long bow in what I would consider novelty shoots such as the English “clout”, where you try to group six arrows as close to a flag, or pole standing in a field 180 meters away from the shooting line. My 80 inch Checkmate Knave longbow is a mere 46# @28 in, which would equate to about 55# @29+1/2 in at my draw length.
Being a target archer, I used a variation of the Turkish recurve, and always relied on a consistent anchor point by drawing the string to the corner of my mouth, while squeezing my shoulder blades together to prevent creep as I took aim. However, I observed the best longbow shooters had a more instinctive draw that was more pull, aim, release in one fluid motion. So you may be right about excess muscle development in the bow arm when shooting a longbow.
Compared to my target recurve bow, I found the longbow “stacked” sooner, and rapidly built up in weight the further I drew the string.
My left arm technique was what Dave Keaggy Sr. described in his book “Power Archery” as a soft, or relaxed. My bow arm being relaxed, with a slightly bent elbow. My wife, who is a physiotherapist, has noticed a slight right side scoliosis of my spine, probably due to my holding technique. I had to abandon archery altogether when I developed a rotated shoulder due to my relaxed bow arm. Proper technique would have been to lock my left elbow as I drew the string with my right hand. Arm muscles have little to do with archery other then helping to hold the bow, and help draw the string. I knew some small women who could easily shoot 45 lb bows. I ignored the pain, and kept shooting longer then I should. I feel lucky to have discovered I am able shoot airguns. I do understand your love of archery, and might be shooting today if I had gone to a sports therapist when my shoulder pains started. Youth must have it’s way I suppose.
By the way, have you tried the “push, pull method? Thats a technique a longbow shooter showed me where you push your bow arm towards your target while drawing the string back. Sometime I think you can consume too much information that can only get confusing.
As for fire arms, I have next to zero experience other then using a shotgun hunting pheasant, and partridge with my Dad in Southern Alberta when I was in my teens.
Straight shooting
Ciao
Titus
B.B.
Have you found or read of a good way to sharpen a serrated edge blade found on kitchen knives? Strangely, I have found this series almost more interesting than airguns. Who would have thunk it!
Ken
Ken,
I have a special diamond file for sharpening serrated knives.
B.B.
Thanks B.B.
I just found a DMT Diafold serrated knife sharpener. Covers 1/16″ to 1/4″ grooves. Comes in coarse,fine and extra fine. They sell for $28 each grade or $75 for all 3. Aah, the powers of the internet!
Ken
Try a Spyderco Triangle Sharpmaker. Of the many different knife sharpening devices, this does a better job on a bigger variety of knife edges than any I have tried, and on serrated blades, it is the ultimate.
Thanks Jerry. I will look into it.