by B.B. Pelletier
Teach a person to shoot: Part 1
Teach a person to shoot: Part 2
Proper sight picture
Illustrate the correct sight picture for the students. Tell them they will not focus on the rear sight; tell them to think of peeking through a small hole in a fence. The object is to see the front sight and the target, with the front sight being in sharp focus.
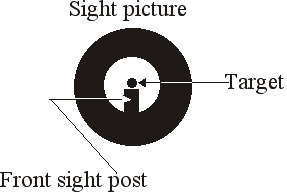
Correct sight picture looks like this.
The front post is supposed to be held up halfway in the rear peep. Your eye tends to center it because the light is better at the center of the hole, but tell the student where the post is supposed to be. The bull sits atop the front post, just touching it at the bottom. This is called a 6 o’clock hold and is universally used in the target shooting world when post-and-aperture sights are employed. Some people like to leave a thin band of space between the front post and the bottom of the bull, but this is better left to the student to decide without prompting.
The triangulation exercise
The sighting stick is laid on a low box, so students can see through the aperture when they are lying down, like a prone shooter. They must not touch the stick during the exercise.
The instructor sits on a chair 30-40 feet away and directly downrange from the sighting stick. In front of him is a cardboard box taped to the floor so it cannot move. A blank sheet of white paper is taped to the side that faces the student. The instructor holds a paper target with a single bull, and a hole has been punched through the center of the bull so a lead pencil can be inserted. The instructor tells the student to sight through the sighting stick and to guide the instructor in moving the target left and right, up and down, until the correct sight picture can be seen through the sights. The student is aligning the bull with the front post in this exercise.
When the sight picture appears correct to the student, he tells the instructor to mark the target. The instructor makes a mark through the hole in the center of the bull with the pencil, then he moves the target away and they do the exercise over again. After three targets, the instructor calls the student down to examine the sheet of paper on the side of the box.
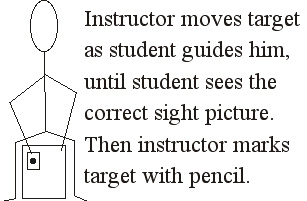
Instructor moves the target as the student directs. When the student says the sight picture looks right, the instructor marks a pencil dot through the target onto the blank paper on the box.
The goal is to have three pencil dots as close to one another as possible. The three dots should be inside a dime (17.91mm) at least, if the instructor was 40 feet from the student. Ideally, the three dots should be inside a circle the size of a pencil eraser. What this exercise illustrates is the student’s understanding of the correct sight picture, because they were able to form it three times in very close proximity each time.
It is important that neither the sighting stick nor the box in front of the instructor move during this exercise, because they are the fixed standards. We are training the student to sight correctly without having a rifle to manage at the same time. The next step in training will be the first shooting exercise, so do not progress beyond triangulation until the student has demonstrated proficiency.

BB: How about something like the RWS 34, where the front post is a little pointed insert, what would the proper sight picture be with the rear portion being a half-circle?
RWS 34,
The RWS has a sporting sight. It should be sighted to hit where the tip of the front post touches, when the post is level with the top of the rear Vee notch.
If you check you’ll find four different notches on the rear sight. The Vee notch is the correct one to use with the pointed (or korn) front sight post.
B.B.
By ‘vee’ you mean the half-circle? Just checked and there are 3 variations of a square-bottomed (kind of rectangular and square in varying sizes) and that half-circle one.
thanks!
RWS,
No, I mean a Vee. If you don’t have it, use the half-circle.
The half-circle is meant to be used with a post that has a bead on top.
B.B.
BB: hmm. just checked and it looks like a very narrow wedge on the front sight. Pretty much like an upside down ‘V’.
Just got the 34 yesterday.
Odd.
RWS,
Yep, that’s a korn sight.
B.B.
B.B.,
Excellent article. This is a wonderful idea – where does this come from? Is this a B.B. original? I wish I had this level of understanding of the proper sight picture before trying to shoot.
Your brief discussion above of various sights is also very interesting. If at soem point you can expand on this further this would be great.
Ehrih
Ehrih,
It’s not my idea. I learned it when I took an NRA course back in the 1960s.
A discussion of different types of open sights sounds like a good idea. I had a question from a guy who just got an RWS 34 abd the sights on that, so I guess this is something a lot of people might like to know.
It’s on the list.
B.B.
The concept of concentrating on the front sight also works with optical sights — concentrate on the reticle and not the target. Since one can see both the reticle and the target clearly with optical sights, it is not obvious that one should still concentrate on the “front sight” but the advantage is the same — it reduces one’s tendency to overcorrect. I find this approach especially useful when shooting offhand.
Joe,
That’s a good point, and one I’m sure I don’t do often enough. When you are looking at fractions of an inch, it’s easy to forget how much they matter.
B.B.
This is great information and it’s really helped me out..
My Son and I have been enjoying a williams peep on our new Sheridan Blue Streak and it’s very accurate with one exception.. It’s shooting about an inch high and my peep sight is lowered all the way. I guess I need to either shoot low, raise the front sight, or something different.
I’ve read some posts about raising sights but would appreciate any suggestions on how to do that, or if it’s possible on a Sheridan Blue Streak.
Thanks!
Tom
Tom,
That IS a problem! Are you trying to shoot at less than 15 yards? That’s the place where airgun sights get squirrely. Id say raising the front sight is the best option. My recommendation would be a folded metal sheath that fits on the sight with rubber cement so it can be removed without a trace.
B.B.
Thanks for the info on the folded sheath. I’m using the williams peep recommended by Crossman for that gun so perhaps something is off with the sight since the gun shoots fine with iron sights.
I wonder if there’s a better peep, perhaps by Beeman, that works bettter on a Blue streak?
Love this site by the way. I’ve spent hours learning about the sport and it’s been very enjoyable.
Tom
Is the object of a peep sight picture having the target’s bullseye at the exact center of the ring where things are brightest, and placing the post just below it, or are you supposed to center the flat top of the post dead center in the peep sight ring, and have the bullseye atop this, technically slightly above the center of the ring? I have been centering the bullseye itself, but I think if I am viewing your picture correctly that I am doing it wrong. Am I being too picky, can I do it either way, or is there an advantage to either one? Thanks.
Believe it or not, both ways work. Once you get comfortable with a particular sight picture, you simply adjust the sights to center the strike of the round.
The way I show is the classic way and yes, the top of the post and bottom of the bull are in the center. But notice that when we move to the ring sight (in part 5 of Teach a person to shoot), the bull itself is centered. So it works either way, as long as you are consistant.
The theory is that with the greatest light at the center of the aperture, that is where you want the aim point to be.
B.B.