by Tom Gaylord
Writing as B.B. Pelletier
This report covers:
- Traps
- Jim Contos trap
- Materials
- Getting more use from a trap
- Affixing targets to the trap
- What else can you use?
- Duct seal
- Good news
- Clean the trap
- Reason for the steel plates
- Putting the new stuff in
- BB trap
- Airsoft trap
- Summary
Today’s report is a basic one on pellet and BB traps. I thought it was time to cover this subject again because of all the new readers we are getting. You guys don’t see it because they don’t sign up for the comments, but we are getting 10-20 new subscribers each day, 7 days a week. That is over and above the fake ones I see that number even more. Well, those new folks need to know how to build pellet traps like the rest of us. And I know the comments to this report will be even more valuable to them than the report itself.
Traps
I use several different traps that I will mention today. But one trap gets used more often than all the others and that is the one I’ll show you how to build. I’ll start with that one.
Jim Contos trap
Blog reader Jim Contos came up with this trap and sent one to me in 2011. It is heavy, so I held off using it regularly for several years, though I did drag it out when I was testing a powerful airgun. Let’s say anything producing over 30 foot-pounds at the muzzle is what I’m calling powerful for this report. I am not addressing traps for big bore airguns — that’s a whole other subject of its own. I’m talking about traps for smallbore airguns today.
Materials
To make a trap like this you’ll need the following:
- One 7-inch Schedule 40 White Cap PVC Socket Fitting (it’s really a little larger than 7 inches across)
- Two 4-inch steel electrical junction box covers
- Enough duct seal to suit yourself (around 5-6 lbs.)
- A cardboard box to hold the trap
Make the trap
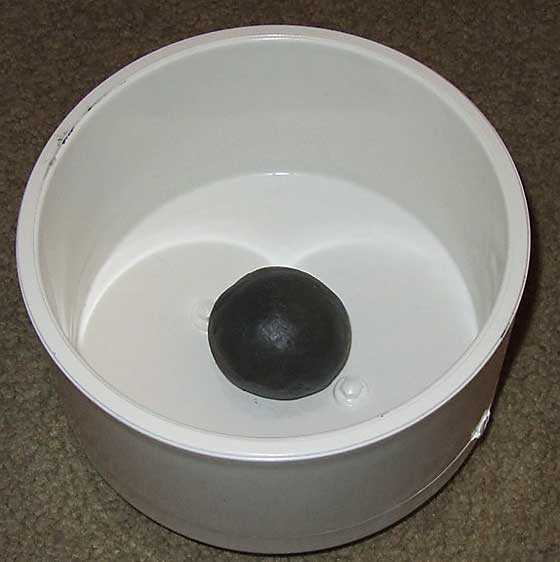
Step 1. Roll a golf ball-sized chunk of duct seal into a ball and place it in the center of the cap.

A ball of duct seal goes into the trap.
Step 2. Squash the duct seal ball with the two electrical junction box covers. Move them so they cover the most possible area inside the cap.
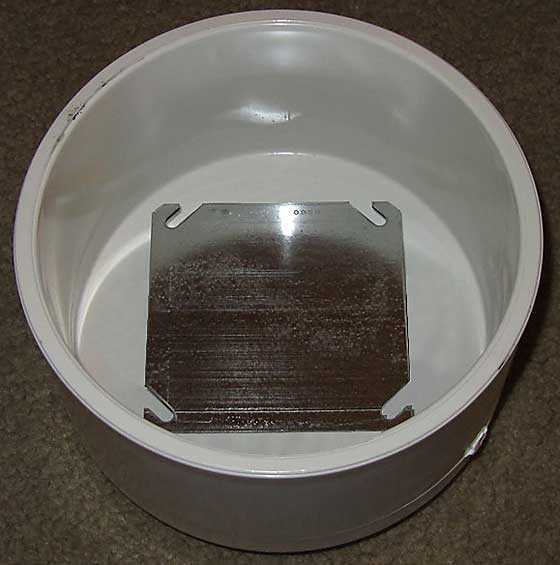
Squash the duct seal ball with the two junction box covers. Jim then arranges the two covers so they cover as much of the back of the PVC cap as possible.
The junction box covers are just there for their steel. If you can find a quarter-inch sheet of steel that fits inside the PVC cap somewhere else, use it! Just don’t do what I once did and cut up your wife’s old metal cookie sheets! I never heard the end of it — and they also didn’t stop pellets, once the 30 foot-pound threshold was exceeded. The trap we are making today will withstand 75 foot-pounds easily. Jim Contos proof-tested his trap by firing a 200 foot-pound .45-caliber big bore into it at point blank range.
[DO NOT TRY THIS! It was just a test to see how much more energy the trap could stop.] Be safe and stick to smallbore airguns, only.
Step 3. Fill the trap with duct seal.
I used to recommend using up to 8-9 pounds of duct seal, but I no longer do for a very good reason. When the trap is filled to the brim with duct seal it looks fine for the first 200 shots or so. After that the pellets it now contains displace the duct seal that then starts oozing out the front of the trap. That is one reason why I recommend putting this trap inside a cardboard box. The second reason is this trap is round and wants to roll. The box will contain it, plus you can rotate the trap to get a fresher spot to shoot. And third, there will be some fallout of pellets, BBs and duct seal as you shoot. The box contains that nicely. In fact, I use two boxes — one to contain the trap and a larger second one to contain the fallout.
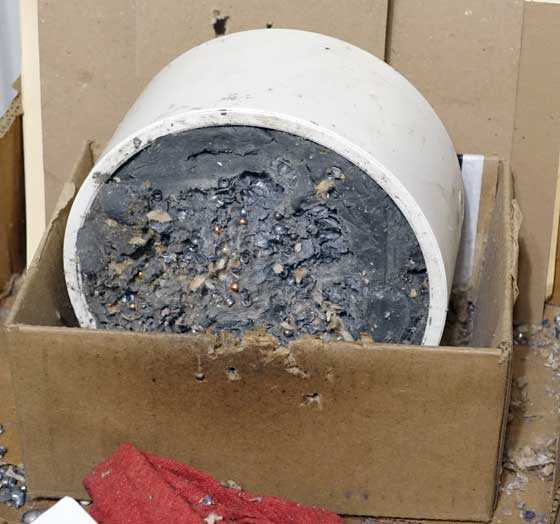
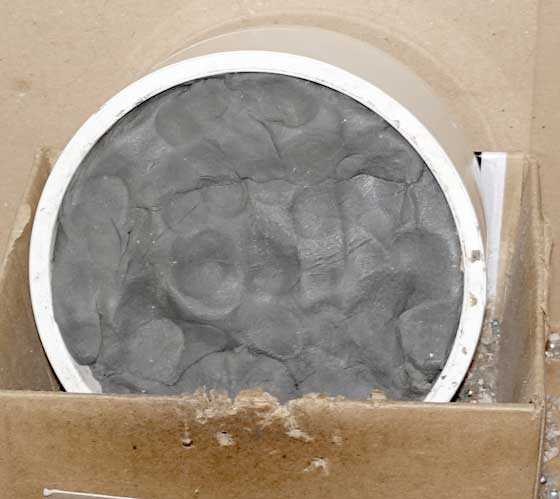
Here is my trap before I changed the duct seal. It has probably seen 25,000 to 30,000 pellets and BBs since last being resealed.
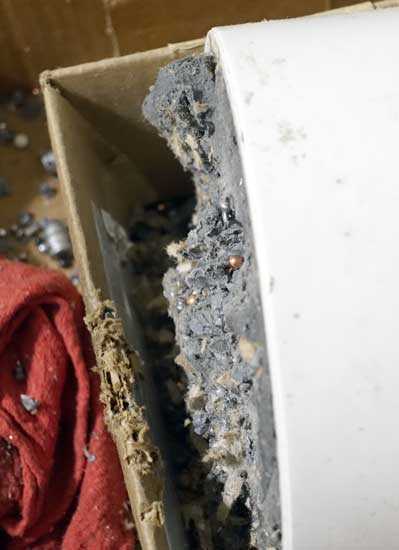
As I shoot the pellets displace the duct seal, making it slowly ooze out the front of the trap, as this top-down view shows.

Getting more use from a trap
As the duct seal slowly oozes out the front of the trap I periodically cut it off flush with the opening. I have a sharp kitchen knife for the job. I have done this twice with this trap in the past three years. That gives me a longer time with the fill, because the top layer of pellets and BBs goes away and mostly fresh duct seal is exposed.
When the trap is in use I put a sheet of cardboard in front of it to slow the rebounding projectiles and duct seal. It just keeps things cleaner as I go. I always place the cardboard so I can see the trap on either side of it.
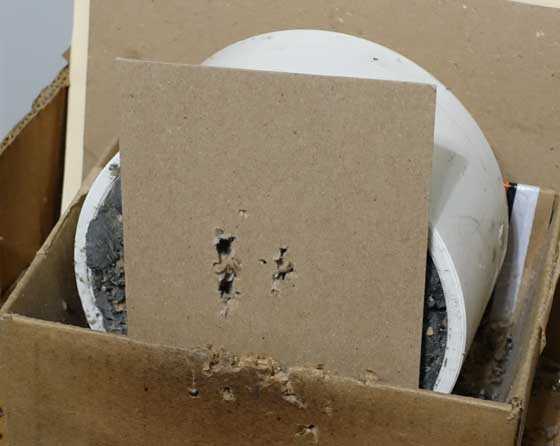
I put a cardboard sheet in front of the trap to keep the rebounds down. Notice that the edges of the round trap are exposed, so I know I’m always shooting into the trap!
Affixing targets to the trap
Jim showed me that he uses a pushpin to hold his targets against the duct seal. All I do is stand the paper target up in front of the cardboard sheet. The box helps with that. But since I mostly use my trap for conducting velocity tests, there is often no target at all — just the cardboard sheet.
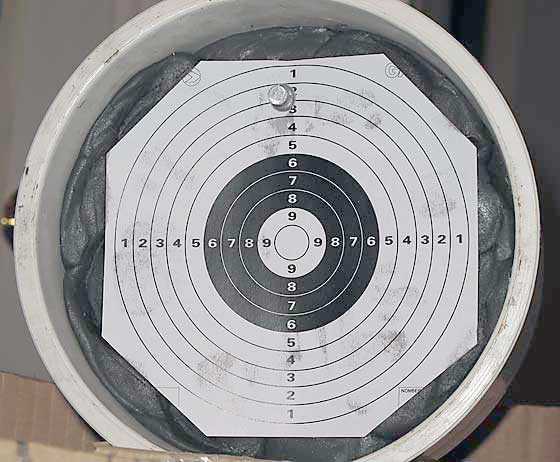
Jim Contos uses a pushpin to attach his targets directly to the duct seal. Notice the oil from the duct seal is seeping into the paper target.
What else can you use?
Of course you don’t need to make your trap this way if you have other options. For example, strong electrical junction boxes (that hold circuit breakers for buildings) are a great possibility, BUT, buying them new is very expensive! If you can get one for free, go for it.
Duct seal
The one product you cannot skimp on is the duct seal. Take my word for it. I have tried modeling clay — it’s too soft and doesn’t stop the pellets that well. Duct seal is many times tougher. I have tried plumber’s putty and it’s horrible. It dries out when exposed to the air and you will have crumbs all over the place. Get duct seal. It’s not cheap but it’s the stuff that works the best. The cost is the bad news.
Good news
Now for the good news. The absolute best deal I have found on duct seal anywhere on the internet is — wait for it — at Pyramyd Air! I would not have believed it but PA has undercut the competition by several dollars per pug (the name for a brick of duct seal). I just paid someone else $59 for 15 pounds of the stuff and thought I was getting a deal. The duct seal cost me 15.70 for a 5-pound pug, and the shipping was $8.99. Tax came to $4.49, so my total was $58.99. It was the best deal I could find on the internet. Other product was cheaper elsewhere but after their handling and shipping charges were factored in they all came out around $70 and more for the same 15 pounds. I never thought of checking at Pyramyd AIR.
I can’t get 15 pounds of duct seal at Pyramyd AIR because they sell it by the 6-pound pug. So I can get 18 pounds for $35.97, plus shipping. Okay, they don’t call it duct seal, they call it Impact Putty, but duct seal is what it is. And, who cares where it comes from or where THEY get it? As long as YOU can’t get it for less, that’s all that should matter.
Clean the trap
I shoot into my trap a lot — probably 7,000-10,000 shots each year, if not more. That’s both pellets and BBs at power levels from less than a foot-pound to over 70 foot-pounds. Jim sent me this trap in 2011 and I have cleaned it out twice since then. In the beginning I wasn’t using it that much, but the last time I replaced the duct deal was about three years ago and I have been using it steadily ever since.
People will tell you that you can clean the pellets out of the duct seal, but that is like cleaning weevils out of flour that’s gone bad. Yes, it is possible, but I have more important things to do with my time. Changing the duct seal takes minutes; cleaning out the pellets can take hours!
It took me 20 seconds to remove the old duct seal from the trap. I pried it out with a screwdriver. Then it took me several minutes more to put the new stuff back in plus take the pictures. In all the job took about 8 minutes, start to finish. Now I’m good for another three years.

It took 20 seconds to pry the old duct seal out with a screwdriver. I did it inside a trash can that was partially full, so the trap rested up high and everything that came out remained inside the trash bag.
Reason for the steel plates
When the old stuff was out I examined the steel plates in the back. There was a single dent in one of them and it was deep. It could have been from a pellet, but I might have fired a .22 long rifle bullet into the trap at some point. I don’t remember doing that and if I did I would not have done so inside my house. This trap is portable and goes outside with me as well. And I do have a legal silencer on my Ruger Mark II pistol.
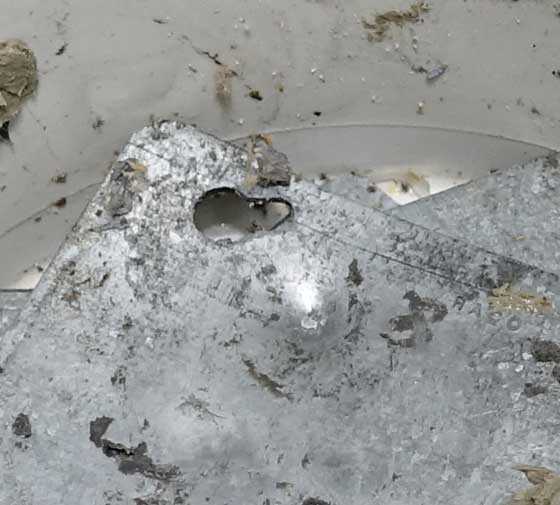
In nine years of use only one pellet or bullet has made a mark on the steel plates. Whatever it was, there was some power behind it!
Putting the new stuff in
It takes longer to put the new duct seal into the trap, because it has to be formed to fit inside the round cap. It’s like working with very cold modeling clay. It does warm up about the time you are finished. That is what used up most of the eight minutes this project took.
And we are back in business for another three years.
BB trap
The trap we just saw built is also ideal for BBs, but you don’t have to go that far if BBs are all that you shoot. Let’s look at the type of trap I use all the time for just BBs from lower-powered guns (under 400 f.p.s.). Mine is the UTG trap that doesn’t seem to be available anymore. But you can make one out of a cardboard box and some denim fabric. Run a dowel through a box over which you can hang several sections of denim cut up from old jeans. Three is a good number, though two will do. Hang the fabric toward the front of the box
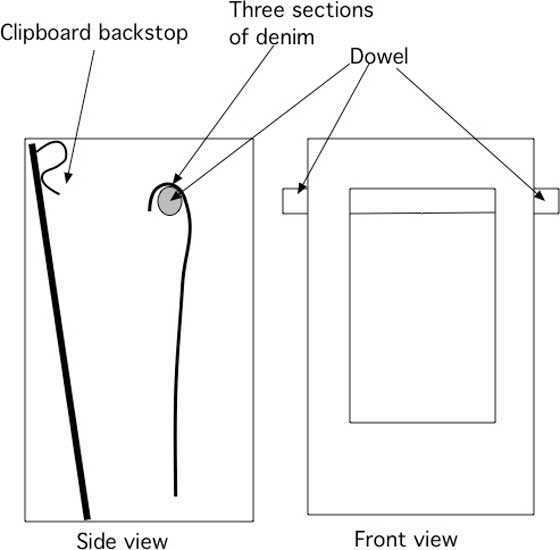
This is a simple and cheap BB trap to make.
Airsoft trap
I’ve been shooting a lot of airsoft lately, so there were lots of plastic BBs to catch. What do I use to trap them? Let me show you.
I cut a large hole in a tough empty cardboard box of kitty litter, then I tape the target over the hole. There is a second box of litter stuffed with wastepaper behind the first box. No airsoft BB has made it though the second box in over 300 shots. It should last for a thousand shots before I need to replace the boxes, but I always have more of them.
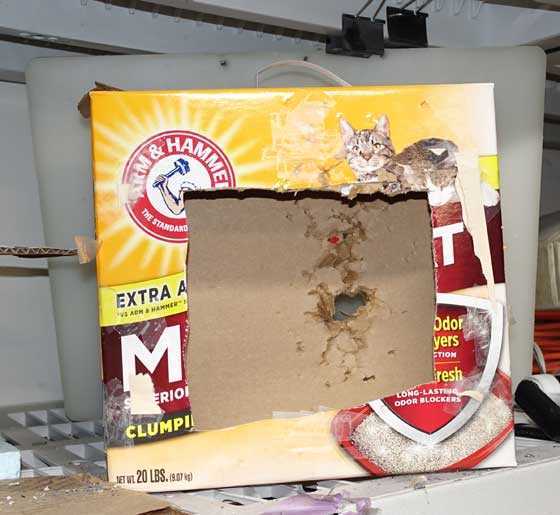
This is my kitty litter airsoft target trap box that I tape targets to. I tape the 4 corners of the target paper so the target is tight. As you can see, this trap has had airsoft BBs shot through it.
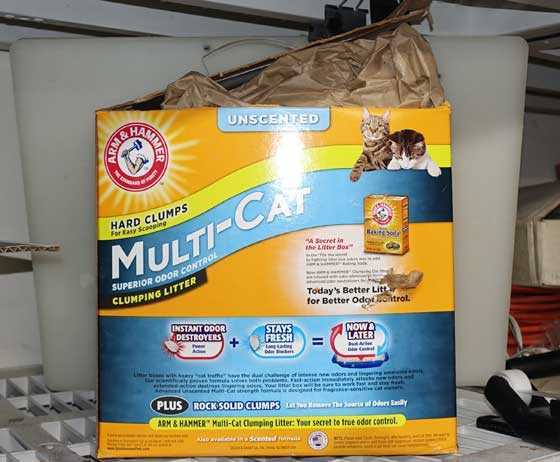
This is the second kitty litter box that has wastepaper stuffed in it. No airsoft BB has yet gone through this one, but there is a half-inch tough plastic cutting board behind it to protect the wall.
Summary
These are a couple cheap and simple traps you can make to enjoy your airgun shooting that much more. They are less expensive than commercial traps, yet they do the job just as well.

B.B.,
Maybe you could provide links to two other trap projects for those who got something with little more oomph:
/blog/2018/03/the-right-now-pellet-and-bb-trap/
and
/blog/2015/04/worlds-best-pellet-trap/
Siraniko
Siraniko,
I think you just did! 🙂
B.B.
I was just going through this thread and thought I’d put my 2 cents in. As I was looking for better, easier and cheaper ways to make backstops a few months ago, I came across this video from 2017.
I actually went to Lowes, picked up a couple of small sheets of Lexan glass about 1/8″ thick and stuck one in a cardboard box about 6″ deep. I put on safety goggles and shot my .22 break barrel air rifle into it.
Nothing came ricocheting out, so I kept going. After 10 shots, I took a look. I was only shooting in my garage, from about 7-8′ away. Tiny scratches on the Lexan glass. All the pellets were mushroomed and sitting at the bottom of the box.
I’ve repeated with .177 and BB’s. All were contained in the box. The BB’s aren’t deformed, but the Lexan glass absorbed the impact, and they just dropped.
Check out the video:
https://www.youtube.com/watch?v=Xo2Fx_tQFvM
Guavity,
Thank you very much! Good to have you comment and please continue. The video is very well done and explains all build aspects very well. Another good option!
Chris
Guavity,
Welcome to the blog. Your strange name had me wondering, as I have had about 50 new subscribers sign up just today. I’m glad to see that you’re real.
I will watch the video and thanks.
B.B.
It’s good to be recognized as real! LOL! The name goes back to AOL dial up days… Typo that I liked, and I never have to put numbers after it!
guavity
Welcome to the blog. Thanks for the video link. It was very interesting to learn that polycarbonate will stop pellets. I am wondering what thickness would be required to stop various calibers and power levels of airguns. Looks to be simple and effective. I liked the portable stand made from pvc tubing as well.
Geo
BB,
That is one thing that RidgeRunner’s Home For Wayward Airguns will not likely ever have, an indoor range. The Boss is most adamant about that.
A berm or a mulch trap are good ideas for outside ranges.
It really is a nice idea to keep projectiles from going willy nilly.
RidgeRunner,
My “Boss” is also not too keen on an indoor range. Her question: “We have 15 acres now, so why do you have to shoot in the house?” Well, that is a good question, but so is my answer: I have two outdoor ranges, however, when I get to shoot during the week, it’s generally after 10 PM, it’s cold (now), dark, and often raining. Hence, while I get to shoot outdoors on the weekends, the 5-meter indoor range gets daily use…mostly with low-powered pistols in the Tempest power range (~ 3 fpe). As a concession to the Boss, I did back up the 3 commercial pellet traps with an inch of pine, just to keep the walls pellet free. =>
(pic below was taken before the pine backing and the addition of an overhead-shelf light for the targets)
Take care & good shootin’ to ya,
dave
P.S. Outside, as you said, I use berms, and also a 2-foot by 2-foot piece of .060″ steel epoxied to a 2-foot by 2-foot piece of 1/2″ exterior plywood, angled at 45 degrees and set in a shallow box of sand. That even does a good job of stopping .22 Quiet rounds, which are in the 40 fpe energy range (they will blow right through a one-inch deck board at 15 yards).
Nice sounding trap.
Thanks =>
B.B.
Great article as always! The one thing that i think you forgot to mention is, wash you hands after you have been handling lead pellets! It does not matter if you have been shooting the pellets or just cleaning them out of your trap.
Also, rubber floor/gym mat works much better than denim at stopping/slowing down pellets. I hope we have some really interesting designs that other people have come up with!
-Y
BB,
10-20 new people a day. That is good. I assume that is new people visiting “Airgun Academy” specifically and just the PA site?
I strongly urge new people to “log in to reply” and participate. No doubt, they have something we all can learn from. Plus,.. more than a regulars are retired and would be more than happy to spend some time answering questions.
On pellets traps,… I have gone through several variations. Duct seal does work. I found it messy and then I always wondered what do I do with it when full of lead. I aimed for something that I could easily recover lead a bb’s from.
I will post a pic here, (or try),.. and then a follow up:
The front is cut out 8 1/2″ x 11″. The front door is hinged and latched. Clips on the front door make for quick target/backer change out.
Box open:
The inside has 2×2’s at all interior joints. The inside back is 11 gauge steel (.125″ or 1/8″ thick). The steel is “isolated” from the box with foam. This prevents it from becoming a Gong when struck. You can shoot a TX200 in .22 at this from 5′ away all day long. Lead and bb’s drop right to the bottom.
I use a 1/4″ thick piece of rubber hanging from the top also (optional). This slows the pellets down a bit. bb’s will hit it and stop. bb’s do not bounce back (through the backer), so bb’s are also contained and will not rebound back out.
I have a .25 -rod and the Red Wolf, both in .25 and both are around 50 fpe guns. (I do all my chrony work indoors) and the muzzle is no more than 5″ away from the box face. If doing something that strong, I will use the rubber mat inside. The 11 ga. plate holds up fine.
As an added measure, the wood wall there is (hardwood 4×4’s). That sits inside and can be used with or without the mat.
With the rubber mat hung, you can plink all day with no issues, no bounce backs and it is easy to clean out.
That is my “refined” version after about 1/2 dozen variations of other designs,… like some mentioned today.
Chris,
Nice. Unfortunately not even one so sophisticated would change the Boss’ mind.
RR, please don’t let your Boss talk to my Boss lest my indoor range get shut down, hahaha! =)~
Dave,
I don’t think that will be a problem as the Boss only likes to talk to me. I think you are safe until you miss the trap.
Hahaha…cool. =>
Cool, Chris; I like it! =>
BB,
My denim jeans are usually too worn to provide much resistance to a bb. When they are too gone to wear in public, they become “working on the car” jeans. At that point who cares if they are oil and grease stained? When those are too far gone there isn’t much left.
All of my shooting is either .177 of .22 cal. So what I’m making is not back stopping super powerful big-bore projectiles.
I’ve found that a visit to a floor covering store will yield cheap or free carpet samples of last year’s fashions. I try to get samples that have deep pile and place the deepest in the front with lesser depths behind. A stack of four samples is more than adequate to stop anything that I’m shooting. I’m not shooting indoors, there’s not enough clear space in my cluttered, project-ridden basement. This backer is light enough to take outside and back in again when I get time to shoot.
I’ve also collected several small pallets for a more permanent outdoor backstop. From some of these I’ve “harvested” boards that I’ve used to make a solid face on one pallet. I place other boards inside the target backer pallet as a fail-safe. A piece of carpet sample on the front completes the backstop. After dealing with soggy carpet, I did make a small “roof” to keep off the worst of rain. It takes about three pallets to make one good backstop, one for the frame and two others dismantled for materials.
The pile on the carpet samples seems to absorb enough energy that I’ve never seen a pellet or bb bounce more than a yard from either backstop.
Dan
BB,
I noticed your litter boxes are sitting on what looks to be a grated mat. That would certainly work well at capturing any “droppings” like bbs from rolling around the room. It will also help “contain” any shreds for easy cleanup.
RR,
It’s grated but it’s not a mat. It’s plastic shelving in my garage.
B.B.
RR,
I wanted something bigger as well. If I were teaching a new kid, the bigger the better! (for my skill level a few years ago,.. “new kid” fitted me pretty well). I have 2 boxes which are pretty much the same, with a few differences.
This one is set up 24′ from my dining table (aka: shooting bench) and is primarily for the 499. Same box for chrony work. For that, I have 2 saw horses (plastic, well made, adjustable), topped. The MTM rest sits on that (or something else if the MTM won’t work),.. then the chrony,.. then the box.
The other box is 41′ away,.. in the opposite direction. The saw horses then become the shooting bench. The TX200 and LGU got used a lot on that one. After awhile though,… 41′ just don’t cut it. Boring! It is good for stretching the gun’s legs over the Winter and staying fresh/familiar with the trigger feel though.
As for pellet/lead/bb clean up,…. if neither the wood or rubber mat is used,… a magnet gets all the bb’s. The lead can be gathered by first taking a shop vac and holding it carefully over the lead debris. This will suck up the cardboard backer bits, leaving just the lead. I gave the last 5+ pounds to a re-loader at work that also casts bullets and fishing sinkers. He was thrilled to get it.
As for the “Boss”,… I can’t help you there unfortunately. 😉
I’ve been using a 5 gal. bucket filled with rubber mulch and laid on it’s side.The top is sealed with a 1 1/4 in.thick piece of old broadhead archery target. Just in case backer is a disc blade that will stop any pellet or slug without the mulch. Yeah it’s kinda heavy but it just sits most of the time.It’s not like I’m gonna take it with me.I use it for chrono testing in the basement.My boss tells me she can’t hear a thing when I;m using it. .
I have a couple of large (18 – 24 inch diameter), dead white pine trees on the property and find that a 12 inch piece (with no knots) cut off the log makes a great backstop. Takes all of 2 minutes to make if you have a chainsaw. Other softwoods can be used but I wouldn’t recommend anything harder than poplar.
I have a couple of fancy butt-stops that stand about waist-high on three legs but usually just cut a flat one one side so that it doesn’t roll.
I just tack a piece of corrugated cardboard to the log face and pin the targets to that.
Hank
Hank,
What!!!!,… no pics? 😉 Those “War of the Worlds” standing targets would inspire new shooters!
Then,… your backstop,… a wall of logs! Your “windicators” are another awesome invention and work absolutely superb! I made 4.
Chris
Sorry! LOL!
Hank, Chris is right…very “War of the Worlds” looking…and way cool, of course! =>
Hank,
What a good idea!
This fall a large white pine blew over next to our field. Took me a month to cut off and burn the smaller branches. I have a friend who has a friend that has an outdoor wood-fired boiler. Heats home, garage and shop. Both gentlemen came with trucks and trailers and cut up the trunk and larger limbs and hauled them away. Nothing left but the roots now. I was grateful for the help disposing of the pine but didn’t tink far enough ahead. Should have had my friend Ken cut off a couple of rounds with his big Stihl. My 14″ bar just wouldn’t do.
Dang!
Dan
Dan,
Burning PINE in an (outdoor) wood burner is not? an issue like burning indoors in a wood stove or fire place,… or do you know? I did hear that if you split and dry it for a couple of years,.. creosote is less of an issue. The BTU yield is still pretty bad though, but better than nothing. I see a lot of those outdoor units around here. Not sure of the pros and cons,… but I know the insurance companies are not fond of wood burners (inside) homes, so that could be part of their recent popularity.
Chris
Chris,
Several of our local townships have banned new outside boilers. Those in place can stay but no new ones. I can only guess that he’s either stockpiling for next season or burning full on, no damper. And yes, white pine in a furnace will disappear in a very short time, no substance, low heat. Most of the outside boilers that I’ve seen have short chimneys so I suspect that they are hot enough to reduce deposits. Of course then the smoke contains more pollutants.
Not optimum for sure. When we bought our land to build our home, it included 10+ acres of woodland. I can only guess that there had been an oak blight 60/70 years ago. We had a wonderful stand of barkless dead oak. We heated our home for 15 years with that dead oak. I stopped cutting when I injured my back and couldn’t manhandle the chain saw.
Dan
Dan,
Thank you for your insight. I now know more than I knew before. 🙂
Chris
ChrisUSA,
Check out my post to Dan below about Catalytic Combuster.
shootski
Shootski,
Can not say I have heard about that one. Not a wood burner myself,… but have no objection.
Is it popular?,… and if not,… why not? It sounds pretty efficient. Not sure, but I do not think that Poplar is very BTU efficient either. No clue on olive wood.
Chris
Dan,
Have you seen a Catalytic Combuster?
We use two on the wood heaters at the ski chalet (ski shed) and burn the Cottonwood; we also used them in Spain to burn Olive wood.
Those will actually burn the smoke and provide even more heat as an added dividend. I have never heard of a CC burning out!
shootski
Shootski,
I hadn’t heard of a Catalytic Combuster. A little search and I found some. A good idea, increase efficiency, reduce pollutants. Win, Win.
We have a fireplace that is a listed as non-polluting device in California. You load the firebox full and light the top of the wood stack. Combustion air is drawn from outside and the burn is un-damped, full on. After the first few minutes of the burn no smoke can be seen coming from the chimney. The smoke path is channeled around the masonry mass and through a bake oven and finally up the chimney. Two burns are enough to heat the masonry mass which will then radiate heat for the next 7 to 8 hours.
Wonder if a Catalytic Combuster could be fitted in the smoke path of our fireplace? Hmmmm.
Dan
Dan,
Edith and I heated our home in Maryland for 21 years with a wood stove that had a catalytic combustor. They do work as described. You get a heating efficiency above 90 percent. The only thing I know of that is better is a pellet stove burning corn. And as a side benefit, your house always smells like popcorn. 🙂
B.B.
Dan,
I don’t think the combustor can be anywhere but inside the stove. It needs to be very hot to work!
B.B.
OFF SUBJECT ALERT!
This Saturday there will be a local auction. They have listed a Flobert Parlor Gun and a Crosman Model 130.
I know these two ladies would really like to move into RRHFWA, but our funding will not likely cover the adoption fees. We need your help. Send us your donations now. Any amount will help Make your checks payable to RidgeRunner’s Home For Wayward Airguns – Adoption Fees.
Your donations will help these ladies move into a retirement home where they will be with friends and family who will care for them as they were meant to be cared for with regular trips to the range, not collecting dust in some closet.
As a special offer, if you act now your name will be engraved on a special plaque commemorating those who have helped this dream to carry on.
Time is short! Help us to help them! Show these gals that someone cares!
Thank you.
RR,
Shameless!!!! 😉 What?,…. no pics from the auction site? Most of them will have taken photos to be posted on their web site.
Chris
Edit: Here is a quick search for both:
https://www.google.com/search?q=Flobert+parlor+air+gun&tbm=isch&source=univ&client=firefox-b-1-d&sa=X&ved=2ahUKEwj8-Nqw8fHnAhVPnKwKHQHXCxsQsAR6BAgJEAE&biw=1252&bih=577&dpr=1.09
https://www.google.com/search?q=Crosman+130+air+pistol&tbm=isch&source=univ&client=firefox-b-1-d&sa=X&ved=2ahUKEwiD9YX18fHnAhVRXq0KHS9TBXUQsAR6BAgJEAE&biw=1252&bih=577&dpr=1.09
Chris,
Shameless?! How so? If I am unable to bring these ladies to RRHFWA, do you know what will happen to them? Those fast talking auctioneers will run the price of these things through the roof. Then some less wealthy poor sap will take them home and put them in the closet or some underwear drawer because he cannot figure out how to use them or does not know how to bring them back to life and wants too much for anyone else to show a serious interest.
I am performing a service for all humanity. My willing self sacrifice will help these old gals live on for generations to come.
RR, I hope you at least get the Crosman 130; I bought mine after reading B.B.’s report here:
/blog/2005/09/another-oldie-crosman-130/
I get 300 fps at 5 pumps and 385 with 10; it’s very accurate and one of my favorite airguns. =>
Dave,
Unless I receive some donations real soon, I will not even bother going. I will just hand out with the rest of the ladies around here and kill some feral soda cans.
RR, that’s just as well; I think those auctioneers will drive the prices too high; I got my first Crosman 130 for $35 or so off eBay; but it was barely working and ATF could not fix it; like B.B., I had to have it re-built; so it was about $80 to have a nice working specimen. I wound up giving it to my brother to use to teach my nephews to shoot (which he did, thank God). Then I found the one above on eBay; I think I only paid $70 for it; and the owner said it was an estate gun that had been re-built by a friend of his who is familiar with these guns; the guy did a great job, for sure. I think one of these ol’ gals belongs in RRHFWA…but skip the auctions and check eBay. =>
Dave,
I went to a local auction a while back and watched a current Red Ryder sell for $35. A new one at Wally World was $25.
I would like to have one, but right now I am working on a FWB300. Maybe later.
FWB300…nice choice. =>
Dave,
Oh yeah. I had two of them and I let GunFun1 talk me out of both of them. He then turned around and sold them off, but he keeps buying one of them back. I would like for him to send it for me, but I think he knows he would not be able to talk me into turning it loose again.
There is another gentleman who is trying to help out RRHFWA and may likely fix me up with a fixerupper. That suits me just fine as I want to refinish it and build it into a mini-sniper. I am certain there are some “collectors” out there who will cry, but I am not concerned with their opinions anyway.
“That suits me just fine as I want to refinish it and build it into a mini-sniper.
RR, oh yeah, I remember B.B. doing a report on mini-sniping:
/blog/2011/08/mini-sniping/
And his friend, Mac, is holding the gun in question; yes, that would be a cool mini-sniper for sure; please post some pics if you get it and refinish it. =>
Dave,
http://minisniping.org/
RR,
….. “I will not even bother going. I will just hand out with the rest of the ladies around here”……”
“hand out”?,…. now there is a (perfect) example of a Freudian slip! Sorry Bud,… I could just not pass that up! 😉
All in good fun,…….. Chris 🙂
Heck,… D and G even have an F between them!
Chris,
Well, the ladies do appreciate being rubbed down with a little oil now and then.
Good morning B.B. and crew,
This is an excellent topic for our new readership! I hope you like this mobile duct seal pellet trap. It can be placed at various distances in the yard from my fixed shooting location in the garage. The target area is 11×11 inches and there is hardwood and steel behind the duct seal, so pellets can’t shoot through it.
When the pellets accumulate in the trap, ricochets might happen so I have a process to remove the pellets, then flatten out the duct seal with a big hammer and a short board and keep going (after washing the lead from my hands as Yogi reminded us above).
The base is from a dead Mosquito Magnet, a product I used to service as a repair technician. Trap is a modified desk drawer, with a brass handle on top. The weight is nicely balanced between the wheels and it rolls right along! It’s very goofy, but it works nicely!
Will,
Aren’t you a clever guy! I have heard that old drawers are good for light backstops and traps. And I like the mobility.
B.B.
Will…wow! Very innovative. =>
When I shot indoors (out of necessity) while living in NJ, I used two old foam rubber pillows stuffed into a cardboard box that printer paper came in. For a backstop, I had a piece of scrap plywood. Everything was duct taped together. I knew it was time to change the pillows when I would hear a loud “splat” which meant that the pellets had finally wore away the foam and could make it to the plywood. I used this for my air rifles with energy under 20 ft. lbs. The hardest hitting rifle back then that I owned was the Discovery and that needed sound reduction in order to shoot indoors and not receive complaints from the boss or the bird. No idea how some of the higher energy pcp’s would do since I now shoot outdoors in the back.
Fred formerly of the DPRoNJ now happily in GA
Will,
I like that a lot. I love the mobility of it. Perfect for moving from 10 to 20 to 30 to 40 to 50 yards.
As yardage markers, in the yard,… I use these to keep from measuring over and over:
https://www.amazon.com/3PRCAP1-Electro-Galvanized-Plastic-Grip-Cap/dp/B00KQFWYZI
They stay put great, easy to spot and be mowed right over. Just shove them tight to the dirt.
Chris
Chris, That’s a good idea for a yard marker and they’re a good size and are apt to last over time.
Will,
They will last at least 2-3 years. The color will fade a bit. Of course,.. you can just get a framing nail, cut out circle from a container lid and you have the same thing.
I bought a box of them at the same time I bought some big plastic tarps for emergency roof cover up (if ever needed),.. so I already had them on hand.
Chris
Chris,
Great idea! Maybe I’ll buy some of these to mark distances. I wonder if Home Depot sells them. If not, I buy a lot of stuff on Amazon and I will buy some from them.
Geo
Geo,
Or,… make your own with framing nails. Lowe’s and Home Depot might have a smaller box. Mine are 1 3/4″ and the box states 1# with no noting of count. Maybe 100 – 200? I forget what I paid for them. Thankfully, I have never had to use them for emergency roof cover up.
Chris
I made a wooden box vrom scrap woo left over from when I replaced the wood on the gate atmy daughters house. It’s made in a size to use the same Gamo target you show in this article. The target slips into place and the front and back are are judt a little larger than the size of these targets. the box is sbout a foot and a half deep with an opening ot top to use as a handle. Much cheaper than ducseal, I use old rags, towels, shirts, whatever, packed into the pellet trap. So there is about a foot and a half of that stuff in thete to stop the pellets. Easy to clean.when the trap gets a little heavy, I pull out the packing starting from the front, shake out the pellets, repack it, reusing the same packing till the towels get really torn up. So, I save up items that would have been thrown out, to use for the packing in my pellet trap. Been using this one for several years now, and shoot a lot. Cost? Zero. Did use a few small nails and wood glue and some clamps to make the box. Scrap wood, old rags and towels, etc. The pellets don’t get far into this packing, even with a magnum level springer.
BB
I saw an outdoor setup that consisted of these materials in the following order:
Paper target of your choice, 2 bales of pine straw still compacted, 5-6 thick logs from the woodpile, a 3 foot diameter tree, and the ground. Shooting elevation was from 6 to 10 feet above two targets. Ecologists won’t be happy but the safety committee would. Ricochets just don’t happen thanks to the baled pine straw. The backstops could even handle firearms until the tree died but neighbors would not be pleased with the noise.
New readers need to learn about ricochets before someone loses an eye. Eye protection is not optional.
Deck
Well, here is the target trap I built last spring. I built two previous traps before this one. The first one was just two pieces of 1/2″ OSB fastened together & mounted on a stand. My Crosman Nitro Venom .22 blew holes completely through that in no time. The second trap was made using 1/2″ OSB for a box with 3″-4″ of duct seal. This stopped the pellets well and lasted for a couple of years or so. The duct seal kept slidding down and got hard with cracks. Eventually pellets started exiting the OSB back and I stopped using it. It was too difficult to change the duct seal and too expensive as well, so I decided on a new design.
At that point I started over building a box 12″ x 14″ x 4″ deep. I used a piece of 1″ aluminum plate for the back. Then Bugbuster offered to send me some rubber sheets 12″ x 12″ x 3/8″ thick. I took him up on his offer and he sent me about a dozen of them. They are uncured heavy rubber. I began testing to see how many it would take to stop a .22 pellet from my Gamo Urban. To my surprise, the pellets blew completely through 3 sheets and stopped midway through the 4th! That’s about 1 1/4″ of solid rubber. At that point I decided to just use two sheets because the 1″ aluminum plate would stop the pellets anyway. The rubber quiets the sound and keeps all the pellets inside of the trap. I left about 2″ at the bottom of the box to accumulate the pellets and debris.
The picture just shows one rubber sheet but I also insert one in front behind the front piece which is 1/8″ masonite fastened with screws. I have shot several hundred rounds at the trap and the rubber is kind of self healing so I have not had to ever replace the sheets yet. I am able to shoot in my basement out to 17 yards. Most of the time I able to hit a 3/16″ dot at that range with the Urban. I use this range to verify my scope’s zero before pesting, and to practice my shooting technique.
Geo
Photo #2 – it rotated when I posted
Trap at 19 yards in my basement range
Geo,
Thanks for the background on development. I think we all go through some kind of evolution on developing what works for each of us.
Cool looking neon dot/circles you got going on there! 🙂 It looks likes you did some additional “artwork” around and in them? I bet the yellow ones are harder to see on white paper.
Chris
Chris,
Those are the ones you sent me. 😉 I have used some of the solid dots already. The Pink and Green show up best with open sights, but when using my Urban with the scope, it does not matter the color. The target shown has a 1/4″ black dots and I placed the circles on the black dots just for fun. Have not shot using those yet.
Geo
Geo,
On ones that are harder to see,.. I have taken a broad tip marker and just colored them black (while still on the peel off sheet). Once stuck, I have traced the interior and exterior of the with regular Sharpie. Glad you like them.
Chris
B.B. and readers here is my trap,
On stopping pellets I came up with this wax trap, it is good indoor or out and fairly quiet.
Construction is very simple 2×4’s 14 inches top and bottom and 12.25 inches on the sides eight wood screws and done. Well not quite, there is the melting and pouring of the wax. I happened to have quite a supply of old candles and a huge drip candle that I had made over a period of years, yes lots of wax. If you want to make one keep in mind wax is kinda expensive.
The unit weighs about 20 pounds so I added a handle for ease of transport. Each side can take about 3000 pellets before it stops catching them. What happens is as the pellets collect you are basically shooting into a lead trap, sometimes the pellets stick sometimes they bounce out.
I like it and it works for me.
Mike
Mike,
Way to go!!! on recycle/re-use/re-purpose. I like it.
Chris
Chris,
Just working with what I have.
Mike
Mike,
And then you melt the wax to remove the lead?
B.B.
B.B.,
Yes, using a propane torch makes fairly short work of removing the wax and pellets, then remelt and pour again.
From 18 fpe to 28 fpe 22 cal pellets seem to only go in about 1 inch, it would be interesting to see how the wax would respond to much higher power levels and even big bores.
Mike
It was sized for the NRA 10 meter 12 bull targets and I tack cardboard onto it and tape targets to the cardboard.
It is big enough for lots of different targets. Oops, image sideways, top is the handle side.
Mike