Today reader Ian McKee, whose blog handle is 45Bravo, tells us about a unique way he colors the metal tins he uses to carry bullets to the range. If you’d like to write a guest post for this blog, please email me at blogger@pyramydair.com.
Take it away, Ian
Making shiny things look old (and better!)
by Ian McKee
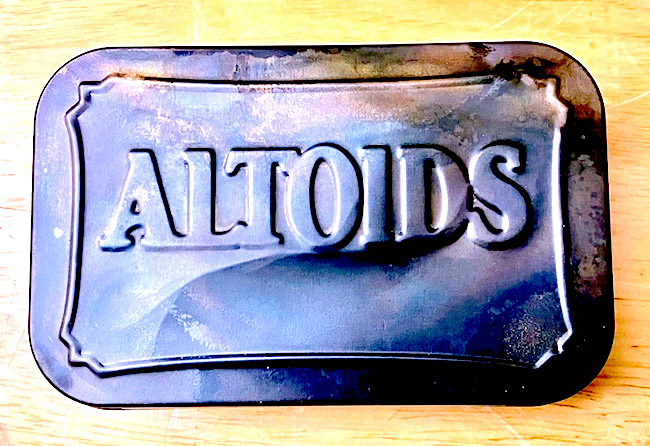
I colored this Altoids tin.
This report covers:
- A curiosity on the range
- Color case hardening
- The Altoids tin
- The film can
- Pellet tins
- What do you think?
I have stepped into the realm of big bore air guns, and I am quite enjoying it. Because of the power of the airguns, I have to use a firearm range to test them.
A curiosity on the range
Being the only airgun on the line chunking a huge piece of lead downrange to the steel targets, and the gun being suppressed all attracts a lot of attention. Everyone is always asking questions and looking at what I am using to shoot the airgun. Always the enabler, I try to put airguns in a positive light for potential enthusiasts.
I have several different projectiles I am testing, and carrying them around in a zip lock bag, or a plastic snap shut container just isn’t doing it for me. It’s just too mundane.
At first I put them in metal tins I had around the house — an old Altoids tin and a couple of old 35mm film cans that the film came in bulk 100 ft. rolls so I could “roll my own” rolls of film (Yes I am that old as to have used them.). But the tins were just so plain. I wanted something a little more decorative with a vintage look.
Color case hardening
In the mid 1800’s many of the revolvers and rifles had color case hardening on them as accents and also as a way to surface harden the metal. (No, I am not that old.) I had always liked the look, so I decided to try my hand at coloring the tins.
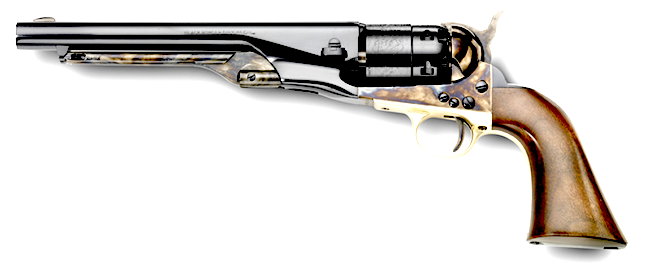
Many cap and ball revolvers used color case hardening in the 1860s
The factory way of doing it involves special equipment I do not have. My method is not a hardening process, just a way of artificially aging the metal. To do it you heat the metal over a flame until it is red hot, then quench it in oil or water. I started this project about 9 p.m. one night, and I didn’t want to dig my fish cooker out of storage to heat the tins with a larger flame area. So I used a handheld propane blow torch. But with the pinpoint flame I could not heat the tins evenly or completely to the desired temp.
(NOTE; To hold the tins over the torch, and to flip them over the larger flame, I used my hemostats. They are a multi purpose tool!)
The Altoids tin
I did the Altoids tin first, it is made from a very lightweight metal similar to our pellet containers and it heated easily. But it was warmer in some areas than others, and I sprayed WD40 on the tin as the oil to quench it.
You do not have to remove the paint from the tin as the heat from the torch flame will take care of that.
Because I could not get it as hot and evenly heated as it needed to be before being quenched in the liquid, the colors are not as vibrant as factory case coloring. But I think it came out well.
It is more subtle and subdued as seen in the photo at the start of today’s blog.
The film can
I wanted to try it with motor oil to see if it had a better effect. I had a quart of motor oil in the garage, and I commandeered a cheap plastic food container with a resealable lid from the kitchen cabinet (don’t tell the wife).
Again I used the blow torch and tried to keep the flame moving to heat as much surface area as possible. After a few minutes of the futile attempt to heat it evenly I just quenched it in the motor oil.
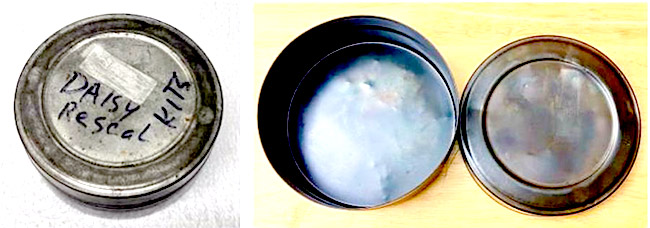
Before and after photos of the film can. I use it for .457 slugs.
Pellet tins
A few days later, I pulled the fish cooker out of storage to have a larger flame area to heat the tins. I used a small JSB tin and a larger JSB tin. I left most of the stickers on the tins to see how well they were removed by the flame.
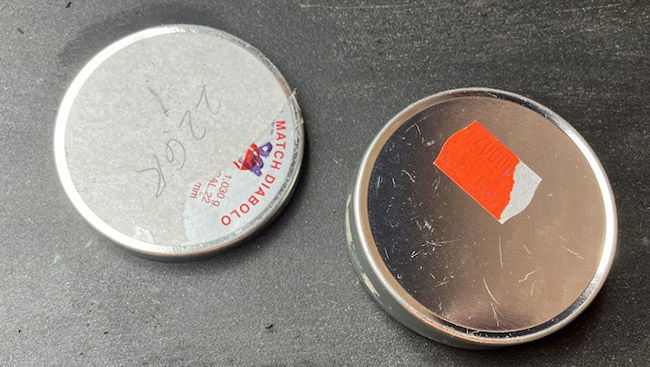
Your old reused tins probably look like this.
I heated them over the fish cooker, and flipped them over to let the flame directly contact the metal everywhere to remove any type of a protective finish they may have. After flipping them a couple of times, and then immediately quenching them in water I dried them and coated them with a light oil to prevent rust.
In trying both oil for the quench and water for the quench, I really don’t see any appreciable difference. Just use water.
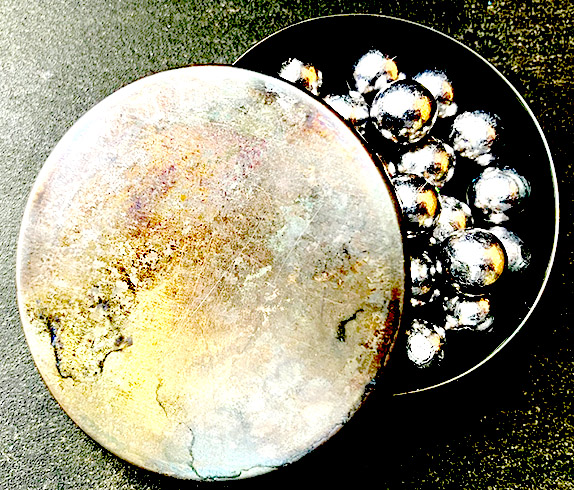
When they could look like this! Yes those are .459 round balls I am testing in my AirForce Texan SS.
Shooting is supposed to be fun, and having the same tins of pellets as everyone else on the firing line is just boring. So try it, or maybe you have your own ideas. Stand out from the crowd.
What do you think?
Is this something you have ever done? Or, now that you have seen a glimpse of how to do it, is it something you might try to dress up your pellet containers?
Show us what you use to hold your pellets or slugs.
Shoot safe, have FUN!
Ian
From BB — Ian, do you have a way to make something old look shiny and better? Because I could use some!
Everyone,
Well, this one was on WordPress, because I did schedule it for the correct time.
BB
I love WordPress, I love WordPress, I love WordPress, I love WordPress…
They look good. I have never done this process for appearance, but I have done it many times to heat treat various things. Though for what I was doing, I generally sanded the coloring off. 🙂
CB
B.B. you would not look better having been roasted on a spit and quenched in oil. Trust me. The lambs we give that treatment to at Easter-time don’t look fluffy and cute any more. But it may improve your taste…. ;o)
Ian, very interesting work. Metallurgy is one area I have little experience with except when it comes to metal fatigue. I’m an expert on that!
It occurs to me that you have a lot of extra time on your hands lately….
Actually it only takes about 5 minutes per tin at the most.
Ian
Ian,
Once again you should give yourself a pat on the back for a job well done. From what I can see in your photos, you have done a superb job of individualizing your pellet/bullet holders. I will have to keep this in mind for my own future big bore excursions to the local PB range.
Often I use the Wilkins pellet pouch, but for these big honkers the larger tins will likely work better.
BB,
Your only hope is very expensive plastic surgery and that will only take you so far.
“From BB — Ian, do you have a way to make something old look shiny and better? Because I could use some!”
I’ve been gray for years. Thinking about rejuvenating myself with some hair coloring. Hey, it works for the wife!
MiTurn
I am right there with you.
Ian
I remember Grecian Formula. Is that stuff still around?
Thankfully, Mrs. RR does not believe in that.
I like it! Now you have me looking around for things to try it on. My fish cooker is too deeply buried in an outbuilding to consider, but I do have a weed dragon thingy and full tank of propane on ground level & very accessible in the barn. I’m going to bet that will be plenty of fairly controllable heat, and at arm’s length. Scott
Scott that should work nicely!
Ian
Ian how hot do different metals have to get to have this effect? Also, once the paint is burned off, how do you keep the remaining exposed metal from oxidizing–regular wipedowns with Ballistol? What about the inside?
Roamin,
Heat until they begin to glow red. He mentioned that.
BB
RG, I wiped them with oil.
And have never looked back.
I actually wrote this blog a few months ago but never submitted it.
And the tins are still holding well and no rust.
Color case hardening (not hardening) pellet tins. This blog never ceases to amaze me.
Not sure you’re going to color case a pellet tin without a lot more work. Quenching is where most color is imparted and what you add to the quench is critical. Think old leather, bone, charcoal, chemicals, etc. (gunsmiths that are still willing to color case harden like aquarium charcoal in their mix).
IF I was interested in “antiquing” the look of pellet tins I would look into anodizing. Only problem with our metal pellet tins is that they may have a coating of tin. I don’t know this for a fact but it would make things more challenging. Lots of home methods for anodizing and even kits are sold.
I just wanted something that was different.
Ian
Ian,
I just attach a piece of colored electrical tape to color code my pellet containers. Much easier than your method.
The trouble with shooting an airgun at a PB range is that you HAVE to wear “ears”. Those things are darn LOUD! When it is just airguners at the range you can have lively conversations as you are shooting. All my PCP knowledge is from over hearing dedicated PCP’ers talk.
-Y
Yogi, when I have to frequent the firearms range I wear electronic hearing protectors.
They amplify ambient sounds so you can hear people talking and range commands.
But it electronically shuts out the blast of firearms.
Ian.
Yogi,
I totally understand coming from your mostly shooting at airgun only ranges having issues with NOISY ranges that cater to mostly firearms and needing to wear hearing protection.
Have you tried the newest electronic earmuffs? You can actually hear folks speaking with them and still have your hearing protected from the firearm reports. As a mater of fact with some of the really good ones you can actually have very good directionality as well.
Yes, it is another expense…but this is for your future hearing.
shootski
The ones tht I have seen either were inexpensive($50+) and did not work very well, or uber expensive ($120+) and functioned as advertised. Most are just a 30db reduction(at least the ones that I have seen.
My eye muffs are 46 db rated. When I wear them, I am my one little world….
-Yogi
I went to an indoor pistol range for the first time a while ago. First time I showed up with ear plugs and muffs. The folks there kindly told me about the electronic muffs. Second time I showed up with the electronic muffs. A revelation. I could hear folks talking between salvos and even the range officer’s little safety speech before the range went hot. Then, another fellow noticed my fancy shmancy new muffs and let me in on a secret…the $20 electronic muffs at the big box stores work just as well. So I returned mine, bought new ones, and spent the extra on ammo. Third time is the charm!
Ian,
I have to admit that this is my favorite blog post of the year. On one of the bushcraft forums I have seen people use a ball peen hammer to dome the top of an altoids tin. Doing that and the heat color treatment would look pretty cool.
BB, I don’t know what ailment you have been battling but I hope you are on the mend.
David Enoch
I would like to see what you mean by doming the lids sounds interesting.
I doubt my metal working skills are up to that.
But I am willing to try.
I had done this long ago when I was shooting muzzleloaders a lot more than airguns.
I used to keep my small tools in a tin that I had done this with.
And kept a fire starter kit with flint, steel and char cloth in another.
The aged look was much better looking when at the rendezvous than a sparkling new tin of what ever you carried.
Ian.
Ian-
Good write up. Usually, I do batches of tins (20-25 or so film cans, etc.) for reenacting use. To fool myself that I’m doing it the ‘old timey’ way, I get a good bed of hardwood coals and toss the tins in. Mix them around a few times. Dig them out of the ashes the next day, clean and oil for a nice dark gray coloring.
For heat coloring iron and steel, as opposed to hardening or tempering, I have used oxy-acetylene torches. Imperative to pay close attention to the colors as they develop and keep the workpiece or the torch moving.
The other side of the denarius coin is to make something old look shiny and new.
http://www.thehistoryblog.com/archives/69841
Ian,
very interesting stuff and a cool DIY project.
I have tried this with airgun parts because I am not really satisfied with the available cold bluing solutions.
Neither approach has given me the deep, dark, blue finish I would like so far. But then, I am somewhat afraid to get the parts *really* hot because it might change the metal’s structure and affect strength or the accuracy of barrels.
Stephan
This was just to get rid of the bright shiny coatings on most tins.
I wanted something that was different and easy to do.
Hardening was not my intention.
Just aging.
Ian
As a Blacksmith ,I like it. I’m going to ramble now………………..Earned every white hair and going to show them off, Hearing , Hungh ? Been a Machinist/millwright for over forty years and shot Service Rifle and 3P Smallbore most of that time.. I was the oddball back when I started as I used eye and hearing protection but alas I have Tinnitus and a major hearing loss. Anyone who uses foam earplugs of any type are kidding themselves they beat nothing but there are many better choices. I went double(plugs and muffs) for the last five or so years in plant and on the range. Now, thanks to a new Doctor at the Refinery I work in I have a Workers Comp claim that paid for nice hearing aids and custom molded ear plugs. The hearing aids are nice but exacerbate the Tinnitus, I pick up my ear plugs next week. mean time I purchased Radians custom molded DYI ear plugs off Amazon and they work fantastic.. I believe if I had these molded silicone rubber plugs forty years ago I would not have these issues. I’ve used electronic muffs for handgun shooting but muffs drive me batty shooting a rifle. With the Radians I cannot hear range commands and while in the field in a operating plant I cannot communicate with anyone but I’ve been making due. Better to keep what little hearing I have and deal with sometimes having to use a note pad to communicate. Thought about jumping through hoops to get a suppressor but nah.Last week I bought some CCI Quiet, they work much better than the old CCI CB longs. The “Quiets” are the length of standard LR , 710 FPS with a 40 gr projectiles out of both my PRS bolt action rifles with 16″ barrels with muzzle breaks, still QUIET.These numbers put them right with Umarex Origin 25 at around 50 FPE.
Ian.
Interesting and well written blog, as usual. I made my first experiments changing the color of steel when attempting to sharpen a knife. Unintentionally, I was experimenting with heat treating steel, which of course ruined the knife. Since then, I have been more careful.
I will try some of your techniques. It looks like fun.
Henry.
Ian,
yes, I understand you did it for aesthetic reasons and I think the result looks really good.
I wasn’t trying to harden anything either. My aim was to get a smooth, dark blue *and* while doing so not to make anything soft or brittle.
I suppose really good bluing is only possible with a hot bluing or maybe a rust bluing process.
Stephan
I have never tried the rust bluing. I have read how it’s done. But never tried it.
I have hot blued gun parts before.
I when I was younger and on a tight budget, I would trade labor with a local gunsmith.
He needed an extra set of hands to do things that didn’t require his expertise.
And he would then teach me how to do the more complicated things he did but let me use his tools to learn that trade on my own guns.
Ian.
Here are a couple of examples. I can’t find the exact one I was looking for yet.
https://bushcraftusa.com/forum/threads/tins-hammered-fired.79227/
https://bushcraftusa.com/forum/threads/altoids-tins-dome-lids.362072/#post-6724551
Picture 1
Picture 2
Ian,
Great post and thank you for having taken over whilst BB was off.
I was just thinking of a technique watchmakers (yes, another one of my hobbies using up a lot of time…) use for bluing watch hands. I mean the old style flame bluing. This was used to prevent the hands from rusting. You can achieve different colors depending on the temperature the metal is heated to, from yellow over brown, violet, light blue over to nearly titanium grey. Search for “tempering colors of steel”.
As for the uniformity: watch hands go from very fine to quite a chunk of material thus not heating up evenly when treated directly with the flame. Watchmakers use to set them on a bed of brass filings and heat up from underneath. There is a video on YT on a channel named “DIY watch club” where the process of watch hand bluing is shown and explained.
Of course, you can also use the flame directly if uniformity is not the goal, can be an interesting effect as well.
Works with steel, though not with all steel/metal materials and alloys. Titanium as well. Material needs to be cleaned with alcohol and be absolutely free from traces, if uniformity is desired. Fingerprints, grease and other residues will show during the process, but can be a desired and interesting feature, as well.
Below two photos, one of a blued vs cleaned clock hand and one of a wristwatch movement of which I flame blued the tiny screws.
Clock hands, direct flame bluing in order to learn the technique and no brass filings at hand. Was something like the 15th attempt, not bad but not perfect at all to watchmaker’s standards…
And the watch movement…