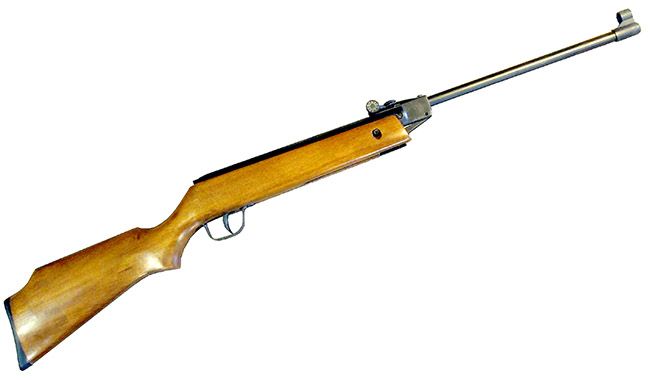
The BAM B15 breakbarrel air rifle.
Little springers Part 1
B15 Part 1
This report covers:
- Cleaning
- The spring tube
- Assembly
- The pin
- The secret
- Velocity
- Deep seating
- Summary
Today I assemble the BAM B15 and test it for velocity.
Something different
I decided to try something different with this rifle. I lubricated everything with Slip2000 EWL. This gives us a chance to see if that stuff really works.
Cleaning
Most of the parts were dry but reasonably clean. All they required was a quick wipe down with denatured alcohol. The spring tube was the exception.
The spring tube
Looking deep into the spring tube I saw what looked like caked-on leather from the piston seal that disintegrated. I started cleaning it with a paper towel soaked in alcohol and fastened to a dowel with a rubber band. I did that for about 10 minutes but it didn’t scrape off all the crud, so I switched to a long-bladed screwdriver.
The screwdriver worked well, but it took a long time to clean everything out. I probably spent 30 minutes on that alone. I would scrape with the screwdriver and follow with the paper towel on a dowel. The little chunks of leather wanted to stick inside the spring tube until I wiped them out with the dowel towel.
Assembly
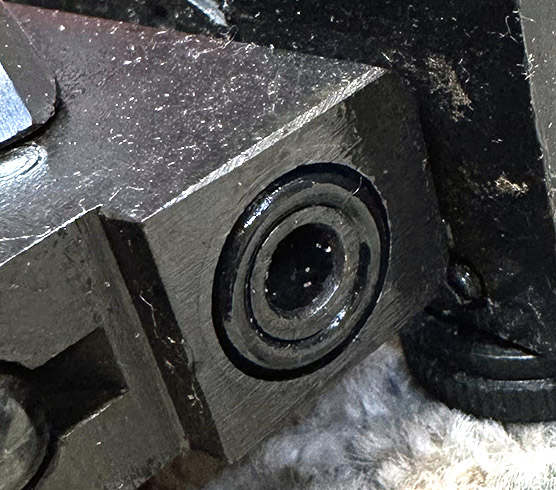
Assembly went very smooth and easy until the very last step. You will recall that the end cap that holds the mainspring in the spring tube is held in by both a threaded bushing that also receives the front triggerguard screw and a crosspin. The bushing does the holding. The pin just helps the trigger function.
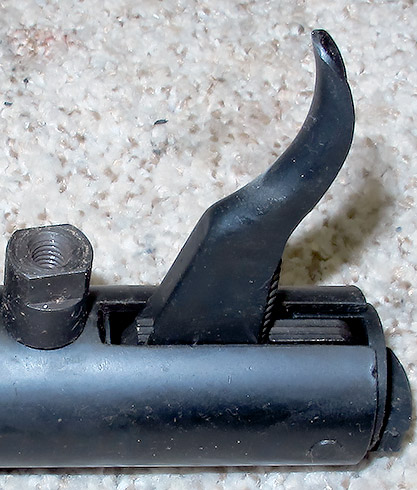
The threaded bushing on the left in this photo is what holds the end cap inside the spring tube. It screws into a nut that fits in the end cap. The threads you see are to receive the front triggerguard screw. Note that single pin at the back of the end cap. That was the troublemaker.

The pin
I assembled the rifle completely and went to test fire it, only to discover the gun wouldn’t cock! The trigger was pushed too far forward to allow for that. That pin was preventing the trigger from moving. So the end cap had to come out and I discovered that the trigger assembly has a hole to accept the pin. If the trigger blade moves forward or back while you are aligning all the holes for the pin, that hole through the trigger assembly doesn’t align. The trigger assembly parts are flexible stamped steel, so there is no forcing the pin through the hole. It has to align.
The secret
I played with that pin for 20 minutes, not getting it to align. Then I discovered the secret. Line all the holes up perfectly — the holes on both sides of the spring tube and the hole in the trigger assembly, then whack the pin with a soft hammer. Tiffany, or in this case, Soo Ling, can do it in her sleep. BB Pelletier takes a little longer!
Notice also that the trigger assembly parts are made of stamped sheet steel. We talked about that design in Part 1 of the first BSF S70 report.
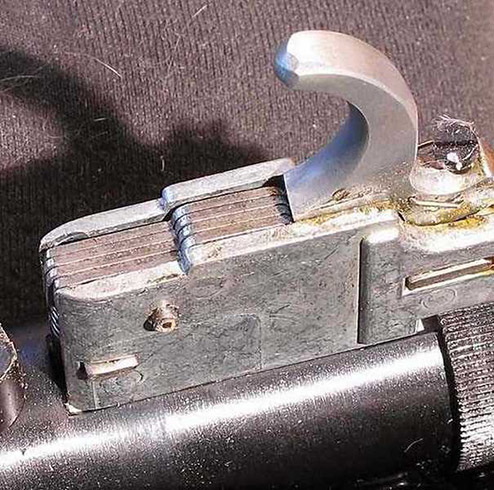
Instead of using one piece of steel, BSF sandwiched four thinner plates together to make the same part. It looks crude but works surprisingly well and the Chinese company BAM did the same thing.
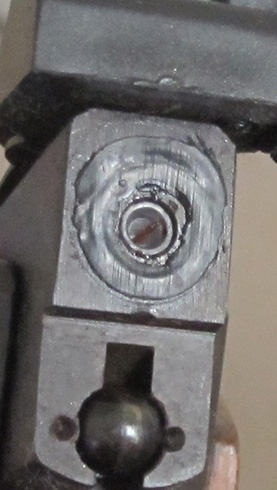
Other than the trigger and pin the assembly went fast. However I didn’t get enough tension on the barrel pivot screw the first time I tightened it. Remember you have to align one of the small cutouts on the rim of that screw so the other locking screw can be fastened. So I removed the stock and tightened the bolt to one more cutout. That worked well.

The pivot bolt is locked by the small screw on its periphery.
Velocity
After assembly I shot the rifle for velocity to see what the overhaul did. The first string of RWS Basic pellets looks like this
SHOT………..Vel.
1………………..307
2………………..272
3………………..292
4………………..276
5………………..256
I stopped and replaced the breech seal.
Before changing the breech seal.
After changing the breech seal.
SHOT………..Vel.
6………………..305
7………………..304
Deep seating
Then I started deep-seating the pellets with a ballpoint pen. Here are those results.
SHOT………..Vel.
1………………..344
2………………..364
3………………..349
4………………..348
5………………..359
6………………..372
7………………..357
8………………..395
9………………..389
10………………387
Obviously the B15 needs deep-seated pellets and a fresh breech seal. Now the rifle is performing in Diana 23 territory. Let’s hope it shoots that well, too!
Summary
This has been an interesting series. Next we look at accuracy.


B.B.,
This type of brush could save you some ELBOGEN FETT ;^)
https://www.harborfreight.com/engine-brush-kit-20-piece-63732.html?utm_source=google&utm_medium=cpc&utm_campaign=21901271210&campaignid=21901271210&utm_content=171677806502&adsetid=171677806502&product=63732&store=3098&gad_source=1&gclid=EAIaIQobChMIu-qpl-awiwMVfimzAB2dvwwqEAQYCSABEgK39PD_BwE
It could even be chucked into a power drill.
Time is money,
shootski
PS: Did you give the chamber a drop or two of chamber silicone oil or are you just depending on the Slip2000 EWL for that as well?
Shootski,
Thanks for the info, I had looked for something like that in the past and could not find what I was looking for.
Thanks again!
🙂
Mike
shootski,
I soaked the piston seal in SLIP 2000 EWL for about three hours before installing.
BB
BB,
I was curious as to what you had done with the leather piston seal.
OOOOOH NICE!
Unfortunately no Harbour Freight here Shootski. 🙁
But I did find (ordered) this kit from Amazon 🙂
https://www.amazon.ca/Swpeet-Materials-Stainless-Cleaning-Twisted/dp/B0B66QNMHX/ref=mp_s_a_1_11?crid=3H6L8Q4OYDE6V&dib=eyJ2IjoiMSJ9.D93kpM3pQpp9s2bChb3RIB_55YGbjSewluzYQFp0yupm2oGmUCQNyqw0cgXnlowHw-3oSSSarzytOyZlNVVmYD552Lxk6YIpuZ50OlMzrdkdp6LMychFvCG1KSarmnceeI20kQEAyxmB3IrAByTtU2p6a36l4XCkcP15jYm0PuVk3RTZi03KRLjX9dZGMr87kDLjoOPidD5_h3rwWB5sYg.zlo9zXWSXNXqSCYdBOXF4HMdSfeVLay2edRfd7LNwQY&dib_tag=se&keywords=engine+cleaning+brush+kit&qid=1738941247&sprefix=Engine+Brush+Kit%2C%2Caps%2C120&sr=8-11
Happy Friday!
Hank
Vana2,
I only linked the HF site because i dislike Amazone. (Intentionally misspelled)
Any engine rebuild shop should know where to get those Brass Tube Brushes locally or on-line.
They also know about Hones and where to source good ones.
shootski
“Obviously the B15 needs deep-seated pellets and a fresh breech seal.”
BB,
I know you have talked about that before, but it’s really interesting to see the difference it made.
Looking forward to the accuracy portion,
dave
Tom,
Any lubrication done to the trigger?
Siraniko
Siraniko,
No, and I should have. It’s one of the detractors of the rifle at present.
BB
A trick I use to insert pins.
Get yourself a low cost, or Cobalt while you’re at it, drill index set with drills from 1/16″ to 3/8″ if you don’t already have one.
Insert a drill smaller than you need all the way through the items to start the hole alignment process.
Pull it out halfway and insert a slightly larger one in the open side. You can wiggle the smaller drill to help insert the larger one. Repeat the process until you have an exact match drill bit inserted. Then simply push the pin in to displace the drill bit.
If it’s a spring pin, just make sure you start the tapered end first and tap it home pushing out the drill.
Drills in a similar way can be used with turnbuckles when aligning the threaded ends to the spring wire safety lock pin holes. More or less to align them up.
Bob,
I use that trick but with pin punches. In this case the trigger assembly flops from side to side, yet the fit through the pinhole is precise, so this one is very tricky.
BB
Bob M,
” ” (DITTOs)
shootski
BB,
Just an observation, it looks as if the o-ring you are using for a breech seal is a little small both in thickness and outer diameter. But that is very hard to determine from just a picture. Did you measure the depth and width of the groove? Or just did you just sort thru your available o-rings and picked an o-ring that was close.
The depth plus gap controls the o-ring squeeze should be at least 20% and no more than 30%. Less than 20% would result in leakage, more will result in increased wear and likely to cut / slice the o-ring.
The width controls the radial movement and stretch of the o-ring. More stretch results in less squeeze when pressurized / fired and more likely to leak and wear.
A backing ring of plastic or metal could be made to reduce the outer diameter of the groove if the o-ring thickness results in the correct squeeze.
The correct OEM seal could be a square o-ring / seal that would be difficult to find or make.
Mike
Mike,
I picked one that was close. There is a backer in the groove. It’s leather that might be from an earlier attempt to seal the breech with leather.
BB
BB,
Putting a backer in the bottom of the groove, is not a good long term solution. A thicker o-ring that fills the groove to outer diameter of the groove and has proper squeeze is the better solution.
Mike
Mike,
And it would have been except I didn’t have one. So I made do.
BB
B.B.
Nice report! Curious how the Slip2000 holds up.
Have a nice weekend everybody!
-Y
BB,
Did you provide extra silicone oil for the leather seal to soak up? Did the Slip stuff reduce any vibration? How is the Slip stuff holding up so far?
Oops!
The spring tube – first sentence.
…the pistol (piston) seal that disintegrated.
RR,
Fixed.
BB
bmwsmiley (Mike),
Clearly you are familiar with oring specification! I’m all perked up now. I did pick an oring from my collection and used it as a breech seal on my Diana 24 and it seems okay. But I’d rather be a smarter feller in this area than a lucky one. I am confused on the “gap” part of “depth plus gap.” Then the percentages I suppose are the change in height after squishing? This is good information to have on hand. Where on the net would you recommend I get more info on oring spec? Thank you.
Regards,
Will
The Parker O-ring Handbook
https://www.parker.com/content/dam/Parker-com/Literature/O-Ring-Division-Literature/ORD-5700.pdf
Everything you could possible want to know and more. Page 4-18 for static face seals, known here as breech seal.
The gap: is the gap between the metal parts when closed, because the breech will not swing close unless the is a little gap. The question is how much is the gap. It will be at least 0.005 inches and could be as much as 0.015.
On a normal face seal the gap is zero, see diagram on page 4-18 since face seals are typically metal to metal.
Squeeze % = (actual depth + gap)/(min thickness of o-ring)*100 and (actual depth + gap)/(max thickness of o-ring)*100
Nominal thickness of o-ring is typically +/- 0.003 or up to +/- 0.006 inches, see chart on page 4-18.
Metal is easy to measure with calipers but actual thickness of o-ring is difficult, so I always calculate squeeze based on max and min of nominal thickness and actual metal measurements.
I hope this answers your questions.
Mike
bmwsmiley,
Thank you for joining in the fight against LEAKS.
Mike you may have just SAVED countless air gunners using every type of powerplant (other than spring catapult) from the vast majority of dreaded leaks.
BRAVO ZULU!
shootski
I’ll second the thanks. Your comment is getting a bookmark for future reference.
If I understand your comment, one could measure the inner and outer diameter and depth of the channel cut into the breech block and then determine the range of ideal o-ring sizes that would seal but still allow metal to metal lock up, which I would assume would be needed for consistent breakbarrel accuracy. Otherwise, you may get a different lock up depending on how the oring gets squished each time.
If you know, what material is recommended for breakbarrel breach seals? It could be subjected to Ballistol, JB bore paste, Silicone chamber oil, and possibly other lubricants that migrate forward from the spring cylinder (tar, TIAT, spring cylinder oil, etc.). I use urethane orings in my CO2 guns, for example.
Roamin,
There are recommended o-ring materials in the Parker O-ring handbook.
There are several that will work, but the lowest cost is NBR, Nitrile, Buna, Buna-N, different names for essentially the same material, except Buna-N which is a high temperature version of Buna, 280F versus regular Buna 240F.
I usually use Viton for most things because Viton takes longer to take a set than NBR, but the cost is usually 2-3 times that of NBR.
When a o-ring is compressed for a long time the shape is changed and tends to not hold pressure if pressure is removed then re-pressurized.
For CO2 the recommended material is EDPM, but EDPM does not tolerate exposure to petroleum distillates, but silicone is best. EDPM tolerates rapid pressure changes of CO2 better than other materials. This is because CO2 will seep inside any polymer o-ring material, this happens quite fast when the temperatures are elevated 180F and above.
Though typically NBR is used because it is cheap and tolerates the lubricants and various fluids used on air guns.
FYI, don’t use NBR in water systems they will breakdown after a year or so and then leak. EDPM or Viton are recommended for water systems.
Mike
Thank you for your advice.
Thank you Mike!
Thanks for the very interesting report. I need to go back and refresh my memory regarding what you first told us about the Slip2000 EWL. I seem to remember that it worked for some extreme (military) conditions in which other lubricants didn’t perform very well. And, if I remember correctly, the lubricant supposedly tends to get “worked into the metal” as time goes by. Anyway, I noticed the progressively increasing velocities of the shots. And I am wondering if that might be an indication that the Slip2000 EWL is doing a fine job and might be actually getting worked into the metal.
Elmer,
I guess that is what we are finding out.
BB
I have been quite surprised by the quality of manufacture I have seen with this air rifle. I have heard good things concerning the BAM air rifles but have never had the opportunity to see one. I for one am very interested in how this particular air rifle performs.
A picture of a sign recently seen by yours truly.
TO BE FRANK I WOULD HAVE TO CHANGE MY NAME
Pretty good RR.
CB
Love that! Though among the wurst puns ever seen by FM, this may be the wiener. Don’t mean to start a Pun-ic war here, now!
FawltyManuel,
My family used to make an annual trip to the Florida Keys on Rt. 301 during my kid days in the 1950’s.
https://www.sobpedro.com/pedros-blog/celebrating-nearly-70-years-of-south-of-the-border-fun#:~:text=South of the Border began,store%2C gas stations and more
Other than the airplanes, submarines, and snorkeling in Key West our stop at Pedro’s is my among my most vivid memories from those vacations. Okay, the first woman i ever saw in a bikini was too!
shootski
Stopped there once on the way to NC with Mrs. – or maybe at the time she was “Future Mrs.” – and coaxed her to get on top of a ridiculous-looking concrete pink elephant sitting on one of the parking areas, then taking a picture for posterity…have to find that priceless image, it is lurking somewhere in Casa FM.
Recall also one night flippin’ on the Duh Tube and happening on some kind of documentary which for some reason included a feature on S of The Border. A waiter was being interviewed and was asked to explain the grits offering on the menu; these were described as “Confederate Kosher Grits.” The question was, “what makes these grits Confederate-Kosher?” The answer was something like, “nothing special, that’s just what we chose to name ’em.”
Yes that is a funny one. It’s similar humor as this tee shirt a guy was wearing that had a big picture of a hammer on it, with the text, “This is not a drill.”
BB,
You indicated that the increase in pellet speed after repairs was caused by deep seating the pellet. With a slanted breech block (Diana), an edge of the pellet skirt doesn’t get pushed all the way in. When closed in battery, then reopened, I see that the skirt has been deformed, which will affect accuracy, so I deep seat pellets in that gun.
But another reason to deep seat pellets, especially in a low-powered springer, might be to pre-cut the rifling in the skirt and make it easier to get the pellet moving. Is this at all correct? Do you think this is the reason why the pellets increased in speed after deep seating?
Regards,
Will
Will,
I believe that is what deep-seating does.
BB
Well, look who’s here.
This is a posting from Airgun 101 this week, with Steve from AEAC and Tyler at the Air Venturi booth looking at some new items. Good information as always—but check out in the background at about the 30 minute mark.
https://www.airgun101.com/aeac/video/new-air-venturi-airguns-avenge-xl-micro-strike-omni-storm-bullseye-trp-pistols-shot-show-2025
Roger
Roger,
I just looked but the background was obscured by some fat old guy.
BB
Maybe a review on the walk-about stool? Others from the demographic may be curious.
jumpin,
It saved me at this show. Every mile or so I was able to sit for five minutes and relieve the pressure off my lower back muscles.
Plus I Iearned to use it as a cane.
BB
After looking at the brush kits from Harbor and Amazon, I had an epiphany. Anyone have a shotgun cleaning kit? Perhaps the brass brushes from 12 to 410 guage might also do the trick?
Fred formerly of the Demokratik Peeples Republik of NJ now happily in sunny GA (for now)
Just watched a few videos of the 2025 Shot Show. My mind is blown. A virtual air gun explosion in high tech and innovation heading our way this year. And I thought there wasn’t much new out there.
Okay folks, late this afternoon I finally received a replacement order of .25 caliber pellets that I had originally ordered on 1/11/25. The original shipment was apparently “lost”. These are JTS Dead Center pellets. I have been eagerly awaiting them to see what some premium pellets would do in the Barra 250z rifle. I had gotten mixed results with the Barra “The Clyde” pellets I received with the rifle. So far I have only shot five pellets (at 10-meters). However, all five pellets went into a hole that measures less than the .25” diameter of the pellets! I will hopefully do some more testing with these pellets this weekend. But so far it is looking very good!
Nice!
Next, do either 3 5-shot groups or one group of 20 at 25 yards. Then try at further distances. Looks like this pellet has potential!
Thanks RG, I hope to be able to go to a range where I can shoot at some longer distances next week. The place I am planning to go to has an indoor 50-yard range. Our basement range is limited to not much more than 10-meters. But, in the meantime, I should be able to check the 25.39-grain JTS Dead Center pellet’s velocities in our basement. So far, the 33.95 grain Clyde pellets average 830-fps; and the 29.5-grain NSA slugs average 861-fps.