by B.B. Pelletier
Guest blogger
Lothar Kommer found a way to improve his QB36-2 and make it a good tool for eliminating pesky pigeons.
If you would like to write a post for this blog, please email me at blogger@pyramydair.com.
Bloggers must be proficient in the simple html that Blogger software uses, know how to take clear photos and size them for the internet (if their post requires them) and they must use proper English. We will edit each submission, but we won’t work on any submission that contains gross misspellings and/or grammatical errors.
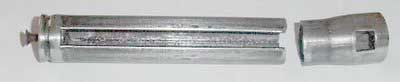
A good QB36-2?
by Lothar Kommer
If you have a QB36-2 that works well but think it could be better, you’re probably right.

I first bought a .22 caliber QB36-2 to control the hundreds of pigeons that were living in my 200-year-old country house in Curico, Chile, because no other pest control method is as selective and precise.
Pigeons were 30-45 meters (35-50 yards) from the nearest point where I could shoot them, so an airgun had to be powerful enough to kill them.
Originally, I tried shooting pigeons with my Gecado 25 (Diana 25). During my first week of pest control, killing pigeons was easy. After they got wise to me, they moved further away, and the Gecado’s limitations became obvious. That’s when I got .177 and .22 QB36-2 underlevers, but I was still having problems taking pigeons further away. Obviously, I blamed the guns rather than my own shooting abilities!
After few weeks, both my guns had broken springs. Even though I ‘d never dissasembled an airgun, I had no problems except for the plastic spring guide and support in the .22 that was torn in four parts and some small plastic parts with no possibility of being reinstalled in the gun.
[Note from B.B.: Disassembling a spring gun can be dangerous. Mainsprings are compressed even when uncocked. Removing and reinstalling them without proper equipment and precautions can result in serious injury and even death. Do not disassemble spring guns unless you know what you’re doing and have the right equipment. You must also know how to safely reassemble your gun!]
Fnding a spare QB36-2 spring was a problem. The original had 50 coils, but I found only 36- and 40-coil Chinese springs. I used the one with 40 coils. Because it was short, I added some spacers to get precompression and to recover some power. At this time, I was convinced that the spring prevented me from getting the power I needed.
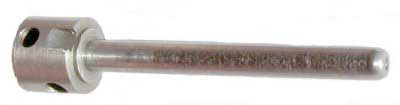
The spring guides and supports for both guns were modeled after the glued parts of the original and made from 1-1/4″ steel bar. Something I still don’t understand is why this part is made of plastic. It’s so cheap and easy to make from steel. Starting with practically nothing, it took me less than 30 minutes to do this.
After that, the internet became my most important source. I read lots of bad reviews about the QB36-2…poor quality, bad seals, low power, too heavy, dieseling, cut fingers, cracked stocks, bent barrels, etc. According to many airgunners, the only solution was to buy a B22 or B21, which are not available in Chile, so I got as much info as I could from the few good reviews.
Two tips made a lasting impression:
- Get or make a spring compressor.
- The ends of a spring should be polished to reduce torsional movements of the gun caused by spring expansion when firing.
With that in mind, I disassembled one gun. Since it was my first time, the other assembled gun would serve as a model when it was time to put everything back together. I removed the piston and cylinder and deburred and polished both. Before polishing, I removed the rubber seal. While pushing the piston into the cylinder, I closed the transfer port with my finger. The air leaked between the seal and cylinder. I decided to replace the seal. Again, no spare parts were available, but Charliedatuna’s website suggested using rubber or an all-Teflon seal, such as a synthetic bottle stopper. It worked slightly better than rubber, but it still leaked a lot. I kept the seal’s thickness at 1/2″ and reduced the diameter of the non-working Teflon seal. The result was a 1″ diameter o-ring with 1/4″ thickness.
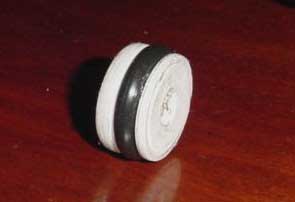
It wasn’t hard to install the seal, but I had to avoid cutting it when passing through the cylinder. Properly lubed, this seal had ZERO air leaks. It costs less than $2 and took almost no time to make. Since eliminating the air leak, my gun’s power increased.
The thickness of the Teflon seal support was gradually reduced, increasing the size of the air chamber until the back completely disappeared and the front became only a support for the o-ring. The more I reduced it, the more power I got from my gun. I also shortened the screw that holds the seal to the piston. The o-ring in the .22 is the first one I used. It has over 7,500 rounds through it, while the .177 has 4,000+ (and still looks new).
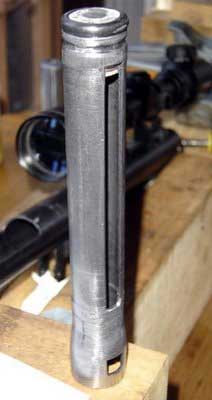
I wasn’t satisfied with the length of the piston, so I reduced it with a rotary grinder on the end with the seal. I took off about 0.5mm (about 2/10″) at a time, until the gun barely cocked.
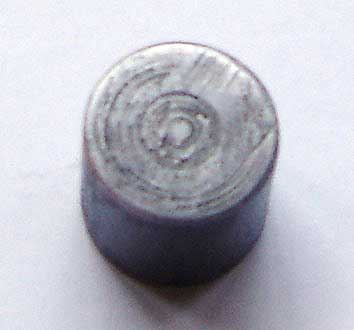
Acting as a spacer and extra weight, a steel chunk measuring 3/4″ long x 3/4″ diameter (from bar stock) was put in the piston. [Note from B.B.: this is usually called a weighted top hat.]
The piston DID break. Fortunately, the gun was pointed in a safe direction. I fixed it, and it’s back in action.


Nice article. I always enjoy reading someone’s journey into improving existing circumstances
BB, thanks for hosting guest bloggers
eric
That’s an interesting idea for guns with screw-in seals – including AR1000 variants, the old QB25, and the Norico Beemans. Might even work on a Mendoza.
Wish I’D thought of it..
Vince:
Feel free to use it.
Lothar
What material did you use for the O ring? Buna-N, neoprene, polyurethane?
I know that the O-ring idea had been used before, but the bolt-on seal looks like it really lends itself to this modification. It’s also a simple matter to yank the O-ring adapter off and reinstall the original seal if it should ever become necessary.
The only downside I can see is that you would tend to lose the ‘parachute’ effect that makes the seal push harder into the cylinder walls as air pressure builds. But frankly, I’m not so sure that this is necessary with your arrangement.
Lothar,
The o-ring seal intrigues me too. Do you know the diameter of the assembled o-ring seal and of the cylinder bore; in other words, how much diametral “squeeze” on the o-ring?
Thanks for a nice write-up!
Lloyd
Lothar,
Great write up, the first of several I hope. The seal and adapter you put on are quite a bit different from what I had pictured in my mind, and I think I understand where we differed on the cocking issue.
Since you wondered why we all don’t have metal guides, I like the plastic guide. My theory is that it is less twangy than a metal one (w/o further measures to improve it). I’ve seen the breakage complaints about the guide, but suspect they are related to the original spring’s weaknesses more than anything: when the long spring kinks or breaks, the guide definitely suffers.
Lothar,
Very impressive. How did the gun perform for you in terms of power, accuracy, and shooting behavior after all the modifications? Did it do the job on the pigeons?
B.B., you were right that the pellet was falling out of the bore of my B30 and blocking the sliding compression chamber. It happened again (this tin of Beeman FTS must be a little undersized) and I found the pellet smashed against the front wall of the tube. What puzzles me is that the pellet was blocking the cocking lever early in its stroke before the sliding compression chamber ever touched the pellet. Oh well, I know enough not to try to disassemble my spring guns.
Matt61
Matt,
That one came from experience with Chinmese airguns that have sliding compression chambers. It happens a lot on some of them. Don’t blame the pellets – the gun’s breech is too large.
Look for a fatter pellet.
B.B.
BB/Matt,
The oversized breech seems to be a problem on many rifles, including but not limited to Chinese and Mexican ones. It seems to be an acknowled issue with European rifles as well, since respected pellet manufacturers such as JSB offer different (from the nominal, e.g. 4.5mm) diameter ranges. The problem is that most vendors only offer one variant, and they often don’t tell you which one. Even PA could improve themselves in this respect, although I’ve been mostly lucky with the premium pellets I’ve bought from them. Am I out in left field (again!) on this?
Vince:
The oring is pressed against the walls of the cylinder, and there is no leaking air between seal and cylinder when firing.
Never asked about oring material, had no alternatives to choose from, is just a “rubber” oring bought in an automotive spare parts store. Absolutelly sure not polyurethane.
Lloyd:
I dont have exact measures, but the o-ring is supposed to be 1″ outer diameter, cylinder bore, like the o-ring, is supposed to be a little, very little, bit less than 1″ internal diameter, so the oring “squeeze”, should be less than half a millimeter, letting it move easily, but not loose, in the cylinder.
Anonymous:
Power and accuracy are good for my needs.
The most accurate and powerful is .22 gun, .177 goes closer.
I use GAMO TS18 in .22 and TS10 in .177, that are the best choice here and using them, both guns can pass thru one and a half EMPTY tins of .22 GAMO pellets at 25 yards, putted in a row, but .22 is closer to exit the second tin. At 25 yards it easily groups in less than 3/4″.
Having the same barrel length (14″), identical internal parts and the same scope, .22 is about 1/2 lb lighter.
About pigeons, no one is alive, and were not less than 400, and for some reason i dont know, they live in the neighbourhood but no one comes here.
Lothar,
Excelent writeup!
You have given me a few more ideas, of what to do with the rifle, I did change the seal into a APEX small seal. I don’t think the effect is great but i didn’t have trouble with the original when I changed so it kinda figures. I have to find a weight also, as it will give more power to compress the air.
Good work.
Tom.
it’s fun because you took a crappy gun and pretty much re-did everything your self. so why not just start from scratch?
Anonymous:
If, by starting from the scratch, you mean creating a new gun, i think it is very interesting, but is totally out of my reach.
Instead of that, modifying the QB36s was very easy, it needed few days of work, find a solution to details, and spend little money.
This could have never been defined as a project. Between minor mods, the guns were used to kill pigeons, that was the main reason to get them, and i cant say that guns are not going to have other changes in the future.
The thing i like about chinese airguns is that you can play, learn, develop you ideas, and if you are wrong and the gun stops working in the process, you get another and continue with the fun for a very low cost.
I cant imagine myself going with a file, a grinder or a drill over a Diana 48 or similar. How much extra accuracy and/or power could you get or recover from them?
Hello Lothar,
I’ve already written a comment in the other post, but it somehow is gone now – well I don’t know. I’m having some trouble at the reassembly of the trigger and would like to ask you for help, i.e. if you have maybe a picture of how exactly the spring has to be positioned against the trigger. I just can’t figure it out myself. If you’d help me (or look at some of my pictures and tell me what I’m doing wrong) I’d be most grateful. Could you send me a mail at gfcwdoty@trashmail.net (don’t mind the strange addess, its a protection against spam)? I’m quite desperate righti now 🙁
Kind regards,
Johannes