by Tom Gaylord
Writing as B.B. Pelletier
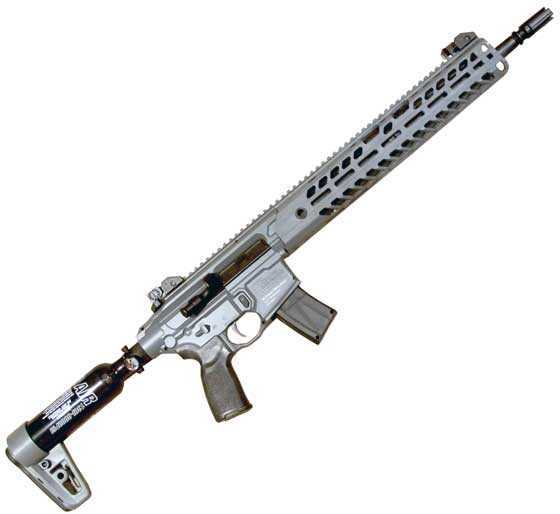
Sig Virtus.
This report covers:
Semiautomatic?
Velocity
The test
Three pellets
Shot count
This is the first
Discharge sound
Trigger pull
Summary
Today we test the power of the new Sig Virtus MCX PCP air rifle. But before I do that, let’s talk.
Semiautomatic?
In Part One I said the Virtus is a true semiautomatic. I said that based on shooting it on Sig day, where I paid particular attention to the function of the trigger. I felt it pull back for a short first stage and then hesitate at stage two before firing. The pull weight seemed consistent with a military rifle, which is something around 5-6 pounds.
Well, several readers got into a protracted discussion about that. Is it REALLY semiautomatic, or are the Sig engineers just fooling us? The discussion raged on for many days and I thought at one point someone was going to renounce their citizenship and move to Brazil! So I resolved to determine in this report once and for all whether the Virtus PCP is a real semiautomatic or not.
To do this I positioned the 30-round belt in the magazine so the 4 white chambers (two on either end of the belt) were just ready to get in line for the bolt to feed a pellet. The belt feeds counter-clockwise when viewed from the rear of the magazine with the access door open on your right side. Then I cocked the rifle and pulled the trigger four times without firing. Believe me — it takes the fingers of a safecracker to do that because this rifle really wants to fire! What I determined is the belt advances by one pellet chamber with each of the extremely short first-stage trigger pulls. You aren’t going to be able to do what I did without a lot of practice. I tried and failed many times before success.
Because of that, what I told you in Part One is incorrect. I should have said that the Virtus trigger FEELS like a semiautomatic trigger, because at the end of the day it is really a double action trigger. That said, not one of you will be able to advance that belt without firing the rifle without practice. The Virtus trigger FEELS LIKE a semiautomatic trigger, but it really isn’t. Because of that, it is not going to be restricted for importation into certain countries on the basis of being semiautomatic.
The bolt, however, does recock with each shot — semiautomatically. So there you are.
Velocity
Okay — this is what you paid for. Let’s check velocity. I loaded the belt with three different types of pellets for this test. You won’t believe what happened in this test because I did it and I still don’t believe it!
The test
I tested three pellets, a light one, a medium-weight one and a heavyweight. For a light pellet I shot Sig’s .22-caliber Crux Ballistic Alloy dome that weighs 10 grains. The medium-weight pellet was the JSB Hades hollowpoint that weighs 15.89-grains, and the 21.14-grain Beeman Kodiak was the heavyweight.
Since the belt holds 30 pellets and I had no idea of how many total shots there were on a fill to 3,000 psi, I filled the beginning of the belt with five of each kind of pellet. That’s 15 of the 30 chambers filled. Then I filled the final 15 chambers in the belt with the other five of each pellet. That way we get a total of 10 shots for each pellet. And, if the air ran out in the first belt I would at least get good numbers for each pellet from the first five that were shot.

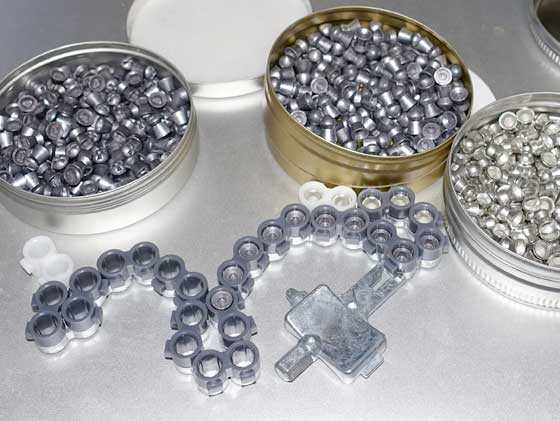
I loaded the belt with groups of five pellets. Each was seated with the Virtus pellet seating tool that pushed the pellet deep into each chamber.
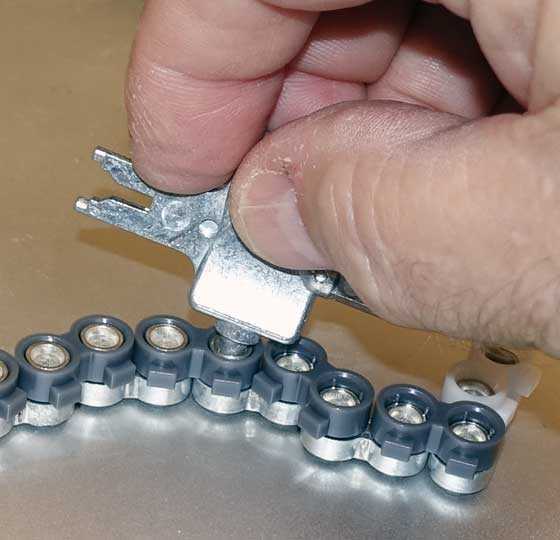
I seated each pellet with the Virtus seating tool that’s stored in the grip.
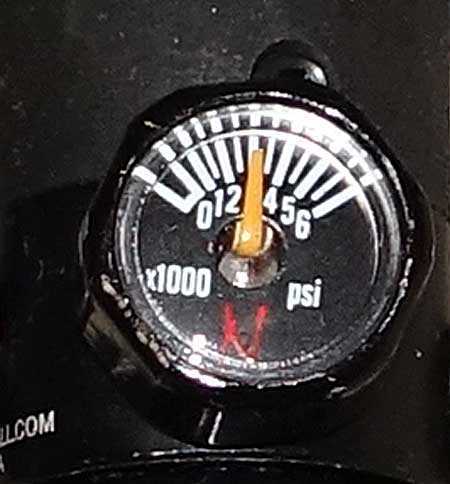
The Virtus onboard pressure gauge is smaller than a dime but very accurate! It agrees with my larger gauge on the fill tank.
I needn’t have worried. I didn’t get ONE belt on a fill. I got over FIVE FULL BELTS!!! Yessir — I got 152 good shots on one fill! Let me tell you the story.
The Confederate forces in the American Civil War called the 16-shot Henry rifle, “That blankety-blank Yankee rifle you load on Sunday and shoot all week!” Well, I’m calling the Virtus, “That blankety-blank Sig rifle you fill on Monday and shoot for the rest of your career!”
Three pellets
You need to see the numbers, so here we go. Here are the first 30 shots with the three different pellets.
SHOT……..Pellet……..Velocity
1…………..Crux………..745
2…………..Crux………..763
3…………..Crux………..740
4…………..Crux………..759
5…………..Crux………..730
6…………..Hades………584
7…………..Hades………566
8…………..Hades………583
9…………..Hades………586
10…………Hades………583
11…………Kodiak……..485
12…………Kodiak……..517
13…………Kodiak……..495
14…………Kodiak……..511
15…………Kodiak……..481
16…………Crux………..731
17…………Crux………..743
18…………Crux………..758
19…………Crux………..742
20…………Crux………..738
21…………Kodiak……..484
22…………Kodiak……..506
23…………Kodiak……..469
24…………Kodiak……..504
25…………Kodiak……..481
26…………Hades………586
27…………Hades………572
28…………Hades………591
29…………Hades………535
30…………Hades………578
Is that list confusing? Let me consolidate it for you. The Sig Crux Ballistic Alloy pellet averaged 745 f.p.s. The low was 730 and the high was 763, so a spread of 33 f.p.s. At the average velocity the Crux pellet generated 12.33 foot-pounds of energy at the muzzle.
The Hades pellet averaged 576 f.p.s. The spread went from 535 to 591 f.p.s. That’s a difference of 56 f.p.s. At the average velocity the Hades pellet generated 11.35 foot-pounds at the muzzle.
The Kodiak pellet that weighs 21.14 grains averaged 493 f.p.s. The low was 469 and the high was 517 f.p.s., so a spread of 48 f.p.s. At the average velocity the Kodiak pellet generated 11.41 foot-pounds at the muzzle.
So the Virtus is indeed a 12 foot-pound air rifle and indeed it has a large velocity spread with all three pellets I tested. I think some of the spread could be due to the variable pressure with which the pellets are held by the individual chambers in the belt.
Shot count
At this point I loaded a second magazine with Sig Crux Ballistic Alloy pellets and commenced to see how many more shots were on the fill. Here is where I usually give you every shot and its velocity. Ain’t gonna do that today. Too many shots! I shot 4 more full magazines! Gonna condense it for you.
Shot….Vel.
31…….745
41…….729
51…….746
61…….741
71…….734
81…….746
91…….736
101……735
111……752
121……737
131……729
141……750
151……731
152……748
At this point the rifle fell off the reg (I think). But even then it fought to keep its velocity up!
Shot….Vel.
153……710
154……738
155……714
156……726
157……701
158……731
159……713
160……714
161……689
162……709
163……693
164……690
165……680
I called it at this point. After 90 minutes of shooting, loading and writing down the numbers I was tired!
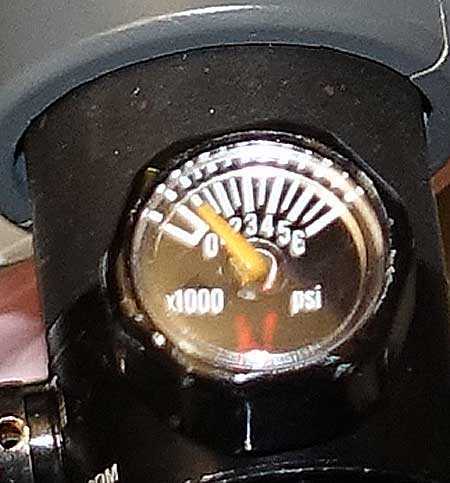
This is the onboard gauge after the last shot. Sorry for the blurry image!
In the first 150 shots — that’s 5 full magazines of 30 shots each — the low recorded for Crux Alloy pellets was 718 f.p.s. on shot 65 and the high was 763 f.p.s. on shot number 2 That is a difference of 45 f.p.s. I know that spread is large, but I do think some of it is the belt and as it wears in I believe the variation will get smaller.
This is the first
I think this is the first time the Virtus has been tested this way. So these numbers are how the gun performed in BB Pelletier’s prone-to-reveal-everything-that-is-wrong-and-watch-as-it-now-breaks-in-his-hands! I’m so glad I got to do it because I would not have believed anyone else reporting number like these.
Discharge sound
I am still wearing those state-of-the-art hearing aids and the Virtus is not a 4 on the 5-point noise scale. It’s about a 3.5-3.7.
Trigger pull
One final bit of data for you— the trigger pull. I guessed 3 lbs. for stage 1 and 6 lbs. for stage 2. I was wrong.
“Take me home, mother, and put me to bed! I have seen enough to know that I have seen too much!”
The first stage trigger pull in the test rifle is 6 lbs. 5 oz. and stage two breaks at 8 lbs. 8 oz. I tested the trigger over ten pulls with an electronic gauge and averaged the numbers for you. I guess I have strong fingers?
Summary
Are you interested? I know I am! What other wonderful surprises lurk within the shell of the amazing Virtus PCP?


Thank you for the long test.
I am glad to see it is an honest 12 ft lb gun, and the trigger is not clunky or rough in the pellet advancement process like we have seen in other guns in the past.
What I find interesting is in each string of pellets, there was 1 shot that was outside of the norm of the other 4, on every pellet listed in the first mag.
Maybe the chambers are not exactly alike, or the machine making them has 1 mold that is out of spec.
I wonder if you could make a “precision” belt by putting links together that were similar in velocities with certain pellets..
Time consuming yes, but maybe worth it to the owner.
Tom, I can help you in the number writing area.
Have you tried the Caldwell series of chronos, they are reasonably priced, and output to your smart phone or tablet.
And the file can be saved, and then exported as a .txt file.
It will also show the extreme spread, the SD, Average FPS, and show the FPE of each shot.
I can loan you mine to try it .
Ian..
Ian,
Thanks but I’m pretty happy with what I have right now. I just complain a lot! 🙂
B.B.
We all like to complain, but no one listens to me …..
B.B.
I am curious as to why this rifle has such large “lungs”?
150+ shots from a fill is pretty incredible! Seems like loading the mags would be a drag after awhile….
Maybe Sig should sell some mags preloaded?
-Y
One can only imagine the power plant’s potential by watching this shot count. A U.S. version with ~30fpe for two magazines maybe?
Bill
Arcadian,
If they are looking at International sales that would not be something coming out of the factory. A home tune? Maybe just by opening up the air passages a little more power can be extracted.
Siraniko
Bill,
Ain’t gonna happen. neither the gun or the belt will take it.
RR I was afraid that someone would bring the matter of strength up when I was writing my comment. Coming from you I take it for granted.
Pitty though since I would really like to feel the recoil firing 30 rounds at 30fpe…
Bill
Bill,
The LCS will give you what you want, that is if you can stand a $2000 price tag.
That’s a good one. LOL
Bill
RR
Teue if its reliable.
Haven’t heard alot about it yet.
It is nothing more than a dressed up Huben K1.
GF1,
https://www.youtube.com/watch?v=L5cwhTszrFs
RR
So have they been reliable too?
GF1,
I have not heard of any issues, but at that price there cannot be many out there.
RR
Right.
Let’s say hypothetically I were to tune the power up on this thing, seeing that in the good ol’ US it’s fine, how would I start? What would I need to do?
Luckily I bought two of these guns; one for me and one for the missus, so I would gladly sacrifice hers for the sake of science:)
That would definitely pique my interest but not in its present form.
I have enough CO2 pistols and rifles to scratch that itch.
If nothing else I am enjoying reading the comments more than this review.
Sorry, B.B…….Sig’s fault, not yours.
B.B.,
Considering the amount of shots this is capable the engineers at Sig should probably start working on a method to make mass loading of pellets into the belt easier rather than single loading which can make it a drag. If they don’t then hopefully somebody else will develop one for the market.
Siraniko
Siraniko
The belts are very easy to load and don’t really take much time at all.
Siraniko,
What you need is something similar to the loading tray for the SMG22.
https://air-ordnance.com/speed-loader/
Siraniko,
Wow!,… that works really nice. Not conducive to any precision work,… but for a full/semi auto belt gun,… that thing is the ticket!
Thanks,….. Chris
Chris,
Dig through Rossi videos to where he is shooting one slo mo and you will see that thing wastes a lot of gas.
RR
When I had my Air Ordinance SMG I almost got that speed loader but people said they had problems with them. Pellets would load upside down among other things.
Heres a link also of the speed loader and the block. My gun came with the block and no speed loader tray. The block worked great. It deep seated 5 pellets at a time in the belt.
https://air-ordnance.com/speed-loader-kit-with-loader-block/
And just to note when deep seat my pellets in my MPX belt I actually use a old ice pick that I rounded the point of it. It works good and fast actually.
RidgeRunner,
That speed loader kit with loading block seems to be the ticket for this. I would probably limit it to two rows and put rails below the block to guide the clip and have them load 5 pellets at a time. Maybe some R&D to automatically pour pellets nose down into the cavities.
Siraniko
Siraniko,
GunFun1 says he did not have good results with the speed loader tray. Perhaps if you make one…
RidgeRunner,
If I ever get a chance to have one I’ll certainly try.
Siraniko
RR
No I didn’t have the tray. I had the block.
I read reviews that people said they had problems with the speed loader tray.
Siraniko,
Maybe they could supply spare mags or belts? Spend the night loading and the da shootin!
Ton,
I know spares are available. But I can imagine that those 150 rounds go by so quickly while the shooter is having fun! I don’t think that tank will take too long to be refilled from even a portable electric pump. I’ll bet the rate of fun will be faster than you can refill those empty clips! From the amount of fun a group will be having the owner will have eyebags in the monring from loading those clips overnight!
Siraniko
Sir5
I love my MPX. It’s probably my most shot gun I have right now. They are a blast to shoot.
I shot the Sig MCX .177 at the texas airgun show a couple of years ago when it was introduced.
Sig has had 2 years or more to get basic system right.
The Sig people had many belts loaded for the rifles, and the shooters would go through them faster than the reps could load them.
I helped them load several belts for other shooters before i stepped to the line to shoot 2 belts at spinning targets at various distances.
The offered to let anyone shoot as much as they wanted, but I limited myself to 2 belts.
I then helped load more belts for other shooters, and talked with the reps for a while loading about the possible uses of the guns, and the reliability, and just to see how they performed over the course of 15-20 shooters.
I found the belts easy to load, and talk at the same time, even with the tiny .177 caliber pellets, the .22 will be easier, as the pellets are bigger.
Ian
I can just imagine doing this on the dining room table and having lead contaminating the food. Yikes!
It’s bad enough that I now have to wear a MOP5 chemical warfare suit because the basement is contaminated with lead. Haha!
BB
Pretty much of everything you said about the Virtus is like my MPX. I love mine.
And I dont have a pull gauge. And I must have strong fingers too. I would swear mine has a 2 pound trigger at the most.
Can’t wait for the accuracy test.
BB,
-Is using the pellet seater a requirement?
-Can they be pushed flush flush to rear with finger pressure only?
-Of the 3 types of pellets tested,.. did the heads of all 3 drop in and only the skirt needed seated, or did some have the skirt drop in past flush as well?
Or, did the above mentioned characteristics vary from pellet chamber to pellet chamber, even if loading the same pellet type?
My first thought,… if I was overly concerned with this, would be to take a drill bit that would match the largest ID of any chamber,…. and then open all others to that.
-On that thought,… (in the picture showing you seating the pellets),… I see what appears to be a metal belt (links) used in conjunction with plastic “funnels” sitting atop. Is that correct (metal and plastic)?
EDIT: Also, why are the 2 end chambers (2/end) all white plastic, while the rest are a metal/plastic combo?
Sorry for the mixed up set of questions. Maybe you can condense them into one, a few, or ten answers? 😉
Chris
Chris
There’s a tight spot in the diameter of the hole the pellet goes in. I found if I don’t push past that I get miss fires sometimes. When I seat the pellet past that tight spot I get absolutely no misfires.
The belts are metal and plastic at the begining and end. Why? I don’t know. And not sure what you mean about a funnel.
And the belts are very consistent. Well remember the MPX is .177 and the belts are very consistent in that caliber. No pellets falling out if that’s what you mean. And plus I believe that when you seat the pellet past that tight spot in the hole that it sizes the pellet skirt in a sense.
And I have not chronyed my gun. But as far as accuracy goes its actually a pretty accurate gun. I hope BB’s gun is the same.
GF1,
I was calling that black plastic part the “funnel”,… not that it actually is a funnel.
Chris
Chris,
Yes, pellets can be pushed flush easily. I seated them all to give the rifle it’s fairest possible test.
The tin Crux pellets loaded hardest as we would expect. The other two are lead and loaded easier, though all made a noice when seated.
Yes the belt links are metal and the chambers are plastic. Except for the two white chambers on either end that are all plastic.
As for your edit, I don’t get it. Where is it?
B.B.
BB,
Going back to Part 1, I assumed the last links were metal. Looking again, I realized they were all plastic.
I deleted a sentence and re-asked something else. I would imagine that the unedited version would be in your e-mail and the now edited one on the blog. I thought that you said awhile back that an e-mail notice will (not) update after someone posts and then edits.
Thank you for your answers,…. Chris
BB,
In a Hard Air Magazine report on the .177 MCX CO2 gun, they showed a photo of the pellets after being pushed through the belt chamber, unfired, and the pellets were deeply etched by 4 projections inside the chamber that hold the pellet in place. Is that technique carried over to this .22 mag? I ask because that report pointed to the grooves as the source of the poor accuracy that they got with that particular gun. I also wondered if it might be the cause of the rather large extreme spreads, considering that this is a regulated gun?
Half
Half,
Yes, those projections are there. They are in every belt-fed magazine, as far as I know. They are also in all pellet-firing cartridges. They don’t seem to cause a problem in many airguns, but perhaps in the MCX they do. I don’t know. We will see.
B.B.
Half
Same with 1077 clips if I remember right.
The reason the ends of the belts are different colors I can only guess that it is to help you find the end of the belt so you can remove it from the magazine easier.
Bravo
That’s what I think too. But you can just grab what ever part of the belt that’s at the door and lift and pull. It feeds right out very easily.
If I was to own one of these I would have to buy four or five belts so I could preload for the range time.
Some are already talking about upping the power. The issue there and with all of the belt fed airguns is the chamber pressure. The belt is your chamber. How much pressure can the plastic tolerate? This is why the pressures are regulated down to around CO2 levels.
Another issue is gas leakage behind and in front of the belt. How tight is the seal between bolt face and belt and between belt and barrel breech? Unless it is a very complicated action, it fires from the open bolt. The first stage pull advances the belt and the second stage break releases the bolt which comes forward, pushing the belt against the barrel and fires. It is possible that during the first stage pull the bolt is pulled back so the belt can advance and then “closes”.
Enjoy it for what it is. If you want more power you are going to have to buy a Huben / LCS. No free rides.
RR
The belts are very durable. Way more durable than that Air Ordinance machine gun belt. Oh and my MPX belt is smooth feeding.
And now this is about the .177 caliber guns. You can buy a mag and it comes with 3 belts. So that would give you 4 belts total and two mags when you count the belt and mag that comes with the gun.
Oh and loading up for a day at the range. Forget that. Once you shoot the gun you will find that them 4 belts will be gone in a blink of a eye. Another reason I’m glad those Winchester dome pellets are accurate and only cost 5 bucks a tin of 500.
The Sig belts do indeed look durable. My concern would be are they up to +3000 PSI and how well can you seal it between the bolt and the breech.
RR
I think the way the gun is set up now is nice. Well my MPX is anyway. It sounds like the Virtus is set up nice too as is.
Remember these guns were more or less designed to run on Co2. You know what the characteristics of Co2 are. When you run them on regulated HPA you don’t get that slow down of velocity like you do with Co2.
I say leave them alone and shoot them like they are tuned from the factory. The energy is actually really good for thump’n aluminum and tin cans hard.
If you got one I believe you and your grandson would have a blast.
GF1,
He would probably enjoy it, but Gadada is more into long range shooting.
RR
Now that ain’t fair. You can’t deprive your grandson some fun just because you like something else. 😉
GF1,
My Dad did not buy a shotgun although I enjoyed skeet shooting.
Life is not fair.
No, it isn’t,, but that’s where granddads come in. We make it SEEM more fair for the kids.
Perzackely.
RR
Like Edlee said.
RR,
I somehow??? pictured the bolt having already pushed the pellet (from the belt,.. into the breech,… automatically), and then, the hammer would release and hit the valve (after being automatically cocked). I did not realize that it fired directly from the belt.
So basically, the hammer automatically re-sets and when the trigger is pulled,… the pellet fires from the belt.
I agree, not a fan of that arrangement. Too much potential for air loss.
Chris
Chris
It actually works pretty good. I’m pretty sure that Co2 pistol you had worked the same. Alot of these type of air guns use the system and shoot fine.
It’s way more reliable than the true semi auto guns I have had.
Finally, had a chance to go downstairs and shoot some groups with my old Crosman 147 muti-pump. I completely rebuilt it this past summer but never really got around to shoot it much. I shot 10-shot groups at 10 yards using open sights. That’s very difficult for me to do, my vision is definitely not what is used to be for sure. I was shooting at 1/2″ dots and the blade of the sight is a little wider than the dot at that distance. But here are the results I promised.
It does not seem to have as much power as I remember either for some reason.
Geo
Geo,
I believe the Crosman 140 (.22 caliber) and 147 (.177 caliber) came before the model I had, the 1400 (in .22 caliber). Anyway, these old wood and steel Crosmans are way cool! Thanks for sharing. =>
Take care,
dave
Hi Dave,
Yes, you are correct. The 1400 came later. I bought the 147 back in around 1959-1961. She’s been out of commission for over 25 years with that broken rivet pin.
Geo
Geo
Nice shoot’n.
Thanks GF1 but I didn’t think I did very well with those groups. I shot about 100 shots before recording the 10-shot groups. I will say that I am spoiled by the triggers on my Diana 34 and my Urban. The old Crosman’s trigger is heavy, long, and gritty. That’s the way she came from the factory though. I didn’t know what a nice trigger was when I was kid. I just know I shot many sparrows back then and didn’t give the trigger any thought at all. It’s doesn’t seem as strong as I remember either.
Geo
Geo
Isn’t it amazing how well we shot as kids. I think we adapted quicker than we do now.
GF1
Yes, and maybe we don’t quite remember things as they actually were. Our brains tell us we were great shots and our old guns were super powerful. Maybe that’s just true in our minds. 🙂
Geo
Geo
I’ll tell you the truth I had a 760 in the late 60’s to early 70’s that I shot the heck out of sparrows and mice and starlings with.
It was the only air gun I had for a good amount of time. I knew that gun. And I shot it open sights too.
Geo,
I can tell the Michigan soup can population is about to take a tumble. Glad you got ‘er up and runnin’ !
Half
Half
Well, I don’t plink at cans much. Most of my shooting nowadays is to eliminate pests. I probably won’t shoot the old Crosman much, but I have wanted to get it repaired for a long time. I am just happy it’s shooting again. Do you have any experience with these old muti-pumps? It doesn’t seem as powerful as I remember. I shot at a pellet tin and the pellet made a big dent but did not penetrate even one side.
Geo
Geo791,
Get yourself some one inch dots!
Concentrate on sitting that dot right on the front post and don’t worry about absolutely nothing else.
Let us know if your groups improve.
;^)
shootski
Thanks, I will give that a go…
Geo,
Thanks for posting your results. You did not say how many pumps and if you used a rest. Other pellets may do better. The groups look like they want to be a little better. I am a big fan of these old multi-pumps so I am trying to egg you on for more shooting.
As Shootski said a little larger sticker should help. Make sure you have a good contrast between the sticker color and the front sight. Try some of your old glasses if you have them to get the best focus on the front sight and still see the target fairly well. Make sure you have a bright light on the target.
After the reseal on your pump you may have a slightly shorter piston rod. That will give more dead space between the piston head and the end of the cylinder; that reduces the volume of air to the reservoir with each stroke. So less pellet velocity for the same number of pumps. I don’t remember if your rod is adjustable. If it is you can adjust it until you just feel the piston hitting the end of the pump cylinder at the “very end” of the stroke. The good news with a multi-pump you can just give it another pump or two and achieve the same pressure as long as you are not nearing the maximum pressure possible. That is usually after 10 pumps.
Check to make sure you are releasing most of your air on each shot. Cock and dry fire after a shot and it should be a weak report. If not you may have a weak hammer spring. If you dry fire it until there is no more air that will give you a feel for what the first pump force should be. That way while you are shooting if the first pump force is higher than it should be you will know there was air left in the valve reservoir.
You may also try a peep sight to help with poor eyesight, they help for me. Every little bit helps.
Good luck, I hope the old Gal gets some exercise.
Don
Don,
Thank you for your response. I used six pumps for all of the 10-shot groups and I use Caldwell bags to rest the rifle. I will print out more targets and use a 1″ red dot on them. I tried using a 1″ black dot but the sight gets lost in it, thus tried the colored 1/2″ dots given to me by ChrisUSA. I did have a bright light focused on the target too.
I used the same design cup seal as the original. The rod is adjustable, as can be seen in the attached photo. The rod needs to be adjusted just enough so that the pump handle holds and doesn’t fall. So there is just a little pressure at the end of the stroke which keeps the pump handle in place. When I give the pump an additional couple of pumps, I can not feel any increase in effort. I do remember that the maximum number of pump strokes was 8.
On the Crosman 147, there is no bolt. The hammer is self cocking at the first pump stroke. The pump does seem to be compressing air okay because even with just one stroke, I can dry fire the rifle. One issue with the 147 is that as the number of pump strokes increase, the trigger pull weight increase. The trigger on these 147s is pretty crude.
I believe you are correct in that a peep sight would work better for me. This would have to be designed especially for this style rifle because there is nothing to mount to. I’ll attach another photo showing the rear sight. I’m not done with this old gal just yet, and there’s more shooting to come. You have motivated me. 😉
Geo
Rear sight…
I don’t see an easy way to add a peep sight.
I did some calculations below. I think the low power has to be from two things either the valve is retaining air. That can be determined by dry firing to check for retained air.
Or you have too much dead space. I am not that familiar with the 147 pump system so I don’t know what could be causing it. Maybe there is something in the end of the pump tube between the piston and the end of the tube.
A leaking piston could also do it but you should hear that while pumping. You can try pumping faster and see if it develops more pressure. The valve could also have something causing it to leak over a certain pressure. Again you should hear it if that is the case.
If the intake valve is sticking it should blow your pump handle open as you open it to pump the next stroke.
It is sounding more like you have a weak hammer spring. Are you sure there is very little air left in the gun after it is shot. I guess with the 147 you cannot cock and fire it without one pump to test for remaining air. Try pumping one pump and firing it a few times to see if it sounds like it is loosing power after each of the one pump shots. That would point to the valve dwell (hammer spring).
I forget. Do you have a chronograph that may be able to shed some light on the issue?
Nothing like a good mystery!
Don
At this energy level, this could be a low cost way to get into the Gunslynger event at the Pyramyd AIR cup.
Without having to cough up the price of a Huben or other High dollar semiauto.
Do we have a date yet for the 2020 Cup?
Ian
Ian,
Bingo! You win the Cupie doll! You are looking at this air rifle realisticly.
Everybody is wanting a selective fire air rifle shooting at 700 FPE that has a cyclic rate of 10000 RPM with a weight that comes in around 5 pounds. Oh, and they want to load it once in the morning and shoot all day. They also do not want it to cost more than $35.
Build it and they’ll buy it.
Hey, I would snap up one myself.
Expensive can roller. For 1/2 the money, my .177 mag fed Synergis will blow holes through a dime at 35 yds all day long. Well, it will hit the dime hard. A real airgun. Tech that sticks, advances slowly in airgun land. This thing will be broken in a few years, watch. My Synergis has a 3 year warrenty, pretty good for wally world rifle.
Rob
1stblue,
SIG as well as SIG AIR usually stands behind their products. I doubt with their business approach that they don’t know exactly how many cycles this Airgun is good for. You may need to change out belts or even magazines at some point but I doubt it will break sooner than typical airguns in this price range.
Maybe B.B. will let us know about the warranty on this Airgun.
shootski
shootski,
I have asked Sig.
B.B.
The warranty is 5 years.
B.B.
That’s a great warrenty! I like the belt feed system, I wonder if a moulded airsoft style slug would perform
better, more economically. A frangible polymer shape that has the benefit of being cheap, accurate at
longer ranges than a bb, but not suitable for hunting. Tin is pricey, and an ar style Sig will never be a hunting rifle, in real life. Right?
R
1stblue,
Airsoft?,… slug?,…? In a high power PCP. What would that be like?? 2,000 fps? 😉
Chris
I guess the bore would get leaded with plastic, but it would get the same number of shots.
I read about guys bragging how accurate their airsoft sniper rifles are with plastic bb’s at fifty yards. Anyway, that would be fast enough for a flechette to fly out a smooth bore pretty well, maybe. Yeah, airsoft slugs. You heard about here first! C’mon Sig, polymer ammo!
R
1stblue,
“…an ar style Sig will never be a hunting rifle, in real life. Right?”
It all depends on what you are hunting!
shootski
2 words that do not go in the same sentence are CHEAP, and ACCURATE..
B.B.,
It seems if the accuracy is there, for those who are realistic about it, Sig is offering a nice rifle that can be had for $300.
The air gauge (manometer; that’s a new word for me) looks like a lot like the one others have said they are using.
Speaking of which, my replacement air gauge arrived yesterday. I replace the old one on the Marauder last evening. I only filled to 1000 psi and left it at that for the night. Still looks good this morning.
However, I don’t know that the trigger is engaging the sear. When all of the air was removed the trigger flopped about like a freshly killed snake. It now seems less floppy, but will not engage and dry fire.
Is there something, other than more psi, that needs to be done to get the trigger to engage? This is all new for me; exciting, but I remain cautious, lest I move to fast and break something.
~ken
Ken
These style of Sig guns are a nice price compared to other semi auto guns out there. I’ll take these cheapy so to speak Sig guns over them high dollar semi auto air guns any day. The high dollar ones break too.
And as for your Marauder. Not exactly sure what you mean is happening. Air pressure shouldn’t be the issue. To me it sounds like you just need to pull back on the bolt a little firmer when your cocking the gun. Or I hate to even say. Maybe something broke in the trigger assembly. Which I have never seen out of all the Marauder rifles I had. Maybe some more details about what is going is needed.
Gunfun1,
I don’t know what else to say without more investigation. The trigger seemed fine prior to the degassing. I didn’t do the degassing, I just waited a week for the air to escape. When I took the rifle out of the case, the trigger was free swinging. I attempted to cock the rifle; the trigger did not engage. That is all I know at this point. The trigger is less loose now that I have partially filled the air cylinder. I expected to be able to cock the rifle and do a low pressure dry fire. No such luck.
I have tried pulling the bolt back all the way. I don’t feel any spring tension.
~ken
Ken
I can honestly say I never had this happen on any of mine to the trigger. To me it sounds broke. I have shot my Marauders down to 800 psi testing different set ups and never had that happen.
I wish I still had a Marauder because I would see what is what. I even sold the Challenger so I have nothing that I can get in front of me right now to actually see..
Gunfun1,
Thanks. I’m sure it will work out.
~ken
Ken
As it goes make sure you give updates on what you find.
Gunfun1,
Will do.
~ken
Ken
Thanks.
Kenholmz,
The first generation Marauders had parts in the trigger group that were prone to breaking very easily. Some blamed it on operators and others on the sintered metal process being flawed. My bet is a broken part in the trigger group.
shootski
Shootski,
I live a cursed life (or, at least, it feels that way it feels sometimes). I will carefully look into the trigger issue.
~ken
Ken,
“When we long for life without difficulties, remind us that Oaks grow strong in contrary winds and Diamonds are made under pressure.”
Peter Marshall
You got this!
shootski
Shootski,
Aye! “A Man Called Peter” is one I should look into viewing again.
Thanks,
~ken
Ken,
See new post at bottom from PA Gene. It looks like maybe just a trigger is needed,.. which PA has. FYI.
Chris
Chris,
Thank you.
Rats!! Wish I had known to include in my order.
By the time I get everything fixed, my wife will want to shoot me with it.
I will check it out before ordering anything.
~ken
Ken,
Well,… lucky for you it has a broken trigger now,… maybe? After all,.. at this point,… you do not know for sure. Hopefully you will have the opportunity to have a peek see to confirm what is up.
Keep us posted there,…. Chris
Ken,
You may want to check out this link:
http://www.marauderairrifle.com/forum/index.php?sid=24ff05664e5149918f5b28b90d1531ee
shootski
Shootski,
Thank you. I’ll do that.
~ken
Ken,
I am sorry for you to have these issues with just getting into PCP’s. I have the .25 M-rod in an RAI stock, but never had the trigger apart,… only adjusting it. It should never do what it is doing. I will have to go with Shootski and say that something is broken. Perhaps the fellow you bought them from has some tear down experience and can assist in determining what is going on.
The trigger should be under spring pressure at all times. More so when cocked. I do (not) think something you did broke anything. I do not see how it could. Maybe BB has some insight?
Chris
Chris USA,
Thank you for this. I will carefully look into this (and yes, Jerry has quite a bit more experience than I do).
Thank you for the trigger video in your next post.
~ken
Ken,
See recent post to GF1 with manual link. Do you have the manuals? You can go to the PA site product page for the M-rod and scroll down a bit to “see manual” to see the same thing I linked in my post. Also, if you have not already done so,… go the Crosman site and download the parts diagram for your gun. This will have (EVERY) part in the entire gun and provides the correct part #’s you need when calling in an order.
Shootski noted that his concern was with part G in the manual, which is (not) the trigger as Gene suggested. I am not sure if PA carries part G. Maybe one, the other, or both can break?
Continued best wishes,….. Chris
Chris,
I have them and I have the PDF files. The trigger blade is part E. Part G is the trigger link.
I suspect it is the trigger blade (or just trigger). After seeing the photo B.B. posted in a previous blog, I think it explains why the trigger swings freely in both directions when it breaks at part B. I haven’t opened it yet. Likely I would have to get part G directly from Crosman.
~ken
Ken,
Here is video on the trigger. It is 8 years old, so it ought to cover a Gen 1 (IF?, that is what you have). To be honest, I am not sure of the difference. GF1 would know and BB of course.
At any rate,… hope it is of some use,…
https://www.youtube.com/watch?v=bUF8-vNjdww
Chris
Chris and Ken
Same parts. Just locates different on the guns tube.
GF1,
Maybe you or someone can point Ken in the direction of a Gen.1 trigger assy. replacement?, in case that is the issue. I doubt the individual parts are sold,… but then again, Crosman is stellar on their parts supply. At least that way,… he has a drop-in unit ready to go.
Chris
Chris
Gen1 and Gen2 trigger assembly’s can still be purchased through Crosman as well as parts for the assembly if you have the part numbers when you call in.
Shootski
What was that? I never heard that. Tell me what parts broke.
Gunfun1,
It as the LINK between the Year and the Trigger.
Part G in the trigger diagram. Crosman actually sent me a replacement that to this day still sits in my parts bin unused. I guess my LINK wasn’t “defective”.
shootski
Shootski
So what was wrong with your trigger then?
GF1,
Go to the link and click on “see manual” link. Part “G” as Shootski noted is clearly shown. I do have the PDF from the Crosman site and the part has a different # and most likely Ken would want to use the PDF version to order parts.
/airgun-resources/manuals/benjamin-marauder-PCP-air-rifle-synthetic-stock-owners-manual3.pdf
Also, if Ken has a manual,… he can see part “G” as well as the other main components of the trigger assy.. My Gen. 2 manual shows a side view very clearly.
Chris
Chris
I know what part it is.
What I was trying to find out is why and how Shootski got the part then didn’t use it.
Then I see below where he said Crosman sent one to registered owners. I was a registered owner of several Marauders and never got one.
That’s what I wanted to know.
GF1,
I copied the “see manual” link from the PA product page and the link I provided takes you directly to the manual.
Chris
Gunfun1,
Nothing! Crosman just sent a replacement for the LINK to all registered owners. I own one of the first Marauders. I have put many rounds through it and my LINK never failed. If you look at the trigger diagram you will see that what the trigger does depends on where the MIM LINK fails which was mostly unpredictable. According to the owners with problems most of the triggers just flopped around and some got stuck.
shootski
Shootski
I had one of the first Marauders in .25 and .177 caliber. That being the gen 1. Then got a couple more gen1’s a bit later. Had 4 or 5 gen2’s.
Never got anything from Crosman for the triggers. ???
Gunfun1,
I guess we will never know all the WHYS in this World!
How’s your daughter and grandson doing? His Mom is suffering the worst of it right about now, sleep deprivation, reality of this is going to be for the long term, just plain Shock and Awe all wrapped up in a much loved little bundle!
shootski
Shootski
Still wouldn’t think Crosman would just send them out unless someone contacted them.
And yep all good with the daughter and baby. She said he’s starting to get a sleep pattern now.
How’s your wife doing?
Gunfun1,
Glad your daughter and grandson are adjusting well to life together.
My wife has been in an Acute Recovery Facility getting PT and OT for over a week now. She is currently doing very well and anticipates being released to home this Saturday. I think her general great condition before the fall and surgeries will keep this from being by life altering accident/condition as it is for so many of us Oldies!
Thank you for asking about her,
shootski
Shootski
As they say noth’n like home.
Glad she is doing better and hope she gets home soon.
BB,
I posted this link at the end of the comments in Part 1. https://www.youtube.com/watch?v=KOkjGjSF1ls
The Virtus is selling in the UK already, but the trigger requires a special action to operate the gun. The blade must be pushed forward by the trigger finger after each shot to reset it for the next shot. I got the impression that that is to prevent it from being semiautomatic according to their laws. Can you or anyone else (a Brit, perhaps) shed any light on this?
Half
Half
I remember you posting that. Sounds a little weird to me.
But thinking more I say it is actually as you say. Another (action). To me they just put another latch so to speak in so you have to manually set the trigger. I don’t believe at all it has anything to do with a semi auto gas type blow back cocking action block.
GF1,
I’m thinking that it’s like putting a button on it that has to be pushed after each shot to ready it for the next shot. Definitely can’t call it semiauto if you have to do all that, and it damned near takes all the fun out of it. Why bother?
Half
Half
I guess for them to just get a “semi” realistic gun in the hands. I don’t know what to think.
Half,
Looking thru the comments under the video one poster said that SIG just left out the the trigger return spring and it is a simple fix to add a spring back in.
Do not know if that is true but it makes sense.
Mike
Mike
I can see that being true about the trigger spring.
B.B.,
Thank you for a great second part to this shooter.
Once again the Airgun Philistines are at the gate and have buried their treasures (credit cards, Pay Pal, checks not at the ready) but desires beyond all understanding!
shootski
B.B.
Did you see my comment posted above regarding my old Crosman 147 muti-pump? I can’t shoot very well with open sights anymore. My question to you is, do you have any experience with the power level these old airguns produced? I shot at a pellet tin at 10 yards and, to my surprise, the pellet did not penetrate through even one side. I can remember as a kid, shooting a woodchuck with this 147 and killing it. It had to have had more power than I’m seeing right now. The pump and valve seem to be working fine. I can give it one pump and it will hold air and shoot. When shooting the groups I posted, I pumped it to six pumps. It’s almost like it reaches a point where no more air is stored in the reservoir. The pumps don’t get harder beyond about four. Maybe I’m just not remembering how it originally pumped? I was very meticulous on the rebuild and I’m certain all the parts are installed correctly. One thing, there was an upgraded Teflon check valve and spring with the new seal kit. Maybe that has something to do with the pumping action?
Geo
George,
The 140s I have tested have pushed out medium-weight pellets at around 700 f.p.s.
B.B.
B.B.
That’s pretty close to the same power level that my Diana RWS 34P .22 caliber generates. This Crosman is a 147, .177 caliber. I am assuming that it should be shooting faster than the 140? Unfortunately, I am playing by ear because I do not own a chronograph. Thanks for your input.
Geo
Geo,
See my reply above. It sounds like you have too much dead space between your pump piston and the end of the pump cylinder. The maximum pressure you can pump is based on this dead space. The goal is always to minimize the dead space. It does not take much volume at the end of your pump to restrict you to 4 pumps you can pump forever and not get more pressure. I am pretty sure you pump rod is adjustable.
I will study the 147 and get back to you.
Don
Don,
Brilliant!,… and jealous I did not think of it myself. While never having done it myself,… I have been around long enough to have known that. I will lay money down that is in fact the issue, especially given the recent re-build and the given description of performance.
Looking forwards to seeing the final chapter,………. Chris
Geo,
It looks like the 147 has a threaded rod going into the pivot pin block with a lock nut. That should allow you to adjust your rod length on your pump.
If any of your pins in the pump linkage have some slop that would increase your dead space. Or your new pin may not set exactly the same as the original. In any case you should be able to make a big difference in your power by adjusting increasing your rod length a little.
The key is to reduce the dead space as much as you can, BUT not to the point of adding binding on the pump system. Ideally you should just barely feel the piston hit the end of the bump pressure tube on the first pump.
I ran a spread sheet on a 101 pump and valve system to check out your dead space based on your comment that it maxed out at 4 pumps.
Using 4 pumps as a guide I came up with a maximum pump pressure of 215 psi. That seems to match the power you were describing also.
The graph below shows three different maximum pressure curves:
The dead space is the equivalent length of compression tube to result in the maximum pressures of 200, 800 and 1200 psi.
The 4 pumps curve used a maximum pressure of 200 psi with an equivalent dead space of .57 inches that is a lot.
The 800 psi curve gave an equivalent dead space of .114 inches that is a good goal.
The 1200 psi curve gave an equivalent dead space of .095 inches that takes a lot of effort and custom fitting everything to minimize the dead space.
I think you may have tightened your connecting rod into your pivot block as far as it will go. I would start by unscrewing it all the way and see what the additional adjustment length is while still having a good number of treads into the block. It may not be a half inch but should be significant.
It is a trial and error process of taking the pump out of the gun and adjusting the rod and then putting it back together to see how tight it is.
Good Luck, Let me know if I can help.
Don
Don,
Wow! That is an excellent explanation. Maybe I just adjusted the pump rod length incorrectly. When I disassembled the rifle, I did not loosen that nut as I recall. When I reassembled the rifle, the pump handle would not stay in position, so I loosened it and adjusted just enough so the handle would not fall. Maybe that is not the correct procedure to adjust for head space? I think you are on to something here. How do you arrive at those figures?
Geo
Oh, and there is no slop in any part of the linkage. The replacement rivet pin and bushing were exactly as the original and everything is tight as new.
Geo,
I have a spread sheet that starts with the pump tube at atmospheric pressure and then does a budget based on air mass moved into the valve reservoir for each pump. I have a plan to finish it so I can calculate the pump force for each pump based on the pump linkage and dimensions. I get a headache with vector mechanics now, old age I guess. Hope to finish it someday.
To the Man with the Marauder ,
The triggers tend to break , Pyramyd AIR has it in stock , You will need to save Your set screws from the old trigger.
/product/benjamin-marauder-trigger-blade-fits-benjamin-marauder-air-rifle?a=7728
Gene
Gene,
Thank you, I will take a look and replace.
~ken
Geo791
I think you have started a revolution on the blog! Haven’t seen this much talk about multi-pumps in a long time.
Update: After viewing your photo of that pump rod, and some work on my end, my 101 is slinging lead again. She will only take 03 pumps before locking up ” weak hammer spring ” so I ordered a reseal kit from Bakers that appears to have a new hammer spring in it. We shall see?
Even on three pumps, The guns accuracy really amazed me! It’s 22YDS wall to wall in my basement. “yes, it won’t quit raining here” and she will keep 10 rds. of JSB Exact RS inside the 08 ring on a 10 meter rifle target at that distance. Thats minute of house sparrow accuracy in my book! Not too shabby for something with a bronze barrel that’s probably around 80 YRS old. If only we humans held up as well.
Geo, after some experimenting I found that this rifle doesn’t like to be rested on a bench or anything else for that matter. Shot my best groups sitting on a stool with elbows resting on knees.
Thanks again!
BobF
Bfrey,
Yeah, I was going to post my comments last night but then thought it would get more views if I posted earlier in the day today. Looking for some answers and received many.
Regarding the hammer spring in the seal kit, I don’t think that the spring you saw is a hammer spring. My kit came with a new spring too. It was new check valve spring. I think you may have to specify the need for a hammer spring. You should email Baker to confirm.
Strange that the multi-pump doesn’t like to be rested on a bench. I would think it should do fine resting on bags because there is no vibration and it’s more like a PCP in that regards. You should know though beings that you have tried it.
Glad your 101 is working again, with the exception of the hammer spring needing to be replaced. Looks like a total tear down to get to that spring. It’s easier the second time around, or maybe you didn’t get that far yet? You will need a good diagram to see how things come apart. A YouTube video is invaluable. Good luck.
Geo
Geo,
I think you got the desired results with an earlier post today!
The original seal kit I got off EBay didn’t contain any springs, just seals. The one from Bakers has a photo on his sight and it actually shows two springs in the kit. As there are only two springs in a 101, the valve spring and the hammer spring, I’m hoping this should have it covered. Sorry, there are 03, forgot the trigger spring.
As far as the teardown, this is the reason I’m really starting to like the Crosman 100 series guns. All you need is the take down wrench, a set of seals, and your lube of choice plus around an hour of your time to make it perform like new again. Probably have more time invested in making the take down wrench than doing the reseal job! As some people would tell you that I’m a frugal kind of guy, I just made one out of an old section of 22 barrel. It seems to work just fine. After doing this once or twice it really shouldn’t take the average guy more than about 05 Min. to completely disassemble a 101. The biggest pain in the backside is remembering to remove the trigger guard and spring and then tying the trigger back to get it out of the way when removing the hammer cylinder. If you ask me it’s simplicity at its finest! Really starting to like the 100 series guns!
Good luck on that 147.
BobF
BB,
106+ comments,… on a Tuesday no less. This blog never ceases to amaze me! 😉
Chris
Chris,
Yeah, today is a hot one.
B.B.
Just a general comment on multi-pumps. On some guns the linkage is set up so that the maximum pump handle force occurs about 2/3 to 3/4 of the way through the pump stroke the maximum pressure on the piston is always at the end of the stroke. As the pressure builds the leverage on the pump overcomes the pressure on the piston once the pump handle is almost closed. The pump linkage leverage aproaches infinity close to the end of the stroke. This is why the pumping force changes very little after 4 to 8 strokes.
Don,
Well, I drove the roll pin out to check the pump rod length. When I push the piston down to the point where it touches the valve body, the roll pin hole shows to be only about .050″ beyond the hole. So it’s very close to bottoming out against the valve body. I was pretty sure it was close, or the pump handle would not stay in position.
I have begun disassembly to verify there is nothing wrong inside the valve body assembly. It’s much easier to disassemble now that I’ve had it apart once. There has to be a cause for this behavior.
This is a note from the service manual: “When repairing a gun having this type lever, the pump should be set so that the plunger just touches the valve at the bottom of Its stroke. There should be no resistance to the pump rod bottoming on the end of the valve.”
Geo,
Well the mystery continues. Be sure to shine a flashlight in the pump tube. I had a gun that had some gasket material and gunk down there that was stoping the piston from bottoming out. Did you check if your valve is retaining air? Or for leaks when pumping. I am out of ideas. Make sure the valve is lined up with the transfer port.
Good Luck,
Don
Geo,
So,… your pump rod is adjustable (or) is not adjustable? The comment about the roll pin and the .050″ is throwing a wrench in my ability to picture the set up.
Chris
Chris,
Yes, the pump rod is adjustable. I posted a photo of the rod up above to Don. I’ll try to help you visualize what I am saying. I removed the roll pin at the end by the front sight, which holds the pump lever. The pump lever pivots on this roll pin. After removing the pin, I slide the pump assembly with the piston down until it made contact with the valve inside of the reservoir. At that point the pivot hole in the lever was slightly left of the roll pin hole, I estimated about .050″. Benj-don thought the head space was too great, but it is very small, less than .100″ I estimate. I didn’t take a photo of the pump assembly when I did this but maybe you can visualize it from this photo I took before the rivet pin and bushing were replaced.
Geo
Geo,
Thank you. I get it now. Thank you for the added photo.
Chris
I am going downstairs in a little while and disassemble the valve to inspect the parts inside.
With a new cup seal and all other seals replaced, I am not understanding the reason the pump does not seem to build pressure after about four pumps. Every pump stroke after that feels the same. I can hear air moving inside, which may be abnormal. We shall see shortly if I find any issues inside the valve. PSB 😉
Geo
You got it oiled good?
Yes, I used Crosman pellgun oil and soaked the felt bushing on the piston. When I had the rifle apart I cleaned the reservoir tube with Ballistol. Everything is lubed nicely.
Geo
And you might try this. It will help seat the cup seal to the cylinder. Plus true up the cylinder better.
Get a wheel cylinder hone (brake cylinder hone). Take the piston and seal out of the tube. Put a little piece of cloth down in the tube so you don’t get contaminants in the valve.
After that put a little transmission fluid in the cylinder and cross hatch the tube like you would a wheel cylinder or engine cylinder.
When your doing that try not to hit the cloth with the stones on the wheel cylinder hone. Then take a coat hanger with a little hook bent in the end to get the cloth out. Takes some kind of cleaning fluid on a rag and clean the cylinder up. Put back together and lube up.
See if that works and let me know.
Gf1,
Thanks for the suggestion. I would have to purchase a wheel cylinder hone, not sure the cost anymore. I know exactly what you are talking about with the cross-hatch pattern in the bore. I guess this is the only thing left to try. The thing is, it never had an issue before with not building pressure, so I would think the new cup seal would actually improve things.
If I end up honing piston bore, I will probably just take the valve out so as not to have any obstructions and make cleaning after honing easier.
I do appreciate your input. I have also commented to Gene Salvino to get his thoughts on the matter. We’ll see what transpires from here.
Geo
Geo
No problem.
Let us know what happens.
Geo791,
From back in the day I remember folks going flathead on these to get the last bit of compression out of them along with hopped-up valves. The idea seemed to be that no headspace as acceptable. .100 is quite a bit of space even the .050 would have them toying with the adjustments. I don’t think you need to go to that length but do eliminate as much as you can without screwing up your pump. I have one final trick: a Nylon Stockings (one leg of old Panty Hose will do) stretched over a proper fitting dowel will clean out the snot and other gunk down at the bottom of the pump tube at the valve face.
Secret Sauce from MAC1 is what I used but Pelgunoil works okay as long as you don’t mind the gunk removal chore from time to time; mostly when the gun sits for too long! So lube and shoot it often and it will blow out the barrel all that snot!
shootski
Shootski,
This afternoon I completely disassembled the Crosman 147. I took the valve apart and checked everything inside. The seals were all fine and the parts were installed correctly. I cleaned and lubed everything again and then reassembled.
It made no difference and the pressure does not seem to build after about four pump strokes. I can hear a little air movement as I’m pumping right at the end of the stroke. My feeling now is that the new cup seal is not sealing well and that as the pressure builds, air begins to bypass the seal. At least that what it feels like to me. I think the valve is holding pressure fine. The pump is just not build up the pressure sufficiently. I checked the cup seal when I had it apart and it looked fine, no nicks at all.
I am kind of stumped now. I don’t know whether to purchase another cup seal or just leave it the way it is now. That cup seal is difficult to remove because the brass collar is pressed on, which holds the seal in place.
Geo
Geo,
I don’t get what (air) you are hearing moving around!
Are you CERTAIN your valve isn’t leaking out the barrel? Take a patch or paper towel, oil it lightly, pack it into the muzzle with a little tail sticking out to grab when done with this check: Pump and listen has the sound(s) you hear moved? Perhaps to the receiver bolt area? Or is their NO sound now. If the latter then you have a valve that is leaking into the barrel. If now you hear it in the receiver/bolt area then check your bolt O-Ring(s) you can make certain if that is true with either the light tissue drape or talc powder test to look for puffs of air escaping as you pump beyond the fourth stroke.
Beyond that I have nothing more right at the moment to check…I’ll let it percolate in my deep memory bank.
Oh! See one proper into one slap the receiver area with open palm once or twice and then pump…I have no idea why that worked but a really old guy showed me that a long time ago on my 392…and it worked!!!! Shook something in the valve just right I guess….
shootski
Here is a previous blog in which B.B. reported on a broken trigger blade (with photo).
I find someone who will sell me a replacement for $45.00, that is a bit over 4 times more than for the Benjamin replacement, but promises is will last.
I don’t know.
At any rate, the Marauder trigger does have a weak spot and may well have broken for no particular reason.
I will see.
/blog/2016/11/generation-2-25-caliber-benjamin-marauder-part-9/
~ken
Ken,
I do not know the difference,.. but piece of mind is priceless. Now?,… I wonder if the Gen. II is susceptible to the same issue? GF1 (did) say that the internals were the same,.. and only the trigger assy. mounting differed.
Mmmm?…. Chris
Chris,
Good questions. It appears that the trigger proper is unchanged.
I see in the manual that the trigger proper should not freely swing forward unless it is the broken part.
~ken
Chris USA,
I’m not certain that the non OEM trigger parts should be worth that much (US $45.00) unless some trigger smith work on them is performed and you need the entire trigger group (housing and all) for that to be plausible.
Color me SKEPTICAL!
shootski
Hello. Well, my Virtus is comming.
I hope works fine and give me a lot satisfactions. It´s my first “semiauto”. 12 foot-pound its less than I like for plinking and fun. All my “serious” air guns works around 12 foot-pound (international power) ….but for fun I like a little more of “Rock´n´Roll”.