by Tom Gaylord
Writing as B.B. Pelletier
This report covers:
- Baseline the test rifle
- The rifle
- The test
- Sight picture
- First target
- Sight adjustment
- Fine bead
- Center hold
- Third group with a fine bead
- Two misfires
- Discussion 1
- Casting bullets
- Discussion 2
- Cleaning cartridge cases
- Summary
Today is the day I show you what’s been happening behind BB’s curtain. There is a lot to this subject and I am so grateful for something that’s new and different.
Baseline the test rifle
When I reload some cartridges I need to test them for both velocity and accuracy, so a baseline rifle whose accuracy is known is the best way to proceed. I also need to generate some empty shells that will fit in the test rifle when I shoot them again. A .22 long rifle case resizing die is available, but to save that expense I simply shot the cartridges I intend reloading in the same rifle I intend to shoot them in after they are reloaded. I could also have hand-tested each case that I picked up off the ground at some range would fit into the test rifle’s chamber, but that would give me different headstamps (cartridges from different manufacturers), and I wanted more control over the test. Besides — it gave me an excuse to shoot my rifle!
The rifle
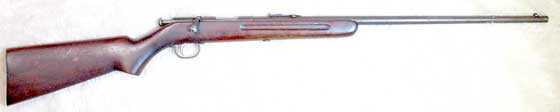
The test rifle is a single-shot Remington model 33. It’s a bolt-action rifle that has to be cocked separately by pulling back on the cocking knob after the bolt is closed on the cartridge. It’s called a “boy’s rifle” for the additional safety of having to be cocked separately. This one is a rough old beater I bought for $75 at a gun show and have since found it to be the most accurate sporting .22 that I own. Luck of the draw, I guess.

The test rifle is an old Remington 33 boy’s rifle.
The test
I went to the AirForce Airguns indoor range, where I can shoot 25 yards in still air. The range is soundproofed, so nobody in the plant is disturbed. And the .22 long rifle cartridges I’m shooting only generate around 110 foot-pounds. Compare that to the 800+ foot pounds of the .50-caliber AirForce Texan big bore they normally shoot on this range!
I shot the rifle off a sandbag rest and I used CCI Standard Velocity .22 long rifle cartridges that have proven to be the best in this rifle. The targets were 10-meter air pistol targets that seem to work well when shooting with open sights at 25 yards.
I shot 5 shots at each bull. I’m not going for the kind of precision we see in an accurate air rifle at this range — just what the average shooter would do with his .22.
The Remington 33 rifle is not a target rifle. It’s a standard sporting rifle that might be used in a survival situation, which is one big reason why anyone would want to reload rimfire cartridges, I guess. I believe a rifle like this will give the best picture of how effective a reloaded .22 rimfire cartridge can be. And one additional thing — when we reload the cartridge we will not remove the dent where the firing pin struck the first time. A single shot that loads easily is best to use, since accurate placement of the reloaded cartridge rim is important! I will show you more on that in a little bit.
Sight picture
The rifle has a post and bead front sight. The normal method of sighting with that kind of front sight is to place the bead where the bullet is supposed to go, and also to center the bead in the rear notch. However, aiming that way is sloppy. You can easily be off by an inch or more at 25 yards because the bead covers several inches downrange.

This is a typical post and bead sight.

This is how a bead sight is typically positioned on the target.
I have always felt that a better sight picture is to hold the top of the bead at 6 o’clock on the bull and also level with the top of the rear sight.

This sight picture should give more precision.
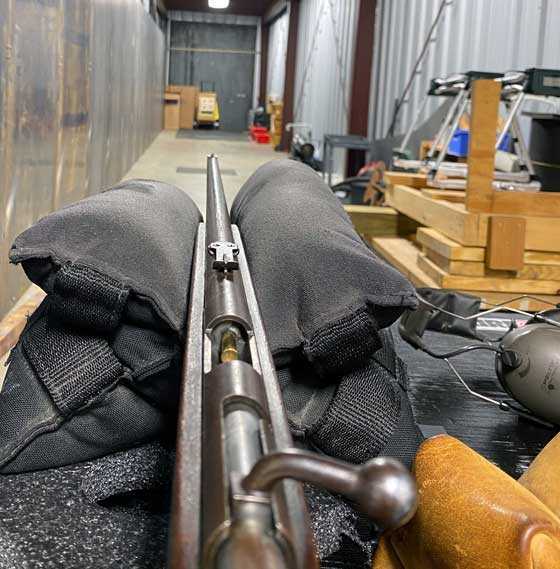
The rifle was easy to control in the sandbag rest. That’s perfect for this test!

First target
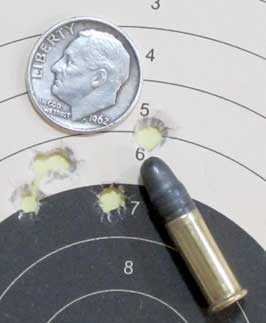
I shot the first target with a 6 o’clock hold on the bull, just as you see in the drawing above. The bullet hit at the top of the bull, and just outside. Five shots are in a group that measures 0.70-inches between centers at 25 yards. It’s an okay group, but not what we might see from a good precharged pneumatic at that distance. It’s very representative of what a typical .22 rimfire sporting rifle might do.
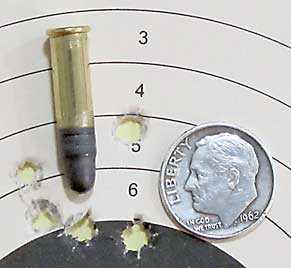
Five CCI 40-grain long rifle bullets landed in a 0.7-inch group at 25 yards. They are high on the target, despite a 6 o’clock hold.
Sight adjustment
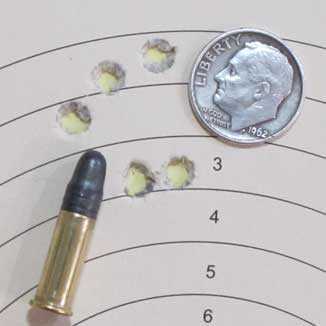
The group was well-centered but the bullets were hitting high at 25 yards. I played with the rear sight to confirm it was set as low as it would go. Then I shot a second 5-shot group with the same 6 o’clock hold. This one landed in nearly the same place and was just as high. At 25 yards 5 shots made a group that measures 0.794-inches between centers.
Five CCI Standard Speed long rifle bullets landed in 0.794-inches at 25 yards.
Fine bead
It was obvious that the rear sight was adjusted as low as it would go. To lower the groups a little more I drew a fine bead sight picture. Let me illustrate.

This is a fine bead sight picture. It’s not Kentucky windage.
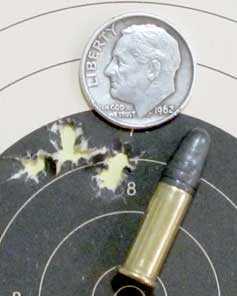
That sight picture did drop the group a little, but it did something else that was remarkable. It seemed to tighten the group! How tight? These five rounds are in 0.767-inches. I could see that this group was smaller than the second one with a 6 o’clock hold.
The group shot with a fine bead looked smaller to me. At 0.767-inches between centers it’s slightly smaller than the second group, but not as small as the first..
Center hold
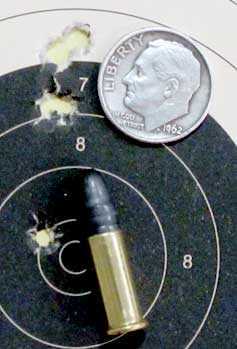
I felt it necessary to shoot a group with the bead held in the center of the bull — just like you see in one of the drawings above. I tried my very best and put 5 rounds into a 0.717-inch group. It’s way too high, but it negates what I said earlier about a center hold being less precise. It’s the second-smallest group of the four shown thus far.
When the front sight was held in the center of the black bull, the group climbed about one inch, and grouped very well. Five shots in 0.717-inches at 25 yards.
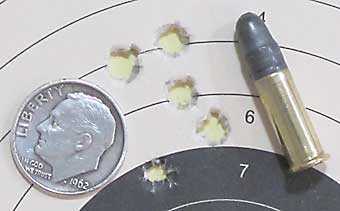
As I said, I still thought the fine bead was the right way to go, so the next target was shot with that sight picture. This time the shots all hit the top of the bull in a group that measures 0.467-inches between centers. Now, we are getting somewhere!
Shot with a fine bead, this group measures 0.467-inches between centers. It’s the smallest group of the test.
Third group with a fine bead
The rifle was doing so well and I wanted 30 cartridge cases to reload, so I shot one more group with a fine hold. This time I put 4 shots into 0.405-inches but shot number five dropped an inch below to open the group to 1.155-inches between centers. And there is more to say about that fifth shot, because I could tell that it wasn’t like the other four. In the first place, it did not fire the first time. That’s common with some rimfire ammo, with Remington being the most common in my experience. Secondly, that shot was much louder than all the other 29 shots when it did fire on the second try. In other words — something was noticeably different.
This time the last shot failed to fire on the first attempt and, when it did fire, it was much louder. Five shots in 1.155-inches at 25 yards with four in 0.405-inches.
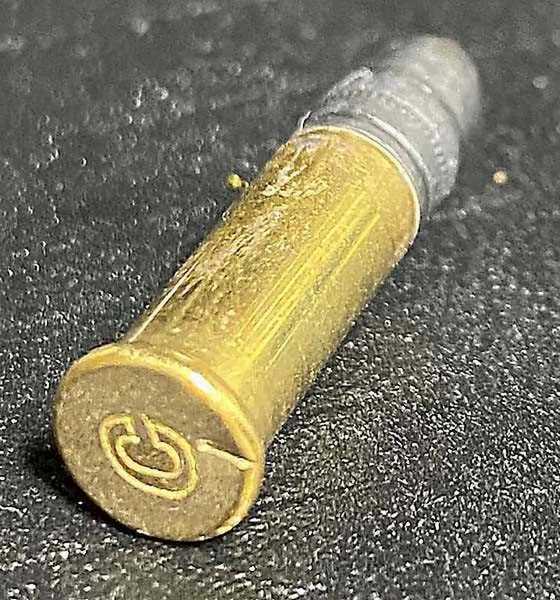
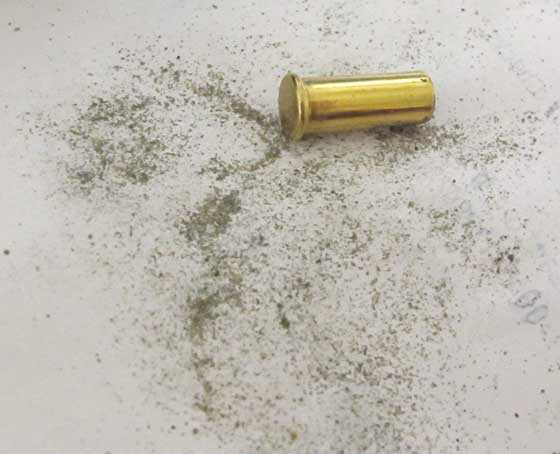
This cartridge was struck by the firing pin yet it failed to fire the first time.
The second strike fired the cartridge. It was louder and the bullet hit in a different place on target than the other four. Sorry for the blur.
Two misfires
Of the 30 cartridges I fired in this test, two of them failed to fire the first time around. I didn’t mention the first one, because when it did fire (in the first group that was shot with a fine bead) it acted normally. That’s 2 misfires for 30 shots of factory ammunition. It will be interesting to see how that compares to reloaded ammunition.
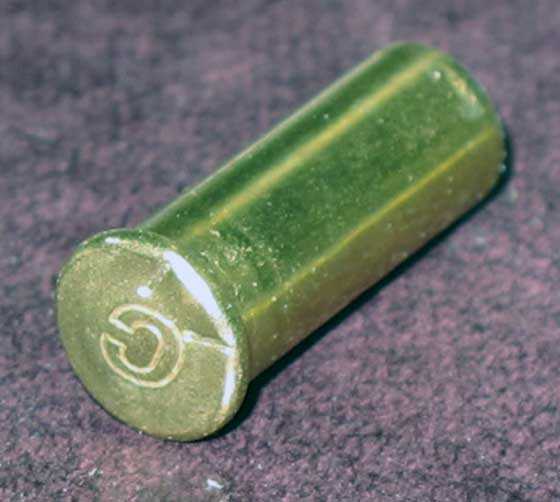
As a note to myself, the rifle’s firing pin strikes the rim of the cartridge at 12 o’clock when the cartridge is in the chamber.
Discussion 1
I believe the Remington model 33 rifle has proven itself to be an accurate rifle. It does seem that a fine bead is the way to sight the rifle.
I’ll use today’s results as a baseline for comparison when I reload the cartridges. Now that I had 30 empty cartridges to load, I needed to cast some lead bullets.
Casting bullets
In Part One I showed the bullet mold that came with the reloading kit. It’s all aluminum with integral handles that are far too short to work. By the time the mold gets up to casting temperature, the handles will be 300-400 degrees F. My neighbor, Denny made wooden insulators for the handles that I then wrapped with electrician’s tape. I hoped I could cast about 30 good bullets of each type — the 38-grain round nose and the 25-grain pointed. Remember, for rimfire cartridges we need heeled bullets.
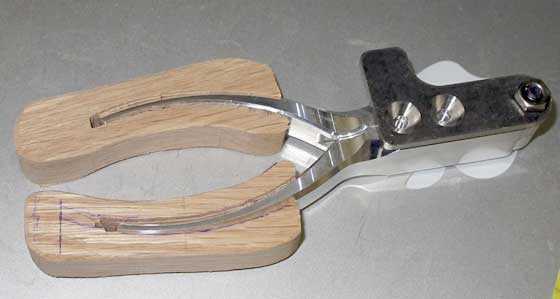
My neighbor, Denny, made these wooden mold handles to insulate the short handles during casting. I wrapped them with electrician’s tape.
Well, by the time the mold had cast 15 bullets of each size and was starting to cast good examples of the smaller bullet, the electrician’s tape had melted and the handles were falling off. I put on a leather glove and toughed it out as long as I could. But the results weren’t as good as I would like. The short pointed bullets did best and I selected 16 of them. The 38-grain round nosed bullets did poorly and I had to lower my minimum selection criteria to get just 5 that I’ll shoot for accuracy. I need to get better handles on this mold so I can cast for a longer time and get a larger selection of bullets to pick through.
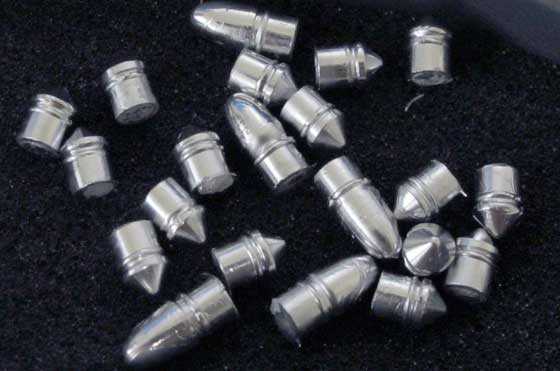
I wasn’t very successful casting the lead bullets. The short pointed ones did better than the longer round-nosed ones. The mold needs better handles.
Discussion 2
The bullet mold included in the kit is okay, however, unlike the claim the manufacturer makes, it is not the only mold available that casts the heeled bullets .22 rimfire cartridges need. But I bought it and will try to use it for awhile. The mold handles are too short and they are made of the same aluminum as the mold so they get too hot to use.
Online I’ve seen photos of the bullets others have cast with this kit and they are all rejects in my opinion. They have visible wrinkles and rounded edges that are unsatisfactory. Casting bullets is an art and before this is over I intend doing it right. It isn’t fair to test this procedure with substandard bullets. However, in the interest of learning more about how the process works, I will proceed with the small batch of bullets I’ve cast so far, But for the record these bullets are not up to my standards. If I can’t get this mold to work I will seek out a more suitable bullet mold.
Cleaning cartridge cases
The final preparatory step is to clean the rims of the empty cartridge cases. If these were centerfire cartridges we would push out the old primer and replace it with a new one, but since the priming compound is in the rim of the case, that’s what needs to be cleaned. There is a small cleaning tool in the kit, but I found it inadequate for the job. It’s too large and gets stuck inside the cartridge rim. I made a much better tool from a dental pick. Then it’s a matter of scraping out the old burnt priming residue to make room for the new.
This step is a subtle one. You are not mining coal. Most of the old priming compound was either vaporized or expelled in the explosion and only a thin layer of crust remains — or at least that’s what it looks like so far. I won’t know that I’ve done it right until I shoot the reloaded rounds, and we’re still a long way from that.

The case cleaning tool that came in the kit (top) is too large to work well. It gets jammed inside each case. The dental pick on which I bent a short hook gets up into the cartridge rims and cleans well.
That is the residue from 30 cleaned cartridge cases. There isn’t much!
It took about a minute to clean each case. That was once I had the right tools in hand and knew how to use them. So 30 cases took half an hour.
Summary
I’m just getting started. We’ll stay with these .22 long rifle rounds until I feel I’ve done my best with them with the commercial priming compound, then we’ll turn our attention to the alternative methods of reloading .22 rimfire cartridges — with homemade priming compounds and gunpowders.
After that I’ll look at reloading the .32 rimfire and .41 rimfire cartridges. I have done some research on these two larger cartridges and there are several surprises in store for you.


Very interesting topic. I had no idea you could reload a 22 long rifle case.
For your handles perhaps you could drill a hole through the wood and the handle itself and insert a small roll pen.
Pete,
I was thinking of that.
BB
B.B.,
Did you do a baseline velocity test? I don’t seem to have seen that part. How else will we know how the velocity of the reload compares to the factory original?
Siraniko
PS: Section Discussion 2 1st paragraph 1st sentence: “The bullet mold included in the kit is okay, however, unlike the claim trhe (the) manufacturer makes, it is not the only mold available that casts the heeled bullets .22 rimfire cartridges need.”
Siraniko,
For this cartridge the factory specifies 1070 f.p.s. It might not be a bad idea to test a couple.
Fixed the error. Thanks,
BB
B.B.,
Three birds with one stone: 1) another excuse to shoot the gun 2) more shells to replace the two misfires 3) we’ll actually see if the gun achieves or surpasses the specified factory velocity.
Siraniko
BB,
Looking good. Quite fascinating. Looking forwards to further reports.
Chris
Perhaps cut/split a (dirty) case open in order to get a pic of the inside of the rim? That way people can get a visual of what is being cleaned.
Chris,
That will be difficult, but it would be interesting. I think a Dremel tool could do it.
BB
B.B.,
I also think that with the right attachment a dremel tool could be used to clean out the inside of the cases. Perhaps a carbon steel brush or a brass brush:
https://us.dremel.com/en_US/products/-/show-product/accessories/443-02-1-8-carbon-steel-brushes
I like pacoinohio’s idea of extending the handles of the bullet mold with a non-conductive material. Of course buying a bullet mold designed by someone that has actually cast bullets is the easiest solution but since you’ve already got that one I think it could be adapted for use.
Heating the stainless steel handles of that bullet mold then putting them in a vice and slowly closing the vice to slightly straighten the handles, then drilling and oversize hole in broom handles or the like, then inserting the handles into the wooden extensions and epoxying with a heat resistant two stage might work.
Kevin,
The mold is all aluminum. Straightening the handles will be easy, but epoxy will not hold atv the temperature the handles reach. I’ll fasten something mechanically.
BB
B.B.,
Fastening the handles mechanically to extensions makes sense. Splitting the extensions during installation or use needs to be taken into consideration.
Lots of high temp epoxy products out there. From first hand experience the JB Weld Muffler Cement makes be believe it would work. Although not clearly stated, this product will adhere to wood. I joined two pieces of metal together for use on my barbeque. Used a piece of scrap wood underneath so my work bench didn’t have to catch the excess epoxy. Once it dried the only way to get this epoxy off the scrap wood was to chisel it. It dries like concrete feels. It’s rated to 700 degrees F and you can probably buy it at your closest automotive store if you ever need it for another project:
https://www.jbweld.com/product/muffler-cement-6-oz
Kevin,
Wow! I need to look into that. It coiuld solve a lot of my problems!
BB
B.B.,
Always happy to help you spend your money. Let’s just consider this a small payback since I think I only paid $6 for a tube.
BB,
If that is a cast aluminum, I would be worried about it breaking if trying to bend/straighten. You could drill and tap the wood for machine screws or pre-drill for short drywall screws (either to act as set screws for the wood handles).
Chris
Chris USA,
To make B.B.’s life easier here’s a picture from https://cartridgecollectors.org/?page=introduction-to-22-box-collecting
Sectioned examples of .22 rimfire cartridges (courtesy of Paul Smith)
Left – .22 short with hollow point bullet
Center – .22 Long with solid bullet
Right – .22 Long Rifle with hollow point bullet.
All are examples made by Dominion Cartridge Company, headstamped “D”.
Siraniko
When you say “head stamped”, do you mean butt stamped? I think of the head as the top part in the photos. IE the head is the bullet and the butt is the casing.
-Y
PS what role does the void between powder and bullet play?
Yogi,
I have no idea why there is that much space inside the case after the powder has been poured in. I think it’s by tradition that the stamping on the “butt” end is called the headstamp. It would make no sense to put it on the bullet that is discharged and there might not be enough space if on the case, where it can also create a point of weakness. (You are just pulling my leg aren’t you?)
Siraniko
No! Not pulling your leg. I am not a firearm person. My butt is bigger than my head, is your head bigger than your butt? It should be called a butt stamp.
Butts are on the bottom, heads are on the top.
-Y
PS no wonder fire arm people are so messed up, they do not know the difference between their butt and their head. Now I am pulling your leg. lol.
Siraniko
I searched what some reloaders were using as fillers.
Hopefully BB will put that in his next report.
No, the case head is the case head. The open mouth of the case holds the bullet. The bullet is the bullet, not the ‘bullet head’. I’ve made and sold millions of rounds of cartridges. When I’m talking to someone and they start referring to ‘bullet heads’, I know I’m talking to a novice in the shooting world. I then gear my presentation to their level of understanding.
In forming the cartridge case, one of the final operations is the heading stage that refines the tube to final shape.
There is air space in most cartridges. The case volume minus the amount of bullet intrusion is fixed. The propellant charge to achieve desired accuracy and velocity goals is determined by weight, not whether it fills the case.
Is the “head space” in the casing necessary for gas expansion? Do center fire cartridges also have so much “head space”?
-Y
Head space is the fit of the cartridge in the barrel’s chamber. A rimmed cartridge like the 22lr is stopped from further forward movement into the barrel by a stepped recess that fits the 22lr cartridge case rim. That recess determines headspace. There are allowances built into that dimension to allow for manufacturing tolerances, crud buildup, etc.
The airspace within the cartridge has some effect on combustion and overcoming the bullet’s inertia to send it on its merry way down the bore. Usually it is a minimal effect. When dealing with an explosive propellant, ie. black powder, it is necessary to eliminate airspace with the use of fillers, in order to avoid excessive pressure spikes.
Now I’m confused-what else is new?
You said, “There is air space in most cartridges”.
Then, ” When dealing with an explosive propellant, ie. black powder, it is necessary to eliminate airspace with the use of fillers, in order to avoid excessive pressure spikes.”
In the diagram that you showed, there is no filler. Should there be?
In 2 out of the 3 examples the amount of “head space” seems equal to the amount of propellant.
-Y
The cross sectioned examples shown are using modern smokeless powders. They are very fast burning, but are not explosive.
You are referring to air space, not head space. Head space is the dimension that precludes a cartridge from moving further forward into a firearm’s chamber.
Common black powder is charcoal, sulfur and salt petre (ammonium nitrate). Pour a quantity on the ground and apply ignition source- the pile of powder will instantly flash off. Pour the same quantity of a smokeless powder and ignite- the pile will just burn merrily away for a few seconds. No flash.
It is when the powders are contained within a cartridge that the work of propelling the bullet down the barrel’s bore can begin. That is due to the rapidly expanding gases of the respective powders. Both act very similarly when confined. If you are not careful, black powder can lead to dangerous pressure spikes.
Just to clarify: the color of the powder does not determine’Black’ powder. It is the chemical composition.
pacoinohio
Ok so here’s the question.
I want to make the lower velocity longrifle rounds. So I know there will be air space.
How do you get rid of the air space?
Seat the lead bullet deeper?
I replied here because there was no where to reply after your comment below.
And I wonder if the pressure spike will happen if I use the colored part of a match as my gun powder.
I’m guessing I will need more of that powder from the match to get the power of black powder or smokeless gun powder. So less air space possibly with the match head gun powder. What do you think.
GF1,
Air space in the cartridge makes no difference unless you are using black powder.
BB
Yogi,
Airspace is bad for black powder only. Smokeless powder often has some space.
BB
BB
What happens when there is air space with black powder?
I plan on making the lower velocity long rifles like the CCI 710 fps 40 grain bullets.
So I know there will be air space with the gun powder load.
When black powder is ignited, it immediately flashes/explodes. The expanding gases will compress the air in the cartridge until the pressure builds to the point of overcoming the bullet’s inertia. This results in a pressure spike. Sometimes nothing bad happens. Sometimes the buildup of pressure blows the gun apart. Removing air space allows the expanding gases to begin moving the bullet immediately. No pressure spike.
Frankly, I would only reload the 22lr with smokeless powders.
GF1
I suggest that you forget about black powder altogether.
You will create a cleaning nightmare that will ruin your day.
tt
TT,
Actually, cleaning black powder is easier than cleaning smokeless. Just pour boiling water into the barrel and then dump it out. The bore is clean! Gotta oil it when it cools down.
BB
GF1,
I guess I’d better show you guys some “walnuts” in black powder barrels. Black powder builds a pressure wave that a barrel cannot contain. If a bullet isn’t rammed down onto the powder, the pressure swells the barrel where tyhe bullet is and it looks like the barrel swallowed a walnut.
BB
Gunfun1,
I have read that some reloaders use a small amount of kapok as a filler when they underload cases for low velocity loads to eliminate air space and ensure uniform ignition.
Siraniko
I use Kaypok in my .32-40 schuetzen rifle. It keeps the small load of smokeless powder on top of the primer for more stable ignition.
BB
BB
I searched what some reloaders were using for fillers. Some said corn meal and such for low powder charges.
Maybe you can tell of some fillers you know about in your next report.
Hi Gunfun,
I read that the dutch army used a cartridge filled bottom half of the case with powder and top half with sawdust for guards in urban settings. (this was before the second world war)
‘Not to make too much of a mess and collateral damage if they had to shoot at anybody’ was what it said in the book.
(I know seems weird to me too)
Carel
Carel,
That sounds normal to me. I never heard of sawdust being used, but I have used Cream of Wheat. And like I said yesterday, I have used Kapok to keep smokeless powder in place when the charge was very small.
BB
Siraniko,
Very nice. That does show the primer cavity/rim quite well. My suggestion to BB was to show the crud left behind after firing. In your picture, the primer powder in the rim looks quite clear.
Thank you,…. Chris
Siraniko,
Thanks for that interesting link!
Hank
Cool picture, thanks!
Am I the only one wondering how much faster they will fly with the entire case filled?
Carel
Carel,
I believe the original loading used black powder which is bulkier. When they shifted to smokeless they did not change the cartridge dimension just the charge by weight. There must be a reason why the .22 magnum rimfire was developed instead of just filling up the standard .22 long rifle.
Siraniko
Still… Only prudent to find out how much faster they will go.
Wow I want to make magnum .22 LR ammo now!
I thought I had kicked the FPS bug. I guess it never really goes away. =-)
Carel
Carel,
Faster is always better,.. up to the point that it ain’t. 🙂 I am with you. Keep pushin’ the limits.
Chris
Siraniko,
Don’t forget the CCI Stinger which has a case that is about 0.702″ long compared to a LR case at about 0.613″ in length. The reason I mention the Stinger is that it is the basis for the magnums such as the .17 and .22 caliber Mach2, Aguilla Super Maximum, 22 WMR and .17 HMR. It took the Stinger case length to pack enough powder into those rimfire cartridges to drive them at those high velocities.
shootski
B.B.
Same old, same old, does get tiring after awhile…..lol.
After you have scraped out the old primer, would it not make sense to chemically clean the inside of the cases too?
As a suggestion for a future article, how about one on shooting bags. I see the ones with “rabbit ears” that cradle the fore end. I see ones that are just round. I know some people who use a rear bag on the front. How do they affect the artillery hold? Which is best?
-Y
Yogi,
It probably makes some sense to chemically clean the cases. I’m just trying to be pragmatic.
BB
What would you use to chemically clean them? Acetone, brake cleaner?
-Y
Yogi,
Don’t know if a solvent type cleaner (acetone, naphtha, etc) would work as the primer is essentially burnt to carbon. Think that mechanical cleaning is the most practical approach.
Hank
I would be inclined to straighten (if possible) the handles and file them to a long tapered point in order to jam on a pair of wooden handles. A couple pieces of broom handle work well. This was pretty common back in the day for the old iron molds. It takes a pretty heavy pair of insulated leather gloves to work with molds. Un- insulated equals pain.
BB,
Perhaps it was just coincidental, but my experience with .22 rimfires is that generally semi rifles will have more misfires than bolt or lever action. Some semis seemed to just barely tap the rim.
I can not recall the old Iver Johnson Model X ever having a misfire. I would gather up all of the misfires at the range and use them in that Model X. That striker would slap that firing pin and almost cut the case open.
RR,
I also pick up every misfire I find. I have several hundred saved up and I have already shot several hundred.
BB
Has anyone ever known a misfire to ignite outside the chamber? My question includes center fire misfires as well as rimfires. I have not but I worry one will.
Just trying to improve my safety education.
Deck
Deck,
We call that a hangfire and because of the possibility I wait for some time before removing tghe misfired cartridge. In a machinegun there is also the threat of a cookooff from a hot barrel.
BB
BB
Me too about waiting on a hang fire. Any safety issues after a misfired round is cooled down and not dropped on a hard surface?
Thanks,
Deck
Deck,
I can’t think of any. The primer doesn’t become more sensitive from a hangfire.
BB
BB,
A cookoff can be awfully scary. You are no longer in control.
BB
I never imagined there would be a time I would learn about reloading rimfires. Your innate curiosity for how things work would make Abe Lincoln smile. I look forward to your sorting through the many variables affecting accuracy in this rifle. I’m dreaming you will best the factory accuracy with a reload. Now that may not be your objective in doing this series since just getting reloaded rimfires to work is quite an achievement.
Survival tools are popular. I see we now have a black powder muzzle loading shotgun pistol that uses modern primers to ignite a caseless charge.
Happy New Year to you and all readers!
Deck
Deck,
Boy — would I like to best the factory accuracy. I doubt I can, but wouldn’t that be something?
BB
B.B.,
Talk about setting the bar way too high! Not questioning your dedication, casting and reloading skill set in the least. The quality of your cast bullets from a marginal bullet mold is impressive. Aluminum just transfers heat too quickly away from the cavity as far as I have been taught.
Given the inherently difficult multi part process inolved it would be amazing if you get 3 out of 4 to just make it out of the barrel! More than that number and it is slap on the back time.
Great Blog topic!
shootski
BB, this is interesting to me. Thanks for taking it on for us, and for caring enough to try to do it well.
I hope you are doing well,
David Enoch
David,
I’m doing very well, thank you. You?
BB
BB,
I am doing better than well. I have a new toy to play with and have been having a ball with it. It is an Artimas PP700 that has been modified with an AirForce .177 15″ long barrel, carbon fiber shroud, and a 3D Printed butt stock. It also has an attached muzzle brake.
David
Cool stuff.
One more picture
DavidEnoch,
That stock is fantastic. The fit potential of 3D Printed furniture is of great interest.
I have way to many questions are you going to write a blog about the project? I will ask a few right now: It looks like three pieces were needed? Did it require finish shaping? How strong is it?
Great looking project!
Happy & Healthy New Year,
shootski
Shootski,
I bought the rifle as is. I didn’t do any of the work. The print is available on the web for download for the stock. It is in 3 pieces. It is not solid plastic but feels solid and stable. There are print files for about 7 or 8 different parts for this pistol available for download. I have thought about trying to fill the grain of the 3D print and painting the stock but it is fine as it is. The maker had the muzzle brake anodized to match. This gun was tuned down to about 600 fps and gets about 90 shots per fill. I have not done any chronograph work yet.
A funny story is that when I got the gun, I put it together, added a 6x BugBuster and went out to sight it in with what ever pellets I had in my pellet pouch which were some type of .177 wadcutter. I figured that when I got it close I would do some pellet testing. Well, at 25 yards it put 5 pellets through the same hole. I backed out to 35 yards and shot three shots and had three touching pellet marks on a steel spinner. I shot it awhile and then went in to get more pellets and I cannot figure for sure what pellet was in the pouch. The pellets look like they might be RWS Hobbies. I thought they were Meisters but they are not. Anyway, I cannot get any pellet I own to group as well as what is in my pouch.
I kind of like the white stock and muzzle brake. I call it my STR (Storm Trooper Rifle). It is a fun little carbine. I doubt is weights over 3 pounds. Hey, you can email me at davidcenoch@gmail.com and we can email or we can talk on the phone.
David Enoch
David,
Thank you.
Nice accuracy! I hope you find THAT pellet. Airgun Law #1: It never ever is allowed to be easy finding the perfect pellet.
It must be in one of those tins on your bench? No! In the trash….
Enjoy the STR,
shootski
David,
That is a sweet looking shooter! WAY to funny about not finding that “magic” pellet again. Ok,……. not funny at all. Great shooting! I hope you find it again with all of my best wishes.
Chris
BB,
I am a bit surprised to hear about the mis-fires. I can’t remember having one in the past couple of dozen bricks.
You might want to check the hammer spring (it might be getting tired) and that firing pin is clean, free of burrs and properly lubricated. Sometimes the firing pin gets “peened” and doesn’t move as easily as it should. A old drill bit shank is a good material (steel and temper) for making a new firing pin if you need to go there.
I have found that rimfire ammo to have quite a variance in velocities (some times over 100 fps though usually around half that). Think that the amount of primer makes a big difference.
Seen some CBs that had no powder and just used the primer for power, it might be interesting to see if you can make some “quiet” rounds like that. Might be a good way to check the consistency of applying primer as well.
Hank
Hank,
If I wasn’t so used to them from Remington ammo I would suspect the rifle, but this Rem. 33 seems to be reliable.
BB
Hank
The .22 rimfire ammo nowdays seems to have hardly any misfires compared to what I remember when I was a kid with my semi auto Winchester 190 that I still have today. Its even 50 years old now.
Maybe a better process nowdays. ???
I do know one thing. The firing pin on my 190 does strike harder than my Savage 93. And I have shot the misfires when I was a kid even with the hard strike and they cycled fine in the semi auto 190.
All I know is I can’t wait to tell some of the firearm guys at work I reloaded some .22 rimfire cartridges. They won’t believe it unless I take pictures.
If the wooden handles don’t work out, you might try some inexpensive welding gloves.
“This sight picture should give more precision.”
B.B.,
Happy 2021 to you! I have always shot my open-sighted .22s as you indicate in the 3rd pic under “Sight Picture.” This is proving to ne a most interesting set of reports. =>
Looking forward to the rest,
dave
BB and TT
Nowhere to reply above about the black powder.
Yes I know how dirty it is. The guys at work that are into firearms have showed me their guns after shooting.
And yep the air space. So then as I said above. Wonder what the match head powder will be like. It’s got to be less potent I guess I will say.
You know that’s were I’m going first. Match head gun powder.
And ok on the air space with black powder that you just mentioned above. Basically it sounds like black powder should be left alone.
Gunfun1-
I recommend the old standby— TM31-210 Improvised Munitions training manual for getting a handle on makeshift type powders. The match head route is doable in an emergency situation. Don’t understand the appeal when a one pound bottle of Bullseye or Unique is cheap and readily available.
pacoinohio
Because I got the match heads right now and I don’t have the other powder.
That’s basically it. No other reason.
Gunfun1,
Black Powder is dirty for sure but so is the propellant made with the Strike Anywhere Matches from my experience with the home-made CO2 capsule rocket motors. The problem as I see it is there are known methods for Black Powder chamber/bore cleaning as well as for the Smokeless Powders. Who knows the proper chemicals for cleaning of the survival substitute matchhead stuff? I for one wouldn’t do testing in any rifle I held dear! For sure i would run loose and wetted patches first after every test session to not scratch the bore. That is my technique on all of my Rimfire barrels because of the sharp shards of glass/sand debris found in the grooves with most any Rimfire ammunition; even with the spendy Arctic Match ammo.
shootski
Shootski
I clean my .22 rimfire barrel and action after every shooting session. The stuff is just to gritty and messy.
That’s one thing I like about air guns. Not as much maintenance needed to shoot them.
And this is off subject. I posted a picture of the freezing rain we had of my back yard the other day.
Well now we are getting what they are calling freezing fog. You can verily see past 60 yards and its freezing on the grass and ground.
Maybe I should post both picrures to see the difference.
Heres the freezing rain the other day with the same view.
Gunfun1,
I hate that stuff! I have had ski races in that kr@p and it is awful. The freezing fog is even worse for kayaking watching as it coats the boat, the paddle, the deck compass and eventually the even the exposed surface of the Drysuit Im wearing!
shootski
Have Nastar (amateur) ski raced on ice in North Carolina and Vermont. Chattering in the bones feels like a toe hit with a 3 iron in freezing weather. It still beats trying to get down the mountain in a total whiteout.
Another off subject; my just acquired Daisy 499B smoothbore is getting between 1/2” and 3/4” ten shot groups at 10 meters rested front and back. Gunfun1 inspired me to buy one and just happy I did.
Deck
Deck
Glad you got it. They are great guns. Still can’t believe how accurate mine is.
And looks like yours is shooting nice too.
Shootski
It was dead calm too. I have seen some thick fog but this freezing fog was thick. Couldn’t go outside with my glasses on. Took about 20 seconds and I couldn’t see.
Nice shooting with irons BB. I will guess a red dot type sight would be no better, except maybe outdoors. With a post front sight, you can tell where centered is, but with the red dot sights I use, that is harder to tell. The dot sights are for speed shooting I think.
I think holding the bead at the base of the notch had a good result, but if it was dark backround, the front sight would tend to disappear Just screw a small flat plate into the wood so it covers the metal part of the handle so they wont come off.
I am going to ‘roast’ the hard wood grips the Bandit comes with in the oven with a recipe I found, hopefully this will highlight the wood grain like you see on a fancy guitar neck. I am up to 14 shots on a fill, would like to see what velocity Barracuda lt fly at as a two mag tune. 770 fps is a one mag tune, I’m at 755 fps now, 10 second spread. I will increase reg output a little to about 1800 psi. This should lower the velocity down a little. The A.A. heavys shoot even better but I’m out of those!
R
BB, I have been reloading centerfire cartridges for over a decade for both pistol and rifle cartridges, but I never considered reloading rimfire cartridges as I always thought applying the primer compound inside the tiny folded rim of a small brass case required specialized/expensive equipment and should be done in a specialized environment. (Quality 22LR match ammo isn’t all that expensive either, relatively speaking). Thus, I have no knowledge to impart re rimfire re-loading, but I will take this opportunity to stress that raw primer compound, even in small amounts, is dangerous, as noted in this online article about homemade primer compounds:
“To avoid serious injury or death, always work with primer compounds in small quantities of less than ~2
grams (~30 grains) at a time. Always wear eye protection and work in a clutter free, well-ventilated area.
It is recommended that wood, plastic, or other non-sparking tools be used to avoid accidental ignition of
primer compounds and primers. Work on a non-porous surface and carefully clean up all residue and
dust from the work area when finished. It is important to wash your hands thoroughly with soap and
water after working with primer compounds to avoid accidental poisoning.”
You likely already know about such precautions regarding primary explosives/primer compound, so I will simply say please use EXTREME caution during your experiment. (I do confess some personal paranoia about primary explosives such as raw primer compounds, as I have met a couple of former EOD guys, one who was missing most of his fingers on his right hand, and the another guy was missing two limbs after working around primary explosives…hence this unusual post regarding this particular topic.) Stay safe in 2021.
Random,
I taught demolitions in the Army. I wasn’t EOD, but I knew most of the stuff they did.
I promise you, I will be VERY careful!
BB
Great article BB!
I especially look forward to your upcoming posts about reloading .32rf!
I recently bought a .32rf suicide special spur trigger pocket revolver called “Penetrator”, and I am in the process of looking for brass to modify & reload.
I am curious to see if you have the reload kits from hle_books in Belgium.
spinoza,
hle_books is one place I have searched.
BB