Today reader Vana2 whose name is Hank, shows us how he modified the Beeman P17 pistol to make it easier to pump.
If you’d like to write a guest post for this blog, please email me at blogger@pyramydair.com.
Beeman P17 Improvements
by Hank Vana2
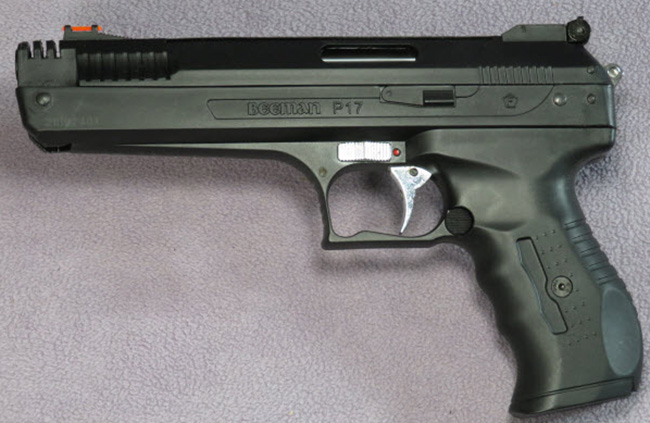
A gem in the rough, the Beeman P17.
This report covers:
- Complaint 1 – Heavy closing force
- My solution
- Piston modification
- Test results
- Complaint 2 – Awkward loading
- Summary
I was taking a break from clearing brush when I spotted him hiding amongst the leaves. “Bet you can’t hit me” the acorn said. “Bet I can” I replied and sent him flying with a well-placed shot.
I love plinking. If shooting tins and spinners on the range is fun, roving and shooting random targets of opportunity while on a walk-about is even more so.
When out working on the property I always bring an airgun. I prefer rifles but often it’s more convenient to carry a pistol which brings me to the subject of my guest blog: the Beeman P17.
The Beeman P17 is an all-around nice little airgun that is excellent value for the money. BUT, there are two common complaints against this .177 caliber Single Stroke Pneumatic (SSP) – It’s heavy to close (charge) and awkward to load. In this blog I’d like to share the improvements that I’ve done to my P17 to address those complaints.
Complaint 1 — Heavy closing force
For its compact size the P17 puts out an impressive amount of power – around 2.7 Foot-Pounds of Energy (FPE) at the muzzle. Unfortunately, with the short cocking lever (the barrel), it takes about 28 pounds of force to compress enough air to drive a 7.4 grain Crosman Premier to 410 Feet Per Second (FPS).
Because it take a lot of effort to close the action on the P17, people hold the pistol close to their body to gain the best mechanical advantage and often trap clothing (or skin) in the mechanism.
The other concern is that the effort of loading takes the fun out of plinking and after shooting for a bit, muscles become fatigued and it’s difficult to shoot accurately.
My solutions
Considering that I use my P17 for casual plinking that doesn’t require a lot of power I thought I’d trade some of the velocity for a lower closing effort.
Being an SSP, the way to reduce the power is to reduce the compression in the cylinder. That can be done by reducing the amount of air being compressed or by increasing the volume of the compression chamber so that the air isn’t compressed as much.
The length of the compression stroke on an SSP is determined by the location of the air intake vent on the cylinder. On the P17 it’s located on the side of the cylinder, about a half inch down from the top. This hole is the one that you should check for O-ring destroying burrs before using your pistol!
It would be easy enough to drill another vent hole (further down on the cylinder) to reduce the volume of air to be compressed, lowering the closing force required. I don’t like this approach as it would be difficult to plug the hole if I wanted to return the pistol to full power.
I chose to increase the volume of the compression chamber and reduce the closing force by drilling a pocket hole into the face of the aluminum piston. My thinking was that I could systematically drill the hole deeper or larger until I found a closing force I was comfortable with and if I wanted to return my P17 to factory specs it would be easy to plug the hole with a set-screw.
The difficulty loading a pellet can be fixed with a bit of polishing.
The testing jig
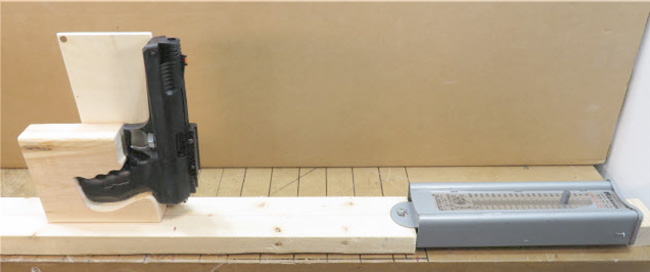
The testing jig used to measure the closing force required.
For myself, I could have just systematically drilled the piston and checked the force until I found what I liked, velocity being whatever it was going to be. For the guest blog I needed to measure the amount of force needed for a specific pocket hole volume and the resultant velocity. So I had to make a jig.
To make measurements, I bolted my scale to the workbench and attached a (sliding) 2×4 that had block to hold the pistol steady while I applied the force needed to close the action. The pointer on the scale moved a magnet down the vernier to record the peak weight. The pistol was then shot over a chronograph and the velocity recorded.
Piston removal
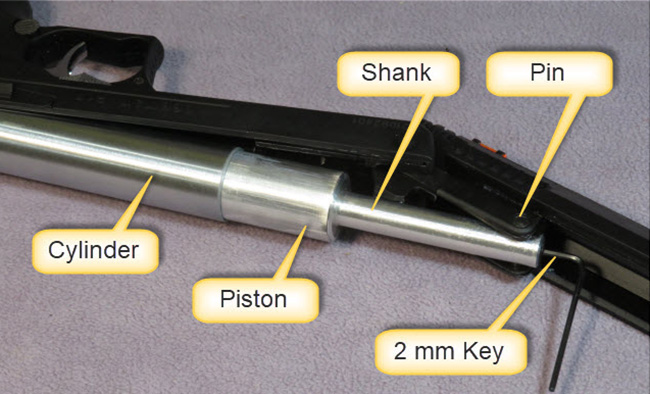
How to remove the piston on the P17.
The piston on the P17 is held with a pin which is locked in place with a set-screw. Loosen the set-screw with a 2mm Allen Key and push the pin out. The cylinder can then be angled so that the piston can be pulled (straight!) out.

There are two things to note here…
First – check the inside of the cylinder to see if there is a burr on the air inlet vent hole that could damage the piston O-ring. The presence of a burr used to be a common manufacturing problem; it seems they have addressed that issue as this P17 was fine. If there is a burr, remove the sharpness with 600 grit sandpaper.
Second – clean the factory grease off of the piston and out of the cylinder – carefully (wood or plastic implements and clean paper towel) to not to scratch the inside of the cylinder. My P17 had an excessive amount of cheap, brown, general purpose grease instead of a thin, light coating of the white lithium grease recommended for SSPs. Some of the excess factory grease worked its way into the valve system and caused the valve to stay open until I flushed it out.
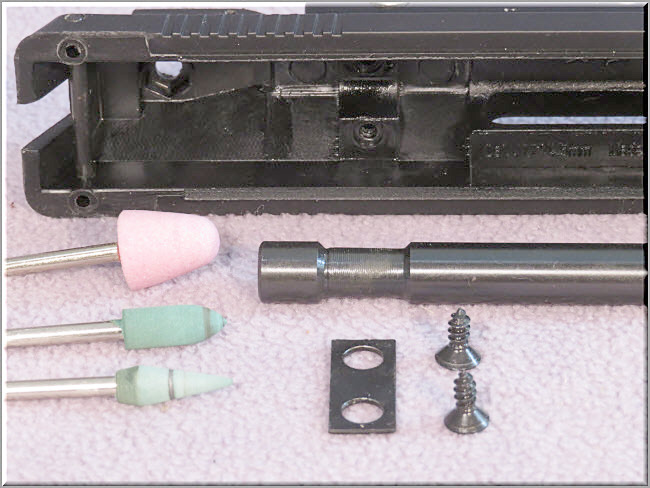
Piston modification

P17 piston detail.
Here’s where we get into the piston details. The modification itself is simple – I put some tape on the drill bit to mark the 1/4 inch depth I wanted and drilled a pocket hole into the aluminum piston.
The interesting thing to note is the air-flow pattern in the grease on the piston face shown on the left in the picture above. The compression chamber transfer port is adjacent to the middle of the cleared area.
The piston is soft aluminum (6061-T6) that is easily marked. Make sure that you support it by the shank and protect the piston itself from damage during the drilling operation. Clean off any chips of metal and lubricate the O-ring and piston with a light coat of white lithium grease before reassembling.
Ideally, for the cleanest air flow, the pocket hole should be in the face of the piston, directly opposite the transfer port. I don’t think it’s critical where you drill the hole as long as you are not too close to the edge of the piston where you can break into the O-ring groove.
I located the hole vertically (in relation to the pin – red dotted line – that secures and orients the piston) about 1/4 inch above the piston center. Just be sure that the distance from the O-ring groove is suitable for the drill diameter you intend to use.
Test results
I baselined my P17; as received from the factory the pistol took 28 pounds to close and shot at an average of 408.8 FPS with an Extreme Spread (ES) of 10.9 FPS and a Standard Deviation (SD) of 3.0 over 10 shots with 7.4 grain pellets.
I tested 1/8, 5/32 and 3/16 inch diameter pocket (blind) holes drilled 1/4 inch deep into the face of the piston and recorded the closing effort and resulting velocities.
The closing effort decreased as expected: for a 1/8×1/4 inch pocket – it was 26 pounds effort; 5/32×1/4 pocket – 22 pounds and 3/16×1/4 pocket – 18 pounds. I found 18 pounds closing effort comfortable so I didn’t test larger pockets.
Surprisingly, the velocity didn’t change appreciably. Over the whole test (150 samples) the average velocity with 7.4 grain pellets was 408.2 FPS.
I surmise that the volume and pressure of the charge in the P17 exceeds what is required to push the pellet out of the relatively short (about 6 1/2 inches long) barrel and much of the air and the effort to compress it is wasted. Tighter fitting and/or heavier pellets will likely show different results. I’m pleased with the way things turned out!
Complaint 2 – Awkward loading
How to deal with a sharp-edged chamfer.
The second complaint that I’ve heard is that the P17 is that it is awkward to load.
Fat fingers aside, I’ve noticed that the real reason that it’s difficult to load a pellet into the breech is that the sharp edge of the chamfer is catching on the soft lead pellet.
The breech on my first P17 was machined flat to seal against the O-ring and didn’t have a chamfer at all. You had to carefully align the pellet to get it to load – domed and pointed pellets were difficult and forget about wad-cutters! Needless to say, that was fixed in a hurry!
The breech of my new P17 has a small chamfer the factory put in but the edge of the chamfer where it meets the rifling and the edge at the sealing surface of the barrel had a slight burr on them that would snag the head of the pellet and make it difficult to seat. It’s better than it was on the first pistol but can easily be improved.
It takes a minute to undo the two screws and pop out the barrel. Then using the fine-grit stones (shown in the picture above and that are sold for use with a Dremmel tool) polish the edges of the chamfer lightly – by hand – to take the burr off and leave them smooth and shiny. (Do NOT touch the crown end of the barrel!) Clean and reinstall the barrel and even wad-cutters should load easily.
Summary
I like my Beeman P17 SSP pistol. It’s got decent power, accuracy is excellent and it’s just a fun pistol to have around. These two little improvements to make it easier to load just add to the enjoyment of plinking with one.
Cheers!
Hank


Hank/Vana2,
I’m very surprised of the amount of effort that dropped (from 28 pounds to 18 pounds force) with not much difference in velocity. Makes me wish that I could purchase one easily to modify accordingly. Thanks for a great article.
Siraniko
I was surprised as well Siraniko.
I was ready to accept a 50-75 fps loss in trade for easier cocking, now feel like I can have my cake and eat it to 🙂
Hank
Hank,
I love to put a few pellets in my pocket and go for a walk about.
Over the barrel cockers are dangerous! One more reason to love break barrels.
Consider getting a Diana LP-8 Magnum, and your strolls will become longer and fewer acorns, leaves and twigs…
-Yogi
Yogi,
Unfortunately the Diana LP-8 Magnum is 700 fps and, by Canadian the 500 fps limit, that would make it a “restricted weapon” (the same as a powder burner) limited to be shot at sanctioned shooting ranges with special permits required.
The restrictions only apply to law abiding citizens of course.
Hank
Yogi,
do you holster the Diana LP-8? I’ve seen where it is “long” for a pistol (comparing to the Beeman P1 and probably the P17). Also do you have to hold it a certain way (with it being a higher power springer)?
Doc
Yogi
Could you please explain why the over the berrel cockers are dangerous? Never thought that way with either the HW 45 or the Zoraki/Webley Ultra.
Bill,
my thoughts too as some would say a barrel cocker could be more so than a break barrel. I don’t think pinched skin would be that bad. Hmmm
Doc
Hank, thanks for the informative article and all the work that went into it. Do you use a holster for the pistol, and if so, what kind?
Roamin,
Nope, no holster.
The nice thing about the P17 is that it easily fits in my pack with my thermos, snack, insect repellent and other stuff I always take when working away from the house.
Hank
Wasted air? Nice discovery. I will be looking for a longer barrel now.
Vana2,
Great report and interesting results.
Hank did you by chance run a few shots over the LabRadar after the piston/valve cleaning and before any drilling?
I have a theory percolating in my brain on why the very small loss of MV after drilling the holes.
shootski
Shootski,
I did baseline the P17 as received from the factory but not after inspection/cleaning and pre-mod.
I expected that the Labradar would be too powerful for my on-the-bench test setup so I shot over my Chrony. I had to set up a jig for the pistol to minimize the screens not seeing the pellet and then record the numbers manually. What a nuisance… I’ve been spoiled by my orange stenographer 😉
One thing I did note about the P17 is that the piston is almost bottomed-out when cocked. Rough measurement says the there was about .025″ to .035″ space.
Please share your MV theory.
Hank
Vana2,
Hank, see my post a way down.
shootski
“For the guest blog I needed to measure the amount of force needed for a specific pocket hole volume and the resultant velocity. So I had to make a jig.”
Hank,
For the benefit of all readers, thanks for taking the time to do that.
So, you reduced the cocking force, and didn’t really lose any velocity…excellent!
Thanks again for a great report. 🙂
Cheers,
dave
Glad you liked it Dave!
😉
Hank,
Nice rig! It is very well thought out and your obvious talent with wood is showing through. 😉
I have been needing to improve the chamfer of my Maximus. I have one polishing stone similar to yours, but it seems to be a bit too rough for my desires. I will have to take a look see to find what I need. You say you enlarged and polished yours by hand. Hmm. I will most definitely take a look at that.
Another concern I have is the transfer port. I strongly suspect it has a rather sharp edge internally, if not an outright burr. I was thinking of using a barrel swab with something like a polishing compound or Brasso on it. A brush MAY work initially, but I would most definitely wish to polish it up afterwards. Thoughts?
RR,
Those grindstones come in a variety of grits and are commonly available wherever Dremel tools are sold and you’ll need the three shapes to reach the sharp edges.
The burr/sharp edge is tiny so applying a light pressure and twisting the grindstone by hand is all that’s needed to polish it off.
IIRC, my Maximus had a slight internal burr at the transfer port that I polished off with a strip of 600 grit sandpaper crazy-glued glued to a piece of bamboo split off of a suitable diameter tomato stake.
I use J-B Non-Embedding Bore Cleaning Compound and their Polishing Compound for stuff like that. Think that Brasso is more of a chemical (ammonia based?) cleaner than an abrasive.
Hank
Good thoughts.
A vewy intewesting and well done weport. Thanks!
🙂
Elmer, Did you catch my pic of Elmer Fudd with his new Wabbit Wacker in a previous blog post?
No, I didn’t see that. Where can it be found?
Good question. How about here?
That’s awesome Bob. Did you create it?
No, found it online searching for something else.
Hank
Thanks for this fine report.
I’m wondering if a heavier pellet like JSB 10.34 grains would use to advantage some of that wasted compressed air before drilling the hole. Looking at BB’s P17 tests and others I can’t find any velocity tests for heavier pellets on the P17. Have you or any readers chronied a 10.34 grain pellet?
Deck
Deck,
I use the Crossman 7.4 pellets (have a couple of pounds of them) for all of my low power plinking and reserve my JSBs for more serious work so I haven’t any other pellets.
Hank
Hank,
What an excellent report! I agree with thedavemyster and RidgeRunner above — that jig is impressive.
And the results of your compression chamber modification is a revelation. It makes me wonder about single-stroke pneumatics in general. In addition to addressing the two imperfections in the otherwise excellent P17, your report also implies a question: how many SSPs would lose little to no power but lose considerable cocking effort with your mod?
Again, a great report.
Michael
Michael,
The jig, once I figured out what was needed, was actually quick to make from stuff I had lying around.
*** your report also implies a question: how many SSPs would lose little to no power but lose considerable cocking effort with your mod? ***
That would depend on the design of the SSP. My Feinwerkbau Model 100 pistol gets 495 fps from 11 pounds of cocking force and my FWB 603 is shooting 560 fps from 19 pound of cocking force. Can’t see improving on that.
Hank
Vana2, B.B., and Readership,
Hank, my MV (Muzzle Velocity) theory needed data on the post valve and piston cleanup. Looking at the excellent photographs of the piston head started the brain pondering and then reading this:
“clean the factory grease off of the piston and out of the cylinder – carefully (wood or plastic implements and clean paper towel) to not to scratch the inside of the cylinder. My P17 had an excessive amount of cheap, brown, general purpose grease instead of a thin, light coating of the white lithium grease recommended for SSPs. Some of the excess factory grease worked its way into the valve system and caused the valve to stay open until I flushed it out.”
shifted the pondering into high gear.
As you and many others already know Headspace is crucial to SSP performance.
For those with a question: Headspace is the volume that remains when the piston stroke ends and the end wall of the compression tube. If there is excess headspace maximum pressure is never achieved. On the other hand if too little the piston will contact the compression tube end wall and either not allow the stroke to finish (worst case) or bind the piston rod linkage much like an Over Center Side Brace. The former results in below design power and the latter well…impossible or hard closing of the pump arm.
The photograph of the piston before cleaning also shows what looks to be a layer of baked on brown grease of some thickness; perhaps as much as .025″ to .035″ along with a blown clean wedge area?
Along with the cleanup of the inside of the valve, the shorter than optimal barrel length might it add up to keeping the MV loss at a minimum?
Well my theory will remain just a that; unless anther P-17 pistol has this degree of excellent work performed on it!
For B.B. and the Readership:
(you too Hank) in general:
”If there is a burr, remove the sharpness with 600 grit sandpaper.”
Sandpaper is great for wood and plastic but Emery Cloth is for metal work…Right?
Perhaps, but then maybe not!
Emery Cloth is made of various very hard oxides.
Commonly corundum and magnetite.
Interestingly in my research about CORROSION caused by Biofilms on metal especially of the Fe (iron and steel) family there are bacteria that live off of Magnetite (they eat it¡) in very high pressure and other horrible conditions and cause CORROSION to quickly spread; far quicker than in SIMPLE water/oxygen environments. These biofilm causing bacteria live almost anywhere but especially on hydrophilic surfaces.
GO Deeper if you want:
https://www.ncbi.nlm.nih.gov/pmc/articles/PMC7079648/
https://benchmarkabrasives.com/blogs/news/difference-between-sandpaper-and-emery-cloth
Don’t introduce biofilm bacteria from you and the environment and don’t feed the bacteria with Magnetite and other Oxides they like to eat…all while RUSTING your STEEL airguns inside and out!
shootski
Shootski,
When I picked up my last resume the woman asked, “My God, do you ever rest?”
I took it as a complement and now I ask you. Do you ever rest? You are on top of everything all the time.
Have a hard time shutting it off when you try to sleep?
Thanks for taking the time to enlighten us all.
Bob M,
I fall asleep easily. I typically sleep for eight hours.
And then i just go like the energizer bunny both physically and mentally.
I don’t remember a time in my life, other than when sick or injured, that hasn’t been the case. Even when sick or injured i use total focus on getting well/recovering.
I learned how to read at another level from a 4th grade teacher who introduced me to Mortimer Adler’s, How to Read a Book. After learning the system i never looked back.
I have a few hardback copies on hand, always, that i gift to students getting ready to attend High School or college that might benefit.
I live to learn, love to learn, and then do!
shootski
I also took a speed-reading class in school. Color coded card stories we progressed through as our retention increased. Basically, learned to pick up on key words as we scanned.
I was like you for a while, then I asked One-A -Day vitamins if they laced the pills with Amphetamine. (AKA Speed) They never replied but thanked me for my interest and sent me a free bottle. Calmed down when I changed Vitamins. I could not sleep.
Bob M,
How to Read a Book was not Speed Reading per say it was reading for maximal comprehension and retention. There are four levels of reading that he taught the methods of in his book. My teacher, the best i ever had, helped me get it all.
Never took One A Day vitamins; did however carry stuff in my SV-2B LPA-2 that i never needed to use.
shootski
Hank,
Great report! Easy to follow and concise. Makes me want to do your piston mod to my pistol. The cocking effort does take some of the fun out of plinking with it. Looks like you came up with a good solution to reducing the cocking effort.
I will try to run your piston mod through my computer program and see what it shows for a reduction in pressure. Need a good estimate of the valve volume though. I still have not come up with a good way to measure valve volume. Maybe weigh it dry and then fill it with water weigh again. Subtract to get the weight of water, then convert to volume. Getting all the air out and removing all the water on the outside of the valve is problematic though.
Don
Hey Don!
The mod is quick to do and can be reversed by filling the hole with a setscrew.
I considered continuing to see where the velocity threshold was but decided that it was not a good idea to tempt Murphy.
Hank
Great report, Hank. I also dislike having to use so much force with my hand on the rear sight. And I have two of these, both of which don’t hold air now.
Jerry,
Below is a link to part 2 of a report on sealing the pistol by 45Bravo.
/blog/2019/07/resealing-the-beeman-p17-air-pistol-part-2/
Don
Thanks for that link. I have one of these pistols and want to make some of the improvements. So, I am hoping someone can give some specific information on what fuel tubing to use for improving the rear sight elevation screw. This is a quote from that post that I am referring to:
“ I put a small piece of the same fuel tubing we used for the transport seal in the S&W 78G reseal on the elevation screw, it now keeps the screw in place, and doesn’t rotate when you press on the rear sight assembly during cocking.
Just put the tubing on the screw, put the spring in place, and tighten the elevation screw.”
Elmer Fudd,
You can find the specification here: /blog/2019/06/smith-wesson-78g-and-79g-target-pistols-part-5/
The silicone tubing I use is silicone fuel line left over from working on nitromethane-powered radio control vehicles. (one of my other hobbies.) It’s 3mm (1/8-inch) inside diameter for .60 engines and up. You can get 2 feet of it from Tower Hobbies for $2.69 and that will be enough for a lifetime of uses.
Siraniko
Thank you vewy much!
FM’s probably not that useful suggestion – instead of fumbling for pellets in your pockets, if you have these laying around, after using up the cleaners, the containers are handy for carrying spare pellets, or even rimfire ammunition if you are out-and-about, plinking, pesting, whatever. You can write what kind of ammo you’re carrying on a piece of tape and attaching it to the back of the boxes. Use, reuse, recycle.
FM-
I too, reuse small containers for pocket carry of pellets, .22s, etc. One of the handiest pocket carriers is the classic soft rubber Quikoin coin holder. I actually think Pyramyd could sell these. Maybe a commemorative ‘Godfather of Airguns’ imprint?
That’s a great idea. I haven’t see one of those things in a while, but it sounds perfect.
Lead flavored tic tacs, anyone?
As long as they’re lead-free…
Tin-tacs? A tin of tin-tacs would be lead free.
FM,
A leather pellet pouch hanging off your belt is the most convenient way to feed a single shot airgun.
They are fun and easy to make. I just made a couple in different lengths for my springers. The short ones are like an extra pocket, the longer ones are easier to access when you are wearing a coat.
Hank
Vana,
Nice report. Thank You. I too walk the woods, land, trails with a airgun. I love plinking at whatever. I also take them in my boat and fishing.
Doc
Thanks Hank for an excellent report. Those two mods hit close to home. I also feel that the heavy closing effort detracts from the fun factor and to make things worse I like to shoot wadcutters.
If I find my ’round tuit’ I will ty to emulate them and report on the results.
Henry
I still do not understand how drilling a small, 3/16”, hole a 1/4” deep made a 10lb difference in cocking effort. Since you didn’t loose velocity why not go with a wider 1/4” hole? I bought 3 of these pistols a few years back when Amazon had them for $7. Looks like I may monkey around with one of them.
Brazos,
The volume of a 3/16”, hole a 1/4” deep is not “small” relative to the headspace (the volume above the piston) which is just under an inch in diameter but only 25 to 35 thousands of an inch high.
It takes a lot of effort to compress the air and it seems that the P17 is not using all of it to get its velocity.
By drilling a 3/16”, hole a 1/4” deep hole in the face of the piston I’m reducing the pressure (and effort) but not enough to affect the velocity because that air was wasted anyway.
At some diameter and/or depth of hole, the volume of the headspace will be increased enough to affect the velocity. You can incrementally increase the hole volume and search for that point. I just decided that 18 pounds cocking force was comfortable enough and stopped there.
Hope this helps.
Hank
Brazos,
Hank (Vana2) did a grat job explaining the why of his small hole did the pumping reduction.
We airgun shooters are actually working with some VERY HIGH pressures even in SSP air pistols.
https://en.m.wikipedia.org/wiki/Equation_of_state
Tell the story with where we are knowledge wise with compressing most gases, fluids, and solids (the states they are talking about and throwing formulas at!)
Air is made up of a number of different gases and that makes it even harder to figure out exactly what happens as the pressure increases.
Not much help to get your head around the issue. What Hank did makes practical (empirical approach) sense.
shootski
PS: It is easier to find and install setscrews (aka: grub screws) flush in the smaller and deeper hole if he wants to reverse the results for some reason.
I did the piston mod during lunch break today, and really don’t feel like there is anywhere near a 35% reduction in the force it takes to compress that cylinder.
I don’t have a way to test it, so maybe it’s just me?