Today reader Ian McKee, whose blog handle is 45Bravo, describes assembly of the Morton Harris Marksman air pistol that was disassembled yesterday. Because this information is so crucial for those intending to repair one of these pistols, I ran these two reports back-to-back. If you’d like to write a guest post for this blog, please email me at blogger@pyramydair.com.
Take it away, Ian
The Morton Harris Marksman air pistol: Part Three
by Ian McKee
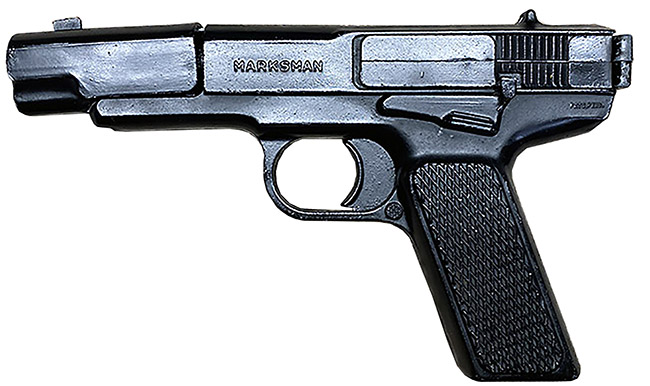
Morton-Harris-Marksman.
This report covers:
- Assembly
- Install the barrel
- Loading and firing
- Test fire
- Summary
- Assembly
Today I’m going to put the pistol together for you. Let’s get started.
Lay the left half of the hollow shell/frame on the table, with the sear spring over the pivot (shown with the yellow arrow), and the trigger on the forward pivot. Make sure the flat spring (green arrow) that is permanently pressed into the “thumb safety” lays on top of the casting that supports the trigger and sear plate. If this spring gets out of position, the thumb safety will not work correctly.
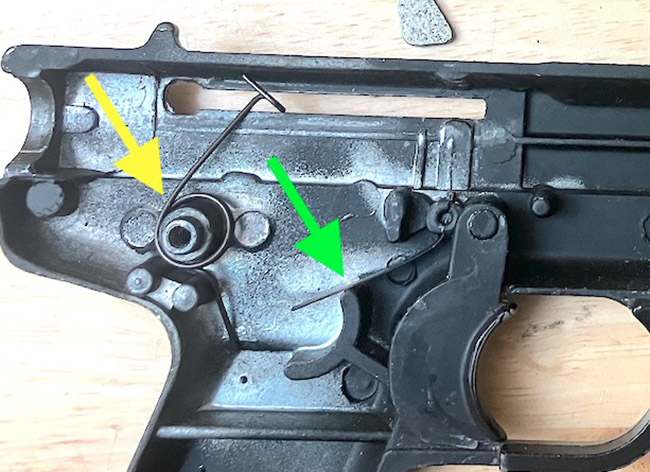
This is the correct position of the springs before assembly. Yellow arrow is the sear spring and green is the thumb safety.
Put the sear plate in position, with the hooked end of the spring lifting it upward, and the sear plate putting forward pressure on the trigger.
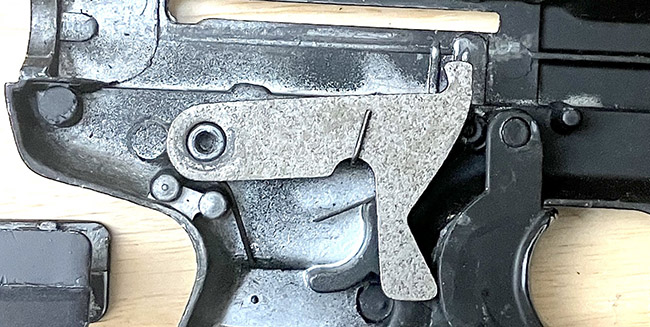
This photo shows everything in position before installing the mainspring assembly.
Install the barrel
You have put the covers over the barrel and latch assembly and screwed them together. Now lay the barrel assembly in place on its pivot, but leave it tipped down in the open position so you can put the mainspring assembly in the frame.
While holding the sear plate and trigger in place lay the entire mainspring assembly (that’s both springs) and compression chamber in position. With the spring at the rear of the frame, lay the right side of the frame in position and start a screw into the upper left hole in the sear plate pivot but do not tighten it.
Press the compression chamber into the front part of the frame. Once it is in position make sure the frame is aligned and put the other two screws in place. Now tighten all three.
Now comes the hard part. Compress the inner spring steel cover exposing the guide rod with the end cap. Use the hemostats or a small pair of needle nose vice grips (the hemostats give you more room to work) to hold the spring guide in place.
Reversing the disassembly procedure, remove the threaded end cap and put the cocking piece in place. Put the end of the guide rod through the hole, then thread the end cap onto the guide rod, and remove the hemostats.
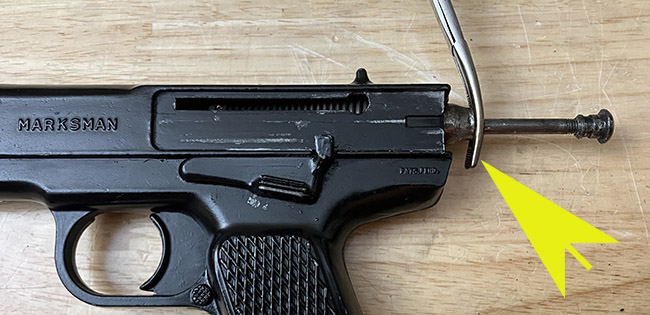
The pistol is cocked, so I grabbed the spring guide with a hemostat (yellow arrow). This allows me to slide the cocking piece back towards the muzzle.
In the reverse of disassembly, I have grabbed the spring guide when the pistol is cocked. Once it is secured unscrew the end cap and put the cocking piece over the rod.
Refer to the two photos above with the hemostat to help you assemble the pistol.
Loading and firing
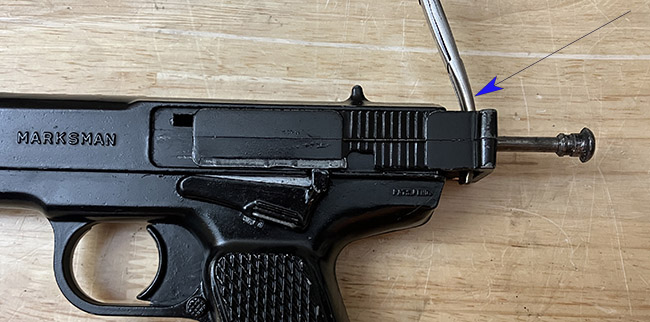
You can now push the slide forward, load a projectile, and fire the pistol.
Unlike the later Marksman pistol, if you want to shoot BBs this model requires you to single load a BB into the rubber face seal at the end of the compression chamber. Pellets and darts load directly into the barrel.
The rubber face seal also is the reason the pistol looks broken (the front of the slide points down). When you cock the gun, the rubber face seal is retracted flush with the frame. However, at the instant of firing, the compression chamber and rubber face seal move forward to seal the rear of the barrel. That violent forward movement and sudden stop contribute to the warped frame.
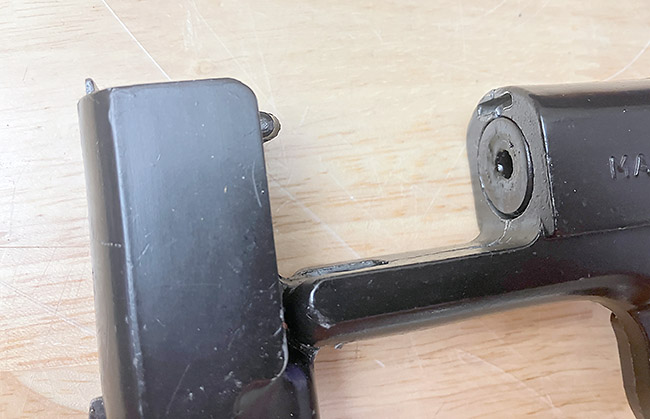
When the pistol is cocked and both mainsprings are under tension, the front seal of the compression chamber remains flush with the frame. The barrel can be opened and closed when it’s like this. BBs are pressed into that hole.
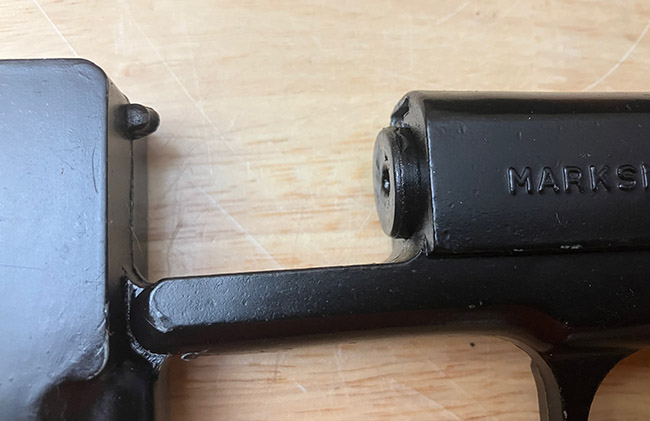
When the pistol has been fired, the front of the compression chamber goes forward like this and you can’t open or close the barrel. This seals the rear of the barrel for greater velocity and it gives the pistol that broken look..
Test fire
I test fired a few pellets through the pistol, with RWS Hobby pellets I had a low of 165 fps, and a high of 173 fps. My research has found the pistol was supposed to achieve about 200 fps, but they did not say with what projectile.
Given the fact that manufacturers have always overstated their velocities in marketing materials I think 175 fps is probably very close to what it was capable of when new with lead pellets.
The velocities were taken with the FX Radar pocket chronograph, a very high tech method to test a very low tech pistol.
Summary
I think part of the reason we have not seen a breakdown of the older Morton Harris model until now is that the design is simple and robust.
You should never have to disassemble the gun unless the leather seal is somehow damaged. The instructions included with the pistol give directions about lubrication.
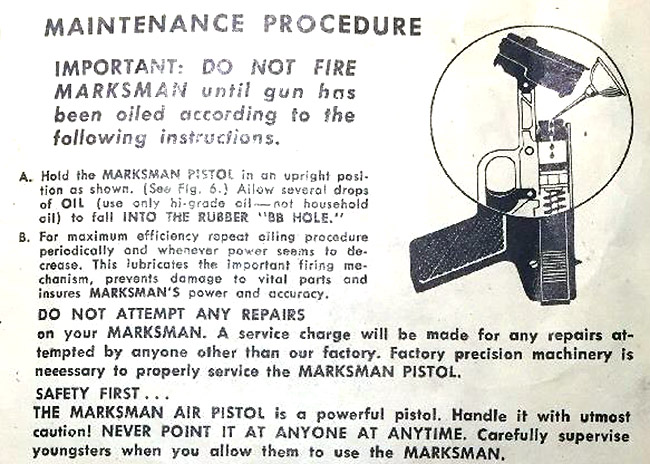
From the owner’s manual.
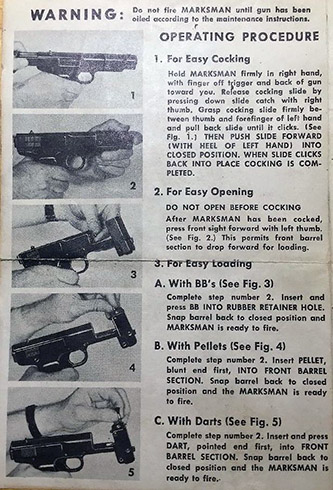
Also from the manual.
If you own or acquire one of these pistols I suggest oiling it and allowing the seal to soak up the oil before you try to fire it. If that fails, then dive into the pistol, now you know in advance what’s inside. [Editor: I oiled my pistol and it now shoots BBs hard.]
Shoot safe, and have FUN!
Ian.


Ian,
Thank you for a good report on an interesting item that I don’t recall ever having seen before. As the progenitor of the Marksman 1010 (that I believe was the first BB gun for so many of us) it is an important piece of history.
I have a new found interest in scouring the local garage sales, to see if I could ever find one.
By the way, publishing of this article has documented that you have disassembled your pistol yourself. You have voided your warranty and you will never be able to send it back to the factory for service!
Bill
Billj, what!, I can’t get my $6.95 back since it quit working?
Ian
Ian,
Thank you for an excellent and well-documented report!
With these descriptions and pictures, I think even I could rebuild one of these pistols. 😉
This report is a great addition to the knowledge base BB is building for the benefit of future generations.
Blessings to you,
dave
Ian,
That last picture really emphasized why you cannot open the pistol unless it is cocked. That rubber front seal hammering the rear of the barrel guaranteed that all the pistols will develop a droop eventually. No wonder they changed the design.
Siraniko
Siraniko, in addition to the droop, the repeated hammering to the rear of the barrel assembly makes the frame start to seperate at the barrel pivot point because of the small area where the pivot is located.
That is why in the newer model the “slide” was lengthened to cover the sides of the barrel, and a screw put in the front area.
It greatly increased the strength of that area, and stopped that problem.
Ian
That hemostat must be the “Factory Precision Machinery” that the manual talks about. lol.
-Y
Thanks Ian. Should I ever run across one of these things, I will now know what I need to do to fix it.
45Bravo,
I have yet to comment on your Marksman guestblog series. In a nutshell: interesting!
Thanks 🙂
I look forward to learning how you deal with dis- and re-assembly of the recoil-cancelling giss system.
Rumour has it, it’s quite the challenge to, for example, renew all the seals in either thus-equipped Diana 60 – 75 long arms, and/ or Diana 6 – 10 handguns.
Out of respect for my own mechanical skills (read: worried I’d wreck it), I recently shipped my Diana 75 off to a gunsmith for resealing. 🙂
“dis- and re-assembly of the recoil-cancelling giss system.” I second that. I have a Diana 6G that at the moment works fine, but I had it professionally resealed and tuned twice. Next time I want to do it myself.
Henry
Henry_TX,
how nice to see that you too wish to encourage 45Bravo. 🙂
I wonder if there are any other readers interested in the giss counter-sprung airguns?
Though it has yet to arrive, I too have bought one of those Diana pistols, but it’s just a plain Diana 6. I look forward to finding out it’s actual condition, like if the seals are still good, the springs are still balanced, etc… 🙂
Anyway, what is the story behind the need for having your Diana 6G tuned more than once? And when do you anticipate having to service yours again?
Count me in for my Winchester 363 (Diana 6) and Winchester 333 (Diana 60?).
Roamin Greco,
ah yes, of course, Mister Winchester! 🙂
Besides us four:
(1) 45Bravo,
(2) Henry_TX,
(3) you and
(4) me, I think
(5) Alex2no,
(6) billj and
(7) RidgeRunner
also mentioned having giss system airguns. I’m sure there must be others, for example, B.B. Pelletier, but I can’t remember…
hihihi,
I bought it new back in ’92, and it worked great for a while. It definitely shoots better than I can hold.
I was working a lot at the time with no much spare time to indulge in hobbies. Around 2003, with infrequent use (which makes things worse IMO) it progressively got very hard to cock. It felt like something binding inside, so I sent it for repairs. It came back working perfectly, and continued that way until by 2016 it started to act funny. It jumped in the hand every 5 or 6 shots, throwing pellets an inch high at 10 meters. Sent it to Umarex who at the time was handling repairs for RWS Diana products. Once again, came back working fine. In addition to the seals they replaced the set of mainsprings, three of them according to the invoice.
Unfortunately, in both cases they didn’t explain what they found as reasons for the failures. For that reason next time I want to do it myself, even if it takes time. That said, I am not in a rush, it is working great now!
Henry
Henry_TX,
thanks for your very interesting answer!
On the one hand, a bit of a shame, not having confirmation of what the issue was, but, on the other, I wonder what value it could have, next to an invoice for three mainsprings, eh! 🙂
The pattern to date seems to be, at least a trouble free decade of ownership.
Can you imagine, in- or after 2027, replacing all the seals with ones made of longer lasting material, like for example, leather? 🙂
Hihihi, Interesting you should say that, there is a Diana 75 scheduled to be repaired in a few months when the owner is ready.
And we were out shooting this past Sunday and a new shooter joined us with a new Umarex Gauntlet .30 caliber.
He has a Diana Model 10 he wants me to work on, it no longer cocks.
So wishes shall be granted in the upcoming months.
Ian
45Bravo,
what a juxtapositioning of airguns:
long arm versus handgun,
precharged pneumatic- versus spring power,
0.3 inches (7,62 mm) versus 0.177 inches (4,5 mm) calibre projectiles,
etc… 🙂
However, I sense a common desire for low recoil accuracy!
I very much look forward to your guidance for us apprentices on how the various required spells combine into the beautiful giss-magic ! 🙂
Thanks for this series – even if one does not own one of these or intends getting one, the assembly/disassembly process documentation is universally useful; some of the tips are applicable to the repair and maintenance of other airguns. FM prefers to learn through the experience of others rather than the hard way. Definitely got to have some hemostats to go with the dental picks and other specialty tools acquired over the years.
Thank you Ian for an excellent article with clear photographs of this historic BB gun. I do not have a particular interest in having one of them, but I enjoy learning how things are done. Well done.
Henry
Thank you Henry, I never intended to own one either.
But here we are, and we now have documentation for the entire world to use.
Everything happens for a reason.
BB also now has a digital copy of the manual, of which a couple of pages were shown here and he will probably include them in a future blog.
Ian
45Bravo,
Great series.
Bravo(45) Zulu hoist!
Thank you!
shootski
Thank you for the enjoyable report, Ian. I think it is excellent that you and BB are making THE documentation on this pistol that everyone can look to for cleaning and repairs. It’s a godsend to find info on the net on how to put your project all back together, when things gang aft agley.
Cheers!
Will