Today reader Ian McKee, whose blog handle is 45Bravo, describes disassembly of the Morton Harris Marksman air pistol. Because this information is so crucial for those intending to repair one of these pistols, I plan to run the assembly portion tomorrow.
If you’d like to write a guest post for this blog, please email me at blogger@pyramydair.com.
Take it away, Ian
The Morton Harris Marksman air pistol: Part Two
by Ian McKee

Morton-Harris-Marksman.
This report covers:
- The Morton Harris Marksman air pistol
- Never say never
- The pistol
- Starting disassembly
- Warped frame
- The barrel assembly
- Summary
The Morton Harris Marksman air pistol
We are all familiar with the Marksman 1010 Repeater air pistol. It looks vaguely like a 1911 semi automatic pistol. But it’s actually a spring-powered single-shot pistol that can loosely be called a repeater only because it has a small reservoir in the tip-up barrel housing that holds a few BB’s. For pellets and darts it’s a single shot.
But before the Marksman Repeater was the Morton Harris Marksman air pistol.
We have all seen them, the front 2 inches of the “slide” is pointed downward at a slight angle like it’s broken. I had seen them, but never handled one and dismissed them as something I would probably never own.
Never say never
Well, BB bought two of them and presented me with one that needed a little TLC. I gave it a cursory look, and tried to open the barrel (I couldn’t get it to open) so I put it back in the box for a few days until I had more time to examine it.
Online I found a few old auctions that had ended on eBay, Gun Broker and some other auction sites.
On Youtube (Youtube has everything right?), there were a couple of short videos and one that showed the loading procedure (you slide the front sight forward to release the tip up barrel) but not much else that is really useful. Apparently there is very little information on the web about this model.
After a few hours of scouring the internet I found a thread in a forum where someone had documented his Morton Harris Marksman, the box and its contents, the instructions and the pistol. But he only showed what’s in the package. He said nothing about the velocity, accuracy or what’s inside the gun.
So BB and I decided to tag-team report this pistol and write the book, in essence. That’s why today is Part 2. BB’s Part 1 was the introduction to the pistol. BB is doing his normal history, manual of arms and testing of the pistol with BB’s, darts, and pellets. I will give you a look inside.
The pistol
This single-shot Marksman has the same basic design of the Marksman 1010 Repeater pistol, but the primary differences are the way the barrel locks up, and the mainspring assembly. That assembly is a compact package composed of six separate parts, with a soft leather piston seal that can be replaced if necessary. The leather seal on my pistol was dry, but soft, pliable and in excellent shape.
I suggest reading the disassembly blog of the newer model titled, Repairing a Marksman spring air pistol, before attempting to disassemble this model.
Starting disassembly
You start disassembling the Morton Harris by lowering the thumb safety like you would on the newer Marksman, then pull the rear portion of the slide rearward until the sear catches the spring piston. I call that thing you just pulled back the cocking piece.
This is where things change, the newer Marksman has a spring clip that holds the rear of the spring guide to the cocking piece (the thing you just pulled back). This model has a threaded rod that extends through the cocking piece and that rod has a small threaded cap on its end that has to be removed.
That can only be accomplished by clamping the spring guide with a hemostat or small needle-nose vise grips, then sliding the cocking piece back towards the muzzle to expose the guide rod and the small threaded end cap that passes through the cocking piece. The spring is under compression when you do this.
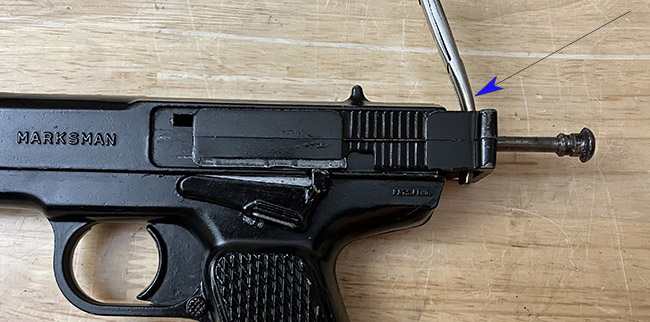
I have cocked the pistol, then grabbed the spring guide with a hemostat (blue arrow). This allows me to slide the cocking piece back towards the muzzle.
I then used a second set of hemostats to unscrew the threaded end cap and then move the rear portion of the slide backwards and remove it just like the newer Marksman pistols.
At this point I suggest threading the end cap back on the guide rod and then releasing the spring tension of the smaller mainspring slowly. The inner spring, guide rod and piston assembly will be in one piece, with the larger mainspring being removable — just like the newer models.
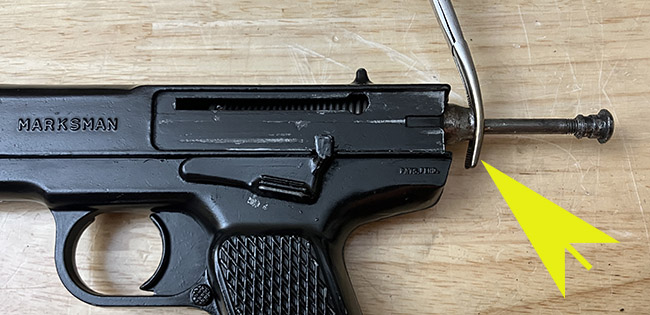
With the hemostat holding the spring guide (yellow arrow), I was able to unscrew the small end cap and slide the cocking piece off the pistol. Then I screwed the end cap back on the guide so I could decompress the smaller mainspring. The larger mainspring is still compressed.
To disassemble the pistol, slide the front sight forward, moving the latch that holds the barrel in position. That allows the barrel to tip.

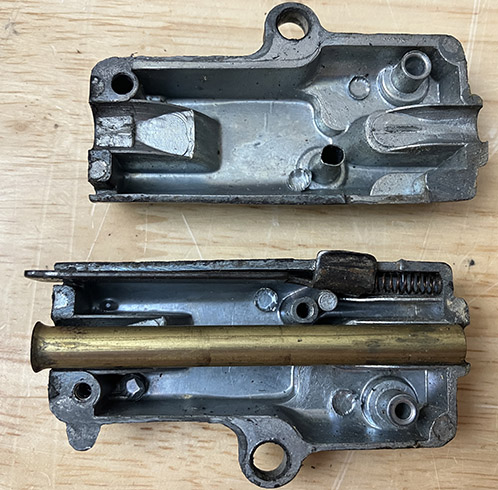
Remove the right cover
There are three screws holding the two halves of the frame together on this pistol. They are all the same size and length, so you do not have to keep them sorted. When you start to separate the halves, the larger mainspring will decompress, so be ready for it.
Internally, other than the spring assembly there are only three more removable parts, the trigger, the sear plate, and a spring. The sear plate and the spring are on the same pivot, with the spring pulling the sear upwards to engage the spring piston. The trigger pushes the sear plate rearwards as you squeeze the trigger, thereby releasing the sear.
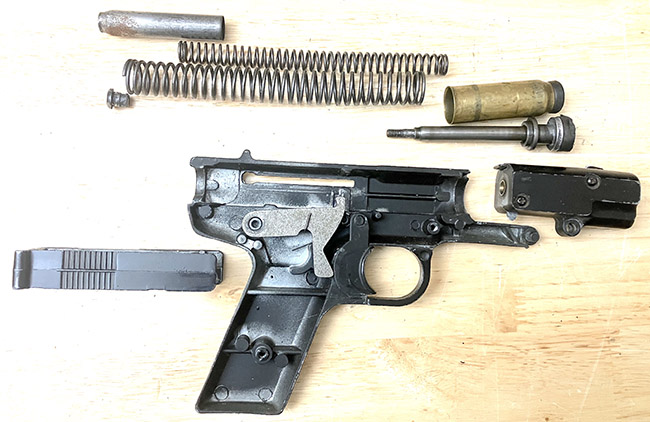
Once the spring assembly and piston are out of the pistol, the sear spring, sear plate and trigger are the only things that remain.
The spring-loaded safety latch that we started disassembly with does not remove from the pistol. It is held in place by a hollow pin that has been swaged at its end to hold the part and its spring to the frame. In the picture above you can see part of a small hollow round piece just behind and to the left of trigger pivot. That’s the swaged safety latch pin.
Warped frame
The frame on my pistol had begun to spread apart in the front where the barrel pivots. Being made of some type of zinc alloy, I was unsure how to bend the frame slightly, bringing it back to square. [Editor’s note: this spreading apart is common for this model pistol.]
I finally decided to place the bent portion in a small machinist vise and gently apply pressure until it was in the proper position. Repeating the same procedure for the other side of the frame straightened it, as well.
The barrel assembly
There are no surprises in the barrel assembly — just the barrel, the front sight plate that extends backwards into the frame, and a small spring that pushes it rearward. These two screws are also the same size, but are shorter than the ones that go in the frame.
No surprises here, just three internal parts — the front sight/latch, latch spring and brass barrel.
Summary
I’m ending his report here, but Ian does go on to show assembly, as well. I’m going to run that tomorrow to keep everything together.


Ian,
A very interesting report; to me, the most interesting part was your use of the term “hemostat.”
I hate to admit my ignorance, but this is the first time I have ever read that word in print, or heard it.
(I had to look it up, LOL! https://en.wikipedia.org/wiki/Hemostat )
That’s what I love about this blog: I learn new things all the time! Thank you. 😉
Blessings to you,
dave
Ian,
Given that you had to use such a specialized instrument (hemostat) that is not usually found in a gunner’s tool kit to hold onto the spring guide, I wonder what the factory used in assembling and disassembling these pistols? A long nose plier would not probably fit. How did you release the spring tension during disassembly?
Siraniko
I think the factory probably had a jig that held the springs under compression from the front and back you could lay the assembly in the gun and close the halves. Then release the tension.
If I was working on these regularly, I would build one.
As to release the tension, you can slowly control the force exerted on the shaft allowing the inner spring cover to move backwards.
Ian.
Hello all,
I am not sure how to phrase my question or comment correctly. Hopefully it will make sense.
I am a magnet for Daisy BBs. I have two soda caps 299s and two 99s. I have at least
six 50 forced feed shot ones model 99s, I purchased another soda cap 99 at a ridiculous price.
Gifted one of them to my brother this past February for his birthday.
I have always wanted a dedicated target pistol . Thought I had found one at a bargain price of $200 only to find out that it needed
new seals and a new rear sight (an FWB 65.)
So, basically a $200 bargain FWB 65 needs $200 to $300 to bring it back to life. The same price of what FWB 65 is going for.
A seller on line, whom, I have purchased items in the past had an Diana model 60.
The rifle had the rear target sight missing.
Pointed this out and the seller dropped the price accordingly ( I had found an Diana diopter missing the claw foot which I ordered from jg.)
The seller has always being spot on about condition of the airguns I have bought from him. Eventhough, the price of the Diana 60 was at the top end, he stated that the airgun had recently being released. I bought it.
How does one evaluate or determine facts when buying online?
Alex2no,
I’ve written several reports about buying online. It comes down to trust. You have found a dealer you trust; it’s as simple as that.
Not that simple, is it?
BB
Alex2no,
Please pardon my ignorance, but what are soda cap 299s and 99s?
Hello RR,
What’s in the name
The bottle cap, soda pop….
Gravity fed 500 + eternity vs the 50 shot tube ones
First edition 1959 Daisy 99s
As I understand your favorite BB gun . Mine as well.
However, recently, I came across an Daisy no 108 model 39 that is looking to replace my soda pop (bottle cap.. gravity fed …500+eternity Daisy 99.)
Alex2no,
That is what I had thought. I have a 1959 Daisy 99. In my most humble opinion (IMMHO) it is the best Daisy bb gun ever made. I know that the 499 can be more accurate, but not by much and it is a single shot.
I use mine to kill carpenter bees. Much more fun than just swatting them.
I put a Cobalt air tube and spring in one and I’m kicking cans out the back yard.
Alex2no,
what a shame about the seller of your Feinwerkbau 65. Of course, the good news is, you now own one, and if my slightly later Feinwerkbau target pistol is anything to go by, then you have a fine shooter indeed – congratulations! 🙂
There must be a reason why this particular pistol chose to be rescued by you, don’t you agree?
By the way, what kind of grip has yours and how does it fit your hand? Care to share a picture? 🙂
Dr. Ian,
I believe surgery on the patient has been successful!
Wonderful report with great explanations. What was your job in your other life?
-Yogi
My dad taught me to learn a little bit about everything I can.
If you haven’t encountered it before, then figure it out.
And I have always used hemostats for model building, holding small parts, reaching into small tight areas.
They are a most useful tool and come in many sizes and shapes.
Ian
Ian,
You always make these things look so simple to work on I feel even I can do this.
Of course you can – all you need is a hemostat and your Round Tooit.
LOL! Finding my round tuit is one reason I did the 150! Another reason is it is so simple. I guess my being simple minded probably helps.
RR
I always try to live by the Clint Eastwood movie line,
“Every man needs to know his limitations”
RK.
that is true, but it never hurts to step outside your comfort zone.
Ian.
45Bravo,
Stepping outside your comfort zone is how we humans make progress.
Ian just think how the first upright walkers felt after a living on all fours!
For us AIR gunners that means doing at least some preventative maintenance and getting up from the Bench to shoot from time to time.
Totally enjoyed your clear writing and excellent photographs. Hemostats need to be on everyone’s workbench. Hemostats also need to be in every shooters First Aid/Trauma Kits; better than a Tourniquet in many instances at selective bleeder stopping. Hemostats also remove Darts, BBs, and pellets better than most tools or fingers from soft things.
shootski
rk,
As a Dirty Harry “early adopter” there are actually two version of that line used in the film.
“You’re a good man lieutenant. A good man always knows his limitations.”
The first use by Detective Callahan on his Lieutenant boss is when the Lt. tells him he has never had to unholster his gun. Harry “compliments” him with the velvet gloved insult he deserves.
At the end of the film Harry uses a second, slightly modified version; FOR the Lieutenant…an apt tombstone inscription at that: “A man’s got to know his limitations.” As the Lieutenant’s car drives off and explodes.
shootski
rk,
I have not limitations. I can even do brain surgery. Now, whether the patient lives or not is a different matter.
RidgeRunner,
Ridge running Sawbones.
Quack, quack, quack, quack!
shootski
If it walks like a duck and sounds like a duck, it must be a duck.
RR,
And that is why I have yet to operate on my old Sheridan.
I know I can do it, with the right tools.But like you, I just haven’t found my round tuit.
rk,
I hope you find it soon.
FawltyManuel,
My way old Benjamin Discovery #0028 finally stopped holding air a few months ago and it looked (sounded) like it was the gauge port, gauge adapter O-Ring(s) leaking; with a small chance the gauge might be the leaker. The soapy water test showed it wasn’t the gauge but was inconclusive on which of the other two possibilities. I had lost my Round Tuit for the project until today when i located a long lost bag of smallish O-Rings and O-Ring lube.
I think i may have also found one of RR’s ROUND TUITs….
Out came the box end wrench after a quick ZERO Pressure test (air blank shot in a safe direction) and out the gauge adapter came. The O-Ring came out easily (with an O-Ring pick) and looked complete but squashed. Someone on the original assembly line had probably just dropped/pushed the O-Ring into the gauge port!
The gauge adapter actually has a groove for the O-Ring on the end.
Lubed on up LIGHTLY and slipped it on and in the groove. HAND THREADED the gauge and adapter into the gauge port and snugged it down finger tight. Finished with the wrench giving it a quarter turn and it felt just right.
The Discovery’s barreled action is still out of the stock and filled to 2,000psi (138 BAR) for a 24 hour leak down test.
This is the first O-Ring failure on this old PCP rifle that has always been stored with a full charge. It had actually been unused for at least 6 years and then some reader comments made me realize how neglectful i had been. It thanked me with this minor leak. I’m going to give it a scoe upgrade from the Crosman “4X scope” it soldiered under for years IF it holds air!
You (other readers) too can do work like this… with just a reasonably decent adjustable wrench and a blunted toothpick!
shootski
Dang, Shootski, no pictures? That could have been a guest blog. I have a Disco (new to me) that awaits my attention.
Roamin Greco,
Yup.
But then my complete gutting and renovation of our house would fall farther behind schedule!
I’m lucky enough to get to fit in time to kayak, shoot, workout, and occasionally get to sit down to eat.
If you have questions about your Discovery just ask; they really are simple to work on.
I still have an extremely slow leak but it is from the Foster fill fitting. I have the O-Ring for that so the next time i have a minute i will replace it.
I need to get my CF Cylinders in for a Hydro inspection too.
shootski
Thanks for that narrative on your Disco repair – yeah, would give the Maximus family a go at fixup when the time comes. Worst case scenario, can’t fix, find a professional who can/will. Now that house project…is downright scary but, you’re the man! It was bad enough the last time we moved, 23+ years ago and nowhere near a gutting job, a lot of it done by people who knew what they were doing. Not FM’s skill set; what little of that there is mostly goes to keep wheeled machines running.
Senor BB,
Can’t think of the exact translation from Spanish to Inglish.
The devil is wise not because he is the devil or wise but because he has lived a long life and has seing a lot.
Went back and read your blogs about buying on line.
My second FWB 124 with original sights and a very nice Bushnell scope was purchased from Gunbroker at a third of the price because the seller had misppelled the heck out of it and there where no other bids but mine.
Muchas gracias
The secret is out
Speaking of sinful,
My sister’s birthday was yesterday. Made the best chocolate cake ever. Was a bit crooked. I don’t have a turn wheel to spin the cake around when frosting.
Anyways, secret
Best Dutch cocoa you can afford. I mean Dutch cocoa from the Netherlands and real butter for the frosting.
Irony
Mexico is the home of chocolate but the best chocolate comes from the Netherlands
I live in California.
The warm weather and rain. My tulips are sticking out the ground.
Chocolate and tulips
Ohh boy. Heavens to Betsy
Till reality kicks in
Traffic, taxes, high prices for food and housing.
The Crocus have come and gone.
The Daffodils are in bloom.
My tulips are starting to sprout.
Tulips sprouted over him a while back…
https://youtu.be/o9KVuBFusvI?si=wKcUbpTMR5I0di6B