This report covers:
- Tripod
- People not products
- Shutter time
- How this can help
- Bounce the light
- Detail
- Summary
Today I reveal one of my secrets to good airgun photography. It’s something to do with lighting the subject. The older professionals will know it but I would guess that since the dawn of digital cameras it has mostly been forgotten. The younger guys may never have heard of it.
Tripod
Before we begin, I will tell you it is far easier to do what I’m about to show you if you have a tripod. Trying to hold the camera still and do all the other things is not the way to go.
People not products
Digital cameras are optimized for taking pictures of people, not products. A smart phone epitomizes that as there is a place on the phone that opens the camera the instant it is touched. It’s for taking “selfies.” But nothing on a digital camera makes taking a picture of an airgun easy. We have to work to take good airgun pictures.
Shutter time
Many years ago in the days of film cameras we manually controlled the time our shutters remained open. We set that time to correspond to the exposure sensitivity of the film in the camera — the ASA number.
Today the “brain” in our digital camera does this for us, but since the charge-coupled-devices (CCD — the chips that capture the image) in those cameras are so sensitive, we have exposure times that are linked to the “film” sensitivity in a way that is completely transparent to the photographer. In other words, we don’t have to think about it; the camera does everything for us.
How this can help
In Part 3 we discussed the difficulties of using a flash. Flashes give you hot spots in your images, while other parts will be dark. If the parts that are dark are also interesting parts, you need to do something to see them better and your flash may not be the way to do it. Let’s look at an example.
You have a revolver you want to sell. It’s an older S&W target model and you have a letter from the S&W factory that’s tied to this firearm. That means it’s worth a lot of money. But your revolver has some cosmetic issues that affect its price. In fact they reduce the value of the revolver to less than half of what it would be worth if it didn’t have the issues.
One issue is seen in the metal just above the wooden grip on the left side of the gun. There are two places where the bluing is gone and there is rust pitting. That cuts the value of the revolver to about 20-40 percent of what a perfect one would be. You want to advertise this revolver on a web site where serious buyers lurk, so the images have to be as close to perfect as you can make them. You can’t afford getting the reputation for false advertising because you’ll never sell these guys anything — ever!
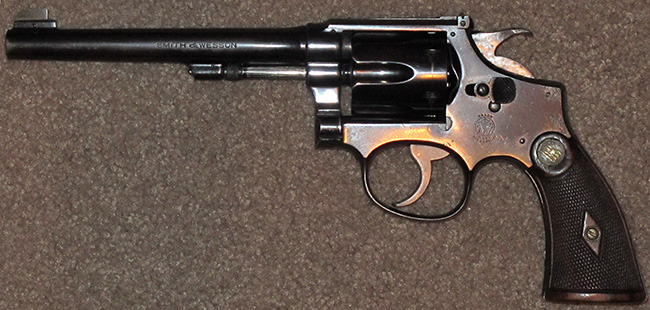
The revolver photographed without flash. I allowed the camera to set the exposure time and the camera was mounted on a tripod. Everything looks okay — right? A lot of people would accept this as it is. Notice that you can read Smith & Wesson on the barrel. What’s not to like?
Can you see the two areas of bluing loss above the left grip panel? Just barely, you say. What about the oddly-shaped hammer? According to your letter from Smith & Wesson the gun was sold by the Bekeart company of San Francisco, and that’s a Roper hammer they installed. That hammer, plus the connection to Bekeart, adds a large amount of money back into the revolver, despite the cosmetic damage. But can you see the jeweling on the hammer? Just barely in this photo. Let’s see what flash photography does.
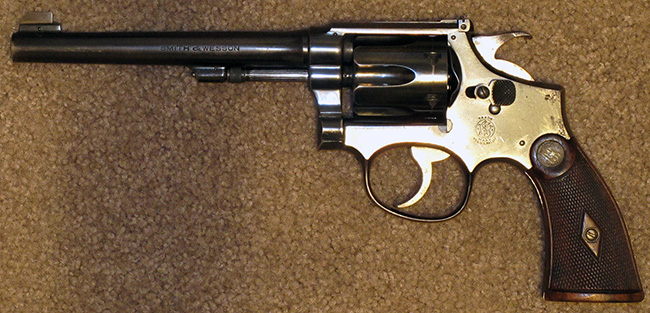
Well, flash makes the areas above the left grip panel slightly more visible, but the jeweling on the hammer disappears completely. And the barrel is dark. This picture looks like you have something to hide.
Bounce the light
Instead of the flash, we will shine light up at the white ceiling. It will return to the subject more diffuse. It creates an inexpensive cloud box effect that softens the image, enabling greater detail to be seen. Instead of a $275 accessory cloud box that’s difficult to store, a $5 flashlight will buy you 80 percent of its performance.
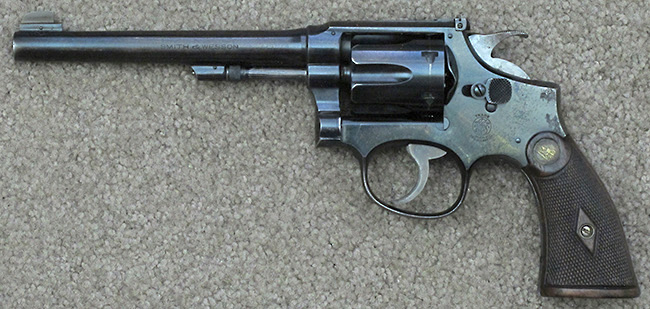
The bounced light gives the best image thus far.
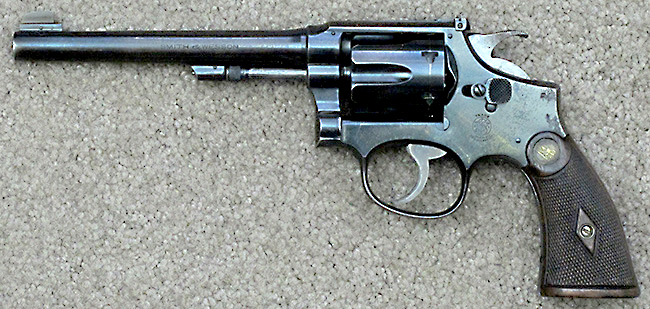
And by lightening the image just a bit I can make it better. With a digital camera this can be done with a simple exposure correction. With a film camera you do it by leaving the shutter open longer, but you have to wait until the photo is developed to see that it worked.
Detail
Sometimes you can’t get what you want in one picture, so you have to take a detail shot. For this one I used the flash that didn’t work for the whole gun, but for the detail shot it was perfect.
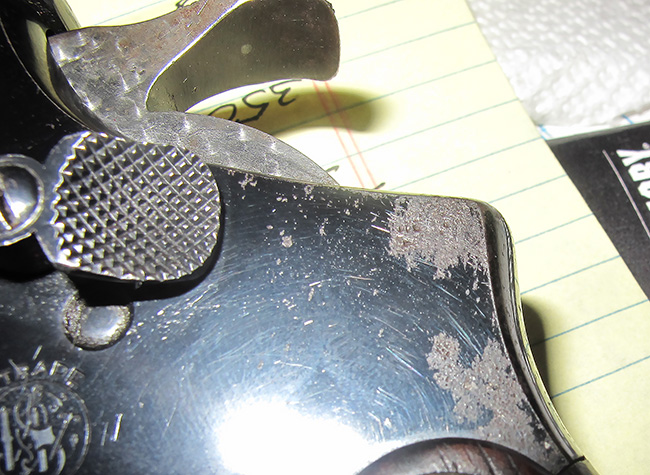
This shot shows the damaged areas of the revolver’s finish quite well. It also shows the subtle jeweling on the hammer. The hot spot from the flash was kept out of the way by angling the subject.
I spent about 90 minutes photographing the revolver many different ways and this is about the best I can do. There is another technique called painting with light but in this case it doesn’t work — or at least I couldn’t get it to work. This revolver is too reflective.
There are some tricks that are still easier for me to do with film than I can do with the digital camera I own. No doubt a better digital camera could do more than the camera I use, but I am satisfied with what I have.
Summary
Today we learned a great trick to make photographing airguns better and easier. But it takes a tripod to achieve the best results with this trick. We also learned that sometimes a detailed shot is necessary, as you can’t get everything into a single photo.

Tom,
Is there any way to make the shiny finish dull to enhance photography? Applying wax maybe?
Siraniko
PS Section Tripod 1st sentence, “Before we begin, I will tell you it is far easier to dowhat (do what) I’m about to show you if you have a tripod.”
Siraniko,
Fixed. Thanks,
BB
What photographers used to use to minimize reflection was a polarized filter. By rotating the filter in its mount, one can reduce the reflection from the shiny surface.
I have no idea what the availability of them would be.
Bill
Bill,
Good one!
BB
Polarized filters are very plentiful and not that expensive. I have three, one for each of the lenses I own for my Lumix and Olympus micro four thirds cameras.
Fred formerly of the Demokratik Peeples Republik of NJ now happily in GA
Polarizing filters (for digital cameras, the use of circular polarizing filters is recommended to minimize autofocus errors) are used to minimize reflections from smooth surfaces like water and glass. They can also be used to enhance contrast. Mostly used in scenery photography.
Unfortunately they do not work for reflections on metallic surfaces. The best way for these use cases is to use diffuse lighting, i.e. indirect lighting as described by BB by directing light on a white ceiling or wall next to your object. Alternatively the use of light boxes or lighting through opaque white plastic plates or a combination.
Another possibility seems to be putting a polarizing filter in front of your light source in addition to the one on your camera’s lens, but I have never tried that myself. Just heard of it, something to explore for sure.
B.B.
What about post photo taking editing? Photoshop and the like….
-Y
Yogi,
I don’t cover Photoshop because most people don’t have it. At best they have a free photo-editing app that can do some things, but as this is a blog about airguns, I don’t want to get into that.
BB
Yogi,
I am one of those yaahoos who are too cheap to bother with software like Photoshop. Or are those apps now? Most often, the free stuff does whatever I need.
I’ve messed around with Photoshop in the past but it’s way too complicated for most people’s needs. For anyone using an Android or Apple device Snapseed is free and very easy to use and the results are simply amazing.
As a novice, the biggest problem I have always had with close-up photography indoors is that the camera I’m holding or have on a tripod is casting a shadow over the object when I’m directly above it. So I usually have to move sideways at an angle so that I am not casting a shadow over the object I am photographing. Or I turn on the flash which gives me a poor photo with bright spots on the object. I frequently use my cell phone to deposit a check so I don’t have to drive to the bank or stand in line and the photos usually turn out perfect but I don’t get a reflection from the paper.
B-I-L,
I have the shadow problem myself. This will teach you to use different angles and be more aware of light sources. Sometimes it can be a good thing though. Sometimes you may wish to use a bit of shadow when takings photos. This is frequently used when taking detail shots though.
This is also where indirect lighting can be of an aid. Indirect lighting can be more “dispersive” of the light and less likely to cast a shadow.
I hate the cell phone camera shadow in the middle of my pictures, too. But with enough diffused light, those shadows get eliminated. I will have several guest blogs or mini-blogs in the comments section over the fall and winter, and I will have to follow some of these tips to make sure the pics are as clear as possible within the size limits of the blog.
Thanks, B.B. for covering the basics.
Something I have noticed with most “smart” phone camera pictures is a lack of a depth of field. As the digital camera provided in the phone as BB points out is designed to be used mostly for selfies and people pictures, this is not a real issue. When taking photos of airguns or detail shots this is usually not an issue either.
The indirect lighting method is something I have recently “learned” to use while taking photos for this blog. BB has often complained that my photos are too dark. Shining a flashlight on the wall or ceiling has greatly benefited my lighting issues.
I have never liked to use a flash as it tends to create too much light on the subject. Since I began using digital cameras, it has been most detrimental to use one. A tripod is a most useful tool when taking photos, most especially if you do not use a flash as sometimes the lens stays open longer and your pictures can be blurred by your motion.
RidgeRunner,
Apple iPhone:
Open Camera , select Portrait mode, then frame your subject. in the top-right corner of the screen. The Depth Control slider appears below the frame. Drag the slider to the right or left to adjust the effect.
General Apps:
DPTH is a photo editing app developed by Roadly, Inc. It uses AI to create depth maps and simulate depth of field and 3D effects like blur and bokeh¹. This gives photos a professional, DSLR-like look with background blur.
A wider aperture results in shallower depth of field. Some smartphone cameras have manual controls, as noted above that can adjust the “aperture,” while some only have a portrait mode or a selective focus mode that automatically creates a shallow depth of field effect.
Key WORD effect; not the real thing such as a stopped down lens opening on a “real” camera lens!
hth,
shootski
¹ bokeh:
the visual quality of the out-of-focus areas of a photographic image, especially as rendered by a particular lens.
shootski,
Good stuff! Thanks for the tips,
BB
shootski,
Apple iPhone? What’s that? 😉
This series has inspired me to dig out my 35-mm digital camera. It is an entry level Nikon that I purchased used and have only used on limited occasions. It is out-dated in several ways including connectivity. So, it isn’t as convenient as say a phone camera. I do have a Power Zoom Flash attachment for it that attaches via the shoe on top of the camera. The flash attachment’s electronic controls are designed for that series of cameras and is thereby integrated with the camera’s electronic controls. Anyway, it has a bounce and swivel head that allows bouncing the flash off of a ceiling or other surface. I plan on using this to enhance photos. Thanks for the inspiration and tips. Hopefully this will lead to better results.
Elmer,
I sometimes use my “35mm” Cannon, but more often use Mrs. RR’s Cannon Elfshot.
My older brother has been into photography in a big way for a very long time. He uses Cannon equipment. The last time I took a photo for him it seemed to me that the pro-level camera weighed a ton. Before digital cameras came around I had a Cannon camera outfit. I used to get film developed at a place where they had a regular contest for photo of the month. They would hang an enlarged winning photo on the wall for everyone to see and appreciate for the month. And give the winner a free enlarged print. I managed to win the contest a couple of times. Once for a waterfall photo and another for a turn-of-the-century whaling ship/museum photo. Lots of fun!
B.B. and Readership,
Great stuff for Macro Photography.
A few quick ideas: using scrims over your light source or between your subject and light(s) to create a diffuse lighting effect. Use reflectors to create fewer shadows and more even lighting of subject. Tripods are great but this device: ARKON Clamp Stand for Cameras, Smartphones & Tablets works better for me and holds up to 5 or so lbs. (2.3kg.) spotting scopes/binoculars as well as my LabRadar on my shooting bench. https://www.bhphotovideo.com/c/product/1623648-REG/arkon_dslptabmg5_dlsr_camera_mount.html/qa
shootski
shootski,
Some day I will show the tripod(s) I use. The design came from WWII machine gun mounts.
BB
BB and readers ,
As I remember, there were a lot of decent designs of 3D printed tripods/mounts for cell phones that appeared during the pandemic (to be used by Zoom presenters).
One more way to steady the camera.
Bill
“The bounced light gives the best image thus far.”
BB, I’ll say! Very impressive! Thank you for this lesson. 🙂