Today reader Ian McKee, whose blog handle is 45Bravo, tells us about repairing BB’s Walther LP53.
If you’d like to write a guest post for this blog, please email me at blogger@pyramydair.com.
Take it away, Ian
Fixing the Walther LP53
by Ian McKee
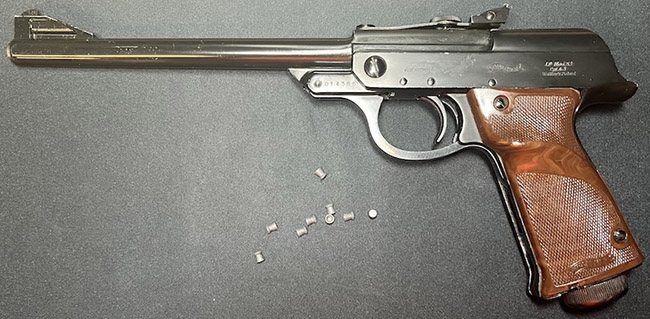
Walther LP53.
This report covers:
- Walther LP53 Disassembly
- It starts off easy
- Removing the barrel and cocking lever
- Removing the piston and seal
- Warning
- Reassembly
- Walther LP53 Disassembly
Tom has started us down the road of exploring the unique Walther LP53 air pistol. He is very familiar with the gun and its history, so I will let him cover that aspect. As usual, I will cover how to disassemble and reseal the pistol, and how not to…
It starts off easy
First of all make sure it isn’t loaded or cocked.
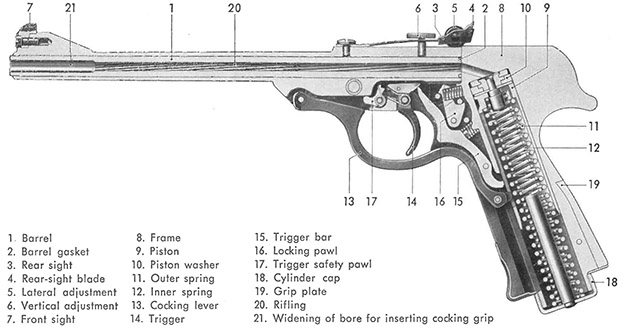
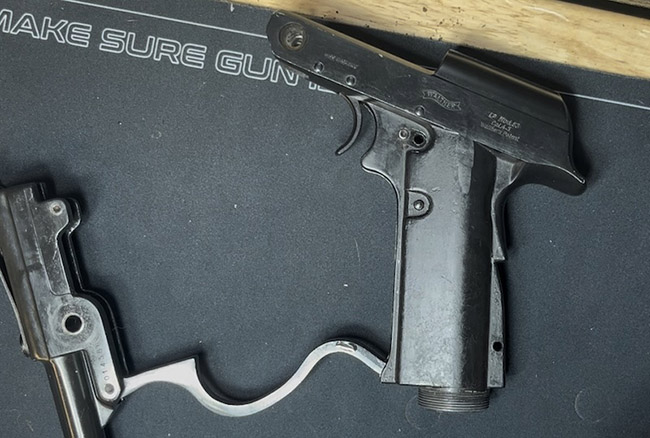
I will be referring to these part numbers in this report.
Remove the cylinder cap (part 18) at the bottom of the grip by turning it counter clockwise, it is under spring pressure. If the pistol is in the fired position, it will pop out about one-half inch just be ready for it. Inside there are two main springs nestled inside each other, set these and the cap off to the side.
Next remove the grip plate (part 19), it is a flat piece of metal that goes around the compression tube where the end cap was and it aligns in the front part of the grip frame. There are two small tabs on this plate that hold the lower part of the grips in place, you can not remove the grips until this plate is removed.
Pay attention to where these go during disassembly.
Remove the grip screws with a small flathead screwdriver. The screws are different lengths, so be aware of that when reassembling.
The top one is longer than the bottom one, and the right side grips have the threaded insert that the screws thread into.
Cocking the gun now pushes the piston and seal down into the lower part of the frame but you cannot remove it as it is under pressure from the trigger bar (part 15).
Removing the barrel and cocking lever
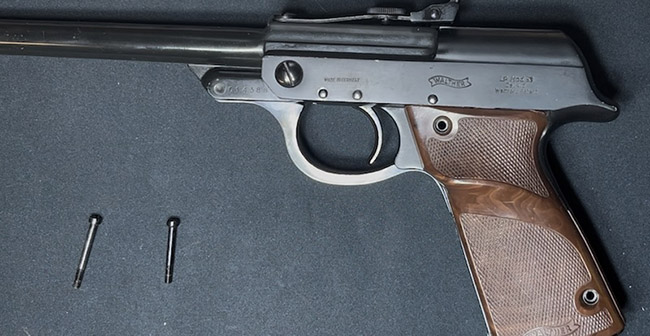
The barrel is retained in a typical example of German over-engineering, and is neatly executed. On the right side of the frame is a small flathead screw that screws into the small end of the barrel pivot screw. The smaller screw slightly spreads the end of the main screw, keeping it from loosening over time and use.
After removing the small screw from the right side, remove the larger barrel pivot screw and slide the barrel out. There are two washers, one on each side that allow the barrel to pivot within the frame.
Now you can pivot the barrel and cocking lever (part 13—the part that also acts as the trigger guard) out of the top part of the frame. With the barrel still attached, you can now slide the cocking lever down within its groove.
Positioning it in a certain orientation where the cocking nub will allow for it to be extracted from the groove at the bottom of the frame, allowing you to remove the barrel/cocking lever assembly out of the grip frame.
This is the general position the lever needs to be to slide out of the base of the frame.
Set the barrel and associated parts off to the side, we will not be needing them for a while, other than replacing the breech seal at the rear of the barrel.
Removing the piston and seal
I cannot stress enough, DO NOT remove the trigger bar (part 15) or locking pawl (part 16—it locks the pistol closed for firing), unless absolutely necessary. Removing these parts is not necessary to reseal the pistol. They are under extreme spring pressure and are buried in the interior of the pistol.
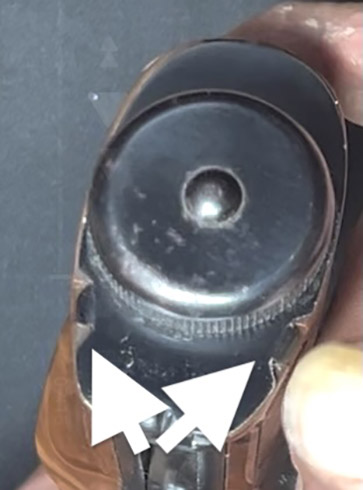
To remove the piston place a small dowel or punch between the trigger and trigger bar. You will have to release the trigger safety pawl at the front of the trigger, allowing the trigger to be pulled slightly, and inserting the dowel/punch at the same time.
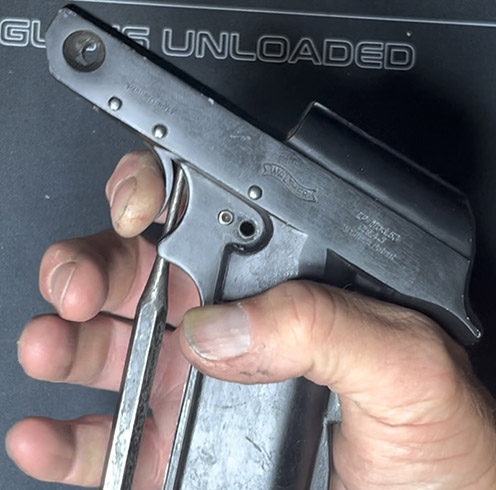
I used a punch to act as a spacer to actuate the trigger bar.
When the trigger bar is compressed, it will allow you to remove the piston and seal out of the bottom of the grip. I was able to remove it by inserting a thumb in the bottom of the piston and pulling down while compressing the trigger bar.
Below is a second photo showing the placement of the punch in relation to the parts inside the gun.
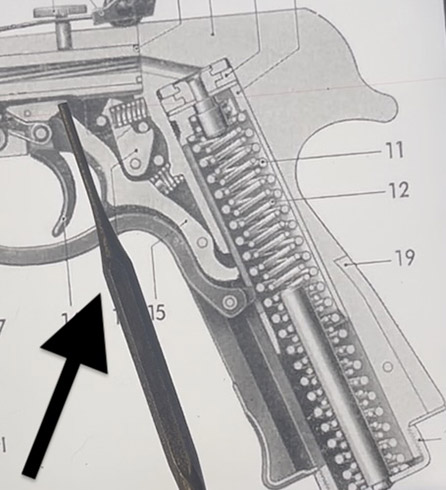
This is how the punch should be used in relation to the internal parts.
The piston seal that is labeled the piston washer on the parts list (part 10) is removed from the piston by sliding it in its groove then simply removing it. The setup is like mounting a power strip to the wall with screws, the screw head goes in the larger round hole and then it slides over to lock in place in the center of the piston. This is normally as far as you would need to go in order to change the seal and piston in the LP53.
The piston head simply slides out of its retaining socket and is easily removed.
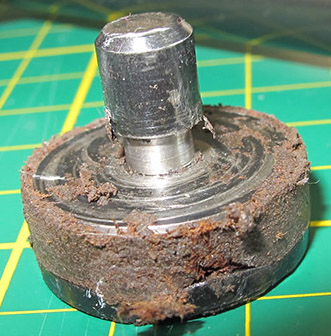
The leather piston head (Walther calls it the piston washer, part 10) in Tom’s LP53 had seen better days.
Warning
While you can go farther, I would not suggest it unless it is absolutely necessary. At this point, everything within the frame can be cleaned with a small brush, oil/solvent, and pipe cleaners. If you have to remove debris of the old piston head out of the compression chamber, use the flat end of a wooden chopstick or similar tool. Debris in the air tube can be removed with compressed air and pipe cleaners.
This is your second warning! Unless absolutely necessary, STOP HERE! DO NOT DISASSEMBLE ANY FURTHER!
Looking into the gun, you may think “There’s like 4 parts left in there. How hard can it be?” Well, the trigger and trigger safety assembly has 12 small parts (8 for the trigger, and 4 for the safety) that make up just that assembly.
There is a part called the locking pawl (part 16) that has 3 parts, a pivot pin, the pawl itself and a spring. The part is under pretty strong spring tension, and has to be assembled around an existing pin, and in between two other pins that are already in the frame. Then it needs to be held in place while you drive in its own pivot pin with a hammer.
Then there is the trigger bar. It is held in place by a pivot pin towards one end, and is also under a very strong spring pressure. I can tell you from experience without the proper jig or possibly a fractal vise, it will take 2 people and 4 hands to get the locking pawl and trigger bar into position.

Reassembly
Assuming you did not take out the parts numbered 14, 15, 16, & 17 in the parts view, reassembly is straightorward.
Attach the piston head and seal onto the piston, lube it with your choice of airgun oil. Orient the metal piston with the open flat area where the cocking lever and trigger bar travel is toward the front of the grip frame so it will engage the cocking lever.
Slide the piston up into position with a dowel or some other tool that will fit inside the piston and is long enough to move it into position. You will have to depress the cocking lever with the punch or dowel again to allow the trigger bar to move far enough for the seal and piston to go past the trigger bar.
Orient the cocking lever and barrel assembly in such a way that it fits into its track in the front of the grip frame, then slide it up into its final position. Lightly lube the two flat steel washers placing one on each side of the barrel. Then align the barrel pivot screw and insert it, and replace the small screw in the end that retains it in the frame.
Now close the action so it locks into the closed position. Then attach the grip panels with the screws in the proper locations. Replace the end plate at the base of the frame, making sure the tabs for the grip panels are in their place. Then insert the dual mainsprings, and the end cap.
You can cock it and replace the breech seal now or you may have done it while the barrel was off the pistol, using a dental pick. At this point it can be test fired.
Congratulations, if all was done correctly you have successfully resealed a vintage Walther LP53! So, let us know in the comments how many of you own a Walther LP53, and what you think of them.
How many of you have owned or currently own the Polish copy of the LP53, the Predom by Lucznik? Tom reviewed that pistol back in 2007. (It doesn’t seem like it’s been that long ago but it has.)
Shoot safe, and have FUN!
Ian


Ian,
Thank you for restoring this LP53 to working order so that Tom can continue his documentation about it.
Maybe the warning, “STOP HERE! DO NOT DISASSEMBLE ANY FURTHER!” Can be supplemented with “BASKET CASE BEYOND THIS POINT!”
Siraniko
Siraniko,
Now this series can continue, thanks to Ian.
BB
Not really a basket case.
Maybe just a large note on the box that says.
“Lifeline needed, phone a friend.”
Ian
Ian,
Sure wish lifelines were as readily accessible as you.
Siraniko
“How many of you have owned or currently own the Polish copy of the LP53, the Predom by Lucznik?”
Ian,
This is a great report on the Walther LP53 (especially the warnings!).
I did own the Predom, mostly because it was cheaper and easier to get than the Walther LP53.
The Predom was OK, but I wound up selling it to someone who wanted it more.
If I get another of these, it will be the Walther LP53.
Thanks again for this report.
Blessings to you,
dave
Some day I would like to lay hands on the Predom, just to compare build techniques.
Ian.
Ian, I actually didn’t buy it; my wife scored the Predom for me from here: https://www.bakerairguns.com/
I used to own a Predom Lucznik. It had an incredibly long trigger pull, but once I became used to it, this was an incredibly accurate pistol. It was easy to kill feral soda cans at twenty-five yards with it.
Would I like to have a Walther LP53 show up here at RRHFWA? Oh yeah, but they do seem to have a pretty high price tag on them. Not as bad as an Izzy, but they are not as good as an Izzy either. They are kinda neat though.
“They are kinda neat though.”
RidgeRunner, well said; that’s the main reason I’d like to see one show up here. 😉
Ian,
Thanks for this report on disassembling the LP53, it will remain as a teaching document for others, as have your guest blogs on resealing the Crosman Mark l and Mark ll pistols.
https://www.pyramydair.com/blog/2020/01/crosman-mark-i-and-ii-reseal/
I have never heard of a fractal vise. It’s a great name for such a tool – similar elements getting smaller and smaller, that conform to and hold odd shapes. Wow!
And now, BB can resume testing his resealed LP53 and we can wish we too could shoot such an elegant air pistol. Looking forward to that.
Regards,
Will
That’s part of why I do this, to get information out in print for future reference .
Thanks to Pyramyd AIR for sponsoring it for these many years, and hopefully many more in the future.
When you Google an Airgun question, the blog is normally the first on the list.
I was looking for parts to make an adapter to fill a bulk fill airgun, I googled “what size threads are on a vintage Crosman bulk fill”
The AI search engine brought up the correct answer that it extracted from the blog, and a photo and a link to the blog.
The fractal vise is a specialized tool, but once you use one, you will wonder how you ever got along without one.
Ian.
In case anyone wants to see the restoration of a fractal vise here’s a link: https://www.youtube.com/watch?v=QBeOgGt_oWU
The site is “Hand Tool Rescue”, with many other interesting videos.
Ian,
Good work! Well beyond my abilities, glad not beyond yours.
-Yogi
“Interesting timing for this post, Ian. A friend FM just visited has this hanging on one of his walls.” Tried uploading this comment with an image of an original, Italian version “Goldfinger” movie poster of Connery showing him holding this particular pistol. The poster is hanging on a friend’s home wall. Cloudflare is blocking FM, preventing him from adding this comment and image. What has FM done?! Is the AI Mindless Minder coming to lock him up?
Basil,
Check the size of your picture. Not just the dimensions but the dots per inch. I can upload 72 dpi pretty well.
BB
Tried what you said Tom.
Basil,
Great!
BB
Thanks Ian, great job explaining the do’s and don’ts of resealing this classic. As far as I am concerned, knowing what to avoid regarding unnecessary disassembly steps is a most valuable part of your report. I admire your mechanical skills.
Henry
Thank you.
Sometimes you don’t know what you don’t know.
So when you take it apart and you’re looking at the pieces and you start to put it back together and say “well, I didn’t need to do that…”
Then you need to make sure you pass along to somebody else so they don’t have to..
Some people learn by reading.
Some people learn by watching others.
Some people just have to touch the electric fence them selves.
Hopefully if I touch the fence, you don’t have to…
Ian.
Yes, I own an LP53. Purchased at the Hickory, NC show. Unfortunately, I can’t tell you the year since I foolishly didn’t write it down. Several years earlier at Roanoke, I had let Tom know I was in the market for one and he pointed to the Polish version but my heart was set on the actual pistol used in the James Bond poster. Mine shoots around 378 fps with a 7.5 gr JSB match diablo.
Still works fine but I guess I should drop some oil down the orifice to lube the leather seal.
Fred formerly of the Demokratik Peeples Republik of NJ now happily in sweltering GA
Yes, a few drops of the correct oil every so often never hurts.
Ian
Thank you, Ian, for another invaluable report! I have been lusting after one of these for my airgun bucket list collection. Someday I will certainly use this report (unless it gets deleted for lack of hits). Now, as the piston seal needs to be replaced, how would one go about doing that? It looks sort of like a short cylindrical piece of leather. Not sure there are any cows around here with such thick skin, but perhaps the German cows had thicker skin than others? ;o)
If making a new seal is part of B.B.’s or your future blog on this pistol, I can wait.
Again, very nice work. Kudos to you!
The seal Tom had bought was a synthetic seal he had acquired somewhere, so I will defer that answer to him.
There are sellers here in the USA that do sell leather seals for the Lp53.
Both just a leather seal, and a complete reproduction of the original seal & stem.
Ian.
Great. Thanks!
Roamin Greco
Tom already did an article way way back: https://www.pyramydair.com/blog/2007/12/how-to-make-a-leather-piston-seal/
Siraniko
Thanks for the reminder.
45Bravo,
Enjoyed the read.
Bravo Zulu for sure.
One question: what do you think about, say, Lanolin or some other natural leather preservative as an alternative to petroleum based oils for leather airgun 10. Piston (seals) Washers ?
Lanolin has a fairly high burn temperature:
Flash point of 460 °F (238 °C)
Autoignition temperature of 833 °F (445 °C)
Thank you for another great Guest Blog,
shootski
Shootski, I work on springers, and I can shoot them reasonably well.
But I am not really a “springer” guy.
I really don’t know the answer to that.
When I have springer questions I “phone a friend” named Tom.
He has forgotten more about them than I will ever know.
I look at a springer like a “fire piston” except it shoots a pellet.
You would never think that by the power of your hand compressing air in a plastic tube that it could ignite something and be used to start a fire.
I don’t know what I the internal flash temperature could be in an Airgun.
I am sure it would depend on the diameter of the tube, the volume of the tube, and the efficiency of the seal.
And I am always willing to learn.
Ian.
Ian and shootski,
If a sproinger has a leather seal, you can use any oil that you prefer. Lanolin should do fine. It is just uncommon to find these days.
I personally use a synthetic oil on these “old gals” around here. The leather will soak it up just fine and it does have a very high flash point.
As I am sure you both know, the use of leather seals was not a problem until the “velocity wars” began. Most people used a light petroleum oil on their leather seals and at those pressures it would auto ignite. Sadly, most of the manufacturers did not know much about the early polymers and most of those seals need to be replaced.
If the power level is not too high, a leather seal works great. With proper care it will last what seems like forever.
P.S. Ian, great article by the way. I enjoyed reading it very much.
Thank you.
Personally, I’ve never been into the velocity wars.
I’ve always been for where the gun WANTS to be shot and every gun has that particular spot where it is just happy.
And I’ve always worried about shot count.
The paper target doesn’t know the difference between 1 foot pound and 100 foot pounds.
Small game, if the shot is properly placed doesn’t know the difference between 12 foot pounds and 20 foot pounds.
Ian
RidgeRunner,
I was looking at the remnants of Tom’s Walther leather piston head and checked my leather facts file. Seems Lanolin, according to the horse tack experts, protects the leather’s structure from degrading.
shootski
B.B. and Readership,
OFF TOPIC Public Health announcement.
Those of you that have Racoons‡, especially in the Southern California/Los Angeles area be aware of this from the CDC:
“An astute clinician diagnosed Baylisascaris procyonis (raccoon roundworm) infection in two unrelated LA County children with neurologic symptoms and signs, peripheral blood and cerebrospinal fluid eosinophilia, and characteristic brain imaging abnormalities, during September of 2024. The source of exposure was likely ingestion of raccoon feces or contaminated soil. Health care providers should suspect B. procyonis in patients with eosinophilic meningoencephalitis, especially young children or people with developmental disabilities or pica, and consider empiric treatment with albendazole. The public should avoid contact with raccoons and their feces.”
shootski
‡ Because of the racoon’s general build, the Procyonidae are often popularly viewed as smaller cousins of the bear family. This is apparent in their German name, Kleinbären (small bears), including the names of the species: a raccoon is called a Waschbär (washing bear, as it “washes” its food before eating), a coati is a Nasenbär (nose-bear), while a kinkajou is a Honigbär (honey-bear). Dutch follows suit, calling the animals wasbeer, neusbeer and rolstaartbeer (curl-tail bear) respectively. However, it is now believed that procyonids are more closely related to mustelids than to bears.