Bow Sight Installation
Tips for Mounting & Sight-In
Learning how to sight a bow properly is crucial for achieving pinpoint accuracy and consistent performance. This comprehensive guide will walk you through everything you need to know about sighting in your bow, from the basics of proper mounting to advanced techniques that will take your archery game to the next level.
Sighting in a bow is more than just a technical process -- it's an art that requires patience, precision, and practice. When done correctly, it transforms your bow into an extension of yourself, allowing you to hit targets with remarkable accuracy at various distances. Whether preparing for a hunting trip, gearing up for a competitive shoot, or simply aiming to improve your backyard archery skills, mastering the bow sight in process is your key to success.
It's necessary to sight a bow when:
- Adding a new sight or optic
- Changing draw length or weight
- Switching arrows or tip weights
- Modifying anchor points
- Changing broadhead brands or types
- Switching between broadheads and field points
Key Considerations of Bow Sighting
When mounting and sighting a bow:
- Sight Leveling: Ensure the sight is level on all three axes. This prevents left or right misses due to bow tilt.
- Consistent Form: Maintain consistent form during the sight-in process. This includes your stance, anchor point, and release technique.
- Start Close: Begin sighting-in at close range (around 10 yards) before moving to longer distances.
- Follow the Arrow: When adjusting your sight, move it in the direction you want your arrows to go.
- Regular Check-ups: Periodically verify your sight's alignment and settings, especially before important hunting trips or competitions.
- Make sure your bow is properly tuned: If your arrow flight is irregular and "wobbly" or if you shoot your arrow through a piece of paper and do not have the tip of the arrow tearing through the paper in the center of where the fletchings and shaft are tearing, you need to tune your bow before sighting in.
Archers can significantly improve their accuracy and consistency by paying careful attention to proper bow sight mounting and sighting in, leading to more successful and enjoyable shooting experiences.
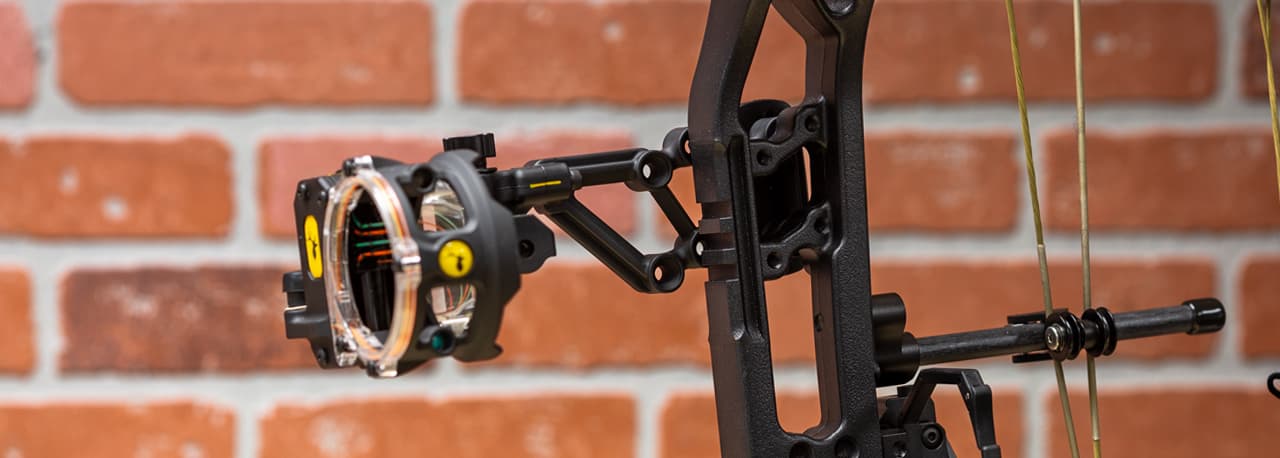
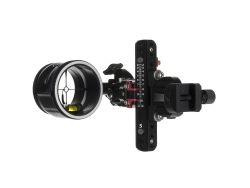
Bow Sight Mounting
Bow sights typically have multiple mounting hole options to accommodate different bows and archer preferences. The most common configurations are:

This traditional setup allows for vertical adjustment of the sight.
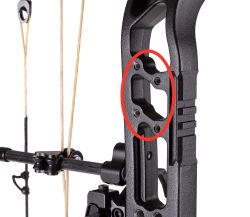
Offers more stability and flexibility in positioning.
Provides quick detachment and reattachment without losing zero.
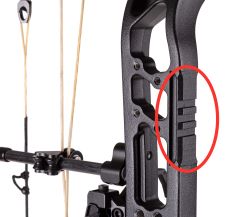
Some sights come with a specific mounting system designed for particular bow models.
A recent trend in the archery industry is gaining popularity for its potential to reduce torque, improve balance, and streamline the profile for a sleeker appearance.
Tips for Optimal Sight Positioning
When positioning your bow sight, consider the following:
- Eye dominance: Align the sight with your dominant eye for more natural aiming.
- Peep sight alignment: Ensure the sight housing aligns perfectly with your peep sight. Ideally, you want the peep diameter to perfectly circle the sight when looking through it at full draw.
- Clearance: Check for adequate clearance with your arrow rest.
- Comfort: Position the sight where it feels most natural and comfortable for your shooting style.
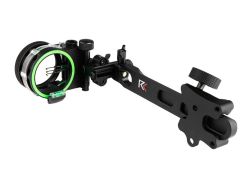
Distance from the Riser
The distance of your sight from the riser plays a crucial role in accuracy and forgiveness, similar to the concept of sight radius in firearms:
- Longer sight bars (e.g., 13 inches):
- Provide greater precision due to increased sight radius
- Offer more forgiveness for slight aiming errors
- Allow for finer adjustments
- May add weight to the bow's front, potentially affecting balance
- Shorter sight bars (e.g., 3 inches):
- More compact and lighter
- Less prone to snagging on obstacles (beneficial for hunters)
- May require more precise aiming
- The principle is similar to rifle vs. pistol iron sights. A longer sight radius (distance between the front and rear sights) allows for more precise aiming, as small angular errors result in less deviation at the target.
Choosing the Right Length
Consider your primary use:
- Target archery: Longer sight bars are often preferred for their precision and forgiveness.
- Hunting: Shorter to medium-length sight bars balance accuracy with maneuverability in the field.
- 3D archery: A medium-length sight bar often provides a good compromise between accuracy and practicality.
Remember, personal preference plays a significant role. Experiment with different lengths to find what works best for your shooting style and needs.
Attaching the Sight
Step 1: Prepare the bow
Ensure your bow is securely placed in a bow vice or on a stable surface. Remove any existing sight or accessories from the sight mounting area.
Step 2: Identify mounting holes
Locate the pre-drilled mounting holes on your bow's riser. Determine which holes align with your sight's mounting bracket.
Step 3: Position the sight
Hold the sight against the riser to check its alignment with the mounting holes. Ensure the sight is level and square with the riser.
Step 4: Insert mounting bolts
Begin with the top mounting bolt, inserting it through the sight bracket and into the riser. Hand-tighten the bolt to hold the sight in place.
Step 5: Align and level the sight
Use a bubble level to ensure the sight is perfectly vertical. Adjust the sight's position if necessary. The arrow should be level with the rest when the sight is measured to be level.
If your sight has multiple axis adjustments, refer to your owner's manual on how to level the additional axis for your specific sight.
Step 6: Insert remaining bolts
Once aligned, insert the remaining mounting bolts. Hand-tighten all bolts to hold the sight securely in position.
Step 7: Final adjustments
Double-check the sight's alignment and level. Make any necessary fine adjustments before final tightening.
Adjusting Sight Pins
Proper adjustment of sight pins is essential for accurate shooting at various distances. Here's how to do it:
- Vertical Adjustments
- Start with your closest distance pin (usually 20 yards). Put your 20-yard pin as far up as you are comfortable to provide enough clearance for your arrow to loose correctly.
- Adjust your sight housing to be comfortable with where your 20-yard pin is on the target, and leave enough room in your sight window to allow the longer-distance pins to be sighted in later.
- Shoot a group of arrows at the target.
- If arrows hit high, move the pin-up. If low, move it down.
- "Chase the arrow" with your sight adjustments.
- Horizontal Adjustments
- Follow the same principle as vertical adjustments.
- If arrows hit left or right, move the sight housing to recenter pin.
- Multiple Pin Setup
- Once your first pin is set, repeat the process for longer distances.
- Typically, set pins for 20, 30, 40, and 50 yards (or your preferred increments).
Creating Proper Eye Relief
Eye relief refers to the distance between your eye and the peep sight at full draw. Proper eye relief is crucial for consistent accuracy:
- Anchor Point: Establish a consistent anchor point (e.g., corner of mouth, under chin).
- Peep Sight Alignment: The peep sight should align naturally with your eye at full draw without stretching or bending to see through the peep.
- Sight Housing Alignment: The sight housing should appear centered in the peep sight.
- Adjustability: The precise placement of the peep sight ensures perfect alignment for each shooter's unique form and anatomy.
Peep Sight Selection
Choosing the right peep sight is crucial for optimal performance with your bow sight. The ideal peep sight opening should match the diameter of your front sight housing when at full draw. You will need to match different diameter peep sights to your draw length and sight. The general rule is the shorter the draw, the larger the peep diameter.
This alignment creates a "circle-in-circle" effect, enhancing accuracy and consistency.
By carefully considering these factors and utilizing our patented peep sight placement system, you can achieve a perfectly customized sight setup that enhances your accuracy and overall shooting experience.
Bow Sight In Process
Choosing Sighting Distance
- Start Close: if you have never shot the bow before. Begin at 5 yards to ensure your bow hits the target.
- Gradual Increase: Move to 10 yards, then 20 yards as your primary bow sight in distance.
- Fine-tuning: Progress to longer distances (30, 40, 50 yards) for precision.
Setting Multiple Pin Distances
- Start at 20 yards and set your first pin.
- Move to 30 yards and adjust the second pin.
- Continue this process for 40 and 50 yards (or your preferred distances).
- Fine-tune each pin for precision.
Shot Grouping
- Shoot 3-5 arrows at each distance.
- Aim for consistency rather than accuracy initially.
- Analyze your groupings for patterns (e.g., all arrows left, high, etc.).
Identifying Tuning Issues
Watch for these top 3 signs that your bow may need tuning:
- Nock Alignment: Arrows should hit the target straight. Angled nocks indicate tuning issues.
- Erratic Arrow Flight: Arrows should fly straight and true. Wobbling or fishtailing suggests tuning problems.
- Axle-to-Axle Length: Compared to your bow's target specs, changes in this measurement may indicate the need for string or cable replacement.
Making Adjustments: Paper Test
Use the Paper Test to see if your bow is properly tuned. Set a piece of paper up at 10 yards and observe how the arrow passes through the paper and the rip pattern it leaves behind.
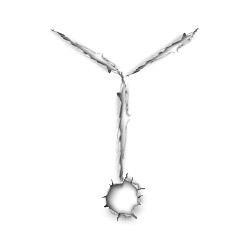
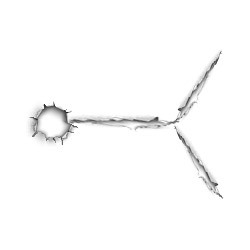
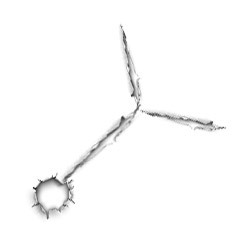
When your arrow hits point low with the knock high, the paper will rip with this appearance. It means your nock is sitting too high and should be moved down.
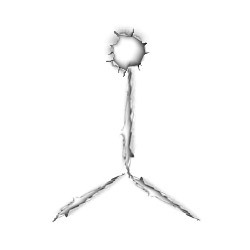
When your arrow hits point high with the knock low, the paper will rip with this appearance. It means your nock is sitting too low and should be moved up.
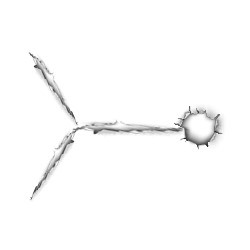
When the knock hits left of the point, move the rest to the right. It could also indicate a weak spine.
When the knock hits right of the point, move the rest to the left. It could also indicate a stiff spine.
When the arrow hits at odd angles, correct for the vertical issue first and then the horizontal issue.
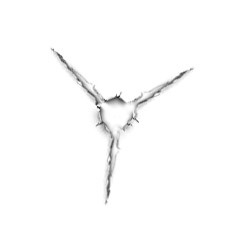
This is how the paper should look when the arrow flies straight through. This is the goal, and it lets you know your bow is properly tuned.
"When paper testing a bow, the single most important thing to remember is to maintain consistent, proper form throughout the entire process. Without consistent form, any adjustments you make based on paper tests will be meaningless since variations in your shooting technique will create different tear patterns. This means maintaining a torque-free grip, proper anchor point, and consistent release for every shot.
Only after you're achieving consistent tear patterns should you begin making adjustments to your rest or sight."
Practice & Training
Accuracy Drills
- Single Spot Focus: Shoot groups at a single aiming point to improve consistency.
- Multi-Distance Practice: Alternate between different distances to hone ranging skills.
- Blank Bale Shooting: Practice form without a target to reinforce muscle memory.
Consistency Tips
- Maintain a consistent anchor point.
- Use the same release technique for every shot.
- Practice regularly to reinforce good habits.
- Periodically check and re-verify your sight settings.
Additional Considerations
- Lighting Conditions: Practice in various light settings to prepare for different shooting scenarios.
- Wind Compensation: Learn how wind affects your arrows at different distances.
- Equipment Checks: Regularly inspect your bow and sight for any looseness or damage.
Following this comprehensive process to sight a bow and maintaining consistent practice will ensure your bow is accurately tuned and your sight is properly adjusted for optimal performance across various distances and shooting conditions. Remember, patience and attention to detail during this process will significantly improve your overall archery experience and accuracy.
Troubleshooting Common Bow Sight In Issues
Problem: Inaccurate shots
Solution: Regularly check and tighten all screws and bolts. Use appropriate tools and follow the manufacturer's torque specifications.
Problem: Arrows consistently hitting off-target
Solution: Re-align the sight and ensure it's properly mounted. Check for any bent components.
Problem: Difficulty seeing pins, especially in low light
Solution: Clean fiber optics or replace if damaged. Consider adding or adjusting the sight light.
Problem: Arrows grouping inconsistently despite proper form
Solution: Check for loose components, verify sight tape accuracy, and ensure the third axis is properly set.
Problem: Digital displays or rangefinders not functioning correctly
Solution: Check battery life, ensure connections are secure, and update software if applicable.
When to Seek Professional Help
While many issues can be resolved with basic troubleshooting, seek professional assistance to sight a bow when:
- You encounter persistent accuracy problems despite adjustments.
- There's visible damage to the sight housing or mounting system.
- Electronic components malfunction and basic troubleshooting doesn't resolve the issue.
- You're unsure about making complex adjustments, such as third-axis alignment.
- The sight requires internal repairs or component replacements.
- Your bow is out of tune, and you are uncomfortable with the steps needed to retune your bow.
Remember, regular maintenance is key to preventing many common sight issues. Periodically clean your sight, check for loose components, and inspect for any signs of wear or damage. By staying proactive with maintenance and addressing issues promptly, you can ensure your bow sight remains accurate and reliable for years to come.


