by Tom Gaylord, a.k.a. B.B. Pelletier
This report covers:
• Light
• Got Photoshop?
• The lesson
• Lesson two
• What have we learned?
We have many new readers who aren’t familiar with what I’ve written in the past. Six years ago, I did a 5-part series on photographing airguns. I tried to cover some fundamentals, and several readers said they got something from it; but so much time has elapsed since then that all but the real veterans have forgotten that I wrote it.
I promised some newer readers hat I would write a few more reports on photographing airguns several weeks ago. This is the first of them, and today we’ll talk about light. In fact, we may need more than one report on this subject since light is so crucial to good (and bad) photography. This is a reiteration of what was in that old series, but I’m trying to say it differently, today. I’ll also share some different tricks I use.
I’m going to keep the discussion simple and oriented on results. But you have to do your part if you want to get something from this.
Light
Light is how an image is recorded. In the days of film, light would cause a chemical change on film. Today, the same thing is done electronically, but the results are essentially the same. For some reason, most of what you think you know about how light works turns out to be wrong and backwards, which is why your photographs may turn out bad.
To see an image, the image needs to be lit so it can be recorded. Most folks think that they have to contrast the image and background by making the background as light as possible to get the image to jump out at them. In fact, you want to do just the opposite. Allow me to illustrate with some photos.
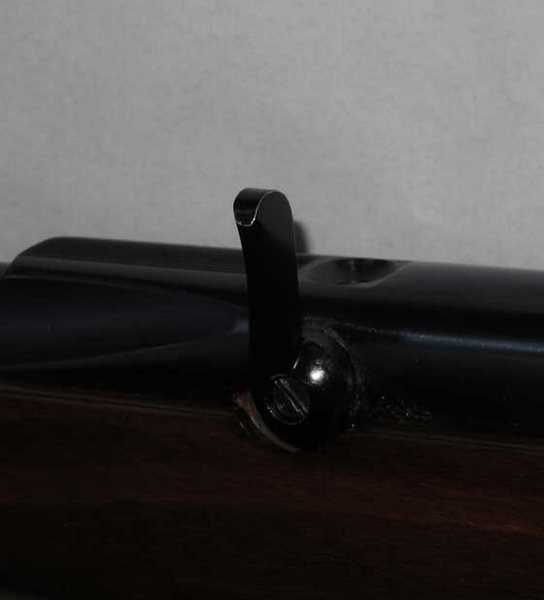
The first picture is a classic dark subject against a white background. It’s the loading tap of the BSA Stutzen you saw yesterday. I’m telling you this because you won’t be able to tell what it is.

This image of the BSA tap was taken with the rifle against a white background. The white appears gray for reasons you will soon learn. I used flash, which is the enemy of the photographer in these circumstances. This is the way the camera recorded this image.
Why is the white background so gray in the image above? It’s because the camera’s brain was trying to compensate for the dark object that was being photographed in the foreground. And it did!
Believe it or not, the image that you cannot see in the foreground is lighter than it really appears to the camera. Let me lighten the entire image so the background is white, and you’ll see what I mean.
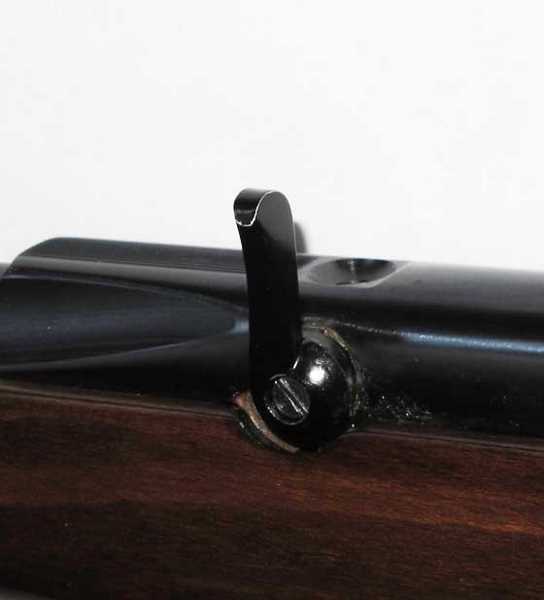
Same image as before, only it’s been lightened to get rid of the camera’s tendency to try to balance the light in the image. Read about this below.
The camera tries to balance the image it sees, so the darks aren’t too dark, and the whites and bright colors aren’t too bright. That’s why the white background appears gray in the first image. I used the flash, so there was tons of light on that white material, and the camera really had to darken the image, to keep it from being too bright. When it does that, it also darkens the main image that’s in the foreground — the image that was dark to begin with — the image we wanted to see. The effect is to turn what you are interested in seeing into a black silhouette!
Let me show you how this image should be lit. Turn off the flash and allow the camera to see the image with less light — yes, less light. To do this, you have to keep the shutter open longer, and that means the camera has to be held steady to keep from blurring the image.

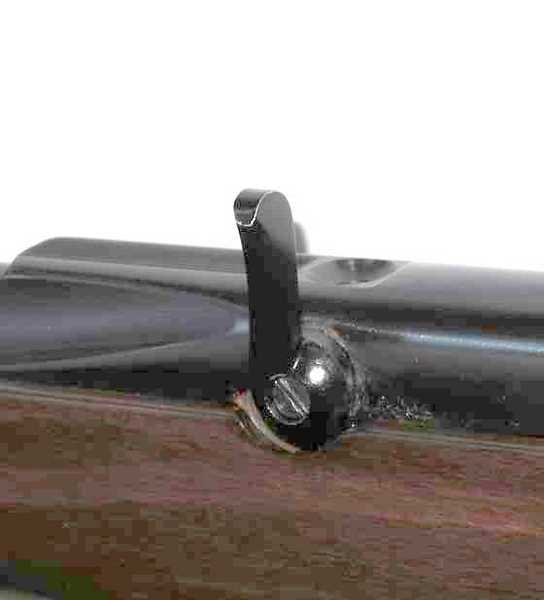
The angle of this shot is a little different than the other two images, but more important is the color of the background. Notice that it’s black! A black image against a black background, and yet everything is clear. This picture was taken with the camera on a tripod and the exposure lasted for one-third of a second.
In the third image the object is easy to see against the black background. And yet, notice that neither the object nor the background are really black. They’re both shades of gray. This is the camera at work, averaging the image so it isn’t too contrasty. By forcing the shutter to remain open much longer for this shot, I got everything exposed more.
If I were to leave the shutter open for a whole minute, this entire image would be white. You wouldn’t be able to see anything because everything would be overexposed. Film works exactly the same way.
Got Photoshop?
Most of you do not own the full Photoshop program, so you can’t do what I’m about to show you. But for those who do, this powerful program can sometimes save the day when a major mistake has been made. I’ll take that first image and Photoshop it to reduce the contrast and bring out the details.
In this image I used the Photoshop program to reduce the contrast and lighten the background. Although this brings out the detail and more can be seen, it also digitizes the image (which I discuss below).
Look at the wood in the two images above — the good one and the one that was Photoshopped. In the image taken without flash, the wood appears natural. In the Photoshopped image you can see small digital blocks of color — the fingerprint of an image that’s been heavily Photoshopped. Look at this wood closely enough, and it starts to look like a cartoon. You can even see this in the metal. That’s because it was “drawn” digitally by the software, while the wood in the image taken without flash appears normal.
The lesson
The lesson is that you don’t need to use flash to take good pictures of your guns. In fact, if you do use flash, there are a great many things you need to think about that that can be ignored if you simply don’t use it.
But you probably do need a tripod! Just like a chronograph is important to shooters, a good tripod is one of those pieces of equipment that amateur photographers try to do without as long as possible. I said a good tripod — not something you pick up at a yard sale for $3. While a really good tripod can cost over $500, you can certainly make wonderful pictures with something that retails for one-tenth of that. Buy it used and maybe cut the price in half, again. It may not be quite as flexible as the more expensive unit, but you can find ways to work around that.
The other thing you need to do is learn how your camera works. You have to take it off the point-and-shoot mode and use some of those menu selections to do what I’m showing here. My camera isn’t an expensive one, but it probably costs more than most people are willing to pay. But I’ve used a simple Canon point-and-shoot camera in the past and gotten great photographs with it because today’s inexpensive digital cameras and even phone cameras have features that rival what the best film cameras were able to do about 25 years ago.
Lesson two
Amateur photographers lack the resources that professionals have. Cloud boxes that eliminate shadows are one resource I’ve always wanted but never had. I compensate with indirect lighting and taking pictures outdoors in the shadows on bright days or in direct light on overcast days — where the sky acts as an enormous cloud box of indirect lighting.
Another resource I lack is an unlimited supply of seamless non-reflective backdrops. I’m talking about material that can be used to set off the photograph in the foreground. Let me show you how I compensate for that. Let’s look at a picture I showed you yesterday of the muzzle of the BSA Stutzen.
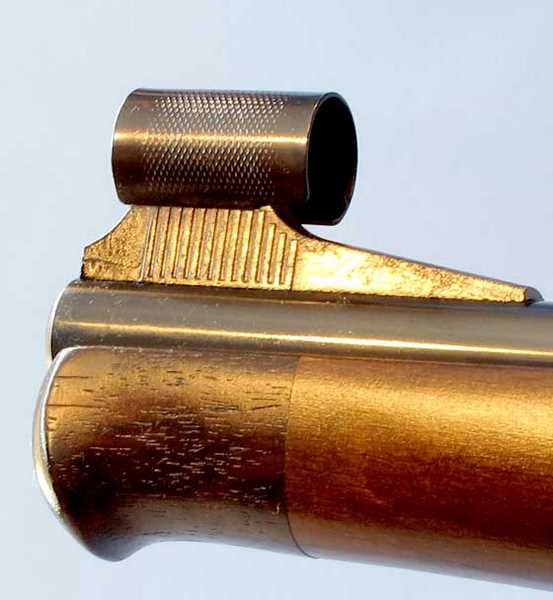
The muzzle of the BSA Stutzen is set off nicely against an even blue backdrop. How did I do it?
To take this picture, I used a tripod, once again. The light in the room was not bright (despite the bright spot seen on the sight ramp), so I set the camera shutter to stay open longer by setting the exposure to the slowest speed setting (setting the ASA/DIN number or film speed to the lowest setting, which is ASA 80 on my camera). Because the camera “thinks” the film takes longer to expose, it keeps the shutter open longer. I don’t do this manually, though I could. Instead, I set my camera to the aperture priority setting and slow down the ASA speed to 80. The camera’s brain does the rest.
Because the shutter will be open longer, I have to use a tripod or the entire image will be blurry. But that’s okay! I am planning on using that tendency to blur to my advantage. The backdrop in this picture is not a blue that has a uniform color, nor is the lighting in the room sophisticated indirect light. Instead, that backdrop is a blur!
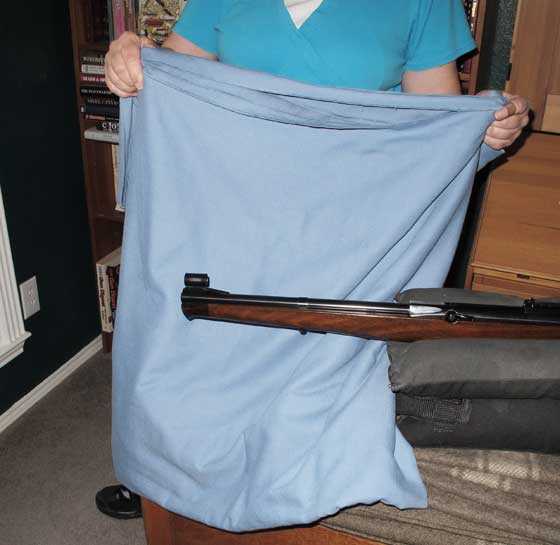
Edith moved the blue backdrop while the shutter was open, so it was blurred in the picture of the BSA muzzle. Because the exposure took so long, the backdrop averaged out and looks uniform. The camera was closer to the muzzle, of course. I backed up to show how it was done, and this picture was taken with flash.
What have we learned?
I hope this report emphasizes the importance of using a tripod with your camera and learning how your camera software controls work.
These last 2 pictures are for those of you who only have cellphone cameras and think you can’t take good detail shots. This image of a Smith & Wesson Frontier model revolver was taken outdoors with my iPhone camera two years ago, and the camera was handheld. The original image is sharp enough for magazine publication. My iPhone has a high-definition setting for photos.
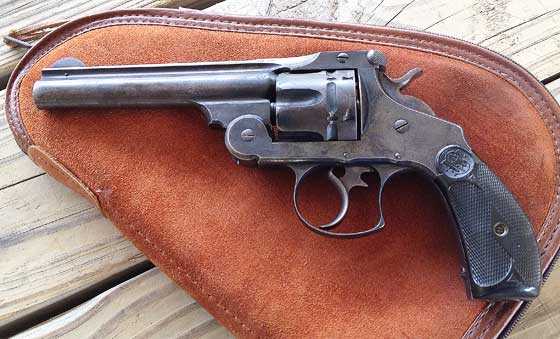
I took this with an iPhone camera two years ago. The camera was handheld outdoors in the shade. The original image is sharp enough for print publication.
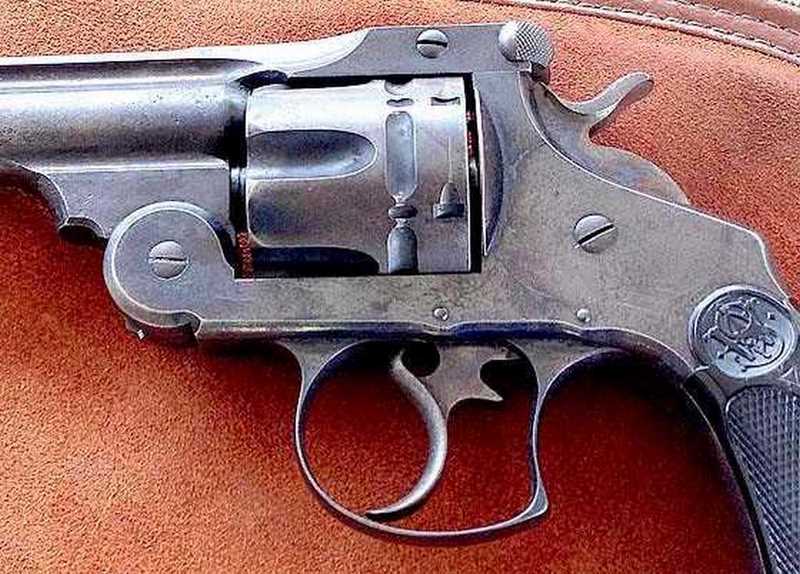
When you can zoom in on a photo like this, the picture is sharp.
Just as it isn’t the gun but the shooter who’s accurate — it often isn’t the camera, but the person taking the pictures who makes or breaks them. Pressing the button and hoping for the best is no substitute for understanding how your camera works and using light to your advantage.

My lady has two pistols in the style of the last few photographs of your blog. I love the sight picture. She refers to them as her “owl ears”. I assume due to the rear sight.
The iphone camera is excellent.
Pop,
Maybe they are Iver Johnson revolvers? They have a picture of an owl’s head on the grips.
B.B.
That is what I was thinking when I saw that early this morning, but it was too early for the brand to pop into my head.
They are smith and Wesson. You are right though…she calls them owl heads.
BB
I’m glad your doing some more reports about photography.
I was messing around practicing taking pictures with my phone after I posted some pictures with not good results. After I did practice; some bits and pieces that I remembered my dad talking about popped into my head. And even more so now after reading what you talked about. Hopefully the next time I post some pictures I will get better. And I guess one thing I learned it doesn’t cost you anything but your time now days to take multiple pictures of the same thing but different ways. Now you just delete the ones you don’t want.
My dad did black and white pictures and then I remember later on after I got my own place he was developing the color pictures at home also.
I remember that exposure was a big thing and lighting and background just like you said. He had some of those long exposure pictures I guess you call them he did in color of the cars driving down the highway at night and you could see the red trails of the tail lights and the yellow/white trails of the head lights. He also did a cool I guess over lay of a real black cat sitting on a picture of a full moon. That was a black and white picture. It looked like you were standing right in front off the moon. And it looked better than a color picture to me. I think that was done with the negatives.
I just never paid attention enough to what he was doing and wasn’t into that at the time. I had cars on the brain. So BB I’m a listening to what you got to say. And I am going to go back through and read your old reports too.
And my wife does have a digital camera with different settings and zoom on it. I just don’t know enough about what settings our I guess exposure to use for the light condition. And I can’t find the cord to down load the pictures on my lap top. I did print my own pictures with it at one time. Then it was just simpler and cheaper to take the sd card to wally world and have them do it. I guess I could get a scanner or something though so I can file them on the computer.
Sorry I’m going on so much about this but its always something I wanted to get more involved in but didn’t. Maybe finally the time is now. 🙂
Once again I have to say “nice shootin’ BB!” This time I am not talking about your marksmanship skills, but rather your photography skills. I am certain that Mac is proud of you.
You once had a blog that featured a photo of a compression tube lit up from the inside to illuminate the cross hatching that retains the lube. The photo was absolutely beautiful if not downright arty.
In future reports please do not neglect to include the cardinal rule of airgun photography: “NO FEET!”
SL,
Ha! No feet? I have to crop my feet out of a lot of shots of whole rifles. Not because I am holding the camera. It’s mounted on a tripod. But I just forget and keep standing there when the shutter opens.
B.B.
I caught myself getting the feet in the picture already too. 🙂
B.B. & Gunfun
Strange but here’s the same problem – when somebody’s selling his airgun or just boasting his mod, there’s almost always 2 things on the photo – a pair of slippers and a cat. It soon became a community joke and a firm belief that if there’s no slippers and a cat – the rifle won’t be bought or will shoot badly. So if there’s none in the frame, people shoot their house shoes separately, search for cat image and attach both – for luck 🙂
duskwight
duskwight,
Funny stuff!
We often have cats around when Tom’s taking pics, but we have to chase them away. I think cats just naturally assume they’re the center of everything and are supposed to be in pictures.
Edith
dw
We have a inside cat and a dog. So that could just happen in one of my pictures. 🙂
That’s hilarious! When I text my friends a pic of an airgun or mod I always get “…cut yer %&@# toenails!”
Testing. This is not posting. Why?
macmaniacoes,
It wasn’t posting because you embedded a link in the message.
B.B.
That’s weird because I wasn’t posting any links, I was trying to warn about fake sites, the software I named is free, but sometimes scammers provide links asking for money or personal data to download the software, but that’s just that, a scam, run from this sites as fast as you can.
macmaniacoes,
I have your deleted email in my inbox. I think you provided the wrong link, as it takes you to paint.net, which is a company that sells paint for the walls, floors & ceilings of photography studios. It has nothing to do with fixing photos digitally, which is the gist of the rest of your comment.
Thanks,
Edith
Oh, I see, my fault, the name of the program is paint dot net, and some company totally unrelated have a site with this address. That’s funny, I guess the bot or whatever that review my comment formatted as a link, but it isn’t, it’s the name of the program.
Anyways, thank you for your anwser and for your work, I enjoy everyday reading this blog and I love it.
macmaniacoes,
I just looked at the site you meant to link to. That’s not really a helpful site. Someone’s bought that domain name and has filled it with related terms and links in order to get their domain ranked higher in search engines. The domain is for sale. When someone wants to buy that domain, the owner can show them how highly they’re ranked in search engines for associated terms that will help the buyer when his site goes live (instead of working from the ground up with a new site). Some domains sell for hundreds of thousands of dollars if they rank high enough for desirable terms.
Edith
I’m sorry, I’m not a native english speaker, so it’s hard to explain. It was meant to be a name, not a link, the coincidence is that once posted, browsers read it like a link, but it’s not. The address of the program is other, and I did not posted it. The correct address can be found searching the name of the program in Wikipedia, the one like the name of the program is not the address of the program, I know I sound confusing, so I apologize once more for the misunderstanding.
So to abbreviate, anyone interested, forget any links and search the name of the program on the Wikipedia, there you will find all relevant information.
You have exquisite sentence structure and grammar for not speakinzee English!
Well, thank you indeed, but I understand I might sound stiff and pedantic to people, even angry or condescending to some, which isn’t the case at all. It’s just the way I was taught English when I was a kid, not the real mood or swing that I’d like to convey, so things like sarcasm, irony or disdain may be read when I wasn’t intending to produce them. Misunderstandings in Internet are easy to come by just as it is, so imagine how many times I had to begin to say “sorry, I wasn’t intending to mean that” left and right, and even so, many people remain suspicious towards me.
So, truly, thanks for your reply.
I wasn’t, so false positive or something fishy in my computer
Just point that if you don’t have Photoshop, you can use The Gimp or Krita for the MacOS, Windows and Linux. They’re both free and able to do all you’d need from them, for this purpose and for much more. For old or slow computers, you can use Paint.NET, only 6 MB to download and can do the usual stuff: rotate, mirror, adjust color, gamma, crop, cut, scale, etc. Only for Windows though, but is free too. And if you are on a mobile device, or don’t want to install anything, you can use online photo editors like Fotor or Pixlr.
Heck, Internal Server Error 500 or Piramid Air Search page, that’s what I’m getting all the time when I try to submit comments, this is so frustating…
Pretty danged interesting stuff! Now if I could just get my dogs to not turn away every time I try to snap a picture…
How did you guys ad that little avatar to your posts? I use my phone for this blog. Is that why I don’t see that option?
Go here: gravatar.com
You can set up an account in minutes. Choose something small as your avatar because when posted here it will be small and we won’t be able to see the small details.
J-F
BB,
I am enjoying the blog today.
Thanks,
David Enoch
BB,
Just as a small tip to your otherwise excellent presentation…
Having taught basic macro photography (essentially what we’re doing here) to jewelers, insurance agents, biologists, and even police investigator types, I very strongly advise the purhase of a suprisingly expensive (not) bit of renewable equipment.
A case of “Canned Air” from Costco or Walmart, or wherever.
The last thing to do before the shutter button is pressed is to blow off all the environmentally deposited carpet clippings, used hairballs from three cats ago, miscellaneous dust blown in from Oaklahoma, pollen from plants nobody but the FBI can identify anyway, individual eyelash hairs you’ve shed while setting up the shot, and vast amounts of near microscopic detritus, mostly unidentifiable, and mostly not only undesirable but distracting to your image.
Since you mostly don’t have to worry about blowing 8 or 9 pounds of air-gun away that may do the trick, but for more delicate items, perhaps a small/fine (even paint) brush may come in handy, but store it in a plastic bag so it doesn’t collect (so much) dust when not in use.
103David,
That’s a good tip! I often use a makeup application brush, but just as often I forget.
B.B.
Excellent article and information that we can all use.
I made my living as a wildlife photographer in the 70’s and 80’s. I specialized in photographing game animals and birds in Texas for the “big three” outdoor magazines. Being completely self taught, I had to learn to improvise “on the job”. Camera technology was very different back then. No electronic cameras, no auto focusing and no memory sticks that hold hundreds of images that can be erased and reused. All shooting was done on Kodachrome slide film that was expensive and had to be processed by Kodak, a one week delay.
My equipment became outdated and film is something from the past. Today, for a few hundred dollars, you can get a fully auto camera with zoom lens to rival the old cameras that cost thousands of dollars. They are capable of magazine quality photographs without having to pay for film and processing.
As B.B. stated in this article, even the cell phone cameras have features that the older “pro” cameras didn’t have. BUT, you have to understand their limitations and know how to “fool” the auto exposure features.
I have admired B.B.’s air gun photos since being a regular reader of this blog. They don’t come by accident. I learned early on, that the ability to improvise and “get the shot”, can be the difference in failure and success. Our host is obviously a master at doing just that.
I have learned much from reading this blog and today was no exception. We have an excellent instructor. I look forward to the next part.
Jerry in Texas
Having seen some of your photography I can say you certainly did I great job getting the picture, and its a skill to create great photos most of the time, as you and bb do, everyone gets lucky when they click the camera now and then, but what valuable information in today’s article. I wish Id read this before doing my guest blog, I didn’t know what I was doing, lol, and didn’t get lucky. If I get a second shot I’ll have to keep this stuff in mind. Hope all is well Jerry, and if anyone would like to see a movie with jerrys work let me know, Id be glad to share.
SIDEBAR: Tom, thank you for your two terrific articles in July 20, 2014, SHOTGUN NEWS …” The $100 PCP: Can it be Done ? ” and ” Airguns: Better Then or Now ? ”
Pete Hallock
Orcutt, California
Pete,
Thank you. I think the $100 PCP article is the best one I have ever written about airguns for Shotgun News.
B.B.
I’m going go throw an addendum in here, more a comment than anything as I know not everyone has the budget for a sooper-dooper DSL type cam.
Try and avoid using the cell-phone cam if you can, as well as the “macro” mode on your point ‘n shoot, and I’ll tell you why.
Usually the cell-cam is a wide-angle lens and the “macro” setting on your P&S works off the wide-angle end of your zoom lens.
“Wide-Angle” and “Macro” do not play well together.
Really. You tend to capture distorted images, peculiar shadows, and random appendages (like feet, fingers, and unwanted incursions like sleeping cats in the image.
Image size is what matters.
I’ll say that again, just for emphasis.
Image size, NOT physical distance, is what matters
Almost always you’ll do better by standing back and zooming in, rather than being at contact distance to your bug or loading gate or whatever. You’ll get much better rendition of the item, plus gain certain practical benefits with lighting and such. If the object at hand is something like a scorpion or live rattlesnake, you’ll find not having to put your face “right there” is also desirable.
Simply put, a wide-angle perspective will tend to unnaturally emphasize distance related distortion, making a photograph of say, an air-rifle, or a skyscraper look distorted simply because the muzzle/buttstock or top floor are farther away. That’s why your photos of the Empire State building always look like it’s somehow a kind of Pyramyd. (That last is not a distortion, but rather “product-placement.”)
B. B.
WOW! Never thought there was so much work involved to get real good pics for us in your articles Sir. Thanks so much for telling us how its done. I sure will appreciate your work so much more in future.
Errol
BB
I was going to say this last night and it slipped my mind.
Its one thing to try to take good pictures and you end up with bad ones. But when you can produce a bad picture at will. Well that shows that you know what to look for that causes the problem. Just like you showed above.
So I guess what your saying is to have low light so you don’t get shadows and no flash. But have enough exposure time with camera lens staying open for a longer time. And I guess that time that the lens stays open has to be balanced for the existing light condition.
So I guess when you slow the shutter speed down to like the ASA 80 you need the tri-pod because there will be no way to hold the camera steady enough for how long the shutter is open.
I think I understand what the shutter speed is now. Or did I get it wrong.
And the phone I have is not one of those high dollar ones. And it doesn’t even have a flash. So maybe that’s good. But there is no way to adjust the shutter speed. But on the other hand my wife’s digital camera can. Its kind of like the one you showed in a link above in your report. So maybe I should get back to that camera for my pictures. I use to use it at the drag strip all the time.
And one more question. Does a certain color back drop work better than other colors?
I should rephrase the last question.
Would a color like red or green be a bad color choice for a backdrop with a digital camera?
Gunfun1
I’ve used the green felt on my pool table as a back drop for most of my airgun photos. I just lay the gun on its side on the table and then adjust the image in the screen before pressing the shutter button. Most of the shots have come out OK, at least well enough for Pyramyd AIR to accept them for publication on the site.
Charles
Thats good it works. I have a piece of green colored backing from a old chair I saved. It resembles the felt on a pool table. I will have to try it out.
Gunfun1
Here’s a few examples of my airgun pictures on the pool table’s green felt.
/customer-product-images/m/walther-cp99-co2-gun/129
/customer-product-images/m/colt-1911-a1-co2-pellet-gun/136
/customer-product-images/m/dan-wesson-co2-bb-revolver-gold-2-5/3313
I took these with my Vivitar ViviCam S527 digital camera using the default camera settings.
2592 x 1944 pixels, 180 dpi, 24 bit depth, F-stop 2.8, 1/17 sec exposure, ISO-200, no flash, no zoom
Charles
I will have to check the pictures out tonight when I get home from work. Phone takes to long to load.
Charles
Nice pictures. I will have to try that piece of green material I have and start using my wife’s digital camera again and see what I can do.
From what I’m doing with this up close picture taking so far. Well all I can do is get better. But I’m going to give it a try.
GF1,
It sounds like you understand what I’m saying. Green and red backdrops are not a problem, unless they are because of the color of the subject.
I generally try to use a darker backdrop to keep the shutter open longer for more detail in the photo. Many of our airguns are black, which is a difficult color to show details, so it needs to be overexposed to a small degree. Edith and I are always at odds about how much is too much. I err on the side of too much overexposure because I want to see every detail, but she likes to see the colors closer to how they actually appear.
I am red-green colorblind, and colors have never meant much to me, but I appreciate they mean a lot to most people.
B.B.
BB
So the back drop shouldnt be the same color of the object then?
And if the back drop was darker than the object with no flash. The object will stand out more then.
And the shutter time staying open longer will give a higher detailed picture. But if you stay open too long the extra light will take away from the color of the object.
Did I get that right?
The metering system of cameras is designed to assume the typical scene averages out to “18% grey”. A polar bear in a snow storm and a black cat in a coal bin would both be rendered as the same medium grey.
If the camera has full manual control, you can obtain a “grey card” from a photography equipment shop. Position the grey card at the subject position (and in the same lighting — this assumes no flash) and fill the frame with the card image. Half press the shutter and see what the camera meter says would be the exposure (use P/A/S mode unless your manual says that you can use the meter indications as a “match needle”); change to M mode, and dial in the exposure that the camera saw with the card. Then remove the card and shoot the subject.
The second option is to use the histogram display of the camera… For the most dynamic range in the subject you do not want the histogram to look like
|\_____/|
(that represents a high contrast subject where one has basically dark/black and bright/white)
If using a light shade backdrop, you may want to use a slower shutter speed until the histogram shows more like
_/\____|
(the white has overexposed and blown out, but the black is now dark greys with details kept)
Reverse that for a dark background.
If the background in a mid tone, you want a histogram that looks
__/—-\__
(no pure black, no pure white; Photoshop et al can expand/contract the range of the hump to increase/decrease the contrast)
Wulfraed
Thats my problem. Got to keep it simple for me.
I still need to learn the terminolgy. Like what does ISO or however it is written mean. Then I want to know what it does.
ISO is a strange one…
Many years ago, there was the American Standards Association (ASA) and they developed a rating system for film sensitivity. The small the ASA value, the less sensitive the film was — but the less grain (noise) it showed also. ASA numbers were scaled such that doubling the ASA number meant a film twice as sensitive (or one stop — ASA 100 vs ASA 200 meant [if the shutter speed was not changed] one could go from f4 to f5.6 [for example], or [if the aperture was not changed] one could go from 1/100s to 1/200s).
At around the same time there was a German standards organization, DIN, which used a “degree” rating. As I recall, a 3 “degree” difference in DIN was a doubling in sensitivity (making it somewhat equivalent to a deciBel system).
In the late 80s or so, ISO (International Standards Organization) felt a need to unify film ratings… The original ISO film speed was a combination of BOTH ASA and DIN, represented as “100/21*” (where the * is a degree circle). After a decade or two, it seems the DIN half of the ISO speed was dropped. ISO is NOT exactly equal to ASA though — I believe ISO also used a different means of measuring the speed so there is some difference between the two, but not significantly.
The end result, for photography, is that one has a triad: ISOshutteraperture. To produce the same exposed image, if you change one of the three by a whole step, you need to move one of the other two by a whole step in the other direction (that is, if you increase the sensitivity you have to reduce the amount of light coming through by either closing the aperture or speeding up the shutter).
Even with digital cameras that holds, along with the facet that typically the lowest ISO setting will produce the least sensor noise.
Wulfraed
A clearer picture then?
GF1,
Change the word shouldn’t to the phrase, “doesn’t have to” and you are right on.
B.B.
Ok thanks BB.
I at least understand that part of photographing.
And I still havent looked back through your older write ups about photographing. I need to do that. You probably already answered some of these questions in the past.
GF1,
The old rule for film cameras was any exposure time longer than 1/60th of a second (if I remember correctly) required a tripod. Modern digital cameras have very good image stabilization these days; I have been able to take exposures at 1/15th of a second with no blurring with a Canon T2 just holding the camera.
Paul in Liberty County
Paul
So the digital cameras are more forgiving now days is what I guess your saying?
For 35mm film, the convention for hand-held shooting was a shutter speed of 1/(focal_length) or faster.
For the common “normal” lens, that was a 50mm lens, so a shutter speed of 1/50s could be hand-held. The steps in shutter speeds tended to be 1/15, 1/30, 1/60, 1/125/ 1/250… So 1/60s would have been the preference.
APS-C digital SLRs have a field of view factor of 1.5X (1.6X for Canon). That is, a 50mm lens on a 1.5X sensor has the same field of view as a 75mm on 35mm film (or “full-frame” digital). As a result, a shutter speed of 1/75s would be the recommendation to hand-hold.
P&S digitals run in the 5X field of view; a “real” 50mm lens sees what a 250mm telephoto would see, and needs 1/250s to hand-hold. “Normal” on one of these would be a “real” 10mm (seeing 50mm field).
(If you have a P&S, check the documentation for “35mm Equivalent” and compare that to the real lens range: eg; 5-30mm [eq.: 25-150mm]; dividing the ranges will give you the field of view factor: 25/5 => 5X FoV)
Note that this convention for hand-holding speed assumes common print enlargements (4×6″, 5×7″, maybe stretch to 8×10″). For larger enlargements, one should go to even faster shutter speeds or tripods.
Cameras with image stabilization can give you 2-4 stops of shutter speed compensation for hand-holding. I favor the lower limit, I think 4 stops is still pushing it… But even 2 stops means where convention would say 1/60s one can hold at 1/15s and have a chance of usable image.
NOTE: image stabilization only counters hand-jitters; it does NOT stop subject motion.
Wulfraed
Ok thats what I mean. I have no idea what to do with the numbers you gave.I can understand some of it. But I need to learn what it does.
To plagiarize Hamlet: Get thee to Amazon
Look for the book “Understanding Exposure” (might be 4th edition by now, but the 3rd edition will do)
Wulfraed
Thanks I will look for that book.
B.B.
Thanks for talking about photography of airguns. I have a budget priced Vivitar Vivicam 527 that I use. My results so far have been OK, but it’s obvious their amateur photos. Pyramyd AIR has published several of them on the product listings. But I still have so much yet to learn. Only this last weekend did I finally learn the lesson about going into those camera menus to adjust the settings. I started my airgun photography using the Vivicam 527 in its default mode because I didn’t know any better. A colleague at work who is a professional photography told me to look for the camera’s macro settings for the close up images. She was so right! I turned on the camera’s macro mode, my close up pictures improved in sharpness and focus. I’ve also started playing with the camera’s metering in conjunction with the macro mode. Originally I was using the broad picture default that the camera calls “pattern”. I’ve begun to see some improvements by resetting the metering to either “center weighted average” or “spot” both of which are more focused on the center of the image. One image I’m still working on getting right is a picture of the target when viewed through a scope. I’m really looking forward to your next installment.
Charles,
Looking through a scope is a tough nut! I have done it, but it takes a lot of setup time. The optical axis of the camera and scope have to align pretty closely and that is the trick. That kind of job is one where a $500 tripod head is worth the investment.
B.B.
B.B.
Yes a tripod would help for this, but even more so for shooting video through the scope view. I actually tried that with my Vivicam. It was a real juggling act trying to hold the camera steady and operate the shutter button with my lone right hand while using my left hand to fire the 2240 at the target! The video isn’t great quality, but I succeeded in capturing the 2×20 BSA scope view of the shot impact on the Shoot-n-C target disk at 10 meters. It was so much fun I will probably try it again after I get a tripod. It might be even better after I mount the new Simmons ProHunter 4×32 handgun scope.
B.B.
Thanks for comprehensive guide. Seems my favorite dark gray “gun photo” yoga mat (my GF just hates when I’m using it like that, mwahaha!) was a step in the right direction.
I also use a “trash” solution for getting soft flash light – just put a cloth like t-shirt or white handkerchief over the flash to get dim soft light.
duskwight
duskwight,
Ah, yes — the t-shirt soft filter! I believe I’ve used it myself.
B.B.
Gunfun1, Slinging lead
I took the stock off my HW50 and yes there is long gliding piece inside the whole length of the cocking lever.. to protect it from gouging the spring tube..
chris
Thats good. I still haven’t looked at mine. But Im going to tonight. I want to know also.
That is good to hear Chris. I am glad to see that Weihrauch finally did something to address this design flaw and that you got one of the good ones.
Well Chris and SL I done it. I took the stock off of my HW50s. And yes it does have the white piece of plastic insert. I think its nylon. But not sure about if its nylon or something else.
And I also noticed that the main spring rides over a metal tube. Like a guide or something for the spring to ride on. Maybe its me but I don’t think I remember seeing that on other spring guns that I had.
And I did put it back together without touching anything else on the gun. But I really did want to look at the trigger.
And I took some pictures of the insert in the gun when I had the action out of the stock but the pictures just ain’t focused sharp enough. I was able to get pretty close. But they didn’t turn out right yet. I think I will give my wife’s digital camera a try on some up close pictures to see what I can get to happen.
So much to do and so little time. But at least its fun stuff to do.
I finally learned the Avatar thing! Been here quietly trying to absorb some of this knowledge.My last Art class was pretty advanced for a 9th grade class 2 weeks learning the basics in how light works with pigments and how to create true and simulated shadows but that’s been along time.I’ll definitely be looking for shutter speed control.
Reb
My oldest daughter will be in 11th grade this year and has took art all the way through school so far. She is very good at shadings. I have always been good at art also. But my daughter is better I believe. I will have to say that so I dont get in trouble. 🙂
Thanks, B.B.! I’ve been waiting on this one (and trying not to remind you too often in the meantime). Thank you also for not just reposting the original blogs, which I finally managed to track down, but going with new and updated information. Providing enough indirect lighting is still my biggest challenge; when I up the exposure on the camera I start getting digital “noise” in the dark areas. Are you still using those 500W Tosens (I know I’m not remembering the name quite right)? Also, a wide shot of your setup including table and light stands would be helpful. Thank you, thank you, thank you. In tracking down your original blogs, I was amazed at the sheer volume of knowledge you have posted–I’ve archived enough reading to last me into the New Year!
Hiveseeker,
They are called Tota lights. They are so indestructible that they were used to light the inside of a submarine during an atomic bomb test. The sub was moved about 20 feet sideways in the blast and all the bulbs popped after lighting things during the shock wave, but the lights themselves survived to be used another day.
Yes, I can pull back and show a setup for you. Matter of fact, maybe I’ll make that my next topic.
B.B.
BB
That will be good. Light placement is really my problem right now. I can’t get the light to look even on the picture. I always have a bright spot or a shadow.
GF1,
I will show you exactly how to deal with that problem!
B.B.
BB
Good. I think when I get over that the other things will start falling in place.
And here I’m going to post the 2 pictures of the HW50 action and that white insert its the white line right above the dot which is a pin. I took them with my phone. And you will probably know right away what I did wrong.
http://s1373.photobucket.com/user/gcars/media/Mobile%20Uploads/0716140126_zps1a6bfb03.jpg.html
http://s1373.photobucket.com/user/gcars/media/Mobile%20Uploads/0716140129_zps9a90e999.jpg.html
See what I mean. Lighting and focus.
Loved the article! Great tutorial, and a remarkable refresher course. (I’m stealing your “sliding” background for my own.)
As an old photographer – real old, think #22 flashbulbs and 4X5 film – I heartily agree with your
endorsement of tripods. Not only do they provide the only real stability, the also provide us
with the ability to actually ‘compose’ the picture before depressing the shutter button.
Speaking of buttons, I cling to my old film photography habits (You do remember film?) and
select the “A” button for manual aperture control. Then I can stop waaay down, like to f16 –
– which, as you know, slows the shutter way down -another advantage of the tripod.
The added depth of focus (or field) can be a big help in both close ups and on diagonal shots
of long guns. (I was going to post an example shot, but don’t see how to attach one, and
I don’t think you appreciate links.)
Cheers,
Old Rick in Sunny Southern Maryland
Old Rick,
I’m going to discuss depth of field in an upcoming report. Digital cameras make it easier, but there are still things that should be known.
F16? I used to stop down to F32? So dark and long an exposure I would get color shifts from some films.
B.B.
I’ll try it anyway… here’s a link to a diagonal shot with indirect window light
http://www.rangefinderforum.com/rffgallery/showphoto.php?photoid=141377
Rick
NPG,
That’s the stuff!
B.B.
Thanks B.B.
It’s been 30 years in the process. Lots of mistakes, including the first all steel, long, heavy barrel.
(Felt like I was back toting a B.A.R.) But, it’s now a sweet-shootin’ little companion.
Just when they stop producing .22 ammo for this part of the country. ;o)
Rick