
by Tom Gaylord
Writing as B.B. Pelletier
Today we have a guest blog by reader Cloud9. He shows us his repair of a friend’s Crosman 101 last year. This was first posted on the GTA forum in April of 2020, at the start of the quarantine period.
If you’d like to write a guest post for this blog, please email me at blogger@pyramydair.com.
Over to you, Cloud9.
This report covers:
- Whose 101?
- No-go
- Valve tool
- Be careful!
- Get going
- My big vise
- Restoration
- Paint
- Stock
- Assembly
- The result
- Thanks|
Whose 101?
Last year I restored a Crosman 101 for a friend. The rifle belonged at his father and he and his brothers shot it a lot when they were kids. He contacted me about fixing it and getting looking better. I like a challenge, so I agreed.
No-go
When I got the rifle it wouldn’t pump or fire. The trigger was loose and floppy. The pump arm was bent and it had a large crack in it.The metal was missing lots of black paint which is typical for these older Crosman rifles — especially when they’ve been well-loved and used. The steel parts had quite a bit of rust on them.
Valve tool
To remove the valve from a 101 requires a special valve tool. The valve in this one was so stubborn that I broke my tool trying to remove it! Now what?
Be careful!
When your wife asks for a new kitchen trash can you have to be careful. She wanted one that was white like the old refrigerator it stood next to, but you bought her a stainless one. That would never do!
Fortunately the fridge was old and you both knew it was on its last legs, so maybe it was time to replace it before it went out altogether. You went to the local appliance center and — WOAH! When did refrigerators start costing $2,500? You went there with $800 on the brain. But you went there to buy one and buy it you did. Installation wasn’t that much more and within a week you had a gleaming new stainless steel fridge keeping your food cold. This one was wider and lower than the old unit and it highlighted a large gap between the old cabinets and the top of the refrigerator.
Back to the appliance/kitchen center you went and discovered that the custom bleached ash cabinets your wife really wanted, the ones with the glass in the doors, would cost $10,000 installed, but these would have the lights your wife always wanted, to see her work on the formica countertops.
Formica! You promised her when you bought the house 15 years ago that someday you’d get rid of those ugly countertops and install real granite. Now’s the time and you have to do the island, too. It’s only another $8,500 and the kitchen looks sharp — except for the floor. That green linoleum has to go! A bright hand-laid tile floor was only another $12,000 because the extra-large breakfast nook and walk-in pantry had to be done, too.
So — a new trash can for the kitchen only cost you, what — $33,360, plus about 40 meals out while the work was being done. A bargain at any price! Why do I tell you this? Just listen.

Get going
So I had to make a Crosman 101 valve tool. I first got my South Bend 10K lathe up and running. But to get it running required installing and programming a variable frequency drive (VFD) that I had purchased about a year before. And I had to level the lathe, plus clean and lubricate it. I also had to purchase a decent 3-jaw chuck, a quick change tool post and some cutting tools. Then I had to blow out all of the cobwebs from my head to remember how to use this stuff.
This all took me about 3 months to accomplish and COVID-19 gave me some spare time to tinker. I made two new Crosman valve tools out of O-1 steel — one for the small nut inside the hammer and a larger one for the big nut that retains the valve. I heat-treated both of them so they wouldn’t break.
My vise
I had to put the rifle’s receiver in my vise and use penetrating oil, my heat gun and a long lever arm on that new tool to get that big valve nut to break loose. And finally it did — hooray!
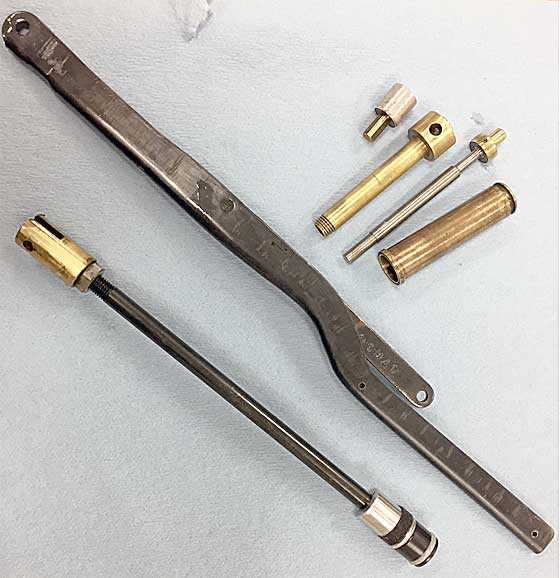
Here’s the valve disassembled, the pump link and the pump rod.
Restoration
After getting the rifle apart I had to order seals. Then I started cleaning. I stripped the paint from the metal and the old varnish from the stock using aircraft stripper. I soaked the rusty metal parts and screws in rust remover, then polished them with Scotchbrite and steel wool. The metal still has some pits and dings that show it has been used but now it has a nice cold-blued finish from Brownells Oxpho-Blue to protect it going forward. A long-time member of the GTA forum sold me another 101 from which I cannibalized the pump arm.

After they were stripped the large metal parts were painted.
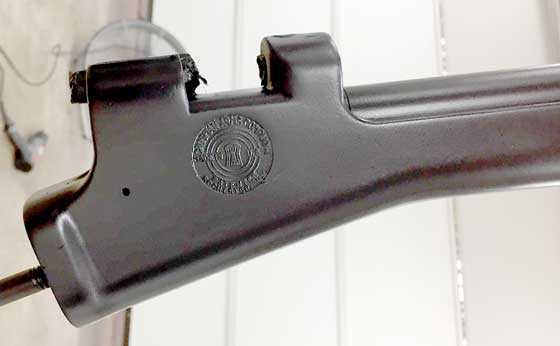
When the paint was sprayed on the cleaned metal parts, the result was smooth and even.
Paint
I used Brownells Dura-Coat two-part semi-gloss black paint. I sprayed it from a airbrush and painted the receiver, pump tube and barrel. I really like this paint because it goes on thin and dries hard, resulting in a durable top coat.
The ferrous parts were cleaned of any rust and lightly sanded or rubbed with Scotchbrite, then given a cold blue.
Stock
I gently sanded the stock and forearm with 320- and 400-grit sandpaper. Then I applied 5 coats of Tru-Oil finish. The stock retains some of the bigger scratches and dents it acquired over its long lifetime, but the finish is much smoother and better-looking than it was.
Assembly
After all the pieces were refinished the next step was assembly. Fortunately I had new tools for this task!
The result
I must say, this rifle came out really nice. It now pumps and holds two pumps of air for two weeks. And of course it fires.
I chronographed the rifle to ensure it really was healthy. Then I zeroed it at 20 yards. Finally I boxed it up for shipment back to its happy owner, who plans to share it with his brothers. Sometimes staying home in quarantine isn’t such a bad thing!
Thanks
I ran this report from Cloud9 today because I had difficulty replacing the parts in my Walther LP53 pistol. I have fitted a new Teflon piston seal, but some of the parts in the cocking mechanism that had to be removed to get the piston out are fighting me to go back in. That took up the morning of Friday, so I set that work aside and put wooden handles on the bullet mold for my rimfire cartridge reloading series in the afternoon. Now that I know how to prime the rimfire cartridge cases, that report can advance again.
I also wanted to run this report because reader RidgeRunner is in the middle of a 101 repair. I thought reading this might encourage him a little. Maybe some of the rest of you are in the same boat?
So, thanks, Cloud9 for saving the day! Oh, and I’m starting to think of things I need your fancy lathe to do!


Everyone,
Well, WordPress did it again. THis post was scheduled properly and they changed it to a draft.
Sorry!
BB
That’s OK. Everybody will live.
B.B.
Is this the “new” format, or have plans changed?
-Yogi
Yogi,
No this is not the new blog format. They are still working on the new website.
BB
BB,
Thanks for this! It is an encouragement!
RR,
I thought you would like it.
BB
B.B. & Cloud 9,
I don’t suppose you can attach a picture showing the 2 valve tools (big and small) you had to make to take the 101 apart?
I figured WordPress was still not playing nice with you. I just hope the IT guys can get the website nailed down. We’ll probably see the new site after Lent.
Siraniko
Cloud9,
How about it. Pix of the two tools you made? 🙂
BB
Here are a bunch of pics. I made a big tool, because my previous tool that fit both nuts was overpowered by the larger valve nut. I didn’t want that to happen again, so I chose much better material, and increased the size of the tool and it’s torque capability.
another pic
Cloud 9,
Many thanks for the pictures.
Siraniko
Cloud9,
I “hear” you man. I have been remodeling our home since 2008. It never ends and always costs more.
You can walk in a circle through my house. I started in the laundry utility room off of the kitchen and went on into the downstairs bathroom, then into the master bedroom, then up the stairs to the loft and it’s bathroom, walk in closet and storeroom, then rebuilt the stairs and replaced the interior walls of the great room.
While this was going on inside, on the outside we replaced the wood boiler and air conditioner with a top of the line heat pump, refinished the logs, rebuilt the porches(which required reframing of much of it), fenced the front yard and put on a metal roof with guttering. I still have a deck to build off the back, a new detached garage and of course, remodel the kitchen. The cost? I do not even want to think about it.
I sometimes wonder when I find time to tinker with and shoot my airguns. Sometimes Mrs. RR makes me take the time.
Boy, I know that feeling. I was a remodeling contractor for years and had the opportunity to work on some great projects. I’m now on the 2nd time around remodeling rooms in my place 1 by 1- and every time I finish a project on my own house I want to burn it down.
PST,
I did new construction and decking. I did my best to stay away from remodeling except on my own home.
Cloud 9,
Nice job on the restore. I am sure that it will bring the owner much joy.
I have done the remodel thing in the past. The last house I bought I decided to opt for newer, maintenance free and will not require interior remodel. Being single has it’s advantages as I have no wife wanting a “new $40,000.00 trash can”. 😉
On kitchens,.. Mom and Dad had the kitchen “refacing” done and it came out exceptional at far less cost. 100% recommend. They had the bathroom done too. My brother had his bathroom done also. Both turned out great. Seriously give the reface thing a consideration for anyone looking at complete re-do’s.
Chris
BB,
I bet the parts that are fighting you on the LP53 are the cocking arm and the small spring behind it. Those took me a good half-hour and a couple of breaks to get back together on my wife’s LP53. The Lucznik 170 clone was a pain, too. Good luck!
Paul in Liberty County
Paul,
Bingo!
BB
Cloud9,
Great that you refinished/repaired the 101 for your friend – they are fun guns to shoot!
I recently overhauled the 101 my father gave me to bring it back to a shootable condition. On a whim, fitted it with a .177 Maximus barrel and a new bolt. Guess that technically (temporarily) it is a 100 now, I’ll be putting the original barrel back on after doing some testing. The rifle had very little paint on it when I got it so, for nostalgia reasons, I opted for a bare metal receiver instead of paint.
Good to see that 101 back in use. Having seen such heavy use (rifling all but gone, parts worn out), mine is officially retired. I still plink with it occasionally but most of the time it hangs quietly on the wall.
Thanks for the blog!
Hank
Vana2,
I always find it interesting that in the World of Airguns a “shot out” barrel would probably be more acceptable to serious collectors than a WELL done barrel replacement. In the firearm World a barrel is treated as a consumable!
Also, in your work with wood what is your skill set on dent removal/reduction from wood (stocks) and forearms? Could you share tips on filling or steaming and refinishing?
shootski
Shootski,
My normal MO when refinishing a stock is to remove the original finish with a good stripper, remove oil and grease with a solvent (usually naphtha), wash the stock well with water followed with a good general steaming. I do this to get clean the wood of contaminants and introduce some moisture to swell the fibers in damaged areas that have become compressed.
After letting the stock dry for a week I will give it a light rub down with steel wool so I can assess what work is needed and make repairs.
I fortify cracks with CA before filling. Deep gouges can be packed with sawdust and set with CA – test a sample of the sawdust first as it can go quite dark. I find that a slightly darker patch is less noticeable than a light one.
A friend made a real mess mounting a bipod (drilled the holes too big and the screws pulled out) so after repairing the broken area I filled the crater with coffee grounds (used and dried) mixed with a bit of coarse sawdust and set with CA. The repair looks like a knot and is hardly noticeable.
Hope this helps.
Hank
For minor dents you can sand the finish down and set a wet rag over the dent to soak up moisture overnight, then work the repar area with a hot iron over that same slightly damp rag to steam the dent out. Keep the iron moving and check frequently that you aren’t burning it.
Thanks B.B. and Cloud9 for a fine report. It gives me encouragement to get started with a couple of airgun repairs I have in the waiting list.
The bit about the trash can hit close to home. A few months ago ‘we’ decided that it was time to clean and re-organize the garaje, which doubles as my woodworking shop. We are still in the middle of it.
Henry
Henry,
My wife threatens to “organize” my cellar workshop. My response is that I will then have to return the favor and arrange her quilting work area to make it more efficient.
So far, a standoff. 😀
Dan
Hang in there Dan! 🙂
Henry
Cloud9, What a nicely made old airgun, Grandad would be proud,good job on overhaul. Ditto on the tool pics. Sorry I lost mine to the sands of time. I want to take the brow pad off an old welding hood, attach an aluminum rod to the front of it, and anchor it to an upside down scope ring attached to the pistol scope and use that instead of a traditional stock to help stabilize my .177 bench rest pistol, because PCP’s dont recoil much at all, and I don’t want the weight of the stock, sort of like the sight on a tank. I have a long eye relief cope on it now for the xtra magnafication, but without a cheek pad it’s hard to get the eye to line up correctly. The rod can be shortened or lengthened depending on the needed eye relief. I’m certain someone else has already figured out why not to do it but, I need to discover if its a good working idea or not. I wouldn’t do this on a .44mag, unless the rod was spring loaded, probably get that adjustment right;) No four jaw chuck?
Almost ready for the trip to Ikea, maybe next year.
Rob
Cloud9
You obviously remember the song by the Temptations.
The one time I was on Cloud 9 that stands out in my memory I was on my Harley cruising the rolling hills and back country roads on a warm summer night with a full moon. Slightly Hi, the road to myself, leaning back with my feet high on the pegs slowly swinging left and right with the wind in my face. That wonderful exhaust, music to my ears. This must be how it feels to fly. “I’m doing fine on cloud 9 !”
So, have you ever considered baking the paint for a more durable finish ? Some things won’t fit in an oven and there are procedures to follow for temp, paint and materials. They can be found on line. I used an inferred heat lamp on custom motorcycle gas tanks as an alternative. Just heating enough to get it warm without boiling the paint. Made a big difference in it being fuel proof.
Bob M
Hi Bob,
Cloud 9 could be related to the old Temptations song, or just the old saying about being on Cloud 9, but I got this one as a nickname that comes from my last name…Cloud.
I have baked finishes before, both spray cans from Home Depot and the Brownells Aluma Hyde, but the DuraCoat 2-part epoxy paint from Brownells works so much better. It is expensive, and does require an airbrush, but the finish is much more robust. I go with Duracoat for all painted airguns that I refinish.
Cloud9
Thanks for the reply. Good to know info.
Reminds me of an old shipmate named Weaver who got the nickname “Dream”. I once said I have the patience of Jobe. It became mine. Funny how nicknames stick. Hay Eugene, you look like a Leon with that stingy brim hat. That’s all it took for him.
Cloud 9,
I really like Aluma Hyde 2, most especially since I do not have an air brush to work with the other epoxy finishes.
I first used this stuff when I was rebuilding the old Mossberg target scopes. When you give that epoxy plenty of time to cure, it is an awesome finish.
I emailed Hatsan USA
Wanted to know if the Kalifornia gun stock, thumbhole with a bar between the bottom of the pistol grip and stock was necessary for structural integrity on the semi-auto Invader? Of course they failed to reply. I got the PCP anyway.
Well I used a miter saw to slice that bar off being careful not to damage it too much in case I had to reinstall it with some attaching hardware. While I was at it I sliced off the protruding sections of the upper and lower rail sections up front. Trying to get that “More traditional AR look”.
The Invader looks great and I did not detect any change in the structural integrity of the stock or grip once separated. They are still connected as a unit above. However I will not be using the rifle to split logs now. The only obviously reason for making it that way. I was surprised to find out that that bar really restricted the way you handle the rifle. Half the time my arm was in the path of the bars original position. Try to get a picture soon.
I considered installing two small guide pins between the upper stock and receiver, if it turned out to be loose, but I really don’t think it will be necessary now with any normal use. Material used to make it is really tuff.
Now speaking of home projects. Sometimes being able to fix, repair and maintain everything can be considered a curse and lately it seems like I must perform three other things to even start a job. Other people may have more free time on their hands by paying others to do the job but I can tell you, doing things myself certainly contributed to me getting rich in my old age.
Now my rememberer is betraying me. “Think I need to trim that tree branch” Where the hell is the pruner? Not in the yard shed, not in the garage? Did I lend it to my neighbor? No. Two weeks later I find all my yard tools in the trunk of a car I don’t drive. Then I remembered, it started to rain one day and I threw them in the trunk to keep them dry till the rain stopped. It never did that day.
Bob M
That’s quite an interesting air rifle. My takeaway from this good article is it pays to be cautious when tackling a task one has not carried out before and, importantly, if you’re gonna have to spend a lot of money on tools/supplies you might use only once or twice in your lifetime, you’re better off developing the skill of figuring out who are the experts and entrusting them with your project. Granted, failure is a great teacher and it is satisfying when one is successful at a task after overcoming that very fear.
Basil,
If failure is a great teacher then I’ve got my PhD! 🙂
BB
BB
Excellent qualification for the Head Master of the Airgun Academy.
Cloud9,
That’s a nice report, and I love the refinishing work you did on the gun.
Take care,
dave
Cloud9,
That old Crosman 101 looks a lot like my old Crosman 147. I bought the 147 when I was about 13 or 14…now I’m 74. My ex son-in-law broke it for me about 20 years ago while I was at work. Last year I bit the bullet and decided to repair it. Than ended up being a total rebuild before I was done. The pivot pin was broken in the cocking arm. I spent $15 on a new pivot pin and $35 for a new seal kit. That’s more than the original cost of the the gun but it was something I had wanted to do for some time. I’m glad I did it.
Geo
Cloud 9
I really enjoyed the write-up. A lot of good information.
Would you consider posting a couple of pictures of the finished product. All I see is parts and tools.
Thanks