

The Gauntlet 2 precharged rifle from Umarex.
This report covers:
- The test
- Filled the rifle
- What pellet trap to use?
- First string
- A different pellet
- Back to JSB Exact King Heavys
- Cocking
- Handle it like a Garand
- Getting tired
- The trigger
- The rubber mulch target trap
- Summary
Today we begin looking at the velocity of the .25-caliber Umarex Gauntlet 2 precharged rifle that I’m testing. I’ll tell you right now, there are some pleasant surprises coming today!
The test
I agonized over this test, as I told you several days ago, because the Gauntlet 2 is supposed to get more than 50 powerful shots in .25 caliber and more than 70 in .22. This is one time I am glad that I chose the .25. You’ll see why I say that as the report unfolds.
I had planned to test the shot count and velocity with the rifle charged to 310 bar/4500 psi and then to fill it to 3,000 psi with a hand pump and test the shot count for that, as well. Many shooters can afford the Gauntlet 2 and a hand pump, but they aren’t ready to take the plunge to a carbon fiber air tank or a small compressor that goes up to 4500 psi, just yet. Believe me — I understand. Been there; done that; got the t-shirt and wore it out!
But sometimes when you plan something out, life happens and man’s best schemes Gang aft agley! That’s what happened to me today. But it was a good thing — a serendipitous thing. And we will all be better for it.
Filled the rifle
I filled the rifle on October 7, the week before Part 1 of this report was published. When I checked the onboard gauge today it was down a few hundred psi, so I topped it off and the onboard gauge read full. It was probably down a little because it had cooled off since I last filled it. At any rate I went into this test with a full reservoir.
What pellet trap to use?
Since I had just finished testing the rubber mulch pellet trap I thought I would use it for today’s test. It certainly would be quieter than my steel trap. I had my electronic earmuff hearing protection ready to use, but I fired the first shot without wearing them, just to hear how loud it was. It was loud, but not nearly as loud as I had imagined. No hearing protection was needed. Though I was in my garage, I fired up the sound meter to record the second shot.
The Gauntlet 2 is loud but not overly so.
The rubber mulch trap absorbed much of the rifle’s noise. I put the steel bullet trap behind the box as a precaution, but we’ll see later that it wasn’t necessary.
First string
I decided to use the JSB Exact King Heavy pellets to test both the velocity and the shots count of the Gauntlet 2. These pellets are not the King Heavy Mark II, but the earlier ones. They weigh 33.95 grains, which will deliver a wallop in .25 caliber!
I’m going to show you every shot in this report, because it has a bearing on where I’m going today. Here we go.
Shot…..Vel
1………856
2………856
3………867
4………862
5………856
6………867
7………860
8………847
The average for this string was 859 f.p.s. and at that velocity this pellet develops 55.64 foot-pounds of energy. That’s slightly more than the advertised 51 foot-pounds. The velocity spread for this string went from 847 to 867 f.p.s. That’s a 20 foot-second difference.

A different pellet
I wanted to try a lighter pellet, so for the second string I shot .25-caliber Benjamin domes. They weigh 27.8 grains and in the Gauntlet 2 this is what they did.
Shot…..Vel
9………925
10..……922
11………818 *
12..……918
13..……921
14..……923
15..……917
16..……922
* I don’t know what happened with that shot, but it sounded weaker. It wasn’t a wrong pellet, either. Perhaps the Gauntlet 2 is just wearing in?
Taking all 8 shots into consideration, the average for this string was 908 f.p.s. It would have been faster except for that one slow shot. The spread for this string was 107 f.p.s., but if we don’t count that slow shot it’s 7 f.p.s.
At the average velocity this pellet develops 50.91 foot-pounds. That’s almost the advertised energy for the .25-caliber Gauntlet 2, and the rifle has done it with a lighter pellet!
Back to JSB Exact King Heavys
From this point on, I shot JSB Exact King Heavy pellets. That way we can get a reliable shot count.
Shot…..Vel
17..……863
18..……857
19..……851
20..……852
21..……851
22..……855
23..……849
24..……859
The average for this string was 855 f.p.s. The spread went from 851 to 863, which is 12 f.p.s. At the average velocity the pellet developed 55.12 foot pounds of energy.
Shot…..Vel
25..……866
26..……855
27..……855
28..……850
29..……853
30..……855
31..……860
32..……850
The average for this string was 859 f.p.s. The spread went from 850 to 866, which is 16 f.p.s. At the average velocity the pellet developed 55.64 foot pounds of energy.
Cocking
The online description says the Gauntlet 2 is 15 percent easier to cock than the first Gauntlet. I can’t tell whether it is or not, but about at this point in the test I discovered something that I think is important. You can’t feel when the rifle cocks. There is no positive stopping point for the bolt, nor is there an audible cue that the rifle is cocked. The bolt simply becomes mushy (and harder to pull) as it is pulled back. It is at that point that the rifle is cocked. Once I developed a feel for it I also knew how to handle the rifle.
Handle it like a Garand
You don’t handle an M1 Garand by pussyfooting around. You pull the cocking handle back with a lot of force and when you load a clip you anticipate the place where the bolt will snap forward and close. In short, you handle a Garand like a man. Same same for the Gauntlet 2. Once I started doing that the rifle was very easy to handle.
Shot…..Vel
33..……852
34..……855
35..……850
36..……853
37..……853
38..……853
39..……860
40..……850
Wow! we are 40 shots into this fill and the Gauntlet 2 is still averaging 854 f.p.s. with this heavy JSB pellet. The spread went from a low of 850 to a high of 860, so a 10 f.p.s. spread. At the average velocity the pellet developed 54.99 foot-pounds on this string.
Shot…..Vel
41..……857
42..……856
43..……850
44..……855
45..……853
46..……857
47..……860
48..……852
On this string the pellet averaged 855 f.p.s. which generates 55.12 foot-pounds of energy. The spread was 10 f.p.s. again. It went from 850 to 860. Are you starting to see a pattern?
Shot…..Vel
49..……860
50..……853
51..……849
52..……848
53..……849
54..……849
55..……865
56..……858
Well — there are your 50+ powerful shots. The rifle is still averaging 854 f.p.s. which gives us 54.99 foot-pounds for this string. The velocity spread went from 848 to 865, so a total of 17 f.p.s. difference. Heaven forbid!
Getting tired
At this point in the test I was getting tired. But the Gauntlet 2 wasn’t. So we carried on.
Shot…..Vel
57..……864
58..……860
59..……855
60..……857
61..……858
62..……852
63..……851
64..……856
This is like trying to keep up with a marathon runner when you started running at mile 20! This .25 Gauntlet 2 really wants to shoot! The average for this string was 857 f.p.s. which generates 55.38 foot-pounds with this pellet. The spread went from a low of 851 to a high of 864 f.p.s., a difference of 13 f.p.s. Cowabunga!
Shot…..Vel
65..……857
66..……852
67..……850
68..……858
69..……855
70..……850
71..……855
72..……849
The average for this next string was 853 f.p.s. That’s good for an energy of 54.86 foot-pounds. The spread went from a low of 849 to a high of 858 — a difference of 9 f.p.s. Is this rifle ever going to run out of air?
Just for fun, I took a picture of the onboard pressure gauge at this point, after 72 shots had been fired.
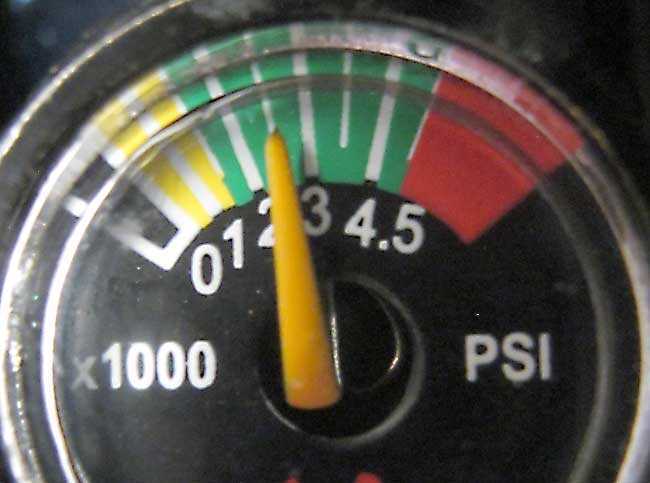
The onboard gauge after 72 shots have been fired.
Shot…..Vel
73..……861
74..……855
75..……846
76..……847
77..……837
78..……831
79..……833
80..……824
Finally! We seem to have dropped off the power curve, that in this case is the regulator, at shot number 77. That means there were 76 powerful shots in the test rifle. The slowest shot in those 77 was shot number 75 that went out at 846 f.p.s. The fastest shots in the 77-shot string were numbers 3 and 6 that were both 867. So across 76 shots the velocity varied by 21 f.p.s. That’s a lot of shots — especially at this power level!
I took another picture of the gauge at this point.

After the final string the gauge looked like this.
The trigger
I thought you would never ask. The trigger on the Gauntlet 2 feels squishy. But, like cocking the rifle, it’s a squishy that can be learned. I still can’t always feel when the trigger is going to break but I am getting closer.
When I measured the trigger with my gauge stage one, the squishy stage, stopped at 2 lbs. 15 oz. and stage two broke at 3 lbs. 2 ozs. Perhaps it’s just the closeness of the two stages that’s throwing me. This trigger is adjustable and I had better give it a go.
The rubber mulch target trap
I used the rubber mulch target trap for this entire test, and that was on top of the 20 shots and one arrow that had already been shot into it. So it did get chewed up a bit, and I thought you would like to see that.
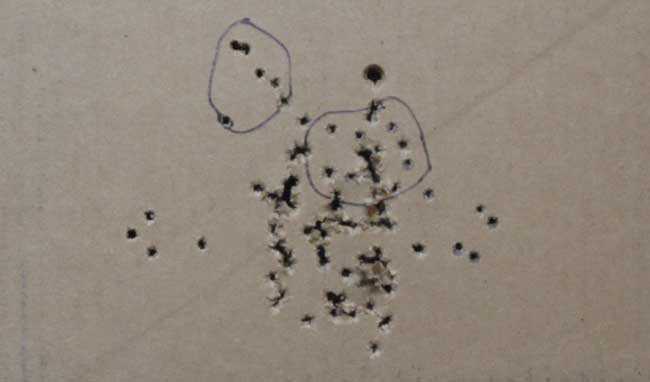
There are the 80 holes that were made in this trap from this test plus the 21 holes from the two past trap tests.
I show you the trap in case you wonder, as I did, whether the pellets can eat their way through the rubber mulch. We know from yesterday that pellets that are even more powerful couldn’t even make it five inches into the trap, but what about the constant pounding of a test like this?
Well, I turned the trap box around and looked at its back, as well as the cardboard backer I placed on my steel pellet trap that was backing up the mulch trap. There were no new holes in the back of the box, nor were there any holes in the backer board on the steel trap. The mulch trap did its job!
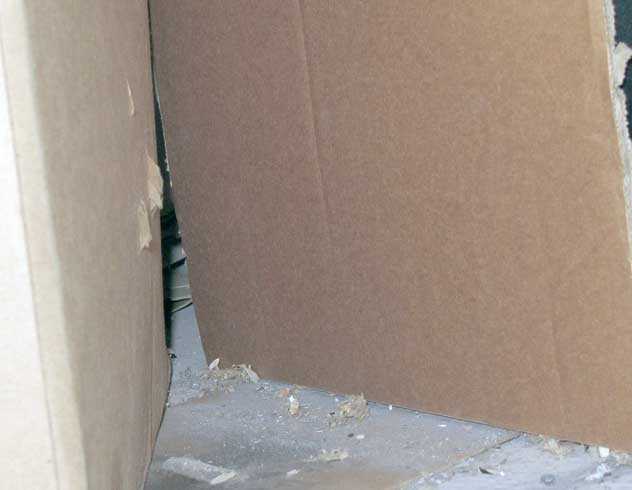
After 80 shots into the trap, nothing made it to the back. Those holes are from previous tests.
Summary
I wanted to test the rifle after filling it from a hand pump but that didn’t happen this time. Next time I’ll do that plus I’ll adjust the trigger so stage two is more distinct from stage one.


Very cool. Can’t wait for the accuracy report.
Just a FYI, U-HAUL sells a 12x12x12 box for $1.25
It is part number SB12..
For those of us that like to be OCD about their projects.
Ian.
You can also get some nice boxes at FedEx (free). ;o)
BB,
I’m a little concerned about the vague cocking point and the mushy trigger. It is suggestive of a shallow notch. Only long term use will reveal if this is a problem or not. Please do look into the trigger adjustment. Is it going to be like the trigger of the Crosman 160?
Siraniko
Siraniko,
We shall see about that trigger.
BB
B.B.
Wondering if this rifle will be a 100 yard benchrest champion? Isn’t that what PCP’s are for?
-Y
And what can a 100 yard pcp bench rest champion do?
Kill small to medium game at 100 yards?
RR
Yes for sure.
Win lots of money. Guy at my range won 3 grand and just missed 10 grand by one point!
That is what they can do!
What can you do??
-Yogi
Yogi
Well I sure ain’t that kind of champion. Whoops I mean I ain’t never tried to be that kind of champion with the pcps I have had. Not to say the pcps weren’t champions.
But I sure can hit a golf ball at 100 yards numerous times with the champion pcps I have and had. Or do you mean the champion shooter behind the trigger. 😉
There are lots of 100 yard bench rest competitions that pay BIG bucks. Utah Airguns seems to sponsor a lot of them.
-Y
PS if you really can hit a gold ball 10 times out of 10, perhaps you should enter?
Yogi
I haven’t shot completion in years. And don’t intend to anymore. I shoot to relax. I can pretty much shoot whatever I want where I’m at now.
So it’s Gunfun1 just having fun and relaxing now.
Yogi,
All sproingers are good for is shooting feral soda cans at 10 feet, aren’t they?
BB,
Golly gee whiz, you are so mean! I did not have much trouble resisting the Gauntlet, because though it was a good shooter, it was b’ugly. At least IMMHO.
Now this thing is another story. This is shaping up to be a real shooter and is also aesthetically pleasing, once again IMMHO.
Once again you will likely demonstrate that one does not have to mortgage their home to afford a nice shooting air rifle. The only reason I do not acquire one of these is I do not really need it. I have a superb collection of sproingers and a few PCPs, including an 100 yard benchrest champion.
Good morning, B.B. What does the cardboard divider look like after all those shots? Here’s a tip: slide a clean piece of cardboard in alongside it before taking out the old one, or you’ll be dumping out half the box of mulch to get it back in. You see, I’m curious when you also get to the accurracy test if you will get a lot of tunneling like AlanMcD reported yesterday.
I’m predicting that your scattered shots during the velocity test pushed the mulch around and would not let too many shots slip by the divider, but when you get to accurracy testing, you might find deeper tunnels into the mulch.
Roamin,
Now I want you to think about this. How am I supposed to put the divider back into the box when the mulch is in?
Once the divider was removed from the box after the second mulch test it was never reinserted.
BB
Whoops, I forgot that you had reported that you had taken the divider out. Sorry. You are right. You would have to dump the mulch out into another container and refill the box with a new divider. I have two shallower boxes back to back that I am experimenting with.
BB
RG was a bit late with his hint on replacing the center piece of cardboard. Truth is,, as simple as it is,, I never thought of it either. When I build mine,, I will try to remember.
Ed
Guilty as charged.
Ed, did you see my question to you yesterday about the peep sight? The blog wouldn’t let me reply to you directly, but I was hoping you would see it.
RG
No, I didn’t see your question. I’ll see if I can find it now.
Ed
B.B,,
Now this is an interesting PCP; I’ll be particularly curious to see how she does with the hand pump fill; thank you.
Take care & God bless,
dave
BB,
So, a single 393 cc, 4500 psi fill in a .25 caliber yields 76 shots at 50ish FPE with a 21 fps spread.
Guessing that a 3000 psi fill would give about 50 shots… which is still decent.
Impressive. The Gaunlet 2 is a prime example of why I think that a regulated PCP with an “up to” 4500 psi fill is the optimal solution.
Hank
Hank,
I’m guessing 3000 psi will give around 30 powerful shots. We’ll see.
BB
BB,
Your guess is probably closer.
Did some quick numbers and came up with 31.6 psi per shot. So 3000 psi fill and a 2100 set point would be about 28 shots before falling off the reg.
Will be interesting to see what the real world results are.
Hank
As it has been alluded to if you keep shooting into the same small area of a box of rubber mulch you will eventually drill a hole to and through the rear of the box as the mulch is slowly forced aside so be sure to shake it up between shooting sessions.
B.B.,
“Now I want you to think about this. How am I supposed to put the divider back into the box when the mulch is in?”
You could push the divider down along the back wall of the box, then push the top edge forward and backfill the newly formed void, repeat until half the rubber mulch is in front of and behind the divider…:^) LOL!
Where there is a Will there is a WAY!
shootski
PS: No engineering fees will be charged for this consultation.
Okay, Will, why don’t you build a box and try it? 😉
BB
Two or three kitty litter boxes filled with rubber mulch and placed one in front of the other would probably work pretty good as a replacement to one big box. B.B., you wouldn’t have any of those around? ;o)
How about this for replaceable-divider target box?
Put a slot (two dividers thick front to back) across the top of the box (left to right facing the box), …. Put a thin “border” between the inside edges of the slot(s) to separate into 2 divider slots. The “open” center area will constitute the usable target area. (Picture your computer screen – open display area surrounded by metal border.)
Now flip the box (towards you) on its face, with the top half of the mulch held UP by the existing divider – which is in the rear(now top) slot .
The idea is that the lower (previously front) half of the mulch will now be pulled down by gravity, leaving “some” space between the divider in the rear(now top) slot and the settled-down front mulch.
Insert divider #2 into the now-opened front(lower) slot, remove old divider from the (now-top) rear slot, and flip the box back right-side up, …VOILA!
New divider replaces old, mulch still divided front/rear as before.
Next time, flip box on its BACK, rather than its face, and the same procedure will replace divider #2 with newer divider #3.
Position target so that impact zone is off center in use, and rotate box clockwise or counter clockwise. as needed to shift impact zone and minimize tunneling.
To improve useful life of target box, put another set of slots ( with dividing border)at 90 degrees to the first slots, and turn the box 90 degrees right or left and here is a fresh, equally functional target. The 4 faces (front/rear ..left/right), with each rotated 4 times, to shift the impact zones, offer 16 relatively tunnel-free target positions!
Is this cool, or what !?
A tiny bit of production thought could make this an inexpensive, (foldable?) lightweight(for shipping) marketable target “kit”. User provides rubber mulch from local dealer. 🙂
Comments welcome!
CBS
Hey CBS,
Did you do the design for: https://en.m.wikipedia.org/wiki/Tennessee%E2%80%93Tombigbee_Waterway
I’m not certain that those instructions would survive the Chinese manual writer!
I shoot mostly Big Bore and don’t think the cardboard box of rubber mulch would contain 500+ foot/lbs of .458 Lead bullet…but I could be wrong ;^)
Seriously you need to make your instructions
simpler Think KISS
airguners live by the KISS concept
perhaps along the lines of: Insert Tab A in Slot B, next fold Flap C over to Side D, then turn counterclockwise and repeat previous steps…finally invert and fill all compartments equally with (User Supplied) rubber mulch.
shootski
shootski,
Your KISS instructions do not describe said tabs, nor where on the cardboard to position tab A,B, etc. My own description of parts, positions, and purposes were actually incomplete. I did not address the provision of means for opening the trap and shuffling or refilling all, or only part of, the mulch, presumably the front half that experienced the most tunneling impact, since fewer of the projectiles penetrate into the rear compartment.
Re. “penetration”: I must have missed any discussion of this box being expected to stop and contain projectiles from super-whackers (500+ ft/lbs).
Seriously, you need to change the previously discussed dimensions of the box from a 12 inch cube to make it a 12 foot cube. I am confident this will stop your “Big Bore”.
I also failed to describe construction/materials for the two “separation” channels needed to keep the two dividers separated and sliding freely in their respective slots. I may yet do this.
(Warning – I will use the words I consider necessary. At 81, I am most probably unteachable regarding new-dog grammar/writing skills. )
So, you see, more, rather than fewer words would have been required to really cover the topic. I am mortified to have been judged remiss for my verbosity, when in reality my sins were sins of omissions 🙂
Thanks Shootski, for your suggestion for more brevity, although truthfully, you were a bit off-the-mark.
Promotion? As a matter of fact, I would never submit product instruction to a “Chinese ad writer”. (if I catch your drift.)
As it is, my post here was intended to stir thinking. If that is not possible for a certain nunber of people, airgunners or not, then I am not writing for them.
“Too many words” is seldom heard from good readers
who perceive and digest the info that specific words have been carefully chosen to convey.
If I were actually to sell any product, instructions would include clearly explanatory images ( worth 1000 words each donchaknow? )
Some things can only be thoroughly described using
a certain number of words, regardless of any number of impatient readers, or “I never read instructions” types.
Perhaps someday I will take the time to learn to post images on this website, …after which we may hold a better back-and-forth on my communicating ability 😉
I seldom post here (or elsewhere), preferring to avoid exchanges unrelated to the actual subject.
There are many contributors at this blog
who know many times what I know about airguns. A great deal can be and is shared/learned here.
My thanks to BB and to all of you!
The projectile stopping box, though, is a relatively simple thought experiment. If you would like to think-of and offer for our critique some further developments on the actual topic, I have already invited you to do so.
CBS,
I trust you understood the Tounge-in-Cheek nature of my reply.
“(Warning – I will use the words I consider necessary. At 81, I am most probably unteachable regarding new-dog grammar/writing skills. )”
You have me by less than a decade so my perspective is not much different than how you see things.
I do think your concept deserves photography to assist the readership in what sounds like a great rubber mulch trap for the “typical” caliber airguns.
Be well and shoot straight,
shootski
CBS, I find your concept interesting, I like to shoot targets in my basement, and I find that the rubber mulch is quiet and safe. I have been thinking about how to improve upon the simple concept, so here are my thoughts:
The two drawbacks to rubber mulch that I have experienced is the potential for the tunneling effect and the weight of the mulch and therefore the weight of the box. A cardboard box is a cheap way to get started, but the size of the box and the depth of the mulch seems to need to be matched to the gun used, especially considering the potential tunneling effect mentioned by others, but which B.B. has not yet really tested (no offense B.B. but your velocity testing on the face of the box resembled a shotgun blast, each pellets served to push the mulch around very effectively, so you did not observe any tunneling effect). I am experimenting with how thick I need the mulch to be for my purposes. To me, the purpose of the divider is to see how thick you need the mulch layer to be, so you can cut down the weight of the box that serves as your primary target. The primary target will absorb and contain the brunt of the shooting and ideally, will not let any shots through, even with the tunneling effect. So for example, I reported on in a prior blog posting my small box that absorbed 750 shots from my relatively low powered
177 springer. There was tunneling, but the tunnels would collapse when I would replace the front of the box with a fresh slice of cardboard (I would say every ten targets or 100 shots), taped over the front. Just the act of laying the box down to replace the cardboard face and flipping it back up was enough. I never rotated the target position because I was trying to get the pellets to penetratrate the box. However, when I tried a .22 Beeman R7, I blew through that small box of mulch with 5 or 6 shots to the same spot with HN Barracudas. That tells me I need a thicker box of mulch to stop pellets from that gun. BUT perhaps not 12″. Well I think I figured out a good solution. I went to FedEx and found a newer white box they call their Extra Large Box. It has big flaps that go across the entire face of the box, but it is really only about 7 or 8 inches deep if I recall correctly. I filled a couple of those with mulch and stood them up one in front of the other. So I have overall, a deep, safe mulch layer, but the front box only weights half as much as the entire system. One could slide in a metal backstop in the rear box for added security. So with two thinner boxes, you essentially have your divider. If all your shots are stopped by the first box, you keep the second box for insurance. If your shots are getting through the first box, you need to either add a third box or get a thicker first box. I think this system keeps the “dirt cheap” and “KISS” goal of the cardboard box rubber mulch pellet trap concept without complicating the whole system with extra inserts.
Although I appreciate your concept, the reason I suggested to B.B. to put a cardboard insert in his 12″ x 12″ x 12″ box is that I figured it would be difficult to determine how deep his pellets were penetrating into a cubic foot of mulch. Case in point, my other mulch trap is a plastic storage bin with a hole cut out in the lid. The lid holds down a replaceable slice of cardboard, and I flip the whole thing on its side to shoot. It has absorbed all the shots from .177 pellets from my Embark and R7 and .22 pellets from the R9. I don’t know how far they penetrate but I know they haven’t come out the bottom. But it’s pretty heavy. Hence my interest in discovering the thinnest effective box for a mulch trap because that first layer needs to be maintained, and if it’s heavy, it becomes a chore.
All the best.
BB,
After tearing down a cardboard box I decided to make a more permanent rubber mulch trap. The dimensions were determined by the size of leftover 3/4″ plywood. For the front panel I used 1/4″ plywood with a larger hole in the center covered by replaceable cardboard backing and the target itself. If needed, it slides out of the box to replace the mulch, although I don’t think that I will ever have to do that. A metal plate in the back is a last ditch insurance but no pellet has gone there yet.
I also have a .22 trap collecting dust as the impact of a pellet is much louder than the gun report itself. I was already sold on the rubber mulch trap and your testing – particularly with the arrow – confirmed my theory.
Henry
Henry,
That’s a fine-looking trap.
BB