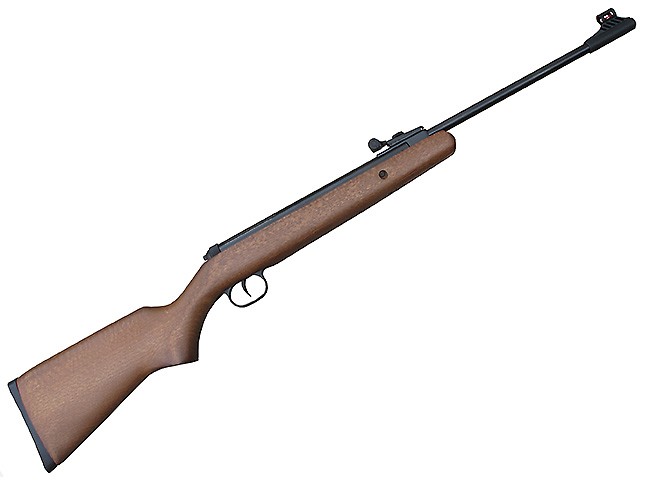
The Diana two forty.
This report covers:
- Pyramyd Air
- Tissue paper test
- Removing the breech seal
- The depth of the two forty breech seal cutout
- What now?
- O-ring
- Let’s test it
- Install the factory seal
- The trigger
- Spring dry
- Things we now know
- Summary
Today we take a look at shimming that breech seal in the Diana two forty. If you don’t remember the issue we had I recommend you read Part 2 again.
Pyramyd Air
Before we begin I want to say a word about Pyramyd AIR and this rifle. I chastised them in Part 1 for calling it a Diana 240. Now, I’m not so sure that’s what they did.
When they stopped carrying the Diana 240 several years ago they sold the final rifles at $99.95. Coincidentally that’s what the two forty retails for today. It may just be that they left up the web page for the 240 and haven’t yet updated it to say ‘no longer available’. Diana no longer offers the 240; the two forty has taken its place. So Pyramyd needs to update their web page, and I hope they decide to carry the two forty, because it is a worthy airgun, as you shall see today.
Tissue paper test
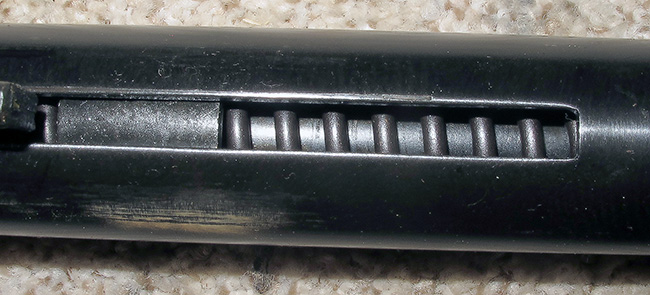
Before I did anything else I did the tissue paper test that was recommended by reader Yogi. I used a genuine bit of tissue from a paper handkerchief and it was a very small piece. If there is a leak, it could be a small one and I don’t want anything to hinder the test.
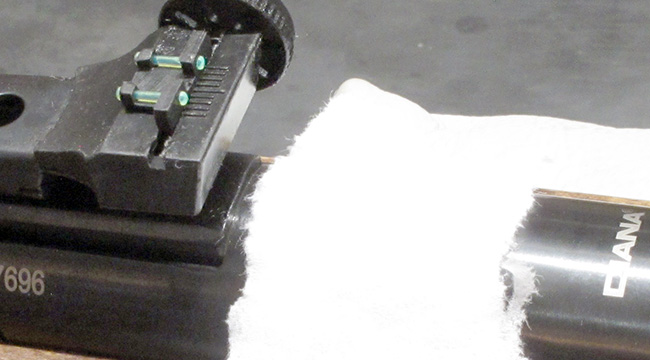
The piece of paper handkerchief is just behind the breech, which is the slot beneath the rear sight. I did that so you could see the breech. To run the test push the paper over the breech that’s to the left in this picture. Then load a pellet and discharge the gun safely while closely watching the paper.
When I tested the two forty I noticed a very small puff of air on the right side of the breech, which is where the breech seal stood proud. The puff was very small and if I hadn’t been watching the paper I would have missed it, because the paper stayed in place where I put it. When a breech really leaks a small piece of tissue like this would be blown off the gun.
The leak was too small to do anything about I would have left it as it was. But so many of you wanted me to show replacingf a breech seal, so I removed this one anyway.
Removing the breech seal
Removing a breech seal from a breakbarrel breech is a risky thing. Some come out easily. Others won’t come out without damage. This time I got caught!
To remove the seal I use a tool that looks like a dental pick but it’s actually a tool that’s specifically made for purposes just like this one.
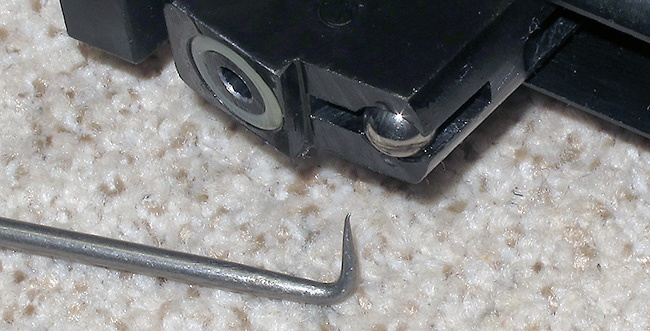
This is the pick tool I use to remove breech seals.
Breech seals come in all different materials and the one in the two forty is not conducive to removal without damage. Instead of an o-ring made from a Buna-N compound that works well with picks, this seal seems to be made of either a nylon or a PTFE compound. That makes it harder and more likely to incur damage when removed this way. When I removed it I put a mark on the outside that I think has ruined the seal.
The pick damaged the two forty breech seal.
Normally when you remove a breech seal you intend replacing it with a new seal, so any damage doesn’t really matter. But this seal wasn’t damaged until I removed it. You wanted to see how this is done and I’m showing you.
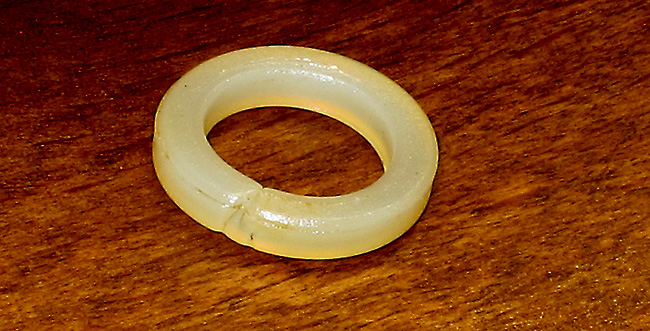
Under the breech seal is a clear flat washer that I also picked out. This washer is very much like the shim I planned to put into the breech cutout.
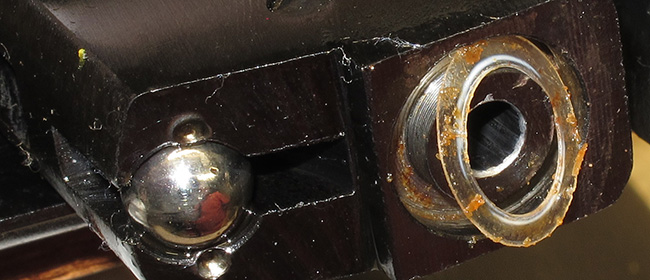
This clear washer is under the two forty breech seal.
The depth of the two forty breech seal cutout
Reader RidgeRunner asked me to measure the depth of the cutout that the breech seal fits in, so I did. He wondered if it was cut to a uniform depth all around. Yes, RidgeRunner, it is. The breech seal cutout measures 0.0975-inches deep all around.

What now?
If the Diana two forty was a German-made airgun I would just buy a new breech seal and replace it. But it isn’t. It’s made in China and I can’t find any place that sells replacement parts. There may be one, I just never found it. What to do, what to do?
O-ring
Well, I know that many Diana rifles use plain o-rings for breech seals and, as shallow as the place on this rifle is, an o-ring might work. I have an assortment of metric o-rings and as it turned out, a number 11 o-ring from my kit is a perfect fit!
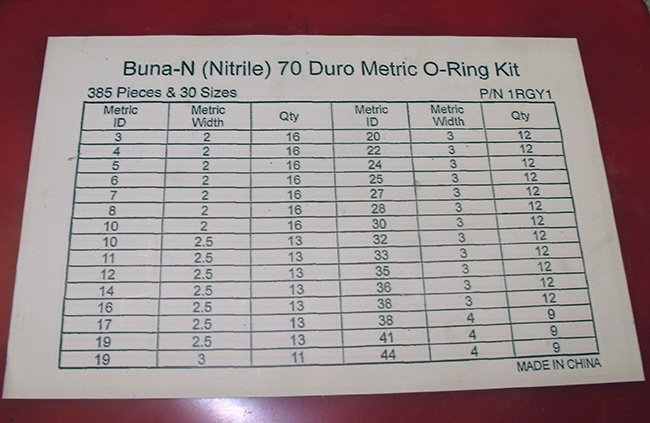
My metric o-ring kit.
I first put the transparent washer back in the o-ring hole, followed by the o-ring, and voila! I think I’m back in business!

The o-rings fits the breech seal place perfectly. Don’t be confused by the dark shadow at the bottom of the seal. The fit is perfect.
Let’s test it
Okay, the fit looks perfect. What does the tissue test say? Well, believe it or not, the tissue moved even less when I shot the rifle with this seal. It barely raised up when the rifle fired.
Now, that isn’t the final word, because I do have a chronograph. We baselined the two forty with the Air Arms Falcon pellet that I’m using for all the tests today. Before removing the factory breech seal the Falcon pellet averaged 561 f.p.s. for 10 shots with a spread of 4 f.p.s., from 559 to 563 f.p.s. With the new o-ring breech seal in place the same pellet averaged 474 f.p.s. The spread was 7 f.p.s., from 470 to 477 f.p.s.
Obviously this o-ring wasn’t cutting it, so I added a paper shim that is 0.010-inches thick on top of the transparent washer. Then I popped the o-ring back in place and the average with the same pellet went to 492 f.p.s. The spread was 8 f.p.s., from 488 to 496 f.p.s. This was better but not good enough.
Install the factory seal
I decided to install the factory seal next. I left the paper shim in place but turned the seal around so the nick on the top and side didn’t show. The average for 10 more pellets was now 577 f.p.s. The low was 576 and the high was 578 for a 3 f.p.s. spread. That’s a little faster than the original 561 average with the factory seal and I have to attribute that to the paper shim.
The trigger
You also wanted to see the trigger, to see if anything might be done to lighten the pull. Here it is.
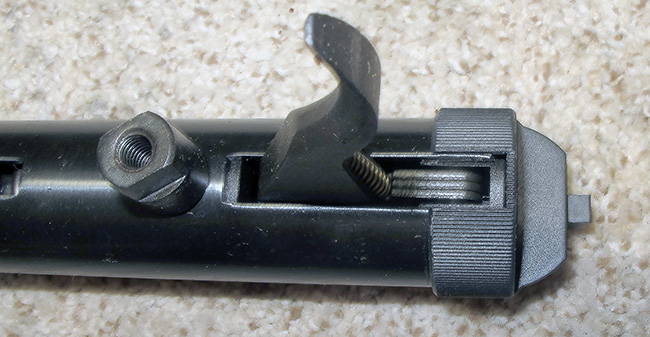
The two forty trigger is plain and has no easy possibilities for adjustment.
Here’s the trigger with the plastic end cap off. You can see that disassembly of this rifle requires removal of the threaded boss in front of the trigger and drifting out the single pin in the back of the spring tube.
The mainspring is dry.
Spring dry
With the stock off I also had the opportunity to see the mainspring. It was dry. So before I put the stock on I squirted a couple small dollops of Tune in a Tube on the spring. I’ll let that spread around for a bit.
I shot the rifle a few more times and it is now dead calm. The little bit of vibration I mentioned in Part 2 is now gone. That’s what I expected. I will chronograph it again, but not until I test it for accuracy at least one time.
Things we now know
We now know that the Diana two forty is assembled in a straightforward way. That means disassembly will be pretty easy.
Once the trigger is outside the spring tube there may be better opportunities to lubricate it. We will all see together when that time comes.
Summary
The Diana two forty is turning out to be a surprisingly nice and well-designed breakbarrel springer. I’m surprised by how well the Chinese manufacturer was able to control quality.


Those Extreme Spreads look/sound real good.
-Y
Tom,
In the picture of the trigger is that a laminated sear the trigger is actuating on? The trigger just might improve with use then, until the sear is finally worn away. Not going to be surprised with the quality if Diana had somebody overseeing the output and negotiated a reasonable price.
Siraniko
PS Section Spring dry 2nd paragraph 2nd sentence: “The little bit of viobration (vibration) I mentioned in Part 2 is now gone.”
Siraniko,
I fixed it. Thanks,
BB
BB when will you shoot the gosh darn thing lol?
Siraniko,
I used to own a .357 and a .44 Magnum Desert Eagles. I do not know if the newer ones are the same, but the originals had stamped metal sear assemblies. Not good. Bad. Those pistols moved on very quickly.
Let us not forget BSF,….. Also was a fan of the lamination.
Breaks in slowly until it breaks out in failure. They were still pretty awesome though.
Frank,
I have yet to own a BSF myself, but I do understand that to be an issue. When I see laminations and stamped metal, I do become wary of wear. Many of the old air rifles just after wars were not the best built things. Diana just after the wars was built rather cheaply. The BSAs just after Vietnam were made with cost cutting in mind.
That is what is wrong with many of the newer airguns. By reducing costs, the quality usually is reduced also. Fortunately, some manufacturers have learned that there are customers out there that are willing to pay the extra for quality.
You also have to keep an eye on case hardening. Some do it right, and some don’t. Just another thing to keep an eye on.
My friend please let me know when you are ready to add a BSF to your lineup. I have a pistol and a rifle that are as new. BSF goes on for a very long time….. All the while the trigger is improving
Until it improves itself to death LOL.
BB
Is the paper shim you added a fix that should last a normal length of time?
Deck
Deck,
It should last a long time. It will likely be compressed very little, if any. “Oil” might deteriorate it, but not likely much. Water is more of paper’s enemy. I do hope that the future owner will take better care of this air rifle.
RR,
Good answer. Thanks,
BB
BB,
As Siraniko pointed out, the Chinese manufacturers must have someone watching their output or as with Snowpeak and Nova Vista, they have learned it takes quality to survive as a supplier in this business. Their competition sets a pretty high standard.
P.S. Last sentence in Tissue paper test. “But so many of you wanted me to show replacingf (replacing of) a breech seal, so I removed this one anyway.”
BB,
The stiff clear plastic used in a lot of packaging varies in from .005 to .025 inch in thickness and is great for shims and stuff.
Hank
Vana2
Good tip. Finally we have a use for this dang packaging that all but prevents removal.
Deck
BB,
Thank you for the lesson in breech seal removal, shimming and testing the repaired seal in a springer. I’m confident thatI could do that myself. I wonder if the dent that the removal tool left in the original could be relaxed out if you put the seal into a cup and poured boiling hot water over it and left it to cool? It was fortunate that you had an o-ring to replace it, but if you didn’t, the OEM seal might still be reusable. The tissue test could prove it.
Some say to use teflon tape as shimming material, but fear that would be a lumpy base for the seal. I like your uniformly flat shim much better.
Regards,
Will
B.B., why do you think the original breech seal (even the uneven, and subsequently damaged one) sealed better and gave better velocity than the o-ring that appeared to sit proud if the breech face and did better than the original in the tissue paper test? That was a surprising result, and I don’t understand that. I have seen many springers with black, o-ring breech seals. I am wondering if we can replace those with these other types and achieve different (higher) velocities, if desired or needed.
The o-ring breech seal in the FAS 6004 has certainly been replaced by a quad seal (I’ve done that myself) and I seem to recall mention of someone using another off-the-shelf seal which was just solid square section rubber.
Of course, the barrel on these is a quite separate part to the overlever casing which contains it, so there is probably a bit more scope for its position to vary and get poor sealing.
Iain
The Engineer in me had to respond to the use of an o-ring:
Since pressure is internal to ID the o-ring will stretch and loose some of its width and proper crush or compression when the breech is closed is essential. Compression set will cause the seal in a breech to leak over time. But an o-ring will leak sooner due to set than a square ring that was the original seal.
To properly size an o-ring and the shim you also need to add the gap between the barrel and the block. That size o-ring needs a crush between 0.020 and 0.032 inch for it to seal properly. So if the breech gap is 0.015 inch plus depth of the groove of 0.0975.
Depth + actual gap + crush – actual o-ring thickness = shim
0.0975 + 0.015 + 0.025 – 0.0984 = 0.039 inches
For o-ring / seal removal, I typically use a small brass welding rod bent, hammered and smoothed into the shape required for the particular seal. Unlike a steel pick, brass is less likely to tear or damage the seal during the removal process.
Did you use any silicone oil or grease on the plastic or paper shim or the o-ring?
Reference:
https://www.parker.com/content/dam/Parker-com/Literature/O-Ring-Division-Literature/ORD-5700.pdf
page 4-18.
Great info. I’m saving your comment for future reference. Could you elaborate on the tool you fashion for removals? Is it flat like a miniature butter or putty knife or pointed like a bricklayer trowel?
I need to make a new one since I’ve misplaced / loss it in various moves across my career. I’ve used a piece of copper recently when I needed to remove an o-ring and that was not stiff enough to easily remove the o-ring. So, I’m order some new 1/16 inch brass rod soon and will post a picture or several to show everyone.
Thanks. A picture is worth a 1000 words.
A small bamboo skewer might have worked to remove the seal with no damage?
BB,
About the Diana 240 page on PA, that was what I thought at first as well. However, you can ‘preorder,’ which I assume PA would cancel with a full refund if anybody ever done that. So, nobody is in fault here. I bet PA will sell two forty one day and update the page accordingly. That must be why they still keep the page ‘active.’ Here, AI could’ve helped.
Fish
BB,
Is it possible to remove the sights? I’ve seen that kind of Diana sights for sale at various places. There is need for aftermarket parts like the o-rings and sight upgrades perhaps. This rifle has something that makes me love it. Simple, practical, accurate, and fun. It’s one of those springers, which, you know, the owner has a large collection of expensive airguns but still finds himself plinking with this one day and night; two forty is that kind of air rifle. I bet once you start plinking, you cannot stop. It is so nice in many ways that it deserves traditional sights.
I’ve seen this kind of products. A friend of mine is into fast supersport bikes. He has always had a couple of them in his garage. One day, he sees a Honda Grom, says what the heck and buys one. He’s been only riding that tiny little bike since then. There is always something like that in different areas, guitars, sailing dingies, over-unders, and such.
Fish
Fish,
The last Air Force base where I worked, one gent, who could afford any motorcycle he wanted, bought a Honda Grom; and he loved it; it was so small that even at the buildings with limited parking, or no motorcycle spaces, he was still always able to find a spot…he also loved the mileage that he got. 😉
Blessings to you,
dave
Yep, just like Grom, two forty might be one of those things that just puts a smile on one’s face.
Tom,
Thanks for doing all of this, mostly to provide some instruction for some of us. I might be misreading the tone of today’s report, but I perceived a slight weariness. (Imagine a father sighing and saying to his kids, “OK. See? Satisfied?”)
But the content was quite instructive for me. Frankly, I really did not know what the tissue test was until I read today’s blog. I had incorrectly assumed it was akin to the impression test dentists use to test one’s bite and how the upper and lower teeth meet. The dentist places the paper in the patient’s mouth, and the patient closes his jaw and wiggles it around a bit (a bit, get it, ar, ar?). The dentist examines the marklings on the paper to assess the bite.
So now I know what I didn’t know, which is always a good thing.
Thanks again for taking the trouble,
Michael
Michael,
Thanks for letting me know. I must have written it for you. And tomorrow’s as well.
BB
I second that, Michael. I have a vintage R7 that had an old, hard, discolored seal that came out in chunks. Now, I know not only how to replace it, but how to tell if it might need a shim, and how to do it. Thank you, B.B.