Today reader Mike Turnlund, whose blog handle is MiTurn, tells us how he built an affordable dueling tree. If you’d like to write a guest post for this blog, please email me at blogger@pyramydair.com.
Take it away, Mike
An affordable dueling tree
by Mike Turnlund
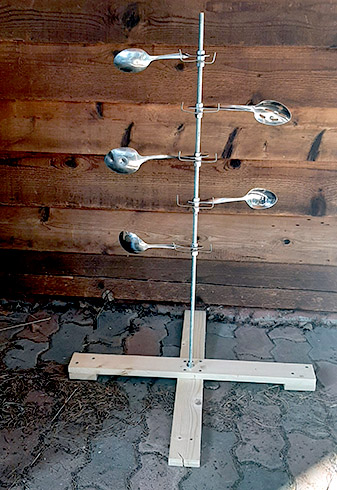
My homemade dueling tree.
This report covers:
- The start
- Found the blog
- The materialsConstruction
- Important
- The start
My handle is MiTurn, but my mom named me Mike Turnlund. I am new to modern airguns, but I have always had an airgun of some sort somewhere in the house. My last was a 1984 Sheridan pump that needed a rebuild. Not being in the mood to do so, I sold it and used the money to buy a brand-new Crosman breakbarrel Shockwave. Wow, what a gun! I did not realize how sophisticated modern airguns had become and I wanted more of this. I have since added to my collection another break barrel and a couple of C02 handguns, a revolver and a pistol. I’m hooked!
Found the blog
That is how I found B.B. Pelletier’s blog and I wanted to learn more. Started from his most recent posting and working backwards, I came upon a DIY article dated October 24, 2019 on how to build a dueling tree. It was written by a reader whose handle is NTOG. I was fascinated by the project and it inspired me. I knew I could build one of those, but one that was even simpler in design. Even BB had commented that some of the parts he used seemed unnecessary. I agreed! What I built for about $9 in material bought from my local ACE hardware is shown above.
The materials
This dueling tree is built around a 3-foot piece of 3/8 threaded rod. The material including the requisite nuts and lockwashers but not the spoons cost about $9. The spoons I gathered from a local thrift store and they cost me 50 cents each, so that’s another $3. The wood was scrap and the wood screws I had in my garage.
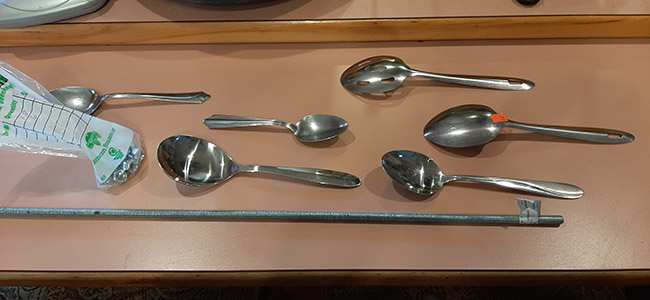
The materials used to build the tree.
Construction
I drilled holes in the spoon handles.
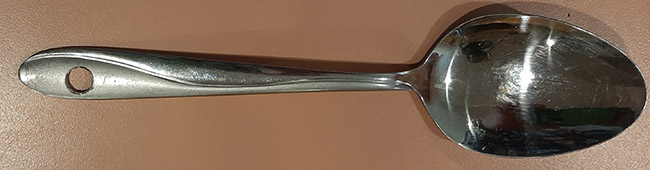
I drilled each spoon handle.
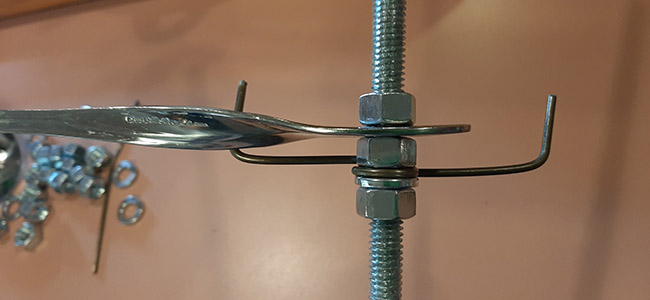
After I had ground and buffed smooth the drilled holes, I secured the spoon handles in my bench vise and twisted them 90 degrees. Be careful here, as you do not want too tight of a twist or the metal might tear. That’s why I ended up using five spoons and not six.
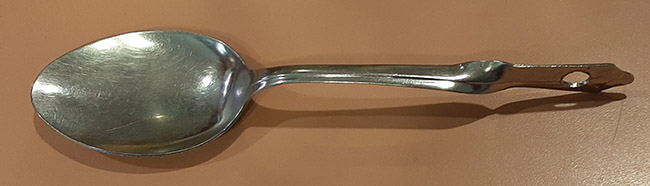
Carefully twist the spoon handle 90 degrees.
Inspired by NTOG’s design, I used wire hangers as the stops for the spoons. I tightly wrapped each of them with one loop around the rod and secured them with two nuts and a lockwasher.
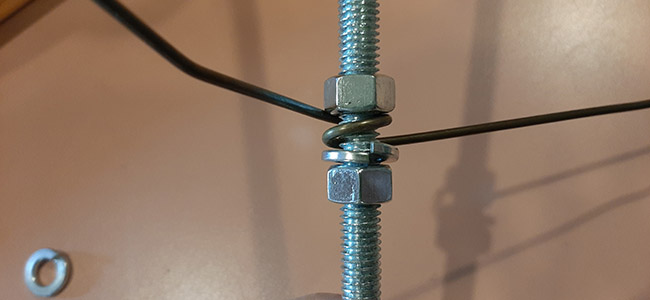
I used wire from a coat hanger to stop the spoons.
I then lightly lubricated the hole in the spoon with a dab of anti-seize lubricant and secured it with another nut.
This is the setup for a spoon. The nut above the spoon can’t be too tight because the spoon has to be free to move. This nut gets the blue Locktite. Allow it to cure before use.
Important
Here’s the important part: the spoon nut can’t be too tight nor too loose. When you find the right amount of tension, secure it with a drop of blue threadlocker adhesive.
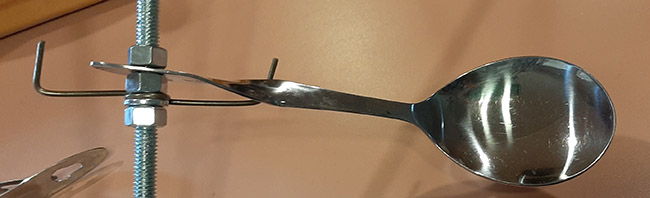
The spoon on the other side.
I originally intended to anchor the rod in a gallon coffee can filled with concrete, but since I was so anxious to use it I made a simple wooden base that you see up top. I counter-sunk the rod end and secured it with washers, nuts, and lockwashers.
That was simple. It’s portable, stable and works great! I not only use it at close range with my pellet handguns, I also use it with my .177 Crosman break barrel. When using a C02 handgun I am about seven yards/6 meters away. With my rifle, it is set about 25 yards/23 meters away.
The spoons are holding up very well – better than I thought they would. They are going to last for dozens if not hundreds of shots. Regardless, they are cheap and easy to replace when needed.

Welcome to the blog MiTurn.
And thank you for the guest blog.
Everyone loves a dueling tree, but store bought ones are expensive.
I know with these easy to follow instructions, many will make it.
Great report, and thank you again.
Ian
MiTurn,
Very nice blog on making one’s own dueling tree. So the wires in front are just to stop the spoons from spinning round and round? How did you twist the spoon handles? Did you put one in a vise and twist with a wrench or did you hold with pliers and twisted with another one? Previous experiments with sheet metal taught me that if the two tools are close together I was more likely to tear the metal sheet. Usually a 1 1/2 inch spacing worked best for me then.
Siraniko
Siraniko,
“After I had ground and buffed smooth the drilled holes, I secured the spoon handles in my bench vise and twisted them 90 degrees. Be careful here, as you do not want too tight of a twist or the metal might tear”
BB
Tom,
Sorry Teacher. Fingers working faster than my brain during my lunch hour.
Siraniko
Siraniko,
If you clamp the metal in a vise and use an adjustable wrench set to a “just touching” (but not gripping) the metal strip the wrench will ride up on the spiral as you rotate it.
The jaws on the wrench should be in good condition (not sacred and rough), the metal should be free of burrs or sharp edge and a smear of oil on the metal helps the operation go smoothly.
…You can tell I do this fairly often 😉
Cheers!
Hank
Hank,
Autocorrection usually is an annoyance, but every once in a long while it can produce poetry: “sacred and rough.”
If you don’t mind, I will hold onto that until I have a use for it. :^)
Michael
MiTurn,
first off, I like how you came up with your username. 🙂
What an interesting reactive target, thanks. Tuning it to one’s airgun by simply tweaking the shooting distance is a good idea. 🙂
Are your CO₂ powered handguns steel ball shooters? If so, how do you deal with possible ricochets?
When actually duelling, as long as both parties are far enough apart, the spoons can’t hide behind the duelling tree trunk. However, for the lone shooter, I can imagine that possibility. So, I guess, either one could side-step until the spoon becomes visible again, or, how about, instead of one spoon, fixing two together at a right angle? 🙂
3hi,
That can be done, but you are making this much more complicated than it needs to be. How do you intend to maintain the proper angle of the two spoon setup? I myself can think of a couple of ways of doing such, but do keep in mind that simplicity is the name of the game for targets. Shooting it the main objective.
As far as ricochets, the shape of the spoons and the reaction of the target will greatly decrease the likelihood of them coming back at you. If you want perfection, go buy one.
RidgeRunner,
I was thinking of bending spoon handle ends back on themselves, thereby clamping one another, or drilling a tiny hole through the overlapped section for a bit of wire, or maybe both.
Despite your likely approval for the rather low extra cost involved, I agree, that would be “… much more complicated than it needs to be.”
____________
In case I misunderstood a possible sense of humour, here an example and my thoughts:
Yesterday I shot soft lead 4,5mm wadcutter pellets at soft targets on wood from ten metres and closer and was surprised to feel two hits on my face. 🙁 🙁
This Morning, while shaving, I extracted, out of a small dried blood spot just below my jaw line, a tiny splinter. Because it looked a shiny grey metal, I tried to remember what kinda mechanical stuff I did that could have caused that. But I hadn’t so much as touched any file, wire brush, metal grinder, etc… hmm!
Of course, by context, you already know, what finally dawned on me: pellet lead splatter ricochet ! 🙂
Personally, I think that no hard target, including a hard back stop, can be considered ricochet-safe. I also think it especially hazardous when shot at from close distances and always highly dangerous, when using steel ball ammunition.
Most of the time I don’t bother with shooting / safety glasses but yesterday I was very, very, Very glad that I wore them. 🙂
Hihihi, one could flatten the spoons in the vise and then bend them slightly downward, then with your right-angle refinement, one would always be presented with a downward-angled target which would direct ricochets to the ground.
Roamin Greco,
I like your thinking! 🙂
Next challenge: how to ricochet-proof the rest of the structure?
Or / and, everyone present has to wear ricochet protection! 🙂
The latter is always true. But it helps to try to achieve the former.
hihihi,
Thanks for the question. I use pellets rather than BBs and I haven’t ever had one ricochet back. The spoons absorb the impact and I suspect that this is why the pellets don’t have enough energy to come back at you — but I’m just speculating.
Yes, sometimes the spoon does not flip all the way around. But this then becomes an even greater challenge to hit, a smaller target because of the angle of the spoon. It’s all part of it.
MiTurn
MiTurn,
ah, “… pellets rather than BBs…”, ok.
I’m guessing that of your two CO₂ powered handguns, the pistol holds more shots than your revolver and it therefore is your first choice for eight and a half paces at dawn? 🙂
Thanks MiTurn, that is an awesome little dueling tree you built. You could do something very similar for spinners using bigger to smaller spoons for targets and long screws to hold them to a vertical 2×4 or something.
I did this with store bought spinners. Your spoon idea is better.
RidgeRunner,
Thanks for the comments. If you build one, get the heavier spoons. They are harder to drill through and bend, but very durable.
MiTurn
MiTurn,
Welcome! Once you get addicted to air guns, you get creative with your choices in targets. You did a nice job making a cool dueling tree on the cheap.
Aren’t thrift shops great? I also look for fun targets while out thrifting. For example, baggies of four hot wheels cars can be had for two bucks. I set them up in my target trap and knock ’em apart with pellets. I only shoot the crummy ones, though. I ended up displaying the ones that are too pretty to bust up and I’m getting too many of those.
I like your dueling tree for its simplicity, low cost, high fun factor and that two people can shoot at the same time. Thank you!
Cheers!
Will
Mike,
Very clever and simple. I did something similar using all thread, nuts, washers and scrap wood I had laying around to build a plinking target. Drilled holes to install clay balls on golf tees, pieces of chalk and dum dum suckers (I like the dum dum suckers best since they explode into a cloud of suger when hit)
here’s another picture
Awesome! I’m inspired….look out wife.
🙂
MiTurn
…I think the Dum-Dums are for outside plinking, not inside… just sayin’
RG,
You are going to owe me one hundred dollars.
kevin,
what a blast, that fun looking colourful array – cool ! Who would have thought that there is, after all, a healthy form of consuming boiled sugar?! 🙂
I notice that the wood hasn’t been exposed to shooters like me, I am confident that I would have marred it multiple times. In just one session. 🙂
PS is that an upside down Weihrauch 80 ?
hihihi,
The picture was taken immediately upon completion. The 2 x 6 wood supports have taken many hits since.
ps-That’s an upside down Beeman R8
Is that the same (essentially) as an HW50?
MiTurn,
Nice, very nice! I love DIY projects, thanks for sharing!
The spoons make great targets – their shape makes them very strong/dent resistant and serves to reduce the chances if rebounds the way that flat surfaces will.
I have all the materials handy, will make one of these up.
Cheers!
Hank
MiTurn,
Great DIY (Do It Yourself) project; and a fun thing to have too! Very good and clear write-up enhanced by the excellent photographs.
The Bravo Zulu hoist is flying!
shootski
PS: i’m going to search for some commercial serving spoons to see if they will work for my Big Bores; with one modification. I will bore an appropriate size hole in the bowl to let the projectile fly through. So if the spoon spins/flips it will be a “miss” indicator.
PPS: READERSHIP: even with wood when shooting any projectile you need to angle the face downward toward the surface in front of the backstop to STOP Bounce Backs. Just think of Billiard Ball reaction angle IN — is angle OUT…until the third carom when spin will likely cause a 90° from the surface rebound.
https://www.wikihow.com/Play-Pool-Like-a-Mathematician
Shootski,
What a great idea, angling the spoons with a cant downward to generate downward deflections! Your observation is an example of why I read this blog: I learn so much!
Thanks! I will implement your idea.
MiTurn
MiTurn,
Even with the downard angle on the spoon bowIs would still wear eye protection Mike.
shootski
Shootski,
Indeed, I do not think it can be mentioned enough that anytime you are shooting any projectile launching device that eye protection is a very wise choice, you only have 2 eyes, two is one and one is none. Be safe.
Mike
Amen.
MiTurn,
Credit where credit is due: Roamin Greco actually deserves the credit for bending the spoons stem so the bowl is angled downward, in a Reply up a way to hihihi, RG wrote: “Hihihi, one could flatten the spoons in the vise and then bend them slightly downward, then with your right-angle refinement, one would always be presented with a downward-angled target which would direct ricochets to the ground.”
He beat me fair and square by posting earlier.
My reply to you was about always adding the downward Backstop Angle since hihihi wrote about possibly getting hit by some rebounding metal fragments.
There are now some commercial projectile traps (EXPENSIVE) made with rubber/synthetic material that will absorb the projectiles energy an the projectile; it is the same AMAZING STUFF used to build or line LIVE round Shoot Houses.
OF course we have our MUCH cheaper rubber mulch in a cardboard box traps ;^)
But the back stop(s) are still a source for rebounds when we occasionally miss the trap.
shootski
Thanks, Shootski. Right gentlemanly of you. I’m a big fan of the rubber mulch trap, too.
stootski,
Thanks for straightening all of that out. Credit is due to where credit should be given!
Interesting idea about putting rubber mulch in a cardboard box trap. That would be the simplest of all. I actually have also built a diy pellet trap for outdoor use. It’s constructed of OSB and backed with strips of composite decking that I halved on the table saw. It is reinforced behind with more OSB. The reason I used the composite decking is that I had it as scrap. I experimented with it and found it to be quite durable. It is positioned at an angle so the pellets deflect downward into the trap. When using my C02 pellet pistols I front the trap with cardboard, onto which I adhere the targets. The trap is 7-8 yards away. The cardboard ensures that there are no ricochets. For my .177 break barrel, I set the trap at 24-25 yards and face it with something far stronger, such as laminate flooring, which is super strong but still penetrable and captures the pellets safely too. I pick up boxes of laminate flooring cheap at Habitat for Humanity, etc. I like building my own things when I can.
I even have an outdoor “shooting shack” that I built out of plastic tubing and plastic tarps. It allows me to shoot when it is raining or snowing outside. But that’s another story. 🙂
MiTurn, may I suggest you explore the blog regarding rubber mulch? Simply run an advanced search in Google for “rubber mulch” and limit the search to this blog’s website: https://www.pyramydair.com/blog/
The stuff is amazing. Just don’t think that regular bark mulch works the same. It does not.
Thanks Roamin Greco, I did as you suggested. Your recommendation is another example of how much good and new information is available on BB’s blog.
As an idea, I could fill my homemade pellet trap with this mulch, retaining it with either cardboard (pellet pistols) or laminate flooring/plywood (rifles).
I know what I’m going to experiment with this week.
🙂
MiTurn
I am working on something that will make rubber mulch even better. Stay tuned.
shootski,
thank you for spelling out the abbreviation.
Which reminds me of my recent amusing surprise:
Having heard me laughing out loud, I had to explain to my girlfriend why, and so I showed her our new kitchen roll… 🙂
hihihi,
Sure looking for the FISH kitty! ;^)
Absolutely…
shootski
Here’s a dueling tree that I made out of some scraps of metal (turned around to see the back side). Note the washing machine lid, which makes it easy for my brother and I to spot our misses. I built the stand to allow for some adjustment of the target angle, thinking that I could “tune” the performance of the target by simply tilting it forward more or less, but it turned out that this hardly mattered, since the angle iron I used as a center post did an admirable job of springing each paddle back around when it was hit, often bringing some of the other paddles along with it and entirely disrupting the competition. To rectify this, I dampened the angle iron by wrapping it with bicycle innertube where the two bolts clamp it into the stand, and I drilled a block of wood to take the residual spring out of the top targets. Now it works flawlessly with 26 and 30 ft/lb pcp’s at any distance from about 30 to 100 yds.
Estimated assembly time: Many hours (Your spoon idea is a good one.)
Daniel Krebs
Daniel Krebs,
wow, your target looks built like a tank! 🙂
And yet, your airguns still managed to rattle that tree, phew… !
I like the idea of the forward facing ridge of the angle iron. Were it not for the rubber and wood damping, I would have suggested another angle iron, placed independently in front, purely as a shield.
Zeroing one’s gun while plinking, eh? 🙂
Thanks for sharing. 🙂
PS Is that plywood panel only partially perforated?
PPS duelling those paddles from up to “… 100 yds.” -> Weihrauch HW100?
hihihi,
I’m afraid I was a bit unclear. Hitting the angle iron did nothing to disturb the targets; rather, when we hit a target (back when I had the tree rigidly mounted in its stand), the target would violently flip to the other side, “torqueing up” the angle iron as the target abruptly came to a stop, and the angle iron (acting as a sort of torsion bar) would bounce the target back to the first side, often bouncing other targets along with it. The rubber serves to deaden the torsion bar effect, allowing the angle iron to twist in the stand by a very small amount, and the wood block specifically helps with the top targets in a similar way by adding its dead, un-harmonic weight to the angle iron, thereby cutting down on the stored energy with which the angle iron was able to bounce the targets back. Essentially, I am deadening the angle iron, top and bottom, to prevent bounce back.
“Zeroing one’s gun while plinking, eh?”->
The white steel plate is necessary for “walking in” your shots, otherwise the wind and tiny variations in trajectory will have you missing the targets all day long with no feedback by which to make a correction.
“PPS duelling those paddles from up to “… 100 yds.” -> Weihrauch HW100?”->
You got it. How did you remember? Surprisingly, my brother’s Avenger is more accurate than my HW100 at that distance; his Avenger will group in an inch or so, and my HW100 won’t do better than about two inches. I suspect that it has something to do with twist rate, as my HW100 is quite his equal out to maybe 50 or 60 yds. Fortunately though, the day-to-day consistency of the HW100 keeps me competitive even at 100 yds on the dueling tree.
“PS Is that plywood panel only partially perforated?”->
Yes. Partially perforated by years worth of bullet holes. 🙂 There is a pile of dirt behind it.
Daniel Krebs
Daniel Krebs,
what an interesting reply !
Also, I appreciate that you explained your duelling tree to me again. Sorry for being a little slow, but I understand it now. Thanks.
I like that your considerable work in manufacturing it, is being rewarded with some family fun! 🙂
PS HW100: when I first learned about Weihrauch’s precharged pneumatic, I was rather impressed and so I must’ve paid attention when you mentioned yours. 🙂
Mike,
An excellent report! You have inspired me. I am about as un-handy as one can be, but I am going to make one of these.
Thanks!
Michael
MiTurn,
I have been without internet access for a little over a week (uncool! #_#).
Anyway, I just got back on and saw your report…I like it!…a lot!…thank you very much. 🙂
This is something even I can make. 😉
Blessings to you,
dave