by Tom Gaylord, a.k.a. B.B. Pelletier
Part 1
Part 2
Secrets of loading the Benjamin Marauder magazine
Part 3
Part 4
Part 5
Part 6
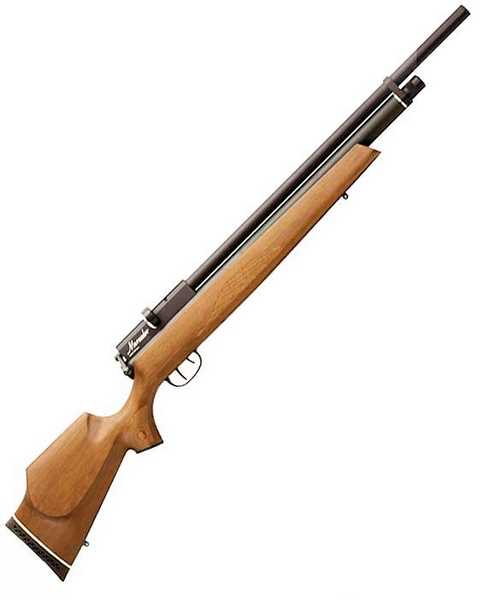
Benjamin Marauder
Today’s report is a guest blog from reader Fred from the Democratik People’s Republik of New Jersey. It came from his ingenuity in dealing with a need that arose in the field. I’ve linked it to the recent .177 Marauder reports because it seems to fit.
If you’d like to write a guest post for this blog, please email us.
Over to you, Fred.
Fixing a Marauder magazine
by Fred DPRONJ
A number of factors led to this blog — the first being a scheduled benchrest .22 rifle competition my league was going to hold following our 25-yard bullseye competition. The second was, I believe, blog reader John. Or was it Mike? No matter. But whoever made the comment mentioned later in my report…thank you!
I had gone to the range several days ahead of the benchrest competition to sight in my .22 cal. Benjamin Marauder. For fun, I decided to take on the rimfire boys with my air rifle. It took roughly 6 pellets to get the scope sighted where I wanted. However, I could not see where pellet 7 landed. Two more shots and I was incredulous. The rifle had gone from hitting the 10 ring to missing the entire target paper and backer. At this point, I looked at the magazine and discovered it was not rotating to feed the next pellet. It was stuck after firing pellet 6. I assumed the internal spring had broken, so I packed up and went home discouraged. I didn’t have another .22-caliber Marauder magazine, so I might have to use my Ruger 10/22 for the competition.
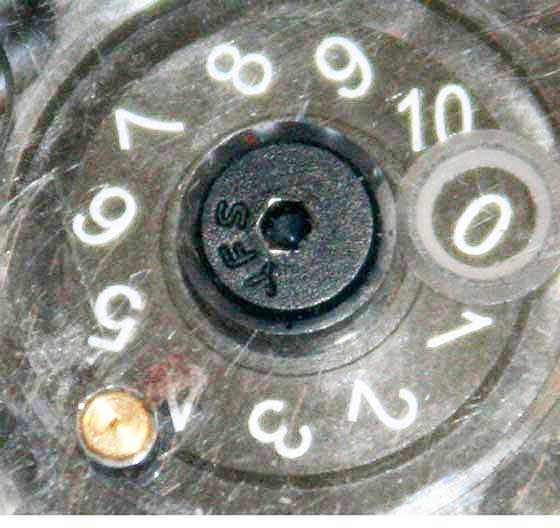
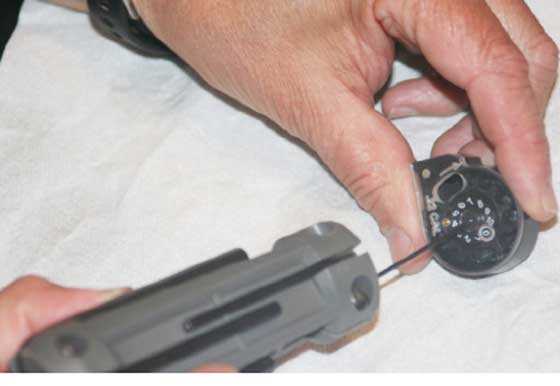
However, I recalled John (?) mentioning in the blog comments that these magazines could come apart. At home, I carefully examined the magazine under magnifying glasses and saw that what I had believed to be a rivet in the center of the magazine was actually an Allen screw.

The Allen screw in the center holds the magazine together. I thought it was just a rivet that couldn’t be removed
A 1.5mm Allen wrench fit; after initial resistance, the screw was removed.
The first several turns met with resistance, then the screw turned freely. The resistance is by design, much like a lock nut, to prevent the screw from backing out.
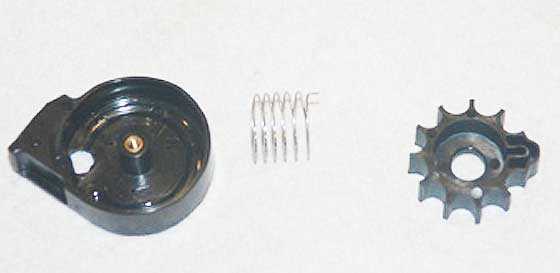
The magazine is really an elegant engineering solution for the task of feeding pellets with a bolt action. It consists of 5 parts — an outer case, a coiled spring, the circular pellet holder, the clear plastic cover and the the screw that holds everything together. When I disassembled it, nothing appeared broken.
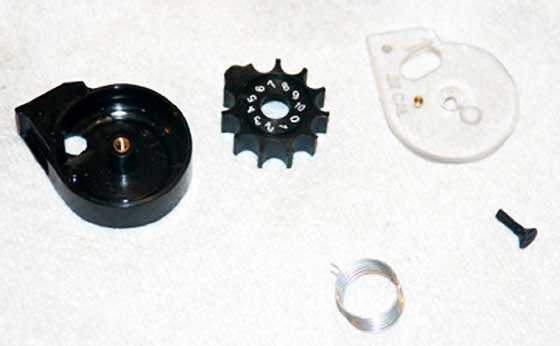
The five components of the Marauder magazine. Note the end of the spring that sticks out.
If you look very carefully at the coiled spring, you will note that the ends are different. While both ends are bent at 90 degrees, one is bent away from the coils while the other end is bent down to stick into a hole in the bottom of the magazine case.
One end of the spring is bent out at a 90-degree angle, while the other end (not visible here) is straight in line with the coils. This is the end that sticks into one of the holes in the bottom of the magazine case.
The end that you see in the above picture goes into one of three holes in the magazine case. Each hole gives a different amount of pre-load to the spring.
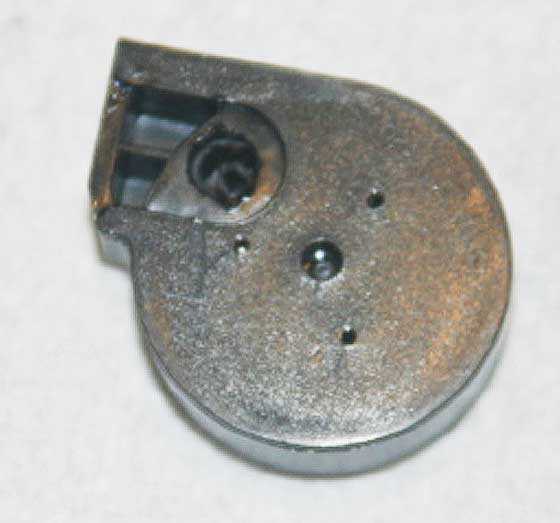
Those three holes at 9 o’clock, 1 o’clock and 5 o’clock (as arranged in this photo) give you a choice where to anchor the spring for increased pre-load. They go all the way through the magazine case.
I decided to insert the spring into the hole nearest the bottom of the case, next to the cutout that slides over the breech when the magazine is installed. In the above photo, that hole appears at the 9 o’clock position, and you can see the cutout that goes around the breech very clearly.
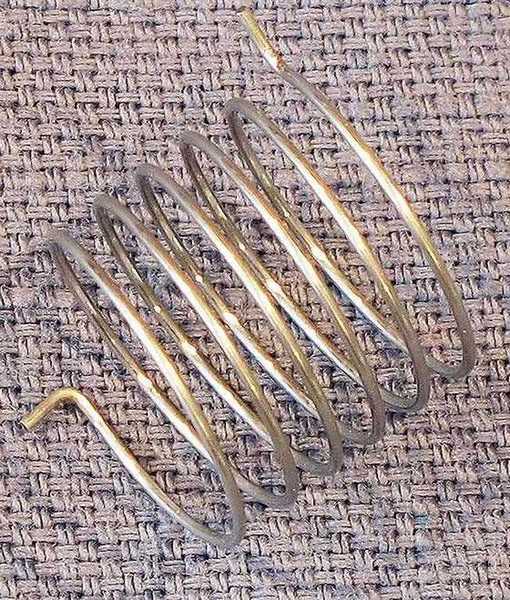
Here’s the magazine spring. Now you can see both ends. The end on the left goes into one of those holes in the bottom of the magazine case, and the end that sticks out on the right fits into the slot on the underside of the pellet holder.
The straight end of the spring that sticks out, away from the spring coils, goes into the slot in the underside of the pellet holder. It’s just a matter of approximating position of the holder’s slot to the spring and moving it back and forth until the spring end clicks in. You easily feel when it pops into the slot.
The end of the magazine spring that sticks out, away from the coils, fits into the slot on the underside of the pellet holder.
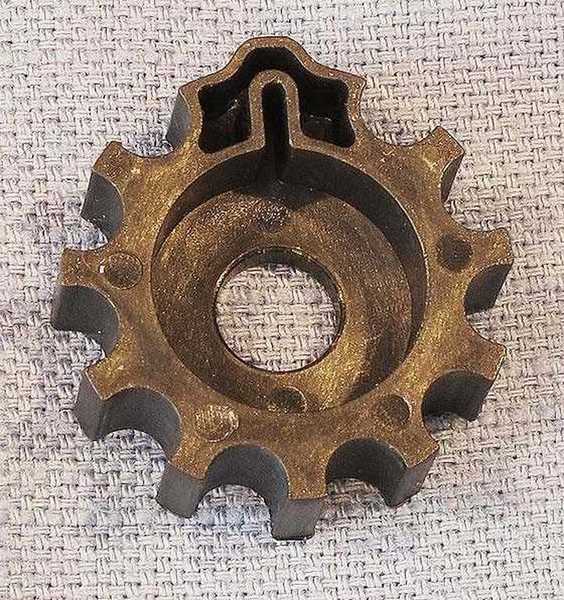
The pellet holder has a circular groove in it, and the brass pin of the cover moves in it. The groove is almost a complete circle, but the part that isn’t grooved allows the cover to rotate the pellet holder against the coiled spring when the magazine is loaded.
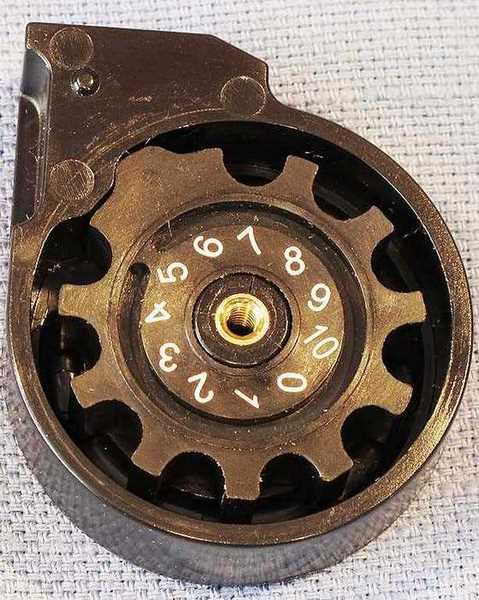
The magazine case with the spring and the pellet holder in place. Notice the circular groove in the pellet holder, next to the numbers. This is where the brass pin of the cover fits, allowing the pellet holder to move as the pellets are pushed out of the magazine by the bolt.
With the pellet holder in position, I pressed it down and slid the clear plastic cover over it and then aligned the cover with the magazine case and inserted the Allen screw. [B.B.’s note: The brass pin in the bottom of the clear plastic cover has to be inside the circular groove of the pellet holder, and the pellet holder stop (the portion of the pellet holder that protrudes) must be to the right of the shelf inside the magazine’s outer case.]
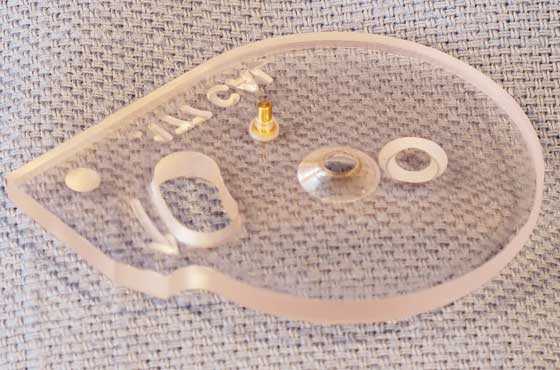
The small brass pin on the underside of the cover engages the circular groove in the pellet holder to turn it for loading. A .177-caliber magazine was used for this photo.

I slide the clear plastic cover over the pellet wheel to keep it in constant contact with the coil spring so the end of the spring would not come out from the notch on the underside of the pellet holder.
The secret of my feeding problem was now revealed. The screw that holds the cover should be tightened only enough to remove any excess slop between the clear plastic cover and the magazine case. Too much tightening and the cover binds the pellet holder, preventing it from turning. The screw has an interference fit so it won’t back out when you rotate the clear plastic cover to load. Lifting and rotating the cover 90 degrees and releasing, the cover now snapped back with authority — indicating the assembly screw was tight enough and the magazine spring was doing its job. I was now set for my benchrest competition.
If this procedure seems confusing, believe me — it clears up when you have the 5 parts of the magazine in your hand. I have given you all of the references you will need to assemble your own magazines, should you attempt this yourself.
[B.B.’s note: I disassembled and assembled my Marauder magazine several times following these instructions. They do work.]

I’ve cleaned the clips on for my ruger 10/22 every few years or so. I believe it helps feed better and sure makes them easier to load when they are not all gummed up. A new extractor after nearly 30 years of use also helped a lot.
Good blog post.
And if anybody is interested in modifying your Marauder mags to accept Predator pellets (which are too long for the unmodified mag), I made a video demonstrating the modification. The video also shows how to disassemble and assemble the mag.
https://www.youtube.com/watch?v=NHUXMolfAKM
Fred…
Thank you for the blog, even though I don’t own one of these .
twotalon
I was wondering why you had a problem in the first place. I have lost track of how many pellets I’ve put through my Marauder and have never had a problem with the magazine. Had you been working the mag before?
Michael In Georgia
Michael,
the magazine had come with a rifle I had purchased used. My .177 Marauder which was a new purchase from PA, has had no problems with the magazine it came with or the two spares I had bought. That used rifle could have been messed with by the former owner or the magazine was just adjusted a wee bit too tight from the factory thus binding the pellet carrier or wheel or the screw had worked itself a bit too tight – but this is unlikely given the resistance that you’ll observe yourself when you turn the screw to disassemble the magazine – if you even have to do that. Could even be the former owner was not clear on how to properly load the magazine. But I had done nothing until the trouble at the range.
Finally, while I thank you and others for your plaudits on this blog, BB and Edith had a big hand in it by adding several photos (the spring showing both ends and the brass pin on the underside of the clear plastic cover as well as several clearer photos of the pellet carrier wheel) and cautioning how that brass pin fits into the groove on the pellet carrier. Thank you BB and Edith – that was nicely done!
Fred DPRoNJ
Fred,
Your report is fundamental for Marauder owners. That’s why I linked it. And those photos were only added to help with the understanding of your excellent report.
Thank you,
B.B.
Fred,
Thanks VERY much for this blog. I have looked at online pages and videos that attempt to explain this process, but every single one lacks your simple, deliberate instructions and your very high quality pictures. Your report is exceptionally clear and well done.
I have two (perhaps even three) non-working Marauder mags around here somewhere that I had given up on long ago. I’ll start looking for them and follow your instructions.
Thanks for the detailed and instructive report,
Michael
Michael,
How about reporting back when you do that? I would like to know how you found the instructions, after you have fixed a magazine.
B.B.
B.B.,
Will do, although the hardest part of the process just might be finding them! But I shall find them and report back.
Michael
Fred,
I am with twotalon and Michael. A top shelf job!
Thanks,
Bruce
Howdy Fred D, TWO atta boys, well done.
Shoot/ride safe,
Beaz
That means only 998 more to go to be confirmed as a leader of men and a fine judge of good whiskey! However, one “aw, dang” wipes the slate clean and I have to start over again 🙂
I appreciate the compliment, Beez. Hey, how about giving us some more feedback on your new TX200?
Fred DPRoNJ
Howdy Fred D, Thanx for askin’, TX update: First group out of the box @ 10 yrds to check poi was a .275. Pretty sure that was due to the o rings on the cocking lever that Slinging Lead suggested. Once the paramedics left & I’d stopped screamin’ like a little girl, I moved back to 20 yrds. First group from there was a .670, so I started the zero process.That’s when the fun started. Began seein’ “floaties” on my scope lense. At first I just thought they were tears of joy, but soon realized they were inside the scope, jumpin’ around w/each shot & often sticking to the lense. Looked like a type of epoxy. Checked my order form ta make sure I hadn’t screwed up & orderd a kalidescope, then unscrewed the oc lense but there’s a definite stop point so I did. Bottom line it’s on it’s way back to PA (bless ’em, their C/S is awesome) & I’m dead in the water until my replacement arrives. Then another couple days to get the scope remounted (yup, I suck) & I’ll be back up ta crusin’ speed. Waitin’ since 5/1 so another week ain’t gonna kill me…much? Sorry ya asked, now, huh?
Nice job, Fred! If/when I pick up a Marauder, imp know what to watch for.
Now…. The rest of the story…. Enquiring minds wanna know…. Did you shoot the Marauder for the competition and clean their clocks with it?
/Dave
I’ll…… Rrrrrrrrrrrrrrrr……….
/Dave,
not quite. Out of a possible 50, I shot a 42. Winner shot a 48 and there were two more shooters (out of 12) who did better than me.
Fred DPRoNJ
Thank you Fred! I have feeling that your report and BB’s “Secrets of loading the Benjamin Marauder magazine” will be very helpful once I finish the Marauder pistol breech modification of my 22xx pistol.
Good job Fred.
I haven’t had any problems with mine either but still good info to know.
Awesome technical detective work. Whenever I have a technical problem, it’s nice to know there is this kind of expertise out there. It’s just a matter of finding it. Speaking of which, Derrick, I wasn’t concerned so much about posting my question to your blog. It just looked like I was getting kicked out each time because I wasn’t getting the spam code right. Anyway, the main thing is that I got through.
Speaking of rimfire .22s, I have another question from my last range session. With my concern about overheating my Mosin, I’m wondering if in my concern about letting the mouse in the front door, I was letting the wolf into the back door with my Anschutz. Operating from the belief that you can’t really wear out a rimfire, I ran something like 300 rounds through the Anschutz to practice my standing position. I had breaks, but the rifle got awfully hot towards the end. For centerfire rifles, I make sure not to shoot more than 50 rounds per range session with breaks to cool down. Is there some similar figure I should use for rimfires? I don’t want to damage that awesome lapped barrel at all costs. The accuracy is truly stunning. And for cooling rifles–like the Mosin–what do you think of running a wet sponge over the barrel and receiver? Even when warm, water has such a high heat capacity it might draw off some of the heat.
B.B., I’ve heard that 1911’s are soldier-proof and impossible to assemble incorrectly, and I believe it. I’ve never heard of an accident with them flying apart. But I may have found a way to do this that scared the hell out of me. While reassembling the gun recently, I just passed the stage you showed me where you insert the slide stop pin through the barrel link then pull the slide back and forth to test it. Sure enough, the slide stopped, so I snapped the slide stop into position BUT WITHOUT CHECKING THAT IT WAS COMPLETELY FLUSH. I worked the slide back and forth. Then I inserted a magazine. In my SW model at least, the slide is supposed to lock when pulled all the way to the rear with the magazine but mine did not. So presumably the pin was not secured in place. On firing, it might have come loose and fallen out of the gun, exposing me to the very situation we talked about with a flying slide to the head! I noticed it after a few pulls of the slide, and now I make damned sure that the slide stop is flush and secure.
Wulfraed, my worry with proof loads is that you will weaken the gun in the act of testing it. But I guess if you check for microscopic cracks afterwards, you are covered. It has kind of puzzled me that I cannot find any gunsmith who tests with proof loads. They all use standard ammunition, and the one guy I mentioned, doesn’t even test fire. He just inspects the gun with a magnifying device.
Matt61
Matt61,
What I’ve heard from some distinguished small-bore champions and gunsmiths is that small-bore rifles actually get more accurate with use, so you don’t have to worry about yours wearing out. Of course, all of this assumes that you use high quality ammo and clean it regularly. I used Eley Tenex (red) exclusively for outdoor matches (mostly prone). For indoor matches I used Eley Match (black).
I learned later that it wasn’t such a good idea to clean your Anschutz too much. I use to clean mine after each relay of 40 rounds + sighters (around 20 rounds, depending on wind). It’s probably better to clean it no sooner than around 100 rounds.
For you Anschutz, make sure you clean it from the breach, and don’t do it too vigorously (a big no-no). In any case, with proper maintenance, you can look forward to your Anschutz only getting more accurate. Cool huh?
Victor
I’m paranoid, and would avoid that… Rapid cooling might affect the temper of the steel (which is probably not all that hard — one probably wants a softer steel to expand/contract rather than a brittle layer that might fracture)
I suspect most of those gunsmiths are using parts that have, themselves, been proofed as standalone parts: barrels and receivers/bolts/slides.
Frames typically don’t need to be proofed as a part (how do you “proof” a plastic frame on a pistol?).
And even those plastic pistols have cast/machined metal for the slide rails, and maybe a metal insert buffering the spring. I’d doubt that the frame would suddenly fail if a gunsmith replaced a barrel.
Great tutorial, it’s crazy how these little things are simple (only 5 parts) yet pretty complicated and precise!
Well done, I hope to need this someday when I can buy a Marauder for myself…
J-F
Fred,
Thanks for the very useful blog! I have a Maurader in .22. I’m sure this will come in handy.
Thanks again,
Victor
Thanks for the report Fred.
Your DIYs really benefit all of us airgunners.
I just registered so I could comment.
Fred, thanks for this well presented information. Last spring I bought a .25 mrod with three clips. One of the clips (that I bought new) hangs on the 8th shot until I tap it. I suspect these kind of clip issues are a common problem.
This blog post should help lots of people, including me, fix their clips. Thanks!
BB, I’m eagerly awaiting to hear how your tuning with the marauder goes. I’m especially interested because you said you got your tuning advice from someone at Crosman. The manual is vague on tuning, but there are multiple credible sources out there with different tuning methods.
I’m interested to see how your process compares to the others. It seems like we’re sailing into uncharted waters with such a configurable air rifle. It will be exciting to hear all you have to report, thanks for doing good work.
Jon
Jon,
Welcome to the blog!
I, too, am anticipating the tuning of the Marauder with excitement.
B.B.
sorta looks like its on the design of a 10-22 mag. I have washed them in soapy water and a good rinse then the air hose to dry. I haven’t had any apart but its looks like they traded ideas. good blog b.b.
Anything but…
A 10-22 rotary magazine is loaded from the “1” position, with subsequent rounds pushing the carrier around against the spring tension.
The Marauder, in contrast, is loaded by rotating the cover plate and dragging the carrier with it (and winding the spring), then putting a pellet in the “1” position to /block/ the carrier from rotating. Then one rotates the cover plate over the other positions to insert pellets, repeating until the cover plate is back to shooting position.
The closest on a 10-22 would be to remove and end-plate (need to check my 77/17 — which uses the 22mag magazines), rotating the carrier and spring with a thumb, then dropping in the rounds, ending by releasing the carrier and snapping the end-plate back on.
Rotary carriers and springs may be similar, but the loading system is enough different: carrier compressed while loading each round vs carrier rotated first and then loading rounds with the carrier locked.
I am planning to make that kind of magazine .22 cal. my problem is the exact dimension of the pellet holder , can you provide me ? if it is not possible no problem I would just estimate based on your blog fixing the marauder magazine. thanks and more power!
Boltaction,
by dimension, do you need the diameter of the internal pellet wheel or holder? What else do you want or need? I’ll get back to you tonight with what you are looking for. Of course, the next question is “why not just buy a magazine or three from Pyramyd Air”? They’re not very expensive – /search-results-ext?q=marauder+magazine
About $15 per magazine – price of a high end tin of pellets.
Fred DPRoNJ
Boltaction,
Click this link for the Marauder mags.
Edith
thank you Edith you’re great!
thanks a lot Fred DPRoNJ! I really appreciate your help,I need the exact dimensions of the internal pellet wheel only, well if it is okay for you to give the whole of it that would be a great help not only myself but to all airgun hobbyist. there are no air gun magazine sold in our place ! well making one is a challenge! again thank you for your precious time spent
Boltaction, here are the wheel dimensions: diameter= 26.2mm (1.03″); width of wheel – 9mm (.353″); hole width or distance between teeth widest – 5.5mm (.125″).
outer case diameter= 34mm (1.342″); case width= 11.95mm (.47″) inner case diameter = 31.3 mm (1.232″)
Let me know if there are any other dimensions you’d like.
Fred DPRoNJ
okay got it ! but what is the dimension of the center hole of the inner wheel ? what material is used?
this info is of great help thank you very much!
The center hole – the hole in the pellet holder? The hole in the center of the wheel is 7.35 mm maybe – my caliper won’t get any finer than two decimal places. That fits over the protrusion in the center of the case (7.3 mm in diameter) which has a brass insert in it for the screw. The hex head screw itself is approximately 2.3mm. The hole in the clear plastic top cover is minimally larger.
Fred DPRoNJ
thanks a lot Fred ! everything is clear, time to get started I just hope I could do it right!