by Tom Gaylord
Writing as B.B. Pelletier
Part 1
Part 3
Part 4
Part 5
Part 6
Part 7
Part 8
Today’s report is the continuation of a guest blog from reader HiveSeeker about his Crosman 2400KT. I actually took what was his Part 1 and broke it into 2 sections, so this is the second half of the original Part 1.
If you’d like to write a guest post for this blog, please email me.
Over to you, HiveSeeker.
The 2400KT CO2 carbine is available exclusively from the Crosman Custom Shop.
This report covers:
• No tipping, please
• Trigger tips
• First shot
Let’s pick up where I left off. I’ve just introduced you to the Sassy Sandy and HiveSeeker carbines — two 2240KT carbines I set up for my wife and me. My wife’s carbine has the CV Life 3-9X40 scope, which is light enough for her.
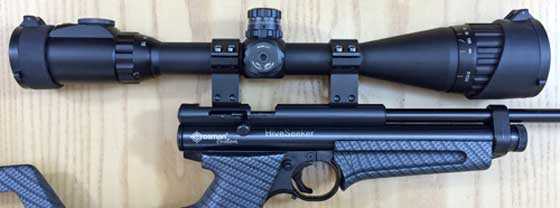
The scope I mounted was a Leapers 4-16X40. Although a similar scope is available with 11mm dovetail airgun rings, that version was out of stock everywhere at the time of my purchase. I ended up ordering the version with Picatinny rings (otherwise identical as far as I can tell), and buying UTG Accushot high profile airgun rings separately. This is a large scope! It has to straddle the breech opening, and high profile rings give a little more finger room for pellet loading in addition to accommodating the large objective. Having to straddle the breech, there’s also less horizontal wiggle room for positioning the scope for best individual eye relief.
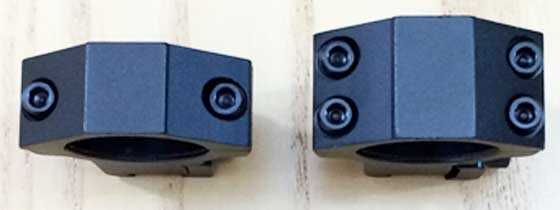
To hedge my bets, I also ordered a set of narrower, 2-screw UTG Accushot scope rings in case my scope needed a little more horizontal leeway. I didn’t end up needing them, but other shooters have. Keep this option in mind if you purchase this gun and choose to scope it. [Editor’s note: The 2-screw Accushot rings are no longer available.]

Narrow 2-screw scope rings allow more horizontal leeway if needed to correctly position the scope for best individual eye relief. Though not as secure as 4-screw rings, they’re quite adequate for the low-recoil CO2-powered 2400KT.
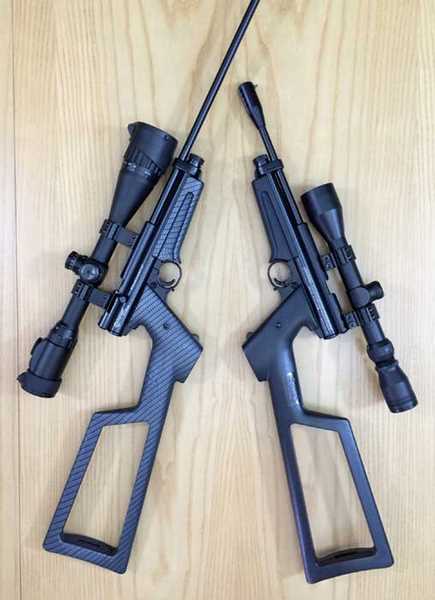
The first time my wife saw this very full-sized scope on my 2400KT, she exclaimed “Your scope is bigger than your gun!” At 22.3 oz., this scope almost does outweigh the pistol and stock! However, this setup was very similar to what my acquaintance had who originally recommended the 2400KT to me, and it worked very well for him. At the time, I didn’t realize that I was entering already-charted waters, but if you want to see a similar setup, check out B.B.’s evaluation of the Crosman Outdoorsman 2250XE.
While my combination looks unwieldy, it shoots like a dream — though I would definitely recommend that you avoid going any heavier on the scope. Women and youth shooters and those seeking a lightweight carbine will want to track down different optics, like the Hawke scope mentioned in part 1.
“Your scope is bigger than your gun!” my wife exclaimed the first time she saw this Leapers UTG 4-16×40 mounted on my 2400KT. It looks cumbersome and you would definitely not want to go heavier, but this combo shoots like a dream.
No tipping, please
I’ve already mentioned that high-profile scope rings provide a little more finger room for pellet loading in the 2400KT. This is very helpful, because pellets absolutely love to tip nose-down or flip backwards in this breech! This is a quirk of the entire 2XXX family of Crosman CO2 pistols, and it occurs with both plastic and steel breeches.
While researching this blog, I came across a multitude of specialized techniques for loading these guns. Ultimately, my wife and I found that a pellet pen is a great help, though not a complete solution. Certain pellets are still quite prone to sit skirt-up, or flip backwards (skirt-first) as you try to load them.
I found that by resting a properly-oriented pellet on the flat surface to the right of the breech channel, and then rolling it gently into the channel with my fingertip, I could usually get it to stay correctly oriented until loaded. For pellets that like to flip backwards as you load them, I found that tipping the muzzle of the gun up would often cause them to flip back into nose-first position ready for loading. This wouldn’t be too difficult while shooting offhand, but repeatedly having to tip the barrel up was a major inconvenience during all the benchrest shooting I did.
Short, “fat” nose-heavy pellets were the worst offenders, especially domed pellets like the .22-caliber Crosman Premiers, with that nice round nose to roll on. Longer-skirted pellets were much better behaved, especially flat-nosed wadcutters. This problem was much worse with the .177 pellets than it was with the .22 pellets. My wife and I both got better at pellet loading with time, but I was still tipping the occasional renegade pellet back into position up until my very last test shot.

This is the way the pellet is supposed to be loaded into the gun.
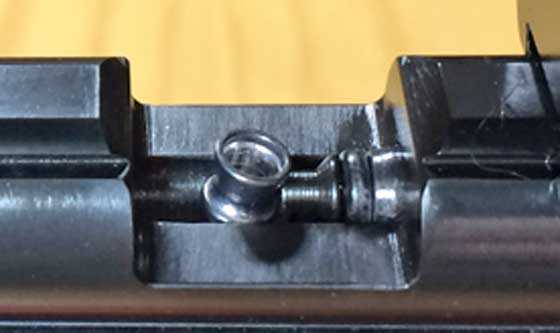
Short, nose-heavy pellets like the otherwise good Crosman Premier have a remarkable tendency to flip skirt-up or backwards in the 2400KT’s steel breech.
Some pellets fit very tightly in the barrel during chambering. Domed pellets, even if tight, would usually slide straight in. But sharp-edged pellets such as wadcutters or hollowpoint noses with similar sharp edges would sometimes catch on the edge of the barrel as they were inserted. For easier pellets, backing the bolt up slightly and then pushing it forward again would smoothly seat the pellet. For pellets that tended to catch an edge, I found that touching the top edge of the pellet skirt as the probe seated it into the barrel could help center the nose and provide a smoother insertion.
Trigger tips
The single-stage trigger on the 2400KT has very little travel, which I really like. It does not feel crisp out of the box. I think this is partly due to its heavy pull, but the release is positive and clean. The trigger-pull averaged just under 5.50 lbs. (or 5 lbs., 8 oz.) on the .177, and just over 5.50 lbs. on the .22. Although the difference was small, the heavier pull on the .22 was noticeable.

The 2400KT trigger is not crisp out of the box, but the release is clean and creep-free. The trigger-pull was on the heavy side at just under 5.50 lbs. (or 5 lbs., 8 oz.) on the .177, and just over 5.50 lbs. on the .22. If you order, be sure to include a trigger shoe. An adjustable overtravel screw helps the trigger feel crisper.
But guess what? This trigger is adjustable! The Custom Shop website won’t tell you. The included manual, which is actually for the Crosman 2240, doesn’t mention it. And you can’t tell by just examining the gun. But remove the shoulder stock, and there it is!
You adjust the trigger by turning the knurled dial to move the spring retainer up (increasing trigger-pull weight) or down (decreasing trigger-pull weight). I initially began adjusting this trigger in very small increments, but eventually turned it down all the way to the minimum spring tension setting. This resulted in a pull of 2.40 lbs. (2 lbs., 6 oz.) on the .177, which I actually found a little bit too light. On the .22, the low trigger-pull setting yielded almost exactly 3 lbs. This still seemed slightly heavy to me, and I wished that I could have dialed it a hair lower. However, this was still an improvement on an already-good trigger.
When B.B. checked trigger pulls on Crosman’s two CO2 match pistols, he got a range of 2 lbs., 14 oz. to 6 lbs., 12 oz. on the 2300T, and 2 lbs., 6 oz. to 5 lbs., 8 oz. on the 2300S (see Crosman’s 2300T, and Crosman 2300S target pistol). The 2400KT appears to have the same adjustable trigger. Sweet! The Crosman 2300T and 2300S manuals list adjustable trigger-pulls from 1 to 4 lbs.; but as you can see, the actual field measurements are heavier. Those manuals also include trigger adjustment instructions, and the 2300T manual might have been a better manual to include with the 2400KT than the 2240 manuals that came with my two guns. However, the trigger adjustment is simple and intuitive.

The Crosman 2400KT CO2 carbine comes with a 2240 manual that has a “2400 Custom Shop Airgun” sticker over it. Check the Spanish or French section of the manual, and the truth is revealed!
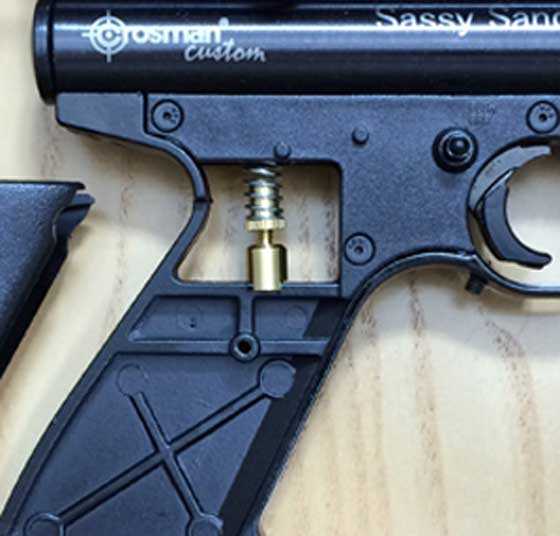
Neither the Custom Shop website nor the included manual hint at an adjustable trigger. You have to remove the shoulder stock to access it. Here it is!
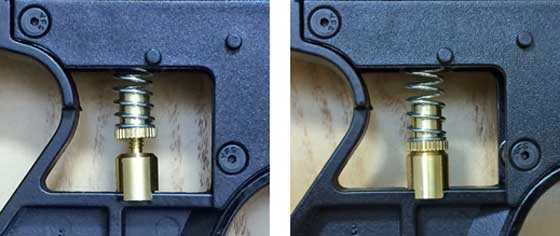
Adjust the spring tension by turning the knurled dial to move the spring retainer up (increasing trigger-pull weight) or down (decreasing trigger-pull weight). On the left, the adjustment dial is at the factory setting. On the right, the dial is shown screwed downward to the lowest tension setting (and lightest trigger-pull).
The trigger includes an overtravel screw, which you can adjust to stop the trigger blade immediately after the hammer is released. This is a great addition to a target pistol. Like the trigger shoe, the overtravel screw does nothing to actually improve the trigger itself, but it does help the trigger feel crisper and cleaner by eliminating excess travel. I adjusted the overtravel screw in about one-and-a-half turns. This, combined with the lighter trigger-pull, makes for one nice feeling trigger! It’s still not quite as crisp as I would like, which is why I still recommend the trigger shoe. Overall, though, this trigger is a pleasure to shoot.
First shot
While researching for this blog, I repeatedly came across references to this family of pistols stating that the first shot on a new CO2 cartridge is always a dud. It’s not! I’m a manual reader, and the manual tells you that you need to cock and fire the gun once before actually loading a pellet in order to puncture the CO2 cylinder. During velocity testing, I found that the first “real” shot was usually much slower than subsequent shots, so I’ve gotten into the habit of firing off a second shot of CO2 before actually loading ammo. Finally, remember to put a drop of Crosman Pellgunoil on the tip of each CO2 cylinder when you install it to keep all those seals healthy and happy.
I’ve spent a lot of time telling you about the Crosman 2400KT CO2 carbine, without telling you anything about how it performs. In the next part, we’ll be looking at shots per fill and velocity. Prepare to be pleased, and — perhaps — mystified!

That trigger assembly is a step up from the 2240,1377/22 non adjustable spring. It looks like the same single stage that comes on the 2300 series guns.
If you want to tell what a nice Crosman trigger assembly is about. Find somebody that owns a 1720T and see if they will let you try it out. That’s a nice true 2 stage trigger.
But it was nice that Crosman threw in the adjustable spring and trigger stop. I found that the stop does make the trigger feel more precise.
And I actually found the opposite works for me loading the Crosman guns with that type if breech. I tilt the gun down and drop the pellet as far forward like I’m trying to load it right in the barrel. Goes in everytime for me anyway.
One more thing. Have you tryed different height scope rings to see how it affects the gun when shooting at different distances. And did you end up in the middle of your up/down turret adjustment. Did you have to shim the back scope ring. Just curious if you ran across some of the sighting things on these guns that I have.
Gunfun
I talk to Mike at TKO today and all they do is 2400s so no luck there with my 2240s. I did email Lloyd and at first he said he was to busy to take on another project and could not help me, but I squeaked a little more and he replied that if all I was wanting is some disco tubes in different lengths that he could probably help with that and asked me to give him a drawing of what I am wanting to do.
So I emailed him a picture of the hipac end that goes into the gun to take the place of the CO2 cartridge and a drawing of the disco tube and fitting and how it would fit on the hipac tube. From the dimensions he gave me on his tubes for the disco it looks like I can get him to thread one end for the disco fill fitting and leave the other end unthreaded. Then I can machine part of the threads that the extension tube thread on to down to the ID of the disco tube of .745″ and slip the hipac into the disco tube so that it is a snug fit in the disco tube and have it Tig weld out at the army depot instead of having my other friend that welded the bungs on with a Mig welder so the welds will be much better in appearance and not need machining to clean them up or be in the way of the barrel bands. I did some testing today and 2200 to 2300 psi is the best pressure to fill to for a good shot FPS and count in the 8 to 900 fps ranges
I have not got your gun back together yet but put the front of your hipac onto one of my 2 extension tubes and put it my 177 Avanti barreled gun and did some chrony testing with the 8.44 and 10.5 JSB and will need to either loosen up on the stronger hammer spring in the gun now or go back to the original and tune with it.
The 8.44 the way the gun is tuned now got 22 shots between 900as a low and 1013 as a high fps. The 10.5s got 22 shots with a low of 813 and a high of 943 so it is not to bad I just need to tune for a little less spread in the string.
I have decided to use my nitro venom for the FT matches this weekend so I can have more time to tune and sight in the 2240s, my nitro shoots the 8.44s at 925 fps and will work good to use for my first match, I still need to build a field box to carry my gun, pellets, shooting bipod, seat and other needed stuff by just having straps to pick it up with and have it all combined into an easy to carry kit and then I can use a back pack for my bottle to go in and will have only 2 things to carry between stations.
Buldawg
buldawg
Well sounds like you were nice and busy.
And I told you Lloyd Sikes was a nice guy. It seems like when you run something past him you just hear the wheels start spinning in his head over the phone. When I asked him about the Mrod double tube he told me the same thing. He didn’t know if he was ready to take on more work or another project if you will. By time we got through talking he had it all worked out with existing pieces of the other kits he made. I think he had my kit in the mail in about 3 weeks.And only because one of the fittings needed redesigned. If it wasn’t for that I probably could of had it sooner.
And it did help me with what I was doing with the .25 cal. Mrod at that time. It was a high powered gun that was only getting about 11 shots per fill. I put his tube kit on and started getting 20 shots per fill. Oh yea that .25 Mrod was making 80 ftp of juice and still shooting good groups at 50 yards like the pictures of the groups and my shooting place I sent you over the weekend.
So my hi-pac is on your Lothar Walther barrel 2240 now so you could test it is what you just said right. Wasn’t my 2240 you got from me with that full length Disco barrel about the same in fps. I can’t remember right now And I was filling to 2400 to 2600 psi wasn’t I. If so pretty comparable. What I want to know is if that LW barrel will out perform that Disco barrel at a given distances or if one barrel will shine at longer or shorter distances over the other. All I was testing was different length Disco barrels and Crosman barrels. So I’m interested how the LW barrel turns out.
And your going to do the nitro gun in the field target this weekend. What scope you got on it. Oh and do you have the Hawke scope on the 2240 still?
Gunfun
Yea I talk to Mike at TKO on the phone but they only do 2400s. I never found a phone number for Lloyd so I emailed him and he returned that he was to busy for any more projects , so I replied with just getting tube and fill fitting from him and he sent back that he could do some different length tubes and thread them at both ends and include the fill fittings and asked if I had a drawing of what I was wanting to do it would make it easier to understand. I sent him a couple pics of the hipac part that takes the place of the CO2 powerlet and a rough drawing of what I wanted with the thread on the hipac tube to extensions as being a 20mm x 1.5 pitch. But after he gave me the tube OD and ID of the disco tubes the easiest way to do it would be for him to just thread the one end for the fill fitting to go into and then I can machine the coarse thread on the extension side of the hipac down to .745″ to fit tight in the disco tube and weld the two together for a one piece tube.
Yep I put your front hipac tube with 2 extensions on my LW barreled 2240 and did some testing and I could use it like it is with a 22 to 2300 psi fill and get 20 good shots per fill or detune just a little to get a flatter curve with a few more shots. When I tested your gun as received it was shooting in the high 500 to low 600s with 32 plus shots with 10.5s and in the mid 700s with 7.9s and 32 plus shots on a 2200 psi fill. I want the fps up in the 800 to 900 range with the 10.5s and in the 900 to 1000 range with the 8.44s which it is real close to that now. I started at 2500 psi and the first shots 4 shots were below 800 fps with the 8.44s but shot 5 thru 26 were above 900 fps with a high of 1013 fps. The 10.5s starting at 2300 psi were 22 shots above 800 to a high of 943 fps. so I think with a little tuning of the hammer spring a can get a flatter curve with maybe about 30 shots in the mid 800s with the 10.5s and mid 900s with the 8.44s
I am also interested in which barrel is more accurate between the disco and the LW as there is only 2 inches difference in length between the two so I will find out.
The hawke scope is going to stay on your gun for now unless the LW barrel is more accurate so basically which ever of the two is the most accurate at fifty yards will get the hawke scope. My nitro venom has one of my Hammers 3x9x 40mm AO scopes on it that are just a single mil dot scope but I like them a lot and they are springer rated, I have had good luck with sighting them at fifty yards also, but the chairgun shows to sight at 40 yards to have the widest span of distances in a one inch kill zone. It shows from 10 to 45 yards you can hold dead center and be inside the 1 inch zone and then just hold 1/2 mil dot under for 50 yards and 1 mil dot under for 55 yards. it shoots the 8.44s at 925 fps
So I will start with the nitro gun as it only requires the gun and pellets and a stool to sit on with a bipod to rest gun on. Then once I have more time to tune and sight my 2240s and build a field cart to carry them and all the other stuff plus air I will switch to pcp, besides I am using BBs trick by using a spring gun there will be less competition to shoot against so I can place better hopefully.
Buldawg
Gunfun
I am going to bed now so will talk to you tomorrow.
buldawg
buldawg
The pcp tube he has for the 2400 should accept everything from a 2240. He doesn’t sell the main tube by itself or with the fittings and such?
I haven’t talked to him in a while and when I did talk to him I was in the process of modifying a Discovery so the 2240 and 2400 was not on my mind. I just new he had stuff available.
Gunfun
I just got done emailing with Lloyd and he has agreed to do two tubes for me in aluminum with the disco fitting at the front and the hipac end threaded in at the back. One 16 inches long and one 13 inches long, he said it will be a month or two before he can do it because he is just finishing getting a new house built and it would be after that before he could do it for me. I told him I am in no hurry as I have one tube that is holding air now and I can use it in which ever gun is the most accurate till he get the tubes done.
He gave me a price of 75 a piece, but he may cut me a break on that I don’t know and if he does not its fine also because I want the setup like the hipacs are only in one piece tube and no leaks. It gives me time to get the disco fill fittings on hand to send him the fittings, the two hipac ends and the 20mm x 1.5mm tap I have for the hipac thread so he can clean up the thread after he cuts it in his lathe,
You are right he is a very pleasurable person to do business with and as long as I get me two tubes that don’t leak and are reliable I will be happy. So I just have to check with him every couple weeks to see when he is ready and I will be all set.
Buldawg
A 16″ aluminum HPA extension would leave enough room for choice of muzzle-break/ front sight with minimal weight-gain! And Lloyd will probably at least offer to build a tube/ barrel band to match. Did ya’ll talk about that?
Reb
Actually the 16 inch tube will be on the 2240 with the 24 inch disco barrel and the will be 2 inches of barrel past the fill fitting so for a muzzle weight to fit it would have to be cut on the bottom to allow the fill hose quick connect to clear it to fill gun. I was not planning on putting a weight or anything else on the end of the barrel and only wanted enough barrel past the air tube to protect the fitting from getting knock off.
There will be no need for Lloyd to make any barrel bands as the disco tube he is using is 7/8 diameter which is the same as the hipac tubes are so the stock barrel bands will fit just like factory ones do.
Buldawg
buldawg that sounds good. Lloyd does nice work. I believe you will be happy.
Gunfun
I know I will be happy as he was very informative and genuinely showed a sincere interest in what I was asking of him. I first ask him to just make the tubes with the front end threaded and I would have the tubes welded to the hipac end and he said that he had some reservations about that unless the person doing the welding is a certified high pressure vessel welder.
So we talked about him doing the tubes in .095″ wall thickness aluminum tubing that would be thick enough for the thread for the hipac to be cut into it and allow it to be threaded in instead of welding on a steel tube, so it will be lighter as well as stronger and will have a 3 to 1 safety factor.
Yes I am happy already, it may be a little time to wait but it will be well worth the wait. I have one setup that I can use until he gets the two made so it is all good. Now I just have to get your trigger frame painted again and get the disco gun put together to see which one of the two is the most accurate to use until I get the new tubes and then the disco will have the 16 inch tube , the LW barreled one will have the 13 inch tube and the all hipac will go on my 18 inch barreled 22 cal 2240 for a nice threesome to enjoy and use at least 2 for the FT Matches.
Buldawg
I forgot to say that was Mike at TKO I was just talking about.
This last comment posted in the wrong place. I was talking about the 2400 tube from Mike and the end pieces and fittings when I was talking to him about moding the Disco.
Any way it sounds like Lloyd has got you all fixed up.
Gunfun1,
I believe it is the same trigger as on the 2300T and 2300S.
I came across literally a dozen-plus methods of loading pellets in that breech. Muzzle-down was one of them, but impractical when benchrest shooting. Muzzle-up was a little more manageable, but still annoying off the benchrest.
No problems sighing in two scopes on these guns, even with the high profile mounts. The Leapers scopes have good elevation and windage adjustment range, but I haven’t had the chance to try the Hawke yet. Didn’t need to shim anything. I do know that adjusting and then re-tightening the barrel within the barrel band can help in some situations.
Hiveseeker
Yep the barrel band trick is good for eliminating side to side poi changes that’s for sure.
And I was wondering because sometimes on lower powered guns and your trying to shoot at father distances you end up with to much up adjustment in your turret. That will play some funny tricks with your poi.
And I guess loading is a personal preference. But I do bench rest my guns probably 60% of the time and load pointing down. And its safer that way. Most ranges that you shoot at frown if a gun gets pointed up while at the bench.
I’ll be doing a 20-yard test (my yard’s too small for a 25-yard test), and if I have any elevation adjustment trouble will report it then. My big Leapers UTG scope seems to have plenty of adjustment, and we’ll see if the same holds true for the entry level Hawke.
Hiveseeker
Good I will be waiting to hear.
Mystified?
Intrigued.
Hiveseeker
Another very well written report and very good pictures also. I agree with GF! that the triggers in the 1720t and even the Mrods can be made to fit in the 2400 frame and you will then have a true two stage adjustable trigger, But I have 3 2240s and I have found that by playing with the spring for the trigger by replacing it with a lighter one and polishing all the sear and trigger contact surfaces can really make a big difference. Yours with the adjustable trigger part would make it even easier to put in a lighter spring and then adjusting to a 2 lb pull along with polishing all the contact surfaces you will be surprised at how nice it can be made to feel and break crisply.
Great report and am waiting for the velocity and accuracy reports to come.
Buldawg
Thanks, buldawg76.
This trigger is the best I’ve tried in the $100 or so range. I have seen others polish and tweak that 2240 trigger, but from what I’ve read (don’t have a 2240 myself) the 2400KT’s is superior. The adjustability, along with the trigger stop, are nice.
Hiveseeker
I agree the 2400 trigger is superior to a 2240 in stock form with the adjustable spring seat and trigger stop, but the basic parts are the same between the two guns as far as the actual trigger blade, the sear, and hammer are concerned. The only difference is being able to adjust the trigger spring and the stop which can easily be added to the 2240s.
I was not aware that the 2400 had a trigger stop screw in the frame and that is one mod that I will be doing on my 2240s for sure. I have put in a aftermarket delrin trigger spring guides in my 2240s with light springs that give me a 2 lb trigger pull and a crisp break by polishing all the contact surfaces and thanks to your report I can now add a trigger stop into the frame.
So once again you have given us all a great report and taught me something I was not aware of to be able to improve my guns even more and make them even better shooting toys. Thank you
Buldawg
Thanks, buldawg76.
From some of the comments, the trigger stop is a relatively new addition to the 2400KT. Apparently it used to come on the 2300KT only.
HiveSeeker
I was not aware of it even being on any of the 22xx guns and now that I know about it I will be adding it to my 3 2240s and my 2289 also. It is one of those easy mods that makes the guns even better shooters.
Buldawg
Thanks again for the series, Hiveseeker. I do learn so much here. 🙂
With a carbine arrangement like this, I do like keeping things as compact as possible, and I’m quite interested in the idea of using a ghost-ring rear sight instead of a glass optic. (To wit: if I ordered via the custom shop builder, I would order the Williams peep sight and simply unscrew and discard the aperture insert.)
My question for this audience strays a bit from the topic of the 2400KT itself, but is germane, I think, to its concept. The question is this: on a gun that does not have a front sight built in (and I’m most specifically thinking of an EscapeSS or a P-rod), what might be the preferred way of mounting such a thing? AirForce has its open sight set, and perhaps the front sight is adequate for my intentions, but if I’m using irons I want a true ghost-ring rear, mounted as close to my eye as I can get it, and that AF rear sight would seem the wrong choice there. Perhaps using the AirForce front sight and a Williams (or similar) dovetail-mounted rear would do the trick?
For something like the P-rod, again it would seem like the 11mm dovetail might support a suitable adjustable rear, but what might be done about the front?
Kevin
Here is something I know is done with Discovery’s if you take the front sight off to put a muzzle brake on.
The Discovery front sight is 2 pieces. The sighting part is held on to the part that slips on the barrel by one screw.
He suggests gluing the factory front sight on to the muzzle brake. He don’t say with what type of glue. I would maybe use hot glue over super glue / CA glue. The hot glue will hold firm in place but it can be separated from objects if you need to.
So basically find you a front sight that has a small flat surface on the bottom then hot glue it on the shroud on a Prod. And I guess if you really wanted open sights on a Mrod you could do the same. And I’m sure other people have done other things to secure front sights also. I would like to hear more suggestions.
Gunfun and kevin
Do not use super glue because when it dries it will leave a white haze around where you glued the sight on especially on a black part. The best option is the hot glue as GF1 suggested or a two part epoxy that is quick setting.
buldawg
Thanks fellas. If I pursue that route, it sounds like I may be able to mount something myself, but I also have recourse to a friend who is getting started in general gunsmithy. A very good data point to have.
Let us know what you end up doing.
Maybe you will come up with some type of open sight that I will be able to use. I have problems with open sights that us a front and rear sight.
Kevin
Glad to help and let us know what you end up using and how it works out for you.
I am like GF1 in that I cannot see with open sights unless they are a diopter rear and hooded aperture front like on the CMP cadet guns they use for training are Olympic shooters and then only at ten meter distances.
Buldawg.
I agree fully that traditional “open sights”, with rear notch, U, or V placed at some distance from the eye, are a challenge. The eye can only focus on one thing at a time, and trying to keep rear sight, front sight and target in a perfect line and then break the shot with hard focus on the front sight is not an easy thing to do. (It is, in effect, the best solution to a problem that has no perfect solution.) The reason the ghost-ring can work and be as accurate as it is, is because the large, thin rear aperture is placed so close to the eye that the shooter doesn’t even bother trying to bring it into focus at all: as long as you look through it, it disappears, even while the eye rather naturally centers itself in the rear, and visual focus is entirely on the front sight post as it should be for an accurate shot.
I am starting to notice the aging in my own eyes, especially with open rifle sights, but I can still hold tighter groups than I can actually see, with my ghost-ring irons. I’ve never figured out how that can be the case, but the hits are there, and I’ll not argue with success. 🙂
Kevin
I have never tried a ghost sight that I know of so I have no experience with them, but form what you say they may be the ticket for us old tired eyed geezers that now rely on scopes to se and hit our targets.
I know for me with open sights have become more of an issue after my cataract surgery in08 in which I went from 20/200 and 20/225 in my left and right eyes with a lot of astigmatism to 20/20 vision with no astigmatism and needing glasses to see far away like driving, but not to read with to seeing far away perfectly, but needing glasses to read or see close up. So it is a 100% opposite change from what I have been used to for 54 years and the issue it creates when using open sights is where I could see both the front and rear sight perfectly before surgery but not focus on the target to now not being able to focus on the sights ,but see the target perfectly.
So a ghost sight my just be the ticket for an open sight for longer shoots as I stated before I can use diopter sights at 10 meter quite well because we have a CMP range here in town that has open to the public night every Tuesday and Thursday where you can sight in your own rifles on their electronic target system as long as they are below 600 fps. Their system allows you to sight in your rifle to be able to hit the eraser head of a pencil laying lengthwise facing you at ten meters or basically put a 177 caliber pellet in the size of the hole it would leave in the paper target with diopter sights or a scope or whatever sights you may use on your going They also have Daisy Avanti match grade guns that you can
shoot also and they only charge five bucks for adults and 2 for kids from 4 pm to 7 pm every Tuesday and Thursdays.
I think I will make one of those 10 dollar ghost sights that Reb gave the link to and see how it work for these tired old eyes and You may have just opened up a whole ne world for me in shooting fun. Thanks Kevin
Buldawg
Boy, that must indeed be a sensory change to contend with! (Believe me, I’m taking notes for my own future; thank you for the data point.)
Certainly if you haven’t tried it before, I think it’s worth a look. I know lots of older eyes than mine that feel the same way, and after learning about the concept (from Jeff Cooper, probably 25 years ago now) in the first place, I had to prove it to myself to accept that the system is as accurate as I am. I make no claim to be a benchrest marksman, but if I can hit it at all with irons, I can hit it with a good ghost-ring.
Do be careful drawing any conclusions from the link to the homemade tube; I don’t have any experience with that (yet) and I view it less as a ghost-ring rear sight (which does depend on a matching front, set far enough away to take advantage of at least some sight radius…remember that you are aligning the two sights–just not nearly so consciously), and more as a (clever) approximation of the single-plane aesthetic of a dot sight. (Consider that it is not actually a single-plane with respect to the target, and will not solve the two-object visual focus problem that a true optic solves for imperfect eyes.) Within the precision requirements of an Airsoft rifle at Airsoft ranges–which I am not disparaging, by the way (I’m becoming a believer in the calculated use of Airsoft as a training aid)–it may indeed be a great way to either try out the dot sight idea, or even use on its own within its limitations. (If nothing else, it looks like a fun experiment that’s worth trying out.)
If this helps: I have usually stayed within the parameters what I originally picked up from Jeff Cooper on the subject: the rear aperture is ideally about 1/4″ wide, with a thin rim that disappears during use. The front can be whatever is most comfortable with you; I like a plain, square post to give me good right angles to judge the precision of my hold, but I know several fellas older than I am who have become believers in the fiber optic front sights as an assist to their eyes, and I try to pay close attention to that. They tell me that no, it’s not as precise as a nice sharp plane on the front sight, but that it’s so much easier to see and focus on that they get better hits that way anyway, at least in the field. 🙂
When I got started with airgunning, it was B.B. and this crowd (bless you all, seriously, for everything you have taught me here) who opened my eyes to the humble AV Bronco, and when I found out I could order one from PA with the Williams sight already installed, well, I was off! I installed the front sight riser kit, removed the aperture insert in the rear, and the result is an absolutely lovely piece to practice and test myself with, with nearly exactly the parameters of large, thin rim and square front post stated above, plus a very manageable trigger, ergonomic safety and overall pleasant demeanor.
Anyway, if you get the chance to try it out, I hope you have the same success I have had. 🙂
Kevin
I guess I still don’t know or really understand the exact concept of what a ghost sight is as I thought the cheap homemade one that Reb gave a link to was basically what one was, but from what you say it appears to have a rear and front sight to give a true plane in which to sight from.
if you can provide a link to what you put on your AV bronco or to another link that I can see actually what one is supposed to be and look like it would be much appreciated.
I would like to see just what they are like and if it would be of use to me for as you state a quick target acquisition type sight.
Buldawg
I find myself wishing you were local to me, so I could show you in person. It’s really less complicated than we’re making it out here. 🙂
To use a PA link for the illustration, the Air Venturi Bronco “Target Pro” mounts the Williams adjustable rear sight against a nice square post front. You can turn that Williams sight into a ghost-ring aperture by simply unscrewing the aperture insert and removing it. The threaded ring that the insert screws into, itself, is nearly perfect as a ghost-ring aperture, being close enough to the eye, about the right diameter, and thin enough to vanish from conscious sight when mounting the rifle for a shot.
Note that it is also possible that there are various definitions floating round that use the term “ghost” when describing a sight. As I think about it there may be other sights that have used that name as well. If this helps anyone, what I am calling a “ghost-ring aperture”, the thin-rim, quarter-inch aperture mounted close to the eye that vanishes from view, seems to have been first described by Townsend Whelen (I believe) in the very early 1900s, and was named and popularized many years later by Jeff Cooper.
Kevin
I did some searches on ghost sights and now understand what you are talking about and since you just described what you did with the Williams rear peep sight to make a ghost ring I can actually have one for my self as I have 4 or 5 daisy peep sight sets that include both front globe and rear peep and a Williams rear peep sight just like you described that I can remove the peep aperture from to have the ghost sight you have made.
They all mount on a dovetail so I can actually have a choice of the 1/4 inch of the Williams sight or the Daisy rears sights with the aperture removed are around 3/8 inch holes so in essence all you are describing is a set of peep sights with out the peep aperture in place.
I will have to try that sight setup out on one of my guns and see how it works for me and my tired eyes. Thanks as I now fully understand what you are talking about and can see how the homemade on that Reb gave the link to is not exactly the right concept or design.
I will give it a try and let you know how it works.
Buldawg
Kevin,
I don’t know what to do for the PRod, except for maybe a dot sight, but you might want to give this set a thought for the SS.
/product/airforce-adaptive-target-sight-set-fits-most-10-meter-3-position?a=2236
I have an Edge and it is no problem for me to quickly acquire my target in the peep. I have been wanting to install an adjustable aperture so as to have a smaller peep.
I understand your desire for a ghost ring, and that would be great for quick, close shots, but may be more of a hindrance for accuracy at longer ranges. I guess it depends on what kind of shooting you are doing. I am more of a mini-sniper kind of dude.
Thanks for the suggestion, RidgeRunner. I did take a peek at this set, but other than presuming that they are very precise and convenient in their adjustments, they would seem to negate nearly everything I am after with a ghost-ring setup for field use. I know I’ve spoken among this crowd about the speed value of a good ghost-ring in terms of target acquisition, but even more valuable than that in terms of a field piece is that a good ghost-ring aperture doesn’t obscure the target or landscape around it at all. (On a good setup, the gun comes to your shoulder and your whole world is instantly and simply front sight and target; the large aperture simply fades from view–hence ‘ghost’–and you quite naturally look both through and around it at the same time. And it is as accurate as I am.) If I’m understanding the picture of the AirForce unit properly (and perhaps I’m not), the sight itself looks like it would very much be in the way of everything but what the aperture exposes to view. I’m sure this is great as a bullseye sight, but I’m just not a bullseye sort of guy. 🙂
I was always more interested in that AirForce front sight, which might theoretically be paired with a different rear if the heights could be matched properly. But I still suspect that I’d be unhappy with that style of competition sight; the picture at PA doesn’t tell me for sure but I suspect it’s the same sort of insert-based setup that I first learned on my grandfather’s 1000-yard 03 Springfield. I understand why it works for that specialty, but it’s not what I want in a generalized field piece. I want a square post, either with no hood at all or a minimal one, or maybe Garand-style wings–and the AirForce design seems to offer neither. (But again, I’m basing this only off the pictures I can see, and would be happy to be corrected.)
Kevin, Look at what this guy did
http://www.x7og.net/gear/17074-super-simple-diy-ghost-ring-sight.html
Man, I’ve got totally mixed feelings about that. An ingenious idea, certainly, and probably worth testing just for being so inexpensive and simple. But it’s not properly a ghost ring, as you’d have to willfully align that tube, rather than ignore it. There’s no “sight radius” at all to take advantage of, and I’d be amazed if it would give me the practical accuracy available in an M1 Garand with the aperture enlarged.
And yet, I’m a geek, and I’ll probably try it anyway, just to see. 🙂
A quick look around and I found a bunch of ghost ring sights that could easily be adapted. There are a bunch of Mattelomatic sights that would easy to adapt.
Have you considered simply removing the screwed in aperture leaving you a huge opening to act as your ghost ring? To make it a precision aperture sight just return your regular aperture into the hole.
Actually, that is exactly what I did with the Williams sight that came on the “Target Pro” Air Venturi Bronco that has been my little sweetheart for the last two years now (thanks again B.B. for leading me to that little gem). I don’t bother putting the insert back in, since there is absolutely no improvement in my groups with the smaller aperture, and now I get to see a lot more of what is downrange.
I did the same thing years ago on my grandfather’s 03 Springfield, and with that gun, looped up in prone, I can shoot groups tighter than I can see with a front post and the big rear aperture. You could say it works for me. 🙂
I now begin to wonder how effective aperture sights really are in relation to the diameter of the hole being looked through.
I suppose I haven’t tested this specifically, but there would at least theoretically be some upper limit to the diameter of the rear aperture, beyond which the natural tendency of the eye to center itself through the ring falls off. That’s just geometry and mechanical tolerance talking there. 🙂
There is of course no magic to the ghost-ring; in terms of sighting mechanics it is absolutely no different than any other aperture. The difference is that instead of tackling the problem of aligning both front and rear sights consciously, you instead fully remand the alignment task to your eye’s subconscious ability to find the center of a circle–and what you find in practice is that you can do this with an aperture that is at once small enough to be geometrically acceptable to work with the overall sight radius for the precision you require, and also large enough to disappear from your conscious sight during acquisition.
For a target gun, all this is somewhat academic, and I’ve had benchrester friends puzzle over me for years. But for a field piece, the ability to see all around your target, reduce your focus concerns to just front sight and target, and get the hit you need under time pressure, is more than just “nice”, and I do go to some pains to set it up that way. 🙂
If the rear peep is far enough back (similar to the sight on my USST Daisy 953 [an early 80s 953 dressed up in 853 trim]) there is no “try to line up target/front/rear/eye” effect… If you can see the front sight, your eye has centered on the rear aperture.
Receiver peeps (.30 M1 carbine, HK-91) may take a moment more, but the same tends to apply — if you can see the front sight, the rear is taken care of (especially for the HK-91 if you can see the full front shield ring with the post in the middle).
Where the diameter of a target aperture comes into play — with bright enough lighting a small aperture increases the effective depth of field, making it easier to focus on the front sight and maybe even bringing the target into near focus.
If you currently wear corrective lenses, take off the glasses and look at something well light across the room… Fuzzy? If so, make a loop with your index finger, bring it up to your eye. While looking at that “something” tighten the loop until it is a small aperture… The odds are that you’ll find the “something” has come into near focus the smaller the aperture becomes.
Boy, you said that a lot better than I did. Thanks for that. 🙂
And that’s an interesting visual test; I just tried it and sure enough I think I do see an effect, although I have to close my non-dominant eye to do it. (My eye dominance is soft enough that I transition too easily while closing the “aperture” imperfectly.)
Let’s not mention dominance…
After all, I’ve gone for a decade or so with a split prescription — my left eye is adjusted for computer monitor usage (~20-24 inches), right eye for distance (and reading glasses both eyes around 12-16 inches)
It’s why I haven’t ever “properly” shot my shotgun at anything… The act of shouldering the shotgun means I see the receiver approaching my right eye — which triggers an instinct to protect my eye, and transfers dominance to the left eye (which is now sighting across the barrel, not down the rib).
Thanks for the explanation.
Hi, Kevin. I’ve been following this conversation with some interest.
On a carbine-length gun like HiveSeeker’s Sassy Sandy or a p-rod, I worry that a truly big rear aperture would suffer from the much shorter sight radius compared to the ’03 Springfield example. I haven’t done the math, but I reckon dropping the sight radius from – what – 30-odd inches on the ’03 to probably more like 20″ on a carbine could introduce a lot more aiming error.
I wonder if the 2400KT with the Williams peep might be a nice compromise, maybe with that upgraded front brake which seems to have a nicer front post. Might not be too far from a Garand type sight picture???
The AirForce peep sight set seems nice, but probably way too match-centric for your needs. I don’t know the exact specs, but I imagine that rear aperture would only range from “small” to “tiny.” And the height of it might make it fussy to adapt to non-AF rifles. What a tease, especially since you’re already considering an AF rifle!
What about a “dot” sight? Some of the multi-reticle offerings seem to have various post-type reticles. Might be a win on something like a p-rod, with a relatively unobstructed sight picture, and saving you from finding a way to adapt a front sight mount only to get a short sight radius. But probably way less satisfying to peer through than that lovely Garand peep!
-Jan
Yeah, I’m with you that there must be some sort of balance point for sight radius, and I truly don’t know how short would be “too short” for what I want. Paradoxically, I like my firearms as short as I can get them, and have been quite happy with sight radii in the 16″-20″ range for quite a while now, on rimfires, leverguns, EBRs, and as reserve sights on my boltguns.
IIRC, my very best groups did indeed come from that old 03 (which is about to be reborn as a custom gun that I will probably squee about for quite a while), and that radius would have been about 27″ or so. I do suspect that is not coincidental–sight radius does matter.
And hopefully anyone following all this discussion understands that my requirements for precision may not be the same as yours. Group size under controlled conditions is an excellent diagnostic tool, but I admit I get through it as quickly as possible. Once I have established that I can guarantee a hit at the “group size” that I need, I spend most of my time improving my ability to get that hit faster, or with an improvised position, etc. So, as an example, for hunting big game, I work toward using either a 3-inch or 4-inch “vital zone radius” as my acceptable “group size”, depending on quarry, and thus whatever range at which I can guarantee a 6- or 8-inch diameter hit, is the range I’ll restrict myself hunting at. (I know that most vital zones are actually bigger than that–especially the moose that are local to me–but this gives me some leeway in the always-possible event that I misjudge the exact range or wind.) I’m good for 300 yards with a scout scope, and currently about 150 with a ghost-ring. (And that is presuming a stable position, of course. Even a “moon scope” can’t help me hold any steadier; it just shows me my wobble zone in greater detail.)
But here, of course, I’m not talking about 6-8 inch targets at up to 300, but–trying to apply the same standard–maybe half- to one-inch targets at up to, maybe, 50 yards of range. (I’m still functionally new to airgunnery and also to the snowshoe hares and spruce grouse that are local to me, so I don’t yet know some of these details.) And so, in the case of the EscapeSS (or TalonP, if I’m really wanting on the short and sweet), I may not be able to extract full value out of the gun’s potential with a ghost-ring arrangement. I should think, maybe, of an airgun at 50y the same way I do of a firearm at 300y; maybe a 20-25y airgun shot is analogous to a 150y shot with a firearm, and thus more amenable to irons. With a 1322, that makes sense, but it would seem that the AirForce platform and perhaps the P-rod are capable of better than that. (Hence my parallel interest in the “wait…could I mount a scout scope on one of these things?” question.)
Thank you (to everyone; I’ve been talking a lot more on this thread than I’d intended) for letting me work some of these thoughts out in this venue. I suspect that to long-time airgunners I probably come across as a weird blend of understanding some things well enough, and at the same time being comically naiive in others.
I’m happy to be guilty of that. The amount I have learned from this little corner of Das Internets is enormous, and I hope that continues for a long time. 🙂
And Jan: I have considered the dot sight idea on the P-rod, definitely, but ultimately I’m a noob to dot sights, and suffer some of the anxieties about batteries, complexity and fragility that seemed to be true of dot sights…well, long ago now. I’d not be surprised if things were very serviceable these days, and I am absolutely open to education on the matter.
As to the specific P-rod question at hand, I’d welcome opinion on whether or not a dot sight (and then which one) would be precise enough for 1″ targets at the Marauder’s maximum range. Beyond that, batteries and electronics would need to be reliable in the cold (this is winter hunting in Alaska we’re talking about) and reasonably durable.
And one other question on optics mounting, which I caught in the discussion of crowding in the loading port area. I notice here that the scopes seem waay back, with the ocular lenses mounted what looks like several inches aft of the end of the receiver. I am wondering about mounting the intermediate eye relief scout scope, here. Presuming that your scopes are in the 2-3″ range for eye relief, and mounted as far aft as it looks like, I do wonder if it would be feasible to mount that Leapers 2-7 scout scope for suitable eye relief, which should be in the 9-11″ range. I guess I have long presumed that would be impossible without some sort of mounting rail extension, but I suppose I should ask, because that would completely clear up the loading port problem, and of course for scout scope devotees like myself, it would carry all the other advantages of that system as well.
The generalized question would be, then: do people successfully mount intermediate-eye-relief glasses (scout scopes and dot sights) on airguns using the standard 11mm dovetails, either mounting outright or using some sort of cantilevered or extended rail to get the right ergonomics?
(And if the answer is yes, what do you think it would take to accomplish this on either or both of the EscapeSS or the P-rod?)
Kevin
I have mounted red dot sights right in front of the opening in the breech were you load the pellet. I never tried a scout scope on any of my steel breech 1377, 2240, 2300 or 1720T but I bet it would work out nice.
Maybe somebody has put a scout scope on. I would like to know. But I have had everything from the See All sight to red dots, a fixed 4 power Leapers Golden Image scope all the way up to a Hawke side winder scope on the guns I just listed and all had the 1399 stock with the piece of AC foam insulation on the stock for a cheek rest. All worked nice.
I’d love to hear from someone who has added a rail extension to an 11mm dovetail. The Leapers scout scope that B.B. reviewed a while back seems painfully heavy (if otherwise outstanding), and a significant cantilever might thus put a lot of stress on the base dovetail. But, as in the firearm world, there just don’t seem to be that many who are really dedicated to the intermediate-eye-relief idea, and it may be that I’m looking at new territory here.
On something like a 1377 carbine, I’d probably opt just for drilling out the supplied aperture to more of a ghost-ring format, or spend a little more for the steel breech and add a rear aperture like the Williams that PA carries, or possibly one of the “WGRS” models made for rimfire dovetails that might also work with the 11mm airgun cut. (Those latter are a little less convenient in their adjustments, but are beautifully trim and minimalist and they obscure as little as an iron sight can.)
It is on the P-rod and the EscapeSS that I’m really contemplating the scout scope. With their ability to shoot precisely out further than I can hold on tiny targets with any iron, I probably should start with glass…but if I can use the same sort of glass that I have on my firearms, I’d love to do that. Thus far I’ve been somewhat resigned to using a conventional glass because of the mounting options presented on the out-of-box guns, but something about looking at just how far rearward some of these scopes seem to ride, I do wonder if it’s possible to do this by cantilever…
Kevin Wilmeth,
Space on that steel breech is very limited. I don’t believe you would be able to find a mount that would let you position the Scout scope far enough forward for that long eye relief, though I’ll defer to anyone who’s actually tried it. Regular rifle scopes work very well on the steel breech, and even they require some jockeying for the best position.
I think I agree with that assessment, after spending a little time inferring dimensions proportionally from pictures. I think that for anything like the 2300/2400, 2240, or 1377/1322, in carbine form, I’d probably just go with the ghost-ring arrangement anyway, and accept the limitations of range that hitting a precision mark with irons would impose. It would then remain light, compact, and uncomplicated, like a carbine should be. 🙂
For the P-rod, I suspect someone could probably ‘smith up some sort of mounting rail that was attached in back on the breechblock and in front on the barrel band, and maybe that is worth the effort of a full-blown custom job. Or, perhaps I just view the P-rod as a vehicle for a conventional glass and simply get one with lots of eye relief and relatively low power.
I had me quite a ‘duh’ moment today, while looking at dimensions, by proportions measured crudely off of pictures at PA. I had completely missed what may be a rather obvious option for mounting a scout scope onto an AirForce frame: the AF 11mm-to-Weaver adapter with the slant that matches the existing AirForce frame.
I would welcome the advice (or ribbing, if I’m off my rocker) of all the AirForce owners out there on this idea.
The idea is this: it seems that if I were to mount two of these adapters, serially, on the 11mm dovetail forward of the frame top and nestled right back against it, the resultant mounting base would actually be pretty close to the same height of the frame top, and would essentially produce a 6″ long mounting surface that the medium-height rings that come with the Leapers 2-7x scout scope just might fit as they are. With that much surface to mount on (and possibly a different-height set of rings, if for some reason the medium height rings are too low for the ocular bell to clear the frame), I’d think I should be able to find the right location for optimum (9-11″) eye relief and be ready to go with a scout-scoped AirForce rifle. (And actually, if my crude measurements are accurate, it looks like two of those adapters might even fit on the TalonP frame…can any of the AirForce crowd confirm that one way or the other?)
Anyway, if that approach is viable, it may well be that the EscapeSS (or possibly the TalonP) may get the nod over the P-rod as the hunting arm of choice for spruce grouse and snowshoe hare this winter. 🙂 Heck, if I can get a variable-power scout scope on an adjustable-LOP hunting airgun of carbine length and weight, that seems very nearly perfect to me!
HiveSeeker,
It sounds like both of your carbines would benefit from having the barrel breech chamfered a little bit to help eliminate that “sharp” lip that the pellets are catching on.
I chucked up a Dremel bit and spun it by hand on my 880 and AM-77
RidgeRunner,
That would be a tweakI could go for, though I’ve gotten pretty used to touching the skirt to center the nose of the pellet during chambering.
Edith,
As I was not interested in the Armada stock, I did not ask specifically if they were going to sell it separately in the future and they did not say. I guess it would depend upon interest. I will try to ask them and see what they say.
I personally would like to drop the Armada in a nice walnut or even a laminate stock. I could probably be happy with the present wood stock with a little bit of shaping here and there and a new finish.
RR,
The Armada is a Marauder in a different stock. So if you want to swap stocks, start with the Marauder.
B.B.
But the 1st gen. wood stock will not work. They changed the trigger location on the 2nd gen. wood and synthetic stock Marauders and the end cap on the main tube also on the gen2.
Dave at RAI only has his gen1 pistol grip stocks available. I’m right now waiting on a gen2 pistol grip stock when he gets them done. He is suppose to let me know when he has them ready. The gen1 that he has now looks nice I will have to say.
And I agree I would like to see a nice walnut stock for a Marauder and even a colored laminated stock. I know Lloyd had a picture on his Airgun Labs site of a Marauder wearing a nice laminated stock.
If I remember correctly, the laminated stock the marauder was wearing on Lloyds site was a boyds blaster stock.
kevin
I know when Lloyd was building my tube for the gen1 Marauder I hadwas getting the factory stock milled out to accept the extra tube.
I wasn’t worried about it at the time because I had the pistol grip assembly on it with the 1399 stock then I ended up putting Dave at RAI’s adapter and AR stock on it. But that’s why I couldn’t say anything about the double tube until he had the stock worked out. BB knew I had it also but Lloyd wanted to get the stock issue figured out first.
I believe he had some body he knew making the stock. So maybe that was the person. I do remember in BB’s report on the Double Disco that he gave a guys name that was doing the stocks for the Discount.
I did end up milling out my wood stock with a end mill on a Bridgeport before I sold the gun. So my gen1 Marauder had Lloyd’s double tube and the factory wood stock on it when it got sold. A guy at work bought it. I will see if he can get me a picture of it and I will post it.
Was suppose to say doing the stocks for the Discovery.
Not for a (discount).
BB,
Oh, I would definitely go for the Marauder. I am not interested in the Armada stock myself. I was just curious about it.
Edith,
I “talked” with Crosman some more today. I was told it would be 6 to 9 months before stocks and such for the Armada will be available.
RR
You mean like replacement stocks if you want to order them from Crosman with a part number.
I have just finished customizing my 2400kt,I had the Custom Shop add a muzzle brake,trigger shoe
and I added a modified 40% larger valve,extra power hammer spring,a new large capacity
tube valve.I have gotten velocities of 700 plus fps with the 18″ bbl. and RWS 15.3 pointed
I get 800 plus with the Crosman SSP’S.I did find in an older Custom Shop manual Instructions
on ajusting the trigger.I have six customized 2240’s and even with the standard 7″ bbl. I get around
600 fps with the above mentioned mods.
I get only 650fps from my Walther 850 magnum using the 88 gram co2. Which by the way are
costing $12.00 plus for one.
I had a longer scope on it at first but I have since put a good BSA Red Dot on it and it
is now a lot easier to handle in the field.
In yesterdays blog I finally found out why the Rogue was dropped from the line up,
Now we have the newer Magpul version coming soon,I hope I can afford to get one
but the first thing I will do is to get a scuba tank.”No more pumping”
PS,The Custom Shop only sells a limited number of acc.The only way to get for example,
wood grips,trigger shoes,muzzle brakes,etc.One must buy a Custom Shop 2240 0r 2400′
Only the steel breech and the stock are available at their site.Crosman gets about $5.00
for the shoe and about $10.00 for the brake,On line the average shoe goes for $18.00 plus and the brake nearly thirty.
NNJM,
How did you gain access to the power mods & did you see an adjustable hammer?
Reb
nonewjerseymike,
Nice upgrades. I came across a ton of after-mod velocities online; these guns all have a great deal of potential. That might be something I move into later, but at the moment am looking at these out-of-the-box.
I’ve heard that the Crosman Custom Shop won’t sell certain parts unless you have a Custom Shop gun, but have had no trouble with stock parts for consumer guns yet. Sounds like their prices are very reasonable; shipping on my order was ridiculously low.
Hiveseeker
Any order placed from crosman over the phone is a 4 dollar flat shipping rate no matter the quantity of parts you get or the price for them, but if you order online it will vary from 10 to 15 dollars so it is always best to have your part numbers at the ready and place the order over the phone for 4 buck shipping regardless of what you order.
Buldawg
I placed my Custom Shop order online and got $4 shipping, but that might be an animal of a different stripe. I also just recently ordered some parts from Crosman over the phone, and shipping was 4 bucks.
Hiveseeker
Yea an order from the custom shop may be on the same lines as over the phone, but I know I have ordered steel breeches online before and the first one was 9.45 shipping and then a couple months later I ordered another one and it was 12.50 shipping so it kind of confused me until I ordered some more parts that are not shown online and it was a flat 4 bucks shipping and I asked the sales person about it and they told me that it is always 4 bucks over the phone but does vary online.
Buldawg
I was stoked when I noticed the overtravel screw! It made me wonder if they ran outta 2400’s and started dolling up 2300’s in order to fill orders.I was still torn between the 2400 with the 1399 or adjustable trigger on the 2300 and just fill in the blanks. It looks like I no longer have to choose! Maybe they just decided to upgrade the 2400? Whatever happened, I’m glad they did it!
Reb
Dear Reb.I went to two web sites one is called Allience Hobby and the other is called
Needful Things,Don’t let the name fool you this site is reliable, As i have ordered and
modified at least ten 2240’s and 2300’s and 2400kt’s.First you can increase your power
by just adding the power spring by at least 80fps and if you add the valve $22.00 combo
hammer/spring you’ll pick up 100fps and if you add the valve system you will be in the
600 fps range with the stock 7″ bbl.
I used a custom 2240 with a 18″ bbl.and all three power mods.Shooting into an old
Numich Arms catalog,I acheived the the same penetration using 15.3 RWS pointed
as my new Benjamin Trail NP2 which was over 237 pages and about sixy dented
Not bad for co2″My Walther 850 Magnum only gets about 650 with the 898 gram co2
PS: The best way to start is to go on the Crosman Custom Shop Site.
When you order the carbine it is the 2400 kt and the pistol is the 2300 the thing is that
the 2300 comes with the ajustable trigger which runs $31.00 and the trigger shoe and muzzle brake are $5.00+ and $10.00+ respectfully.All the rest you have to go on line for.
I think you will get addicted to the mods when you see what can be done and what you
can build.Watch You Tube on assembly and reassembly and after a while you’ll
be able to take apart the 2240 or 2300 in your sleep.I was surprised when the 2300
was almost the same power as the NP Trail.You will get less shots with the mods
about 16 to 20 good ones verses forty+ from stock but it is worth it,you can keep
one 2240 stock and use it to compare the difference in performance.
PS: If you order from the Custom Shop,You get the steel breech a $ 40.00 to$50.00
value either long or short depending on bbl. size.I hope this answers your query
Feel free at any time to contact me.
Reb,
As long as I’ve been drooling–I mean browsing–over the Custom Shop (about a year or so), they’ve shown the trigger stop on both the 2300KT and 2400KT. It does help the trigger feel crisper by shortening the travel. I’d love to see a two-stage adjustable trigger as one of the available options.
Have I really been waiting that long?
Reb
You need to read and listen to Nonewjerseymike when he says to go to the Alliance hobby and needfullthingsnow sellers on ebay for your 2240 to 2400 mods and hop up parts as I have used several of their parts and all are top quality and perform as they state that they do.
My 177 lothar walther Daisy Avanti modified 20 inch barreled 2240 with a 2 extension hipac HPA kit will shoot JSBs 8.44 pellets at a 2300 psi fill in the ranges of 930.6 fps to 1013 fps for a 20 shot count and with JSB 10.5s at the same fill pressure it shoots at 800 fps to 950 fps for a 20 shot count and that is with a slightly modded valve and a stronger hammer spring only for power mods. Then the trigger is polished and has a light spring with the white two piece spring guide on the trigger and a steel breech with the transfer port in the valve and barrel drilled out to 11/64ths of an inch and the transfer seal faces on the valve and barrel spot faced to 1/4 inch diameter about .050 inches deep to retain the refrigerator ice maker plastic line that is 3/16 in inside diameter that I use for the transfer port seal that is cut .050 inches longer than the space between the valve and barrel seats so that it compresses when the breech is tightened down on the tube assy for a leak proof seal.
I am still in the process of increasing the power with out losing shot count and my next mod will be to increase the valves internal volume by cutting off about three threads from the front half of the valve and opening up the back half by removing some of the threads inside the valve that will not be used by the shortened front half and then angle the transfer port to reduce the restrictions in the airflow pathways from inside the valve to the barrel. It is basically making a Boss high flow valve myself without spending 60 bucks for some one else to do it for me.
The valve is also pinned on either side of the tube 90 degrees from where the bottom grub screw holds the valve in the tube and the grub screw is also bushed to take up all space between it and the tube so that the valve remains perfectly centered in the tube to align the transfer port exactly to the port in the barrel without the possibility of becoming misaligned from the forces of the hipac being screwed into the tube and trying to push the valve rearwards in the tube and causing a misalignment of the transfer port.
I am working towards a 25 shot count of mid 900 fps with 8.44 JSBs and a mid 800 fps shot count of 25 with JSBs 10.5 pellets and if I can achieve that then I will be at my intended goal with this and my 24 inched disco barreled 2240 copy of the above gun I just described which should be two very accurate and fun guns to shoot.
Then I am going to do the same thing to my 18 inch 22 cal barreled 2240 also.
The mods to these guns are almost endless in their parts availability and customizing, but a chrony is a definite to know what works and what doe not.
Buldawg
I love the idea of a trigger stop, but I do remember looking at the stop screw on these 2400s (and the P-rod) and thinking that it would be murder on your middle finger. I do presume it does not do that in practice? (Perhaps I have over-developed my “highest-grip possible” aesthetic. 🙂 )
I just realized what you had done about the time I hit the submit button and how dumb I sounded.
The same thing happened with my reply to GF1 on the conquering new worlds blog. I’ll finish this cup of coffee and see how to go about cleaning up the mess in a few.
Thanks for your reply!
Reb
Nice job, HiveSeeker.
Gunfun1, you may be onto something with your power adjustment twist rate idea. But how do you adjust twist rate since it is fixed in the barrel. I could see a computer to adjust the variables for power and pellet choice if all the factors were known sort of the way computerized scopes can adjust for ballistics. But the problem based on many blogs is that pellet choice is largely voodoo and trial and error, and the relationship to power is another complication. It certainly represents a problem to solve.
Matt61
Matt61
We talked a while back about that. I probably used the wrong word. Should of said interchangeable.
The idea was have something like the FX smooth twist barrel. In other words a smooth bore barrel and have adapters that can be screwed on to the end of the barrel that have different twist rates. That way you could try different twist rates and power settings for a pellet you have.
Something like put a slow twist adapter on for maybe in close shooting or put a fast twist adapter for long range shooting. Or say you have a lowered power .25 cal. gun and you need a faster twist rate to keep the pellet stable.
And what I just stated was examples it could work out to be just the opposite of what I said. But you would at least have the option to try different twist rates then to fine tune your set up.
And maybe more work than what its worth. But that’s what I end up doing when I get a gun any way is putting work into it till I get it the way I want it. It was just a idea.
Yeah!
Had my head full of visions of piano-wire encased in a tube with a knob on the end.
Sounds like it’d be noisy to me. But may also help moderate the report???
Reb
And maybe you vision could just work.
Piano-wire-ogonal adjustable rifling?
Or something.
Go with it!
I still don’t have a barrel for the Tippman 98.
Just ran the 392 over the Chrony pushing the 25.39 gr Monsters with 8 pumps @ 282 fps for 8.32 fpe. Way too heavy! this gun puts out 10-11 fpe with standard weight pellets but I lost power with these, even though they still hit hard.
Thank You RifleDNA for giving me the opportunity to learn this valuable lesson!
Reb
Typo-382 fps
Now I wanna try their other offerings, Nice pellets!
Have you seen this?
http://www.ebay.com/itm/Hensoldt-Wetzlar-adjustable-iris-for-guns-airguns-/271651304838?ssPageName=ADME:L:LCA:US:1123
kevin
I will anxiously await you next installment which I presume will have crono info and some accuracy information. I am planning on ordering a .177 with an 18 inch barrel if I see good stuff.
Thanks for your information
I am wondering if anyone else has any crono information on the unmodified .177 version of the 2400TK
For those who have some chrony data on their unmodified 2400s, we’ll be getting into that shortly. I’ll let you know when! It will be an interesting discussion when the time comes.
Cliff, I’ll beg your patience in the meantime. An 18″ barrel may be a bit too long in the .177 unless you plan to mod. But I’m confident you’ll be pretty happy with whatever you pick out, and hope that the blog will provide some direction and guidance soon.
Cliff
I don’t have chrony data on a 2400 with a 18 inch barrel but I do have some data on a 2240 22 cal with an 18 inch barrel with CO2 before I converted it to HPA with a hipac and it was shooting around 625 on a full cartridge to 600 as the cartridge ran low, but that is in 22 cal so the 177 should be a little higher like closer to the mid 600 to high s 600s depending on the pellets. I was shooting 14.3 CPs
Buldawg