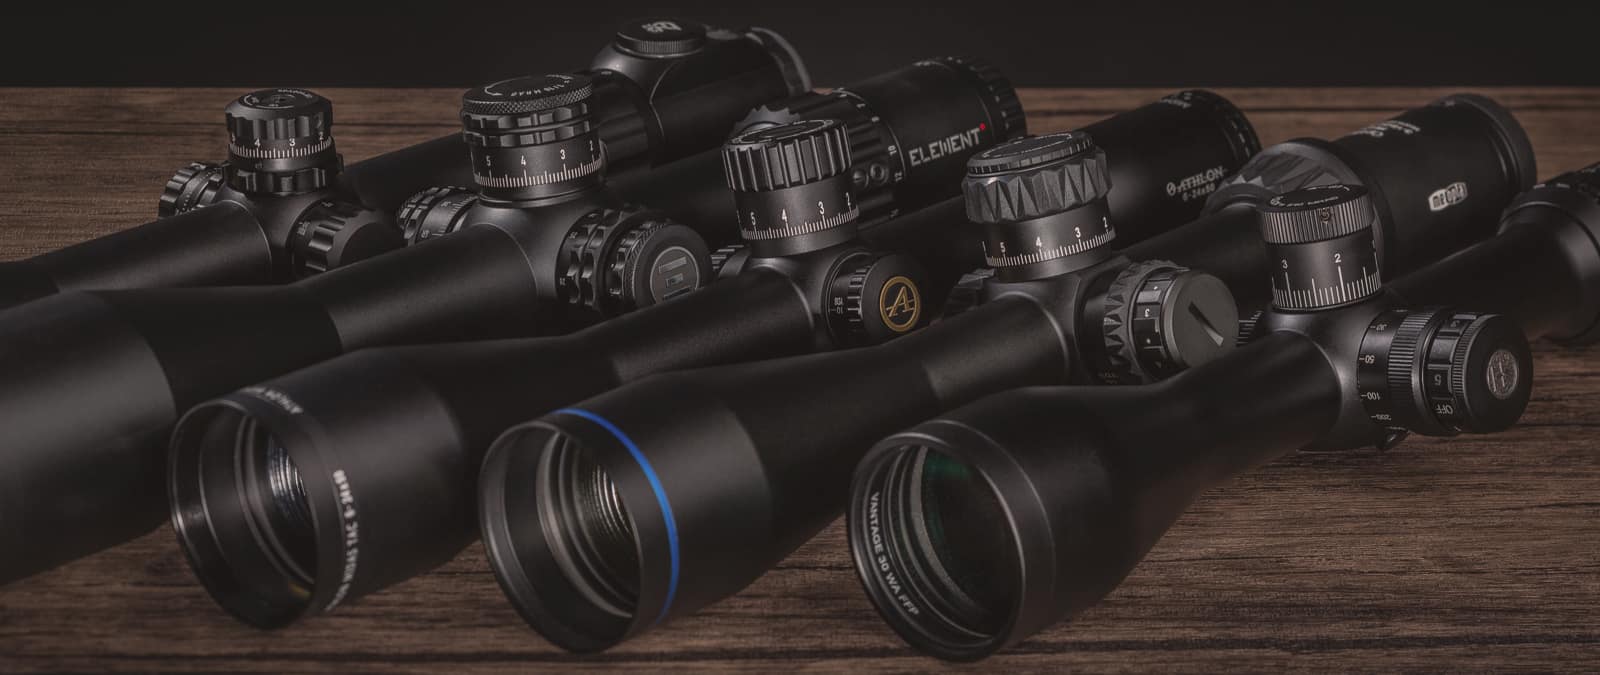
If you're in the market for an optic for your rifle, you may find yourself overwhelmed with the options available. There are different types of optics that cater to various shooting applications and situations. Understanding the differences between them can help you choose the right one for your needs. In this guide, we'll not only help you understand the basic features of a scope but also give you guidance on picking the right one.
Common Shooting Activities
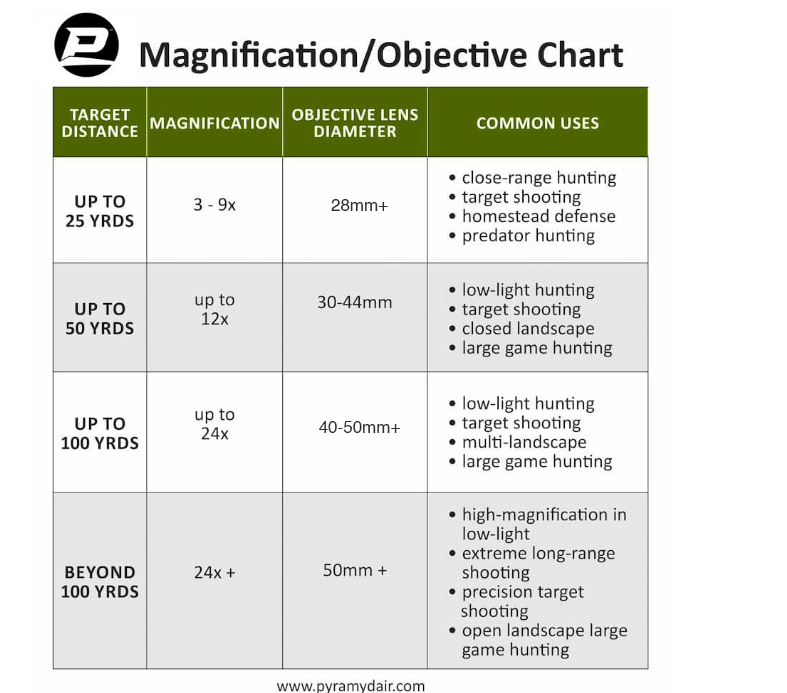
Your activities will determine the type of rifle scope you need with each activity having different magnification and objective requirements.
Plinking or Target Practice
Plinking and close-range target shooting need low magnification which allows you to use a smaller objective.
Preferred Magnification: 3-9x
Preferred Objective: 28mm+
Pest Control or Small Game Hunting
Pest control and small game hunting are most often performed at close range. Close-range pursuits require low magnification and a small objective. But an adjustable objective will probably be best since small animals rarely stay still while you're hunting them. As the critter roams, you can adjust the magnification to suit the distance for accurate shooting.
Preferred Magnification: 3-9x
Preferred Objective: 28mm+
Big Game Hunting
With big game hunting, you want to be as accurate as possible. A higher-powered adjustable scope will help you zoom in on your target and get a better field of view. A larger objective lens will help allow more light to enter your scope for a clearer picture and an enhanced view, especially in low-light conditions.
Preferred Magnification: 4-12x
Preferred Objective: 40-50mm
Bench Shooting
Bench rest competitions often have targets at several distances. An adjustable objective will help you be more accurate at variable distances. Larger objective lenses allow more light for a clearer image at higher magnification.
Preferred Magnification: 10-45x+
Preferred Objective: 30-50mm+
Tactical Training
In tactical applications, it's important to acquire your target quickly, even with multiple targets, in any light conditions. Variable power will help you acquire targets at close to medium distances, and an illuminated reticle can make the targets visible even in low-light conditions.
Preferred Magnification: 1-24x
Preferred Objective: 30-40mm
Long Range Hunting or Target Shooting
Accuracy is most important in long-range shooting and hunting. You'll need a very high-powered scope to get an accurate shot without sacrificing your image clarity. High-powered scopes offer more control over adjustments and precision aiming.
Preferred Magnification: 24x+
Preferred Objective: 50mm+
Types of Rifle Scopes or Optics
Red Dot Sights
Red dot sights are one of the most popular types of optics used today. These sights have a simple design and are typically used for close-range targeting. They offer a fast and easy target acquisition that is ideal for hunters, competitive shooters, and law enforcement or security personnel.
Red dot sights work by showing a red LED dot on the sight screen. The shooter simply needs to line up the red dot on the target through the screen and pull the trigger. The red dot is easy to see and does not obstruct the shooter's view, allowing for quick and accurate shots.
One of the greatest advantages of using red dot sights is that they can be used in low-light conditions. This is because the LED allows for a clear and bright sight picture even in low light. Additionally, these sights are very lightweight and do not alter your hold position or balance.
Red dot sights are great for those who want a quick and accurate sight for close-range targeting. They are easy to use and provide an excellent sight picture in both bright and low light conditions.
Short Distance Scopes
Short-distance scopes are typically used for hunting in close-range environments. They provide a low magnification of about 1-4x, allowing for quick target acquisition ad a wider field of view. They are ideal for hunting small game like rabbits, squirrels, and birds. These scopes are usually lightweight and compact, making them easy to carry and maneuver in tight spaces.
The reticle on short-distance scopes are usually not illuminated, have very little parallax, and are fairly inexpensive. They are suitable for beginning shooters who are just learning the basics of hunting and shooting.
In summary, short-distance scopes are a great choice for hunters who need a lightweight, compact, and affordable scope for hunting in close-range environments. They offer fast target acquisition and accurate shot placement, making them ideal for small-game hunting.
Medium Distance Scopes
Medium-distance scopes are popular among hunters and target shooters who need a greater degree of accuracy. They typically offer a magnification of 4-12x, allowing a clear and detailed image of the target. With an objective lens between 40-50mm, it is sufficient to gather enough light for bright and clear images.
Most medium-distance scopes offer a range of adjustments for windage and elevation, allowing for precision aiming and accuracy even in challenging environments. They may also feature illuminated reticles to enhance visibility in low-light conditions.
It's important to consider factors such as magnification range, objective lens diameter, and reticle type when choosing a medium-distance scope. The magnification range should be appropriate for the intended shooting distance, and the objective lens diameter should be large enough to provide a bright and clear image. The reticle type is a matter of personal preference and shooting needs.
Overall, medium-distance scopes offer a versatile and reliable option for shooters who need to engage targets at mid-range distances. Whether for hunting or target shooting, investing in a high-quality medium-distance scope can significantly improve your accuracy and precision.
Long Distance Scopes
Long-distance scopes are designed to provide clear images of targets that are farther away, around, or beyond 300 yards. Hunters, competitive shooters, and long-range enthusiasts commonly use long-distance scopes.
One of the most important aspects of a long-distance scope is its magnification, typically 10-50x. Another factor to consider is the objective lens diameter. This determines how much light enters the scope. Larger diameters allow in more light. But larger diameters also make the scope heavier, bulkier, and can affect the stability and accuracy of the shot.
Overall, a quality long-distance scope is essential for long-distance shooting. Look for a scope with high magnification, a large objective lens, and a reticle that suits your needs. With the right scope, you'll be able to hit targets that are farther away than ever before.
Air Gun Rated Scopes
Air guns use compressed air to shoot pellets or BBs. However, they have unique characteristics that make them different from firearms. One is the "double recoil" of a springer-type air gun. Air gun-rated scopes are designed to withstand bi-directional recoil. They are engineered to be durable, shockproof, and able to retain zero even after several shots.
Air gun-rated scopes are essential for air gun enthusiasts who want to improve their accuracy and precision for a better shooting experience.
Reading Scope Specs Online: What do the numbers mean?
Understanding scope specs isn't as complicated as it might seem. The numbers and abbreviations may seem like a foreign language, but they all have a purpose. Once you know that purpose, reading the specifications becomes quite easy.
Magnification
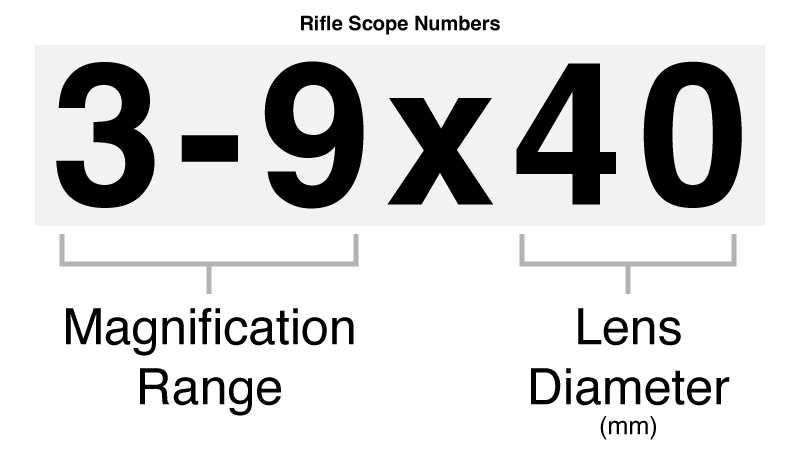
Magnification refers to how much closer an object appears through the scope compared with viewing with the naked eye. For example, if a scope has a magnification of 4x, an object appears four times closer than it would without the scope.
Many scopes have a range of magnification options, typically denoted by two numbers with a hyphen between them (3-9x). The first number is the lowest magnification setting, while the second number is the highest magnification setting.
It's important to keep in mind that higher magnification doesn't always mean it's a better scope. Higher magnification can lead to a narrow field of view and make it harder to keep the target in focus. Also, working with a higher magnification can lead to more difficulty hitting the target if you're shaky or don't use the proper techniques. You'll want to take some time to consider how much magnification you'll need for the type of hunting or target shooting you'll do.
Objective Lens Diameter
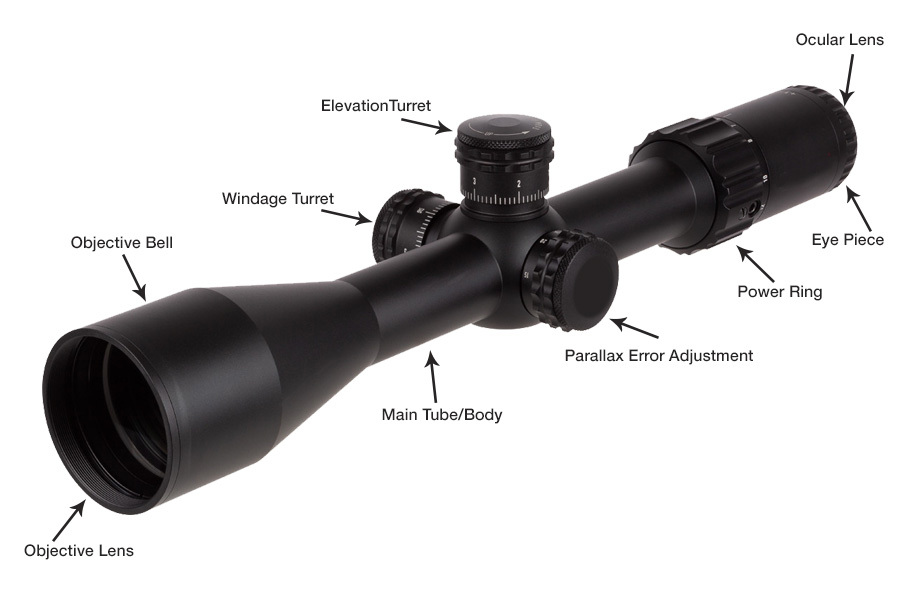
The objective lens is the lens at the front of the scope that collects and focuses the light entering the scope. This is one of the most important parts of the scope because it affects image quality and clarity.
Objective lens diameter is measured in millimeters and can vary from around 20mm to over 80mm. Generally, a larger objective lens will provide a brighter and clearer image, especially in low-light conditions. However, larger lenses can also make the scope heavier and more difficult to carry.
When looking at scope specs, you will often see something like "3-9x40" which indicates the magnification range (3-9x) and the objective lens size (40mm). Keep in mind that the magnification range is not the only important factor to consider when choosing a scope. Another thing to note is that a larger objective lens may also require higher mounting rings for the scope to clear the barrel of the rifle. Be sure to check the scope recommended mounting height before ordering.
AO
Adjustable Objective (AO) is a feature that some scopes have to allow for parallax error correction. A parallax error occurs when the target appears to move within the scope's sight picture as the shooter moves their eye position behind the scope. AO allows the shooter to adjust the scope's internal lenses to eliminate this error, resulting in more accurate shot placement.
When looking at scope specs online, you may see numbers listed for the AO feature. These numbers refer to the minimum and maximum distance in yards that the AO feature can be adjusted for. If a scope has an AO adjustment range of 10 to 50 yards, that means it can be adjusted for parallax error at targets within that distance range.
AO is particularly useful for shooting at longer ranges, where even a slight amount of parallax error can result in significant shot placement errors. It's also a helpful feature for hunters who need to take shots at various distances and may need to adjust their scope for each shot.
Reticles
The reticle is the aiming point seen when looking through the lens of the scope. There are several styles of reticles available. Consider your specific needs when choosing which reticle type to use.
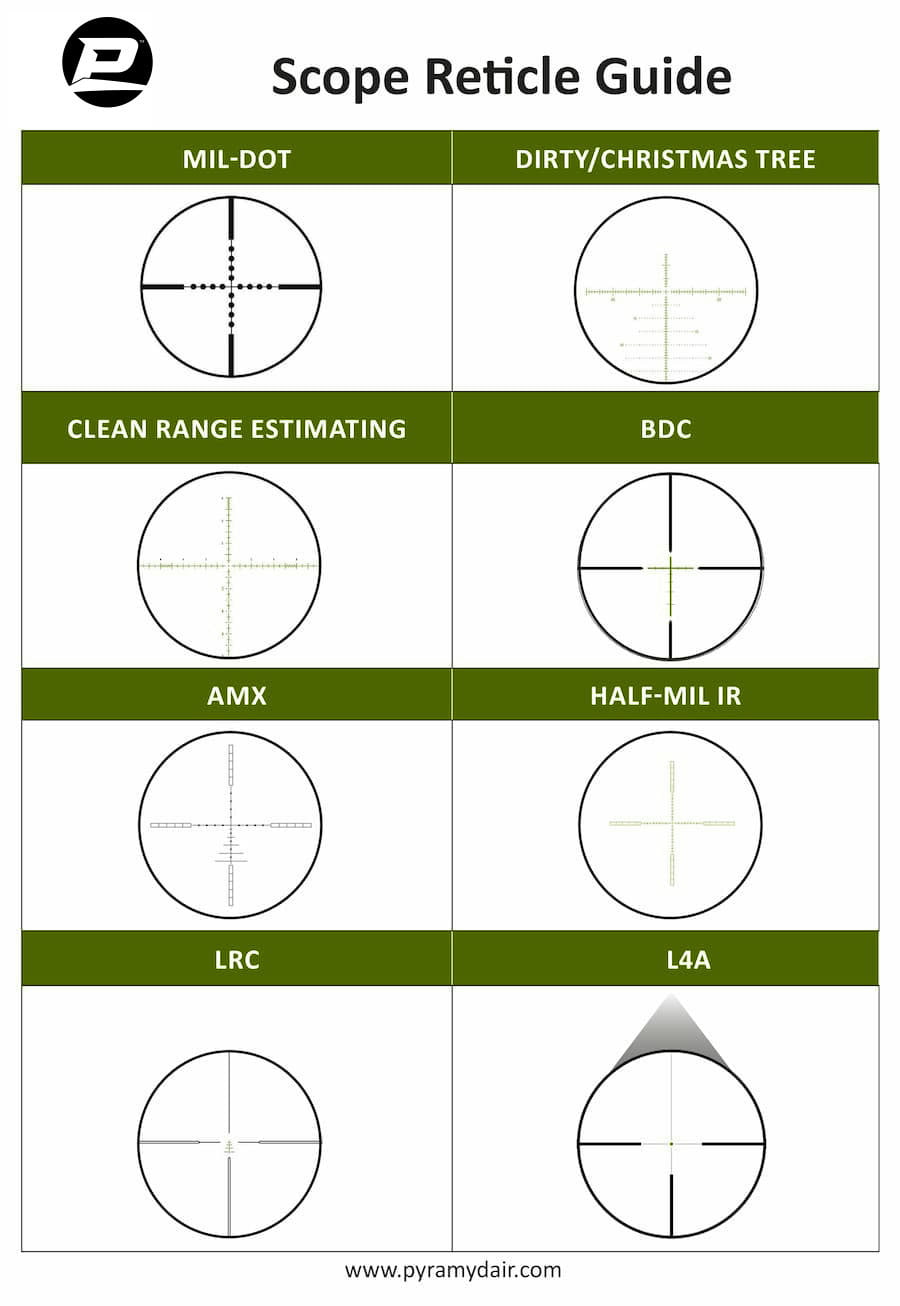
Other Common Reticle Types
- APR = all-purpose reticle
- EHR = expedited hold reticle
- IR = illuminated reticle
Focal Plane
The focal plane is the location where the reticle is placed in regard to the magnification lens. There are two options on a scope where the focal plane can be placed; first focal plane and second focal plane. A first focal plane reticle is placed in front of the magnifying lens, while the second focal plane reticle is placed behind the magnifying lens.
First Focal Plane vs Second Focal Plane
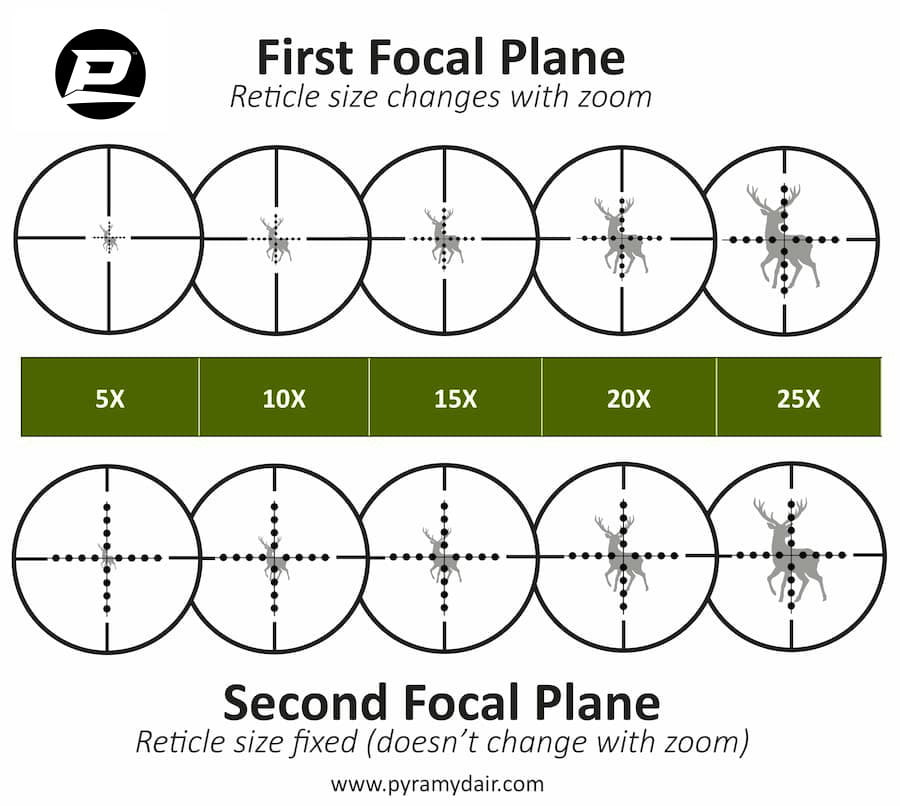
First Focal Plane (FFP)
On a first focal plane reticle, the reticle image changes with the magnification changes. On the lower magnification, the reticle will look smaller while on a higher magnification, the reticle will look larger, sling with the image of your target.
First focal plane scopes tend to be more expensive, higher-end scopes and are best used for long-distance shooting to allow for more accuracy at distance.
Second Focal Plane (SFP)
On a second focal plane reticle, the reticle image stays the same regardless of what magnification power you use.
Second focal plane scopes have a more basic construction, tend to be less expensive, and are better suited to short and medium-range shooting.
Things to Consider
Fixed Magnification vs Variable Magnification
Something else to consider when choosing a rifle scope is whether you want a fixed magnification or a variable magnification. A fixed magnification scope has a set magnification and cannot be changed. For instance, a 4x scope only magnifies 4 times more than normal vision. Whereas, a variable magnification scope allows you to adjust the magnification. For example, a 4-12x scope has between 4x magnification and 12x magnification.
The advantage of a fixed magnification scope is that it is often simpler and more reliable. Fewer moving parts means there is less that can go wrong. Additionally, a fixed magnification scope may be more affordable than a variable magnification scope.
The advantage of a variable magnification scope is that it allows your magnification to fit different situations. For example, you might use a lower magnification for closer or moving targets and a higher magnification for longer-range or stationary targets. This can be especially helpful if you hunt or shoot in different environments with varying distances.
Field of View
The field of view refers to the area you can see through your scope. It's usually measured in feet or yards at a specific distance. For instance, a scope with a 100 feet field of view at 100 yards means you can see 100 feet of your surroundings when you're 100 yards away from your target.
A wider field of view can be beneficial in situations where you need to acquire your target quickly or when you're shooting moving targets. However, a narrower field of view can offer greater detail and precision, which can be advantageous for longer-range shots.
The field of view might vary depending on your magnification. Generally, a lower magnification will give you a wider field of view, while a higher magnification will narrow it.
You may also want to consider the distances you'll be shooting before deciding which scope to choose. A scope with a wide field of view might be better for hunting in deep woods, while a scope with a narrow field of view could be more suitable for precision shooting in open terrain.
Lens Coatings
Rifle scope lens coatings are a crucial part of modern scopes. Lens coating refers to the various chemical or physical processes that have been applied to the surface of the lenses to enhance their optical performance. This improvement allows for greater clarity, color fidelity, and light transmission, all of which improve your ability to sight your targets accurately.
The quality of lens coatings plays an important role in determining the clarity of your view, especially when using your scope at varying light conditions.
- Coated - one lens surface has a single layer of coating to reduce glare and improve image quality
- Fully Coated - all air-to-glass surfaces have a single layer of coating
- Multi-coated - multiple coatings are applied to one lens
- Fully Multi-coated - multiple coatings are applied to all air-to-glass surfaces
Ultimately, deciding which level of coating to choose will depend on your budget and target needs. If you need the best image quality for long-range shooting, a fully multi-coated lens may be worth the investment. If you're a casual shooter or need a scope for short-range shooting, a multi-coated lens may offer enough quality at a more affordable price.
Tunneling
A potential issue for scopes is tunneling. This occurs when the field of view stops changing during the span of magnification, essentially creating a tunnel-like effect when looking through the scope. Tunneling can be especially problematic when shooting moving targets, as it can be difficult to keep them in view.
The extent of tunneling depends on several factors, including magnification and objective lens size. Generally, higher magnifications and smaller objective lenses can increase the likelihood of tunneling. To minimize the risk of tunneling, it's important to choose a scope with an appropriate magnification and objective lens size for your needs.
Some scopes are designed with features that reduce or eliminate tunneling. For example, some manufacturers offer scopes with a wider field of view, which can make it easier to track moving targets.
How Much Should You Spend on a Rifle Scope?
When choosing a rifle scope, you want to ensure you're getting your money's worth. A scope is a big investment and could make or break your accuracy in the field.
While it may be tempting to opt for a cheaper scope, it's important to evaluate your needs and buy a scope that meets your needs and your budget. An inexpensive scope might seem like a great deal at first, but if it doesn't have all the features you need, you've wasted your money. But getting more scope than you need is also a waste.
A good rule of thumb is to buy a scope that costs at least half as much as your rifle. However, if you're on a tight budget and need to save money, it's better to buy a less expensive rifle and use the savings to buy a better scope. After all, it's the scope that helps you hit your target.
Investing in a high-quality rifle scope is a critical decision that shouldn't be taken lightly. Getting a scope that doesn't suit your needs will lead to poor performance and disappointment. But getting a scope with tons of bells and whistles you don't use will also lead to disappointment in the field. So it's best to evaluate your needs and buy the scope that does everything you need it to do that also fits your budget.
Common Terms
- MOA = minute of angle
- MRAD = milliradians or mil-dot reticle
- BDC = bullet drop compensator
- AMX = air gun rated 10x mil-dot reticle
- LRC = long-range centerfire reticle
- APR = all-purpose reticle
- EHR = expedited hold reticle
- IR = illuminated reticle
- SF = side focus
- FFP = first focal point
- SFP = second focal point
- TAC = tactical
- XB = crossbow scope
- AO = adjustable objective
