by B.B. Pelletier
Blog reader Vince has been disassembling and repairing so many guns lately that I believe no gun will ever leave his house without some part of it being removed, replaced, repaired or refined. He’s a master at fixing just about any gun that crosses his path. Sit back and read as Vince shows you the ins and outs of fixing a Daisy 717 pistol.
If you’d like to write a guest post for this blog, please email us.
Bloggers must be proficient in the simple html that Blogger software uses, know how to take clear photos and size them for the internet (if their post requires them), and they must use proper English. We’ll edit each submission, but we won’t work on any submission that contains gross misspellings and/or grammatical errors.
by Vince
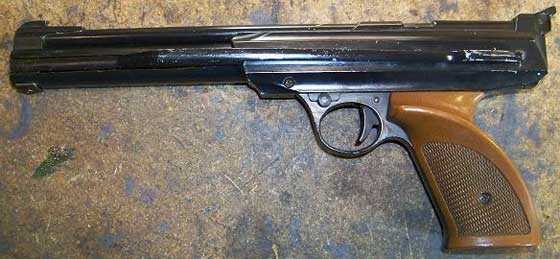
A diamond in the rough, that’s what I thought when I looked at the beat-up Daisy 717 in a hole-in-the-wall gun shop not far from my parents’ house just about 2 years ago. Sure, it was a bit ugly, but (as the proprietor demonstrated) it pumped up and went pfffft when you pulled the trigger. So, I let him talk me out of $10 for it.

$10 is a minimal investment for a gun that now sells for $149.
Turns out that going pfffft was about the only thing it did well. Putting pellets on paper in the same spot certainly wasn’t in its repertoire! I fiddled with it on and off for some time. I oiled it and cleaned the barrel, and it got a little better — but not great. It really struggled to do under 1″ at 10 meters for 5 shots, which is about twice the group size I can get from my Marksman 2004 (now known as the Beeman P17).
Barrel, anyone? Fair chance that’s the ticket. For all I know, some ding-dong used to shoot BBs through this thing. Like I probably would have done as a kid. But there’s a complication. I’m aware that Daisy still makes the 717, but they also make the 747 with a superior Lothar Walther barrel — a gun that appears to be identical in every other respect.
I got the parts diagrams and price lists for both pistols, and lo! Barrel aside, everything is indeed the same between the two. Well, except for the metal shells that are stamped 747 instead of 717. But certainly everything else.
Now I had to decide — $18 for the Daisy barrel, or $793 for the Lothar Walther? Ha! Only kidding! The LW barrel is only $50, still a bit steep for me, especially when I’m worse at pistol than I am at rifle. Is it worth the extra bucks? Will Wobbles the Pistol Pointer really be able to tell the difference?
I went to the expert: Mr. B.B. himself, who told me, “Absolutely go for the better barrel. It ain’t MY money!” Well, he didn’t phrase it quite like that, but he certainly did recommend the Lothar Walther. After kicking it around for about 18 months, I finally got off my keister and ordered it. For good measure, I also ordered a new valve assembly for $3. TWO DAYS LATER, I got them. I’m serious — I ordered Thursday, they showed up Saturday.

The replacement parts have arrived.
It wasn’t until I took the above picture that I noticed something. Seems that the new barrel assembly comes WITH all new valve guts, making that extra $3 superfluous. Not even worth sending back. Oh well, live and learn.
Anyway, down to business. The 717 comes apart rather easily, beginning with the three screws you can get to after lifting the pump handle.

Disassembly is a piece of cake.

The cover just lifts off. No little parts go “sproing.”

Before you do anything else, note how the trigger fork engages the valve.
From here, you can either lift the barrel and grip assembly away from the right-hand cover, or you can pull the grip off (rearward and downward) first. It’s not particularly difficult either way.

It didn’t take much to pop this apart.

While you’re at it, you might want to replace the o-ring on the bolt. A standard #006 seems about perfect. (Original old, squished o-ring on left, #006 on right.)

With a little coaxing the barrel slides out the back.
Now, you’re ready to put everything back together. Oil the o-ring on the new barrel assembly and put it all back together in reverse order. When you put the grip back in place, make sure you put the trigger fork over the valve stem as I pointed out in the above photos.
Everything is now all back together, and I’m itching to start punching one-holers. But, there’s a problem. I pumped the gun and heard a very light sssssssss from somewhere. It doesn’t take long to figure out that it’s coming from the muzzle, which means that my brand new valve is leaking. Grrrrrrrr.
Again, I take it apart and pop out the valve.

I took out the valve, again. (I cheated. This is the old barrel. When I originally did this, I neglected to take pictures, so I’m showing these steps using the old barrel as a model.)
Hmmmm. No lint, no dirt, nothing apparently wrong. Aha! Maybe I just need to use that other valve assembly I bought after all! So I grabbed it, reassembled, pumped, and…sssssssssssss.
Right. Back apart, again. Looking at the guts of the valve, it’s obvious that the fault lies either in the valve plunger or the seat. Since I changed the plunger, that leaves the seat. It shows no obvious flaws, but I know that there’s got to be something wrong with it. So, I dug up a rounded Dremel-type stone that will fit the seat.

Dremel-type tool for modifying the seat…ever so slightly.
Gently, by hand, I reface the soft pot metal valve seat. I’m emphasizing gently and pot metal because someone might be tempted to go a little too nuts. The leak was obviously rather small, so the flaw in the seat must be pretty nominal.

Very moderate-to-light pressure while twirling back and forth for a few seconds.
Clean it out, back together again — with the original valve guts — cock it, give ‘er a pump, and…
(Crickets chirping)
No sssssssssssssss! I left it for a few hours and it held just fine. Now I can go back to finding out if my B.B.-induced extravagance on a $10 pistol worked out.
In a word, yes. Suffice to say that my group sizes are cut in half, meaning that it’s shooting at least as good as my Marksman 2004. Which, believe it or not, is saying something, considering how poorly I shoot pistol. One thing that makes it tougher than it has to be is the trigger. It seems awful heavy, and a check with my fishing scale shows it’s breaking at about 6 lbs.
Six pounds? We can do better than that. And I did. I opened ‘er up, again, fiddled with springs and such and cut the trigge-pull weight in half. It’s not quite as straightforward as just putting in a lighter trigger return-spring, because the same spring moves the hammer and opens the valve.
I was able to get around that problem pretty simply. How? That’ll have to wait for another day.


Vince,
Another great “how To” blog. Reminds me of the time I took apart my old Crosman 760.
One day you should compile all these repair blogs into a book. I will be you first customer.
Thanks
Pete
Make that 2… Isn’t great, the books isn’t finished yet 2 are already sold !
Vince, nice article. I had a similar experience but with the 722. Same gun only in .22 cal. Same guts & a nice shooter. I am looking forward to your trigger adjustment as I don’t like the heavy pull mine has. I also have the 747 Match pistol & love its trigger.
Guys – bad news on the trigger mod. With use it proved to give an inconsistent trigger pull, and overall it just didn’t work that well.
Vince, thank you for putting this up. I have the 747 and think it’s a great air pistol for what it is- making hundreds of small holes in paper quietly for an inexpensive price.
Ahhhh Vince,
The world loves a good cliff hanger! See you tomorrow. Same tme, same station.
*Dremel? Pot Metal? You got guts, man!
-Chuck
Vince,
That looks like a nice project, although I would be interested to see how much difference an LW barrel makes over the standard Daisy. I would just buy the cheap barrel for a pistol — I’m happy hitting a bucket at 10 yards with the blasted things. Dremels are great tools — in my hands, they allow me to ruin a project before sinking too much time into it :).
To really compare you’d have to check with someone who can shoot pistol worth a darn. In other words, not me.
Vince, great info as usual!
Pot metal and a Dremel stone? I love it when a plan comes together! No fear!
BB,
A bit off topic here, but would you know where I can get clear iris inserts for the front sight of an AR 2078? I believe it is the same as the TF 79 you blogged.
I am having trouble aligning the rear peep and the front hole in the disc, partly due to a dim bulls eye because the front aperture is too small. Also I think a clear aperture would provide better light than the standard metal ones.
I have PLENTY of light as I have two 80 watt fluorescent fixtures almost directly above and a little to the front of the targets and also have a 60 watt fluorescent light in a clamp on recessed bullet fixture pointing directly on the targets.
Victor, they are the same gun. Not sure where you would find clear inserts? Try an email to Stephen Archer at Archer Airguns sales@archerairguns.com
He’s a good guy to work with.
Another thought, post your query over on the chinese airgun forums (Network 54 forums) same server as the Yellow Forum
pcp4me,
The best place to buy clear front sight inserts if Champion’s Choice in LaVerne, TN. Look here:
http://www.champchoice.com/cat-Sights_and_Accessories-548-3.aspx
B.B.
Vince,
Excellent display of skill and CONFIDENCE.
Also, thanks for your help with my P17. Your notes are amazing!
Victor
Vince,
Again you’ve given us an extremely interesting, well illustrated, excellently written blog! Thank you so very much! (Don’t let all this praise go to your head–I’d put one of those little yellow smiley faces here if I knew how to do them.)
Bruce
Mr B,
Just put a 🙂 in the comment…oops, no, put a 🙂 in your comment…wait… put a colon, dash, right parentheses in your comment and we’ll know you’re not raggin on us. Don’t put a left-paren or we’ll have to call the happy squad on you.
-C
Great job, Vince. This is way over my head but makes me all the more grateful for the advice I’ve received to keep my Daisy 747 shooting. First was, I think, Robert in Indiana, who told me to measure the lever pause of the Daisy without cocking the lever. I had thought the gun was broken. And then there was yourself telling me to oil the poop out of the little pad on the inside of the lever with Pellgunoil to reseal the gun. Worked like a charm and has every time since. The Daisy actually used to be the dog of my collection for accuracy, mostly because I spent little time on pistol shooting and because I was not comfortable with the one-handed hold. But I’m doing much better recently, keeping 10 shots in a contiguous opening at 25 feet which I attribute largely to allowing a line of white space beneath the bull for my six o’clock hold.
Vince, interesting about the fingers and the straight line trigger press. Nancy Tompkins talks about this and advises squeezing very lightly with the thumb, rested on top of the pistol grip, to straighten the trigger pull. I’m a little leery of imposing a lot of technique on subtle movements like this. I found when I tried that initially, it would just mess things up. At the moment, I’m more comfortable with my Jaws technique whereby I relax and get into a frame of mind where the subconscious rises up like Jaws to fasten on to the struggling, elusive shooting moment. It’s like being taken over by a higher power, and I execute much better than I could while thinking about it. On the other hand, I’m not cleaning offhand or anything close. No doubt I’ll get to the subtler techniques in time but filtered in a natural way. For example, I’ve found that in shooting a 1911, that it helps very much to apply powerful grip pressure to the front and back of the handgrip. I haven’t quite gotten to B.B.’s suggestion about exerting pressure with only the third finger, but I have that in mind.
I have to second Caveman about keeping your shooting advice on the blog. It’s very much appreciated. Picture a master shooter showing up with a wealth of knowledge and then removing himself for modesty’s sake. Only a master would make a suggestion like that…. Shooting technique seems equally relevant to the sport as knowledge about the mechanism of guns. By all means keep it coming and follow the Bible’s injunction about not hiding yourself under a bushel basket. We’ll let B.B. tell us if we’re in the way.
Matt61
I can’t stress enough the importance of shooting to your wobble area. Your wobble area is NOT the problem until you’ve mastered your trigger squeeze. If you don’t master your trigger squeeze, then your shooting will reflect both your wobble area AND other errors that can be fundamentally even worse. This is particularly true in pistol shooting.
Regarding another pistol…can anyone relate their experience with the Benjamin HB22 pump pistol? I’ve eyeballed it for a long time, and now I have lots of .22 pellets I bought to experiment with in my RWS 350, which won’t group well past 25 yards (she prefers the CP domes)…but would be perfect for blasting cans and a big bag of old used ping-pong balls I have. I like the real wood grip and pump handle. Thanks in advance…cheers all!
Matt61,
Nancy Tompkins advice is very good. That is precisely what I’m getting at. Namely, finding whatever helps straighten the trigger pull. This detail about thumb placement is very subtle, very personal, and will change a bit from gun to gun. A fundamental tenet of shooting is that the shot should surprise you. That’s similar to what you’re describing as your preferred mental state during execution. We’re suppose to squeeze the trigger DELIBERATELY such that: A) We do not disturb sight alignment, and B) We are surprised when the shot goes off. There’s a fine line between squeezing too slowly (putting a strain on our concentration) and too fast (jerking). The key is to know the proper mechanics between your finger and the trigger, and being deliberate about getting the shot off. The only way to master this is with LOTS of practice.
The original triggers on my Crosman’s and Gamo’s put a strain on my concentration so I replaced all triggers with the GRT III. This trigger isn’t in the same ball park as what you’ll find on your Anschutz, but it’s acceptable, meaning it won’t cause me to learn (or enforce) bad habits. In fact, I think that shooting these air rifles is really making me a better shooter (which is what we’ve been talking about).
B.B.’s suggestion about exerting pressure with only the third finger is another way of telling you to keep the bottom two fingers more relaxed. Anytime you move a finger, muscles in your forearm contract. Try shooting off a bag, or rest, on a table such that you’re trigger finger arm leans into the edge of the table. The contraction of your muscles will throw your shots off a bit. You need to keep that arm either off the table, or at enough of an angle that the forearm muscles are not introducing movement that corresponds precisely with your trigger squeeze.
Victor
“You need to keep that arm either off the table, OR AT ENOUGH OF AN ANGLE that the forearm muscles are not introducing movement that corresponds precisely with your trigger squeeze.”
Think about how this applies to prone shooting. Your arm placement, and angle matter.
So….
If I understand this, for a mere $50 I could upgrade my 717 to an effective clone of the 747… Ah, but is it worth it — with my vision prescriptions I suspect not. My current shooting glasses inserts are set to my distance (aka: driving) prescription leaving me no chance of getting a sharp front sight image (one reason I’ve been fitting optics to everything I can — including a Ruger Mk-II “government target” (keeping track of the nomenclature on those .22 pistols is almost as bad as dating Volkswagons of the 50s and 60s)
Ouch — the 717 now goes for three times what I paid? Ah well, when bargain (transparent) air-soft pistols break $30 I suppose I shouldn’t be surprised.
Been a bunch of posts just today on http://www.targettalk.org/viewtopic.php?t=18228 discussing specifically the Daisy 7xx modifications, valve leaking, etc. The thread is under >Olympic Pistol in case the link I gave doesn’t take you directly there.
pete
I was putting a new spring in my RWS 34p today(the original spring is only 8 1/4 inches long!), so I did everything I was supposed to, and when I put the gun back together, it will “break” and it is just like normal, but it wont “click” so I can shoot it. What/where is the thing that holds the spring in place until you pull the trigger? What do the two “plates with holes in the middle and one has a little nipple at the end” do that are right where the safety goes do?
Thanks,
Conor
Did you take those two plates out? Also, did you pull the trigger before you tried to cock it?
twotalon
Yes, try pulling the trigger. Oftentimes the T05 trigger gets cocked when reassembling a Diana gun, and it won’t catch the piston until you pull the trigger and release it.
Those plates – are you talking about the ones that the safety fits around?
This may help. It’s for 1 48 with a TO5 trigger group.
Near the end of the text it explains how the plates are installed.
http://home.comcast.net/~scot_for_sale/guns/RWS48_tune/index.html
twotalon
I’ve got the two plates in how they’re supposed to be, but when I cock it, it still won’t catch even after I pull the trigger multiple times while I’m cocking it and when I’m not! Then I take the stock back off, and I find that the long cup-like-thing that the spring fits in, is being chewed up! so now it is like an inch long instead of 3″.
Any thoughts?
Conor
I think we need to back up here…
The long cup like thing that the spring fits in..
The standard part (spring guide ) should be a hollow rod that fits inside the rear of the spring. There should have been a washer over the hollow tube before pushing it into the spring.
If there is something different, then it is not stock. Did you buy it used or new?
If it had a ‘tune kit’ installed and you stuck an original spring in then there is a good chance the spring would not fit the kit guide and break it.
I have a ‘pro guide’ kit for my 48 that I have not used yet, and the spring goes INTO the rear guide instead of over it.
http://www.gunspares.co.uk/shopdisplayproducts.asp?id=24380&cat=34
twotalon
Twotalon,
Yes I’ve got the spring guide(that fits in the spring), I was talking about the long “black empty shotgun shell like thing” on the other side of the spring. No worries, I took it out, and now the gun cocks!
Conor
Some may throw rocks at me for offering this, but some years ago a friend of mine who was shooting air pistol silhouette showed me his very simple “target trigger” mod for a 717. He cut a piece of rubber band, removed his grips, placed the band over the trigger and under the loosened grips, adjusted to a proper light trigger and tightened the band under the grips. (He managed to win matches with this air pistol).
I have an older 717, and the bolt no longer closes. The bolt goes forward, but will not close. Any ideas as to what might be wrong?
Is the breech O-ring messed up and preventing it from closing all the way?
Don’t know. How would I check that? I’ve never disassembled the pistol
Cervantes,
Can you run a rod through the bore from the muzzle, and does it come out in the breech?
B.B.
Yes, since I had a pellet in the breech when the bolt wouldn’t close, I ran a cleaning rod back down the barrel to push out the pellet.
Cervantes,
And now the barrel is clear? Then I think Vince is right — it might be the o-ring. Look on the small tip of the bolt — where it reduces in diameter. Do you see a black rubber o-ring near the tip? Or do you just see a groove where an o-ring once was?
B.B.
The o-ring on the bolt is still there, and appears to be in good shape – it doesn’t seem to be distorted.
Cervantes,
Then I am stumped. Maybe the best thing to do is to send the gun to Daisy, if you are able to.
B.B.
I have an older model 717 Power Line pistol made by Daisy. It has been sitting for a long while, I am now using it again. I oiled the felt ring and o-ring and after a few hundred rounds have developed an air leak, not sure the location, but losing compression. Read several blogs and it seems that there are several possibilities. What would be the best route to repair and upgrade this pistol and is there anyone out there who does this other than the factory, any ideas on the cost?
Thanks for any insight:
John
978 273 9683
John,
Hi, and welcome to the blog.
If the leak is a slow one, maybe we can fix it without disassembly. You have already applied either Crosman Pellgunoil or 10-30-weight motor oil (you didn’t specify). If you used any other kind of oil — WD-40, for instance — that could be the problem right there.
But if you used the correct oil and still have a slow leak (takes 5 minutes to leak down and you can’t hear it), then this fix might work. Put some Transmission Stop Leak on the felt and work it in (pump and fire the gun repeatedly). Read this report to see what I’m talking about, and yes, it does work on pneumatics, too.
/blog/2013/08/neat-fix-for-bulk-fill-co2-guns/
If that doesn’t stop the leak, your pistol needs a new set of seals, and that entails complete disassembly. If you don’t feel up to it, Pyramyd AIR can do the job for you 888-2623-4867.
B.B.
Sir,
I own a Daisy Powerline 747 Air Pistol and the “TIP” of the bolt that pushes the .177 pellet has broken. Anyone please advise where I can get this part.
Thank you.
Behram.
Behram,
You get that part directly from Daisy. Their customer service should be able to help you.
https://www.daisy.com/customerserviceform
B.B.
After going through the steps here, my 717 was 95% fixed, but it still had a minor leak. It turned out that the bolt follower was sticking slightly and was causing the valve to be slightly opened. Cleaning the follower and bolt-back plus a bit of lube completed the repair. Thanks for a very clear guide!
Congratulations on being a nle to shoot your classic airgunblog again!
I so glad these posts come up in searches, otherwise I never would’ve been able to fix a few of my old guns and acquired the knowledge of the newer designs and found a whole new world of airguns.
Welcome to the blog!
Thomas,
Welcome to the blog.
Isn’t it great when something works your way?
B.B.