by Tom Gaylord, a.k.a. B.B. Pelletier
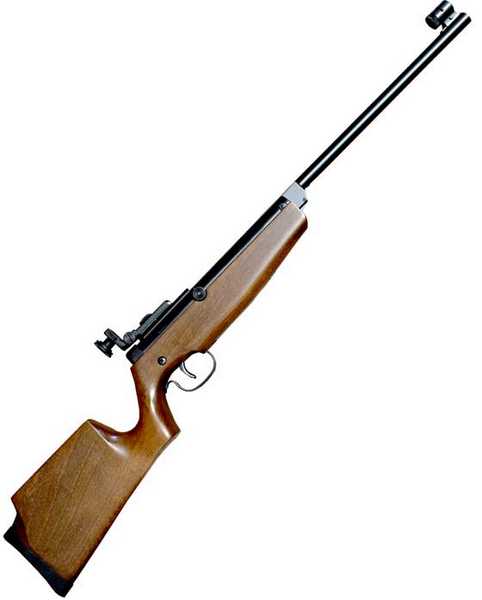
Diana 72 is a youth target rifle from the late 20th century.
This report addresses:
• Examining the Diana model 72 trigger.
• Two trigger adjustments.
• Caution — you may not want to do this!
• Trigger adjustment directions.
• Blog reader Mikeiniowa.
Today, we’re going to look at how to adjust the Diana model 72 trigger. I know this report is needed; because when I searched for information on the Diana model 72 target rifle, this blog was at the top of the list! I wish I had an owner’s manual for this little rifle, as I’m sure clear trigger adjustment instructions are in there. Lacking that, let’s first look at the trigger.
The Diana 72 trigger
As you’ve learned, the Diana model 72 youth rifle is just a model 6 target pistol in a rifle stock. Most things remained the same, but the trigger is one feature that had to change. People will tell you this rifle trigger is identical to the pistol trigger, but the presence of the long linkage from the trigger blade to the sear adds complexity the pistol trigger doesn’t have.

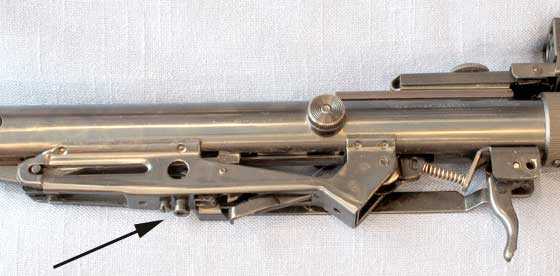
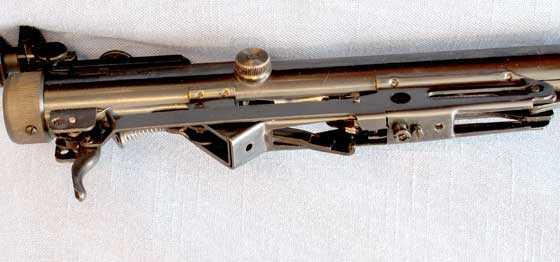
Kind of surprising, no? What looks like the trigger is nothing but an isolated lever. Under the large hole in the flat plate several inches to the left is where the actual trigger lies. The arrow points to the trigger adjustment screws.
On the right side of the trigger mechanism, we see the trigger linkage (the flat bar above the trigger blade that connects it to the trigger mechanism on the right).
What you thought was the rifle’s trigger turns out to be just a lever sitting out by itself and connected to a lot of machinery located several inches away. The linkage that connects the blade to the rest of the trigger mechanism is long and springy. It’s why this trigger can never be set to operate as crisply as a true target trigger. But some small amount of adjustment is possible, and this trigger can be very nice.
You can see the trigger adjustment screws in both pictures, but it isn’t necessary to take the stock off to access them. The rifle has an oval cut in the bottom of the forearm, and both screws are exposed. Actually, I should say all three screws are exposed, because the adjustment screw is actually two screws — one inside the other. The other screw isn’t for adjustment — it’s there to lock the larger adjustment screw in place.
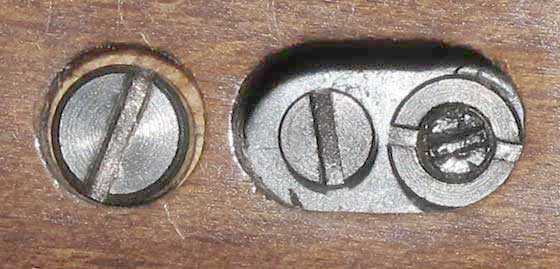
The trigger adjustment screws can be seen through an oval hole in the underside of the forearm when the rifle is assembled. There are three screws. The one on the right is actually 2 different screws. On the left is the locking screw that locks the large screw on the right. Notice the very large screw at the far left of this picture? That’s the stock screw and has nothing to do with the trigger adjustment.
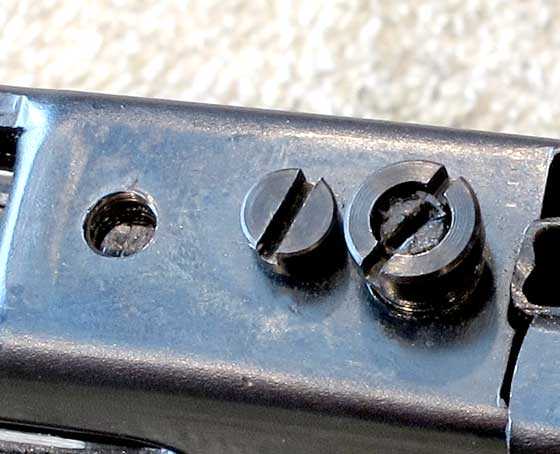
Here you can see the adjustment screws exposed. The screw on the right in this picture is actually two different screws — one inside the other. The small screw inside the large screw on the right will turn at all times. The single screw to the left of the two screws locks the larger screw in place. When you do that, the smaller screw inside can still be turned.
Two trigger adjustments
You can make 2 adjustments to the trigger. You can adjust the length of first-stage travel, and you can adjust the amount of second-stage letoff — which means the weight of the trigger-pull.
BUT — Please read this and believe it. These two screws — one inside the other — act in unison. As one is adjusted, it affects the other. It is extremely easy to adjust them OUTSIDE the safe range, in which case the trigger stops working altogether. When that happens the gun can be cocked, but cannot be fired!
To be safe, when that happened to me several times, I always broke open the action so the anti-beartrap would prevent the gun from firing. Then, I adjusted the 2 screws together until the gun worked once more. I did this several times to learn what each screw does. One time it took a full 10 minutes of working with both screws before I got the gun firing again!
Caution: This is very difficult
If you’re afraid of how sensitive this adjustment is — good! Stay away from it! The large hollow screw has a very small range of adjustment and can get out of the range very easily. But if you want to try this, below are the instructions.
Adjustment directions
First adjust the length of first-stage travel (the small screw inside the large one). This can be done with the second-stage screw (the large hollow screw) locked in place. Turning the small screw out (counterclockwise) lengthens the first-stage travel. Turning it in (clockwise) shortens the first-stage travel. I tried to eliminate the first stage altogether because I know some people like it that way, but I was unable to get rid of the last little bit of travel. Formal target shooters use two-stage triggers almost exclusively, so perhaps Diana thought some travel was needed; but it also might be necessary to have some travel in this particular trigger for safe operation.
After you have the first stage where you want it, you can adjust the second stage. First, unlock it by loosening the locking screw to the left. I found the adjustment range of the large, hollow (second stage) screw extremely limited. It was possible to get out of the range with as little as one complete turn of the large, hollow screw.
I played and played with this adjustment mechanism and came to the conclusion that not only are the screw turns limited — the weight range of the trigger release is also very limited. That’s because this trigger blade is connected by a springy linkage.
The best I was able to do was reduce the release from 2 lbs., 1 oz. (33 oz.) to 1 lb., 8.5 oz. (24.5 oz.). The first stage takes up about the first pound of that weight, so stage 2 is very light and difficult to feel until you get accustomed to it. There’s also some travel in stage 2, but there’s no creep (moving and pausing at random points).
Mikeiniowa
If you search the internet for directions on how to adjust the Diana model 72 trigger, you’ll discover that a good many folks who are experts with vintage airguns avoid this job. Several of them recommend sending your rifle to our blog reader Mikeiniowa, who apparently knows this rifle quite well. I hope he reads this report and comments.
Status of the rifle
The model 72 is now ready for accuracy testing. Although the trigger isn’t match grade, it’s as good as it can get– and it isn’t that bad.


hello
could anyone provide me with some information regarding accuracy and poi when using a scope and open sights with eyeglasses vs contact lenses vs bare eyes
thanking you
Welcome to the blog.
The question you ask has too many variables to have just a single answer. I wear bifocals, yet I always shoot best with no correction. But someone who cannot see the sights or target without glasses would be the other way around.
Three years ago when I contracted diabetes, my eyes went bad for half a year and I had to wear reading glasses to see the gun sights. That has changed, now that I am on medication and I no longer wear corrective lenses to shoot.
I hope this answer is of some help to you.
B.B.
Presuming the corrective lenses are set up for distance vision, there should be no effect with OPTICAL sights.
Optical sights are, ideally, set up so the outlet from the eyepiece is “infinity” (the “focus” adjustment sets the cross-hairs to be at “infinity”), so any corrective lenses for distance should be a perfect match — the optic output is parallel, and the corrective lenses are expecting parallel input.
Open sights are another matter. Traditional open sight usages says “focus on the front sight” (letting target blur, and rear sight may blur too). But if one’s eyes can not adjust for that distance (as mine — my daily wear prescription is distance for right eye, and computer monitor with left eye; I can actually get a better pistol sight using my left eye as the right will be focused on target but blurry on front sight).
True peep/aperture sights take the rear sight out of the equation (if you can see the front sight, your eye is in alignment; whereas pistols and rifles with sights on the barrel require eye-rear-front-target alignment).
Unfortunately, my shooting glasses are an older prescription AND set for distance-both-eyes; good for scoped rifles, and red-dot sights on pistols… Nearly useless for open sights (I was dinged at the CCW class for lowering the pistol and bringing it back up on rapid fire — but with my eyesight I had to drop low enough to pick up the front sight first then lift to bring rear sight into the view; I was shooting once I had three white blurs on the paper; otherwise I’d have been fiddling trying to find a front sight)
I haven’t done it with my scopes, but one way to set the focus is to take a small handheld telescope (or one side of binoculars). First focus on some real star (in some cases, a distant planet is too close). Then look through the riflescope using the telescope and adjust the riflescope focus to be sharp through the telescope. DO NOT CHANGE the telescope focus.
This procedure sets the telescope to “infinity” which is what you want the riflescope output to match.
This is a really smart and helpful bit of science for optics and their mechanisms and behavior with a third party influence, Im glad you answered that question, I need reading glasses for close focusing and use my opposite eye for pistol irons and just deal with the difficulty of scopeing. The glasses cause too much focus right into the scope and I lose the picture past the crosshairs, but need something, don’t know which way to go with it.
DON’T use a reading prescription with scopes… Use a distance prescription (you don’t care that the body of the scope is blurry); the scope’s eyepiece should then let you adjust the focus on the cross hairs — and if you have an adjustable objective (parallax) scope, you use /that/ to focus the target onto the cross hairs (which is why you need to first get the cross hairs sharp using the eyepiece; the target gets projected onto the same plane as the cross-hairs)
Red-dots are normally 1X and don’t need focusing — the dot is projected out to infinity (or some relatively long distance) so it looks to be “at” the target. Therefore, again, distance prescription.
Open/iron sights — ideally whatever prescription lets the front sight come up sharp, while the target blurs.
How does this linkage differ from a bull pup?
Since mikeiniowa is all over the internet about the Diana 72 I hope he’ll offer some insight into this rare gun as well.
kevin
Mostly, it is in the opposite direction. With this assembly, you are pulling on the trigger mechanism and with most bullpups you are pushing on the trigger mechanism. How the trigger mechanism operates will determine just how sweet it can be adjusted, if at all.
Kevin,
This linkage is very similar to a bullpup trigger linkage, except this linkage is probably shorter. The springy-ness is similar, though.
B.B.
Gunfun1,
I got the Stoeger X20s and did a little shooting with it. Even though I had read about how bad the trigger was, I was not expecting it to be that bad. The first time I fired it, I started pulling the trigger…..and pulling….and pulling….and it kept coming back……further…and further….. sort of like I was pulling the band of a slingshot….. then I lifted my head off the stock because I thought there is something wrong and its not going to shoot……then it let off. Wow. I shot it about 10 more times, and I really could not get a feel for the trigger. So I ordered the GTX trigger from Archer, and kept shooting it to start breaking it in. At first, there was a lot of spring noise when it fired, but now I must have put over a hundred shots thru it, and all the spring noise is gone. Just a solid thunk. I installed the GTX trigger and WOW what a difference. Nice take up to the second stage, then a pretty crisp let off. Not as good as my old R9, but I still like it. The scope it came with is probably fine for hunting, but I like a longer scope, so I ordered a Bushnell 4-12AO from Pyramid, and that should be delivered in the next day or two. I hear that these take a while to break in, but once they do, they are really good. I think once I get the big scope on it, and I start to shoot some serious groups, I will let you know more.
Jim.
Jim,
A good trigger makes a big difference in how a gun shoots — doesn’t it?
Please keep us updated on your success with this rifle.
B.B.
B.B,
I definitely will. The trigger made a huge difference. I will probably still pick up the NP2 when it comes out, but for the the sale price of the StoegerX20s, it was well worth it. The stock feels and fits very good. The shooting sequence is starting to settle down and smooth out. I will let you know how the accuracy is once I break it in a little more. I am happy with it so far.
Jim
Jim I shot with my neighbor a little bit that’s borrowing mine. And the gun is definitely smoothing out. And it is a quiet gun when it shoots.
And the trigger is definitely not what I’m use to. We tryed to adjust it and it maybe got a little better but not much. I think I will look into getting one of them triggers your talking about.
How was it to install. Did you run into any problems when you did yours?
GF,
The trigger was pretty easy to install. It came with generic instructions, not the exact same rifle as the X20s. The only thing you have to be aware of, is that you need to remove the trigger pin from the opposite side as shown in the directions. My pin might have been put in from the wrong side, I am not sure, but I kept it the way it was. You have to release the tension on the large spring over the pin, just so you can have room to remove the little clip holding the pin, then slide out the old trigger, remove the barrel pin from the old trigger, stick it into the new trigger, and slide the new trigger in. Then put the pin back in, put the clip retainer on it, then just put the large spring back over the pin the way it was. The pull of the new trigger is unbelievably better. It is adjustable also, but just the way it gets put in at the original settings is fine for me. IT took me about 10 minutes on my kitchen table. It would have only taken me about 3 minutes if the pic in the directions were from the same model. I guess they are all pretty close. I like the GTX trigger from Archer because it is just drop in. The one from Charlie the Tuna requires you to file a bit off the safety arm bar.
Jim
Thanks for the info. I will have to look into it.
Hey Jim,
I meant to contact you yesterday about this. Once you try out the new scope, if you decide you do not want the small scope, let me know. I am looking for a compact low power scope and would like to try that one out.
Hi BB and others,
This last Saturday we had the second Field Target competition at Pecan Plantation. I think we had 22 shooters. Craig was well organized and had us all in three man squads and that worked well. Craig made several small changes to move the group towards real hunter field target rules. Craig did not allow shooting from stools with back rest or arm rest. On one target we had a standing and a kneeling shot. There were several reducers in targets to make them more challenging. It was also windy and that added another fun challenge to me. We are still using the modified points system where you get one point for a face plate hit and two points of the target falls over. Craig also made the smart decision to ask for some help to take down the range. When the shooting ended all up and down the course there were guys winding up strings and picking up targets and lane markers.
There was still a lot of local shooters shooting. They are enjoying themselves and making progress. For their first competition most had gone to Walmart and bought cheap springers. Now at the second competition several had bought RWS 34 models from Pyramyd AIR. Most of the new shooters had also practiced some and shot better. New shooters are now starting to ask questions about PCPs. These guys are getting the airgun and field target bug…bad!
One more neat thing is that several men that could not shoot helped with everything from signing us in and taking our entry fees, getting us grouped up, and doing whatever needed doing. Someone had made breakfast tacos and someone grilled hotdogs for us all for lunch.These men are a valuable part of the team and set an example to me that even if I get to where I can’t shoot anymore that I can still be useful at the range.
As for me, I shot my new to me Air Arms Shamal. I was a little confused on the first lane and hit high on every shot. I will have to go back to the bench and try to figure that out. Anyway, after the first lane, I just aimed about 1/2″ lower than my practice had indicated and did a lot better the rest of the way. I think I ended up with a 80/96 on the modified point system. Not great, but a lot of fun.
I am now looking forward to the Dallas Field Target Club’s first Field Target event on June 14th at the 3D archery range at the Elm Fork Shooting Complex in Dallas.
David Enoch
David,
Thank you for your report on the club’s shoot. It sounds like Craig is getting some experience running these events.
I will be starting my report on the Shamal I recently received this week (I hope), so I expect to hear from you on that.
B.B.
Hi David (or anyone else who can answer),
What are the various distance you shot at in the competition? Are your rules online some where, or maybe BB has published them somewhere???
That sounds like a load of fun.
Rob
Rob,
There is a lot of info about field target on this blog.
Start here:
/article/Field_Target_Part_1_Starting_a_club_March_2007/39
http://airgun-academy.blogspot.com/2009/02/scopes-for-field-target-part-3.html
http://airgun-academy.blogspot.com/2008/10/starting-your-own-field-target-club.html
B.B.
David
Sounds like fun stuff.
Hey BB and the rest of you who also have an interest in vintage firearms, this past weekend I was visiting my friend in Waxhaw, NC and we did some shooting at the Charlotte Rifle and Pistol Club. Joe (my buddy) brought several firearms including his Remington Model 4 Rolling Block .22 rifle. Due to it’s age, Joe felt only .22 shorts would be safe to u se. We shot offhand using the iron sights at a steel plate some 35 yards away. It was like shooting a target rifle like the FWB 300. At times, we weren’t sure that the rifle had actually fired due to no recoil and not enough noise to make it past our hearing protection. We couldn’t even tell if we hit the steel plate as it didn’t move when struck nor did it make any noise at times. Hysterical! It’s a youth rifle with a very short pull but it was fun.
Fred DPRoNJ
Fred,
I love those older single shots! As you may remember, I have a Winchester Winder Musket that shoots shorts and really groups well at 50 yards.
The Remington model 4 is a very tiny rifle. It’s the firearm equivalent of this Diana 72.
B.B.
Hello,I need to ask a off subject question if I may.Does any know if the pump hose with the foster fitting coming off a Benjamin pump would fit a Hill pump? Trying to save a few bucks.
Give the sales people at Pyramyd AIR a call. This is the kind of question they either know or can easily find out.
B.B.
Hello Anonymous.
I went out and checked mine and it looks like the Benjamin pump uses a adapter on the end of the hose and then it threads into the bottom of the pump base.
The Hill pump looks like it threads right into the base of the pump.
With out taking them apart I cant tell for sure but they look like different sizes to me. I don’t want to take mine apart because it looks like they got it sealed with something. If you get a leak from the hose or fittings you kill yourself pumping the gun up.
So what I’m saying is I would just buy the right fitting you want for your gun and then you shouldn’t have any worries.
BB
Was that gun that clean when you took it out of the stock? Or did you clean it up for the pictures?
And the way your describing the adjustments it sounds like it doesn’t take much to make something happen. Can you see through that hole in the side how things are working in there when you pull the trigger?
And I’m with you maybe Mikeiniowa will have something to say.
It just amazes how they come up with some of these trigger designs in these air guns. But when I saw the first picture of the action sitting there I thought it was definitely a unique set up. And bull pup came to mind also. And like RidgeRunner said in reverse.
GF1,
Yes, it was that clean. I’d say the rifle is 98 percent.
And yes, you can see through the hole. That’s how I discovered the locking screw!
B.B.
Wow that’s cool that its in that condition.
I guess its hard to see how things move or where the adjusting screws contact. And it looks like you can’t take that rigger assembly apart because of the spot welds.
I guess if you really wanted to get into the trigger you would have to take a small drill and drill out the spot welds. It don’t look like you would drill into the air pressure chamber. I don’t know if I would go through the trouble. Or if I wanted to mess with the originality of the gun. But just a thought.
So, Mr. Michaelangelo,
Don’t you think that ceiling needs a second coat? 😉
B.B.
BB
Yep your are right. That gun sure looks nice. Sometimes its best to leave well enough alone. 🙂
Don’t care who you are, that’s funny!
Hi BB, I am waiting for the NP2 to be released and I have a concern. You have suggested in the past cleaning new guns with a new brush and J-B non- embedding bore cleaning compound. Can you, or anyone, tell me if this is going to create a problem with the sound reduction system? Thanks.
SP4449,
Welcome to the blog.
Yes, it would be a problem to clean a rifle that has baffles.
B.B.
Thanks. I guess I have to put 500 – 1000 rounds through it before finding out how accurate it really is.
B.B., I had considered sucking at the back of the bullet as one type of drag which I associated mostly with resistance at the front caused by the cross-section.
I would have considered the delicate adjustments in this blog beyond me had I not resumed reloading. I see from my records that it’s been three years since I fired my Garand!!! Now, the Arsenal of Democracy is back in action, cranking out rounds to fire. When I got to weighing the powder charges, a kind of mania took hold of me. I made sure that each charge was measured to the exact particle. Even Black Hills can’t do better than that. So, at least for uniformity of powder charges, Matt61 ammo is unsurpassed in the world! Otherwise, I’ve got a Federal (non-match) primer, Remington case, and a Sierra Matchking bullet. But I think the quality might suffer a bit with my overall length tolerances since my press is not too stable. 🙁 In any case, reloading is a great feeling.
Matt61
Matt,
Don’t obsess too much over Garand ammo! Remember the action is semiautomatic and that limits what the rifle is able to do. For a Garand I set the powder scale at a safe charge and never weigh another round.
When I load for super accurate guns and for cartridges that have low capacity I start weighing powder to the tenth of a grain. I doubt the Garand knows when a round is a tenth off.
B.B.
Just got the sale of a century. Picked up a drozd bb gun for $85. Now I got the raw material for my next build. I’m going to see just how much power I can get out of it. I just found out for full auto I don’t need a mod board, just a few alterations to what is in it. But I’m loving the quality Russia puts into these things. Give me a few months and It won’t look anything like what it is now. I’m taking it full tactical.I figure my bb gun needs to really frighten liberals. It will be a while until I get to fire it, but it will be fun. I promised myself I wouldn’t fire it until I got it the way I want it.
John
Sounds like fun. As you go through it and make changes maybe you could document it. Then post it here so somebody can mod one from your info.
I would probably be one of those somebody’s. 🙂
I’ll be getting a base chrony reading before I send it out for a tune up and full auto mod. It seems that the particular model I have doesn’t need a mod board so I’ll let Drozd max do their magic. From there I’ll put in a longer barrel since we already know that increases velocity in airguns. From there I’d need to go to high pressure air to get much more. But I’m leaving it on co2. So at best I might see around 100fps gain on it and max rate of fire of 1200 rpm. I’ll have Drozd Max tune for maximum power with a 23″ barrel. That’s going to be my first step. Tonight I did my cosmetic fix and got rid of all the yellow, made it all evil black.
That is awesome, I was checking those out the other day, so cool. Are you suping up the bb gun as is, or are you taking the mechanics and powerplant and building a new gun around it? Will it get a belt mag and shoot pellets? Please do take gunfuns suggestion, I too would love to read about this project!
I’m not really going to do all that much other than some cosmetic changes. Make it more of a tactical rifle and less pistol. But it’s always good to tune a bit on anything. So I figure get what I got shooting a bit stronger, a bit faster, look better. This is just a bit of practice for what comes next. I got my eye on a Blackbird. That one is going to become something formidable. My goal will be to get it to 900fps or better. This drozd is probably going to just become part of my collection. The Blackbird will be one of my high power show pieces.
John I didn’t get back with you but you said you have the yellow and black version. That was a earlier model they called the bumble bee. I almost got one but the color thing turned me off. I guess I could of painted it but I think the black bird will be the one I build.
And I wonder if the insides of the bumble bee are the same as the black birds. Either way when you start making changes write down in your replies what you had to do when you make that particular mod and if you ran into any snags while your were doing. That way it well help that next person trying to copy your build be ready for something that they didn’t see coming.
I will be waiting for your replies. I’m pretty interested in building a black bird.
I didn’t like the yellow either but that was cured with some flat black spray paint. I carefully took it apart and pained everything that was yellow. So it looks every bit as modern as if it was new. I checked with Drozd Max. To get full auto in the bumble bee you simply need to do a few modifications to the circuit board. They wouldn’t tell me what I had to modify but they will do so for $35. So I’ll let them do that. I probably won’t get much more power out of this one but I’d rather start with a cheap model so that if I destroy it I’m not out $300. I got my eye on a blackbird which is where I intend to really get modifying. Mostly this bumble bee is going to be cosmetic with slight power mods. I want it to look “more evil” more than I want squirrel shredding power. The blackbird gets that honor. I’ll chronicle all I do and maybe do a guest blog on it at some point.
John that sounds like a good idea about the guest blog then it will be a specific topic and easy to search to reference it.
Hello everyone, I know there was some interest in the falcon .177 pellets a while back, they were not in stock anywhere. I have kept my eye out for them because my sons Air Venturi Bronco likes them very much. Pyramyd air has them in stock right now, just ordered a few tins. Get em while they last.
Thanks for the headsup, I would like to try them, hopefully there are some left by the time I order.
Sorry it took so long to post on this one, I have been in SC for a shoot. I can adjust the triggers in these rifles they are much like the trigger in the XSP-180 pistol, just need to be done carefully, very carefully as Tom has said…..
Mike,
Thanks for chiming in. Your name is plastered all over the internet as the go-to guy for this trigger.
Please be as critical of my report as you like. I want to learn, too.
Thanks,
B.B.
Remember…don’t believe everything you read on the net. I have worked on some of them but don’t consider myself an expert by any means. just like all the other triggers out there, you have to understand how they work both for release and for cocking then adjust as needed…