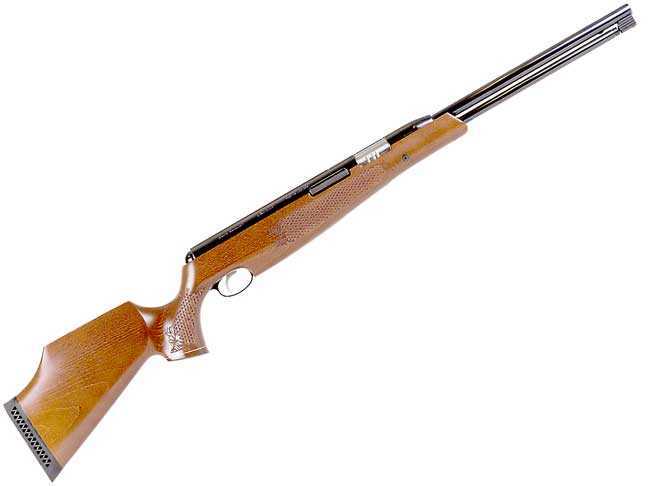
The TX200-MkIII is a legendary underlever spring-piston air rifle.
This report covers:
- Get it right!
- Mounting a scope
- Focusing the eyepiece
- Good rings
- The stop pin
- Where to mount the rings?
- Where does the other ring go?
- WAIT A MINUTE!
- The fix
- Summary
Today is an important one for all who want to learn more about scopes. Today we set up and mount a scope on the TX200 Mark III in preparation for accuracy testing.
Get it right!
At least one reader was put off by BB’s Monday diatribe about the importance of words and getting details right. Well, funny you should ask, but even the great and awesomely humble BB Pelletier sometimes makes mistakes. NO! Say it isn’t so, BB!
I have been looking for a hard shell protection case for my iPhone 11, since my OtterBox shell started molting a couple months ago. Well, I just went to the big box store and bought another OtterBox — for an iPhone 11, of course. When I got it home it didn’t fit — too big for the phone. So I returned it and went to a different box store, this time an electronics house and got a second one. But when I got it home all it was, was the glass shield with a wee teeny protective ring around the sides. I didn’t read the box carefully enough. Bad BB! Stupid BB!
So I went back to the same store and returned the glass and bought an iPhone 11 hard case. I even took it up to the information desk and had the wizards confirm that’s what it was — a hard case for an iPhone 11.
Took it home and it didn’t fit. Too big for the phone.
So I went online to see what the problem was. Is everyone having trouble finding cases for their iPhone 11?
Turns out BB doesn’t own an iPhone 11. He owns an iPhone 11 Pro, the one with several camera lenses. And Apple, in their infinite wisdom, made the iPhone 11 Pro slightly smaller than the standard iPhone 11.

As it happens, an iPhone 11 Pro isn’t the same as an iPhone 11.
Why do I tell you this? Yes, it is because I am supremely humble, but also to emphasize the point that the details do matter.
So reader Gary S. was bragging about his 21mm kit he bought from Tony Leach to tune his TX200 Mark I. And he said the same thing that reader GunFun1 said about his kit — that it turns the TX into almost a PCP (precharged pneumatic) because it is so smooth.
I emailed Tony from his website and told him that I would like to buy a 21mm kit for my TX to install and test for you. Well, Gary, it seems the kit is a 22mm one, so a box of 9mm bullets is on its way to you!
Editor’s note: Gary S. was quite offended by what I said about his 21mm kit. I implied that it wasn’t correct, because Tony Leach now offers a 22mm kit. Tony’s website is not full of information, so I can’t tell when he switched from 21mm to 22mm, or even if he did switch. It seems like this kit or these kits is/are perhaps too tenuous for a review in this blog. I will wait and see if the dust ever settles. My apologies to Gary S.
But that ain’t what today is about. Today is about getting ready for some accuracy testing.
Mounting a scope
This will be a lesson in mounting a scope, one that I believe a lot of readers will like. So the scope I chose for the most accurate spring piston pellet rifle that’s currently in production is the new Meopta MeoPro Optika5 4-20×50 RD BDC3.
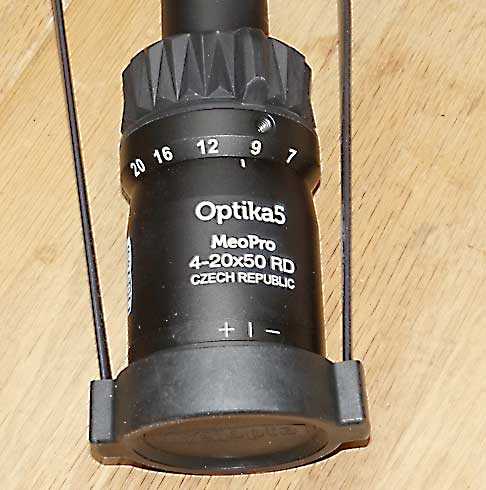
Meopta MeoPro Optika5-4-20X50 scope.
If you’re a regular reader then you know that I bought this scope. I used my writer’s discount, but even then this scope that retails for $490 wasn’t cheap. But it’s a Meopta, and I knew from experience what that means. My TX is quite accurate and deserves a good scope, and since the TX recoils so little I knew this scope would be up to the task.
Today I’m going to take you through all the steps I follow when mounting a scope. Are you ready? WAIT A MINUTE!
Before that scope goes anywhere there is something I need to do. I need to focus the eyepiece so the reticle is sharp. I’m not focusing the scope, that would be silly. But I am adjusting the eyepiece so the reticle is in sharp focus.
This scope came with the BDC3 illuminated reticle. Here is what it looks like.
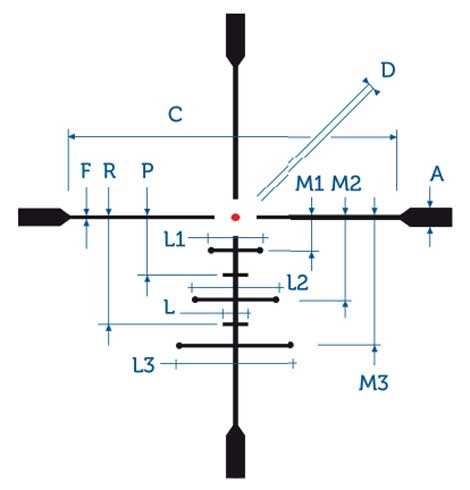
The BDC3 reticle. Yes, those letters all have meaning and a card with explanations comes with the scope. And no, they are not in the reticle. Only the black lines show and the heavy lines go out to the edge of view in the scope. When illuminated, only that central dot lights up — just like my Meopta MeoPro Optika6.
Focusing the eyepiece
Decide whether you will look through the scope with glasses on, or not and wear them if you will be. Then point the scope at a bright white surface (doesn’t have to be white, but it needs to be light-colored and plain), so you can focus on the reticle. Look through the eyepiece and turn the eyepiece ring until the reticle is in sharp focus. That’s it! On some scopes there are numbers on the eyepiece or the ring, but all you need to do is turn the ring until the reticle is in sharp focus. Then LEAVE IT ALONE!
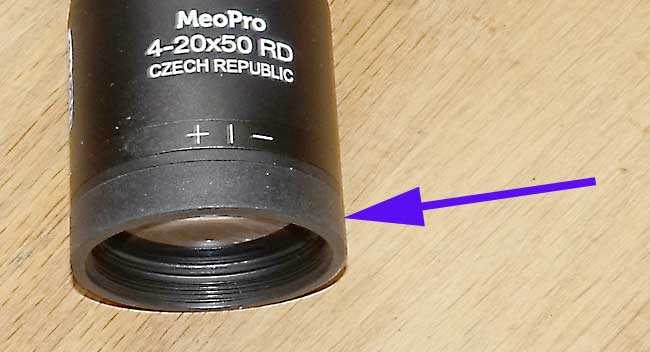
Turn that ring (arrow) until the reticle is sharp and in focus. If there are numbers on the ring or scope, forget them. Just focus the reticle by turning the ring.
Good rings
This is a premium scope that deserves premium rings. I selected UTG Pro one-inch high rings. Yes, this scope has a one-inch tube. The Pro rings have the most perfectly round holes through their bases and caps, and I felt the scope deserved the best.
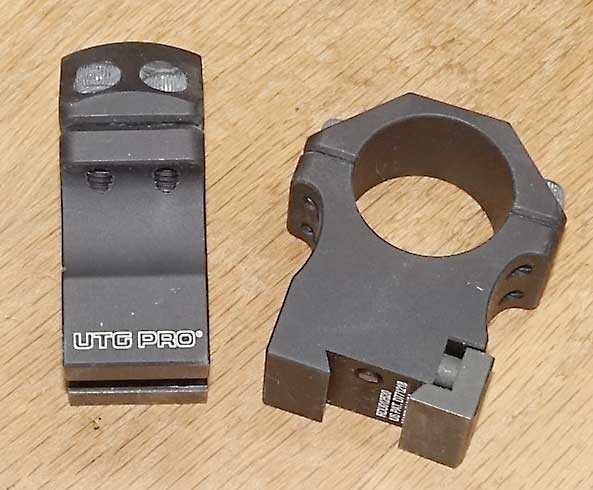
These UTG Pro rings are perfectly concentric. The base jaw is spring-loaded and on a guide pin so there’s no problem mounting it.
The stop pin
The TX200 Mark III is one of the softest-recoiling springers around, but there still is some movement, so the scope stop pin on the bottom of the rear ring base has to be deployed.
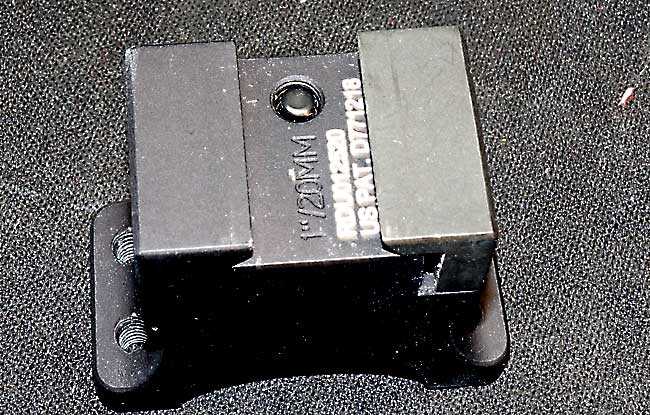
The stop pin is now flush with the base of the ring. Access it through the scope ring. It’s an Allen screw.
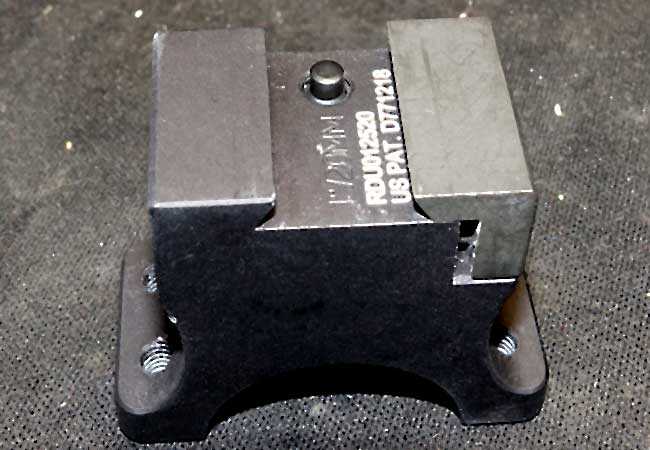
The stop pin is now proud of the ring base. It doesn’t need to be that high because it’s a steel pin.
Where to mount the rings?
Okay, the next question is where to mount the rings on the rifle. The TX200 Mark III has three scope stop holes on top of the spring tube. Experience tells me to use the hole in the rear because the scope is going to need to be close as possible to the shooter’s eye. So the ring with the stop pin lowered is attached so the pin is in that stop hole, and that ring is slid to the rear as far as it will go. The Pro rings are so easy to mount and the TX 200 is also quite easy, but WAIT A MINUTE!
Where does the other ring go?
I am using 2-piece rings, which I always will if there is a choice. The mounting options are so much greater with 2-piece than with one piece. You’ll see that in a moment.
You see — the ring has to fit on the part of the scope tube that’s straight. If the tube is swelling, no ring can fit it. So it isn’t the entire length of the scope that’s available. Here is my technique for locating the scope rings.
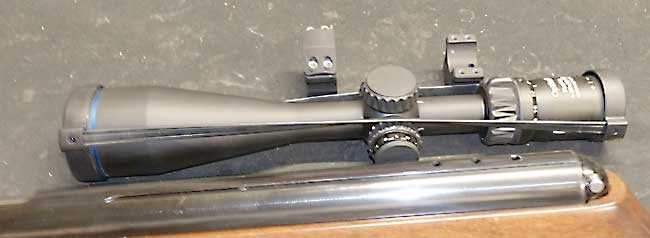
I lay the rifle down and lay the scope above and next to it. I know the rear ring has to go over the rear scope stop hole, and the scope has to stick back as far as possible. In this picture the scope isn’t as far back as it should be. Once the scope is positioned by the rear ring, I know were the front ring can go.
Notice in this photo that this scope doesn’t have a long scope tube in front of the turret. You may be surprised how close together the rings need to be for this one!
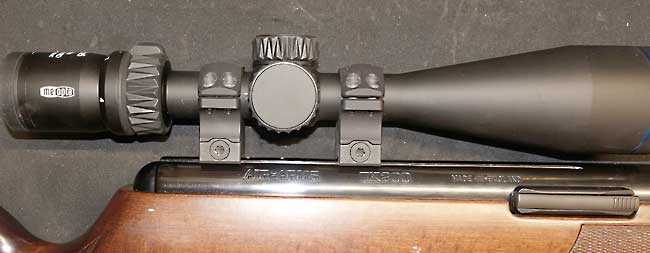
See how close together the rings are. The scope has to be this far back because of what I’ll be telling you next.
WAIT A MINUTE!
Put the scope caps on but don’t tighten them down yet. There are two more things you need to do. First, position the scope close enough to your eye that you can see the entire image through the eyepiece when you hold the rifle to your shoulder. This Meopta scope is wonderful this way because there is a lot of leeway for positioning. Some scopes, especially the more powerful ones, have a very narrow range where they can be put. If you aren’t in the exact right place the image either grows smaller or it goes completely dark. And if you shoot off a bench you may want to position the scope even farther back, because your shooting eye will be farther back.
The second thing you need to do before the scope caps are tightened is set the scope up vertically, which also sets it up horizontally. Now I would LOVE to make a joke here and tell you all sorts of stuff you have to do to accomplish this, like suspending a plumb bob at 50 yards to align the vertical reticle, but the truth is, it doesn’t make one bit of difference if you do. Because that is not how you align the vertical reticle line!
You hoist the rifle to your shoulder and carefully rotate the scope in the rings until the vertical reticle line appears to bisect the center of the rifle. If you are able to close your eyes and touch your nose with both index fingers, you can do this.
“But how will I know if the scope is level?” Level with what? What part of your air rifle is level? Your air rifle is a cylindrical tube that contains a spring and piston. Ain’t no level in that — at least not when looking from the back side.
Could you be “off” (whatever that means) by a degree or two? Sure. Does it matter? Maybe, sometimes. It depends on what you are doing.
If you discover that the shots closer than your sight-in distance are to one side of the centerline of the bull and to the other side when they are farther than the sight-in distance, then your scope is not level.
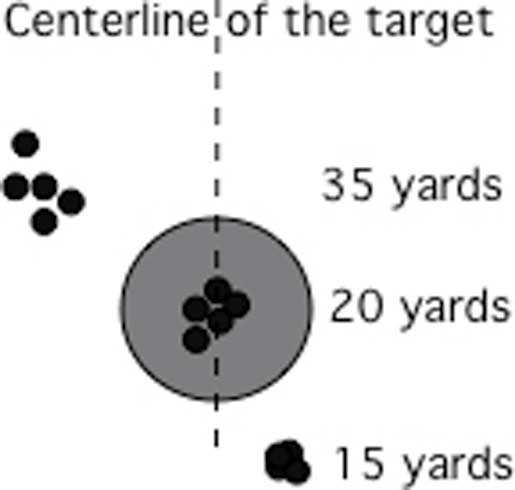
When your groups move from one side of the centerline to the other as the distance increases, the scope is probably not level.
The fix
So, if you want to shoot at different distances all the time, you correct this issue. But if all you want is to shoot groups at 100 yards, there is nothing more to do. Just refine the sight picture until the pellets land where you want them to.
BB — I want to shoot at different distances with my rifle and I am getting the results you show in your drawing. How do I correct it?
You loosen the scope cap screws and carefully rotate the scope in the rings a degree in the clockwise direction, as viewed when looking through the scope. Be careful and only rotate it about a degree and that should fix the problem. If it doesn’t, loosen the cap screws again and rotate the scope another degree clockwise. Yes, this is a lot of hassle, but it’s the only way I know of getting the scope right on.
When I test the TX200 for accuracy the first time it will be at 25 yards and I will zero the scope for that test. So nothing will be learned from that. But if I move out to 50 yards and the group goes sideways from the centerline, then this is what has to be done if I want a perfectly zeroed scope.
Summary
For many years I have tried to write about mounting a scope the way I have in this report. Are there other things to be done? Certainly. I didn’t discuss a scope level, a cheek weld or things like that. But what we went through today is what I went through to mount this scope on my TX200. We shall see.


I would also suggest that when you adjust the ocular correctly that you secure it with electrical tape or something similar. Adjusting for parallax at this juncture is also important. The A Team (appelles?) have a wonderful process for this step.
BB
I belive that was Buldawg that said that about the tuning kit not me.
GF1,
Oh, okay.
BB
BB,
Tony Leach’s 22mm conversion will need the help of a machinist to install I think. It’s not quite a drop in piece of kit. Shouldn’t you be adjusting the eyepiece after installing/mounting the score to the gun? I would imagine the distance your eye is from the eyepiece would be critical especially with high magnification scopes.
Siraniko
Siraniko,
I’m just telling you the way I do it.
BB
Nope, it is a drop in kit–no machinist needed.
BB
I would like to please ask for your opinion. There is this never-ending “2-piece rings vs. 1-piece set for your scope on springer” discussion… Let’s get some clear statement on that.
You prefer to rather use 2-piece rings to mount the scope because there is more flexibility compared to 1-piece set. I have still in mind tons of discussion conducted in one airgunning forum years ago. There was a strong wind blowing in 1-piece rings set direction as it “should be” much better for the scope when using on a strong recoil springer. Does your experience confirms this statement? Does the scope lives longer with 1-piece rings set?
Example: I would like to add a cheap entry level scope NikkoStirling 4x32mmAO on one of my .22 mid-energy springer which has some recoil, more then TX. I have both ring options – 1-piece set or 2-piece rings. Which should I prioritise for this purpose?
tomek ,
As long as the rings are quality ones I see no difference between two-piece and one-piece, as far as scope longevity goes.
BB
Thank you BB! This is exactly my experience so far (but mine is still not sooo enhanced). There are special dampa rings and other special system for extreme recoil damping. But it is a different story.
So I think whenever possible I will use 2-piece rings as they are lighter and more flexible.
This is how RidgeRunner mounts a scope. This is how RR’s Daddy taught him to mount a scope. This is how RR’s Granddaddy mounted a scope.
I have never understood what all those clamps and levels and stuff was all about except to wheedle some money from the ignorant masses.
Do use a quality scope. Do use quality rings/mounts. Neither of these really need to cost a small fortune, but do not reach in the bargain bin for them either.
B.B.
Why didn’t you take you phone with you and just say, “Here I need a case for this phone?” Then hand the phone to the wizards that are working at the store? The whole purpose of the device that is ruining modern life is that you can take it with you!!!
-Y
PS would you use that Meopta scope for shooting FT hunter class?
Yogi,
Yeah — that would have worked. But I wouldn’t have had a funny story to tell you.
Well, you would have to set the power at the legal limit, but yes, this probably would be a good scope for the Hunter Class of field target.
BB
BB, this is the text I got from Tony when I purchased the kit, “You just bought my last 21mm kit
I had 4 left before new stock in a fee weeks 21mm is faster still and less recoil still”
Tony Leach
You may want to check with him to see if he ever made the kit in 21mm. In the text he also mentioned the 21mm kit he made for Joel Goodwin, winner of the Canadian Field Target Nationals, beating out all the PCP shooters at that event.
Gary,
Thanks for clearing that up. The more I read about this kit the more it sounds like a rolling experiment. Did you have to modify your TX in any way to accept it?
BB
No other modification other than to remove the transfer port on the compression sleeve to install the 21mm sleeve. Your comment about me in this blog was offensive to me, basically calling me a lier or misinformed. I did my research before purchasing the kit as well as extensive conversations with Tony. I don’t know if he still makes the sleeve kit. I know he makes the kit complete with a new compression tube. I believe only in 22mm. You might want to check with him. I bought the sleeve kit because it was quite a bit cheaper than the one with the new compression tube.
Gary,
I had no intention of offending you. That is why I said “That said (with a smile),”…
I’m sorry I offended you,
BB
You should edit your blog to reflect that I indeed have a 21mm kit.
Gary,
I will do that right now.
BB
May I suggest you check out his FB page at:
https://www.facebook.com/groups/1447138175311176
What is your email address? I don’t want to hijack your blog with a topic that does not pertain to its subject.
Gary,
I don’t normally respond to inquires made this way but you can write to blogger@pyramydair.com
BB
Got it. You can delete the comment if you want.
Gary,
No, the only comments I delete are those that would offend families or when the discussion take a bad turn for an argument. I like to keep the blog open for discussion.
BB
I meant the one with your email address.
Gary,
Gotcha. I will leave it up because I just trash the messages that come to that address unless they are genuine inquiries to write guest blogs. No harm done.
BB
BB, that looks like the most compact hi magnafication scope with electronics i have seen.
Thank you for the tip about 1 degree adjustments of the reticle. Priceless.
I should have got a fruit phone too. I need to down size all my pics on the desktop because of the 2mb file size limit. Windows 10 doesn’t even come with image management software, that cost extra. Nickel and dime me to death. Apple does a way better job of integrating computer and phone than the competion. drives me even more nuts than I already am. You are not using a stand alone camera anymore?
Rob
Rob,
I still use a dedicated camera. The smart phone cameras are very good, but there is so much they can’t do that I need.
And I had the same thought about this Meopta scope. It is very compact for what it offers.
BB
BB-
Errata- section- ‘Wait a minute’, second paragraph, second sentence-
‘….make a joke here are (and) tell…..’
In the section, The Fix, you advise rotating the scope clockwise to rectify left/right error. Would actually need counterclockwise rotation. Easy way to visualize is to hold target so the groups are in a vertical line. Scope’s vertical reticle needs to rotate to the left (counterclockwise) to coincide with the shot groups and also the bore centerline.
Please elucidate further on that Meopta scope during the succeeding tests. It’s on my short list for a scope. Alas, I have no gunriterz discount to apply. Someday….
Paco,
You got it backwards. When you look through the scope it needs to be rotated clockwise to correct the error I show in the drawing. I know, it’s like looking in a mirror! 😉
You might like to read this report.
/blog/2019/06/what-cant-does/
It shows the effects of rotating the scope graphically, though through cant and not misalignment.
I fixed the typo. Thanks,
BB
B.B. I like your sense of humor… “it is because I am supremely humble.”
How ironic, indeed. Or is that oxymoronic? ;o)
Roamin,
I do like the moron part but I think it’s just redonkulous. 🙂
BB
My Tarheel State Mrs. frequently uses “redonkulous;” wonder if it’s a Southern thing.
As for “oxymoron,” that term could be offensive to male bovines; gotta be careful with words in these Politically Correct times. 😉
Perhaps the term is applicable to a PCP airgunner who insists on charging his/her airgun with pure oxygen…
Basil,
Now I really am rolling on the floor and laughing my Ashtabula off! 😉
BB
There are days FM thinks he’s stuck in the Kalama Zoo of Alt-Reality world…
Roamin Greco
It reminds me of this quote: “When it comes to humility, I’m the greatest.” — Bullwinkle Moose
Siraniko
;o)
I used to watch that show!
A punster’s paradise; my dad and I used to watch it together. He was a natural pun-generator. Still chuckle remembering “The Ruby Yacht of Omar Khayyam” episode.
BB,
In the old days I used to set up the cross hairs on the scope the same way as you.
Back then, with guns, scopes and pellets being what they were, minute-of-a-squirrels-head accuracy (about 1 inch groups) was limited to 25-30 yards or so with a good rest. Rifle cant and POI crossover was not an apparent problem because the maximum effective range of the whole system was relatively short. Agree that if you are shooting a low power, modestly accurate airgun at sub 30 yard distances then you don’t have to worry about cross hair alignment or cant.
On the other hand, I have several airguns that will easily print sub half inch groups at 50 yards and sub 1 inch groups out to 80ish yards (depends on if I’m having a good day). At those ranges, rifle cant and POI crossover are very noticeable especially when pesting at random ranges anywhere from 10 to 80 yards.
Yeah, small, tight groups are impressive but for my type of shooting (plinking, pesting and hunting at random ranges out to 80 yards), POA and POI have to be (horizontally) aligned. I put a lot of effort into making sure that the scope is properly aligned and the vertical cross hairs bisect the bore, then test left/right drift at 10, 30 and 50 yards.
It may seem to be a lot of fuss but you need to be confident in your equipment to (regularly) make head-shots on sparrows at 50 yards.
Hank
B.B.,
First the plaudits: for the average shooter your scope mounting Gouge (slang for crib sheet or quick start) is one of the best i have read.
And now for the disparagement an misery: there is in fact a Level in every Balistic system because that science is All based on an XYZ axis; it is true, however, that the human holder is the weakest element in a hand-held projectile launching system. The Z axis is defined by the True bore line extended and the X and Y are derived from that.
shootski
shootski,
Of course that right, Or I wouldn’t have told how to correct the gun when the scope wasn’t mounted level.
BB
B.B.,
I’m SUre you knew that and you also probably knew I was going to comment. Lol!
For those readers that want to go a bit farther down this rabbit hole I will share three or so things that I add to what BB has done to mount his scope. You will need a Laser Bore Collimator, a manual or automatic 2 axis level.
https://engineerwarehouse.com/blogs/types-of/types-of-laser-levels
If you use the manual then a plum bob is also needed. A big white wall that is reasonably plum as far away (up to 100 yards/meters,) as you can see your laser point and line. You need a bipod, rest, bags, or cleaning/maintenance cradle or better still a gun vice.
Shine the installed gun bore laser Collimator at the wall. Hang a plum line that intersects the point if needed. Level the scope in the rings (i use the bottom flat on the turret housing because the turret caps are almost never level for 360° they are lopsided even on Nightforce, Swarovski, and Schmidt & Bender scopes costing thousands! This will give you two plane precision on the X and Y axes for leveling your scope to the bore. It gives you the chance to also mount a rifle level to the scope tube or the reciever rail and get it all to help you shoot straighter. Look through the scope and align on the point first then level the scope reticle. You are as close to a three axes level sighting system as any gunsmith is going to get you for lots of your hard earned cash.
The Z axis is ruled by a combination of the projectile drop due to gravity, built in Z axis cant to make up for barrel droop, longer range shooting or you choosing to shoot uphill or downhill.
You really don’t NEED to do any of what I have covered
…well not until you start shooting to 100 and beyond.
More and more of you are, or will be, and sooner than you believe just now!
shootski
B.B.
Once you have the rear scope ring mounted, do you further adjust the stop pin so that it is all the way down to the receiver?
-Y
Yogi,
You certainly could and it would make sense, but I don’t. I guess I have a good feel for how far down the pin needs to be.
BB
What if your pellet trajectory is a spiral? I just gave myself a headache!
RG
If that’s the case you better try a different pellet. If still spiraling then you better start looking at the gun. Yep that could be a headache.
I remember your method for determining whether your pellets were spiraling with multiple paper targets at varying distances. Take two aspirin and call me in the morning.
RG
Yep thats the way to do it.