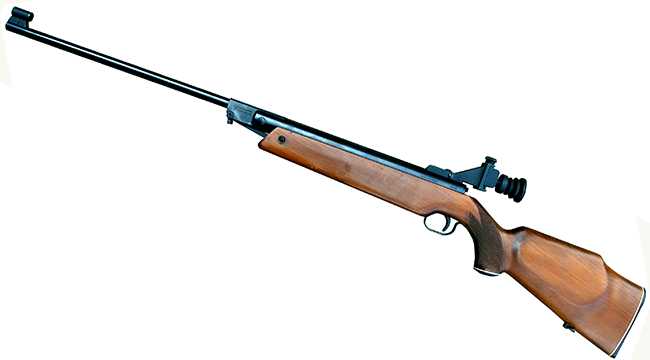
FWB 127. It’s the same rifle as the 124 only in .22 caliber.
This report covers:
- Disassembly
- The mainspring
- Power down?
- Trigger assembly and spring guide
- Rifle has been tuned
- More proof of tuningPiston seal
- Next
Today we disassemble the FWB 127 to find out what parts are needed for a rebuild. Obviously from the last test in Part 2 the rifle is not performing as it should.
Step one is to pop the barreled action out of the stock. And just to keep that easy I also removed both front and rear sights.
The 127 barreled action is identical to the 124 barreled action.
Disassembly
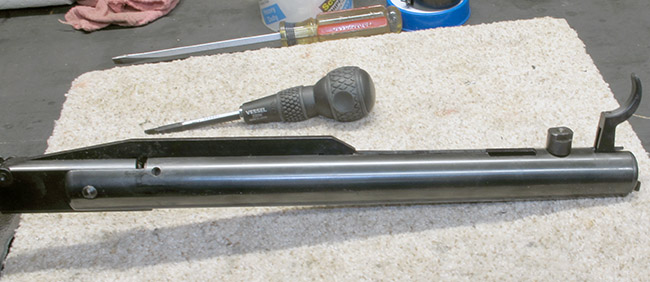
The FWB 124/127 is on the easier side of spring-piston airguns when it comes to disassembly and assembly. I did use a mainspring compressor but no other special tools.
The powerplant is held together by one bolt that is also threaded for the front triggerguard screw. Put the barreled action in the mainspring compressor and take a slight bit of tension off the end cap. Then the bolt almost unscrews itself.
The bolt that holds the 127 together. Only remove it when the rifle is in a mainspring compressor.
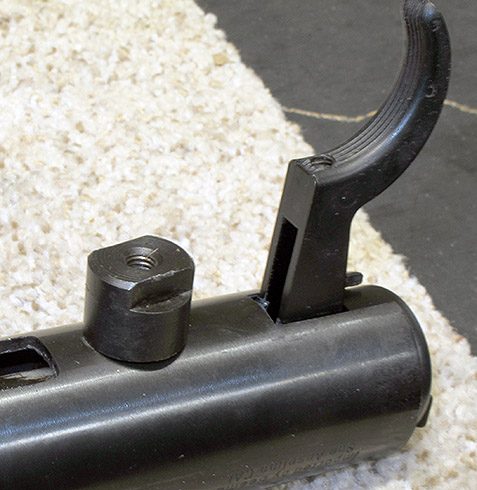
Once that bolt is out back off on the mainspring compressor and the end cap assembly that contains the trigger assembly, the safety and the rear spring guide slides out of the rifle.
Here you see the end cap with the trigger assembly. The wings on the right are the safety.
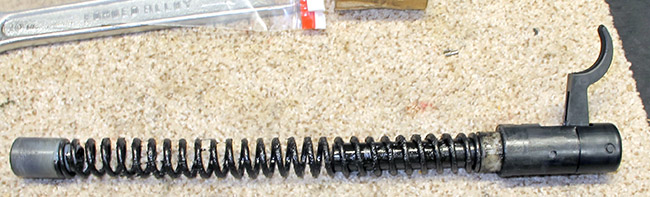
Once that bolt is out the end cap assembly and the mainspring slide out of the spring tube.
When the mainspring came out I saw that it was coated with black tar grease. That costs about 30-40 f.p.s. in velocity. I will recover that without losing velocity by using Tune in a Tube (TIAT) grease when I assemble the rifle again.
The black tar grease is all over everything. It will have to be cleaned off before the rifle is assembled again.
The mainspring
I held off ordering parts for the 127 until I saw the condition of the parts that are in the rifle now. The mainspring was a surprise because it isn’t an FWB factory spring. It’s an aftermarket spring with many less coils than the factory spring — six or seven less coils for sure. I know by counting the coils on this spring and comparing them to a replacement factory spring from a 124 tuneup report. I counted those in the photo of the same report.

The mainspring that was in the rifle looks fine. In this image the coils in the center look slightly collapsed in this photo but I examined the actual spring and can tell you that this is an optical illusion.
I cleaned all the grease off the spring and then rolled it on a flat surface. There are no kinks in the coils and only a very slight wobble in the roll that some factory springs might also have. In other words, it’s in very good condition. I could put it back in the rifle and, with the elimination of the black tar grease, pick up 30-40 f.p.s. And perhaps the same or a little more with a new breech seal. But that still leaves the rifle in the basement. Right now it’s a 9 foot-pound rifle that should be a 15-16 foot-pound rifle. A fresh breech seal and TIAT might bring it up to 12-13 foot-pounds but that’s it. I’m not a power monger, but I want more than that from this rifle.
Power down?
The mainspring is the principal reason this rifle’s power was down. The man I got this rifle from thought the piston seal needed to be resized — that it was too tight for the compression chamber. But that spring is the main reason for the low velocity, with the breech seal and black tar grease minor and secondary reasons.
Trigger assembly and spring guide
Once free of the mainspring I wiped off the rear spring guide and trigger assembly. The FWB 124/127 trigger is pretty basic and doesn’t offer the same range of adjustability as a Rekord or Air Arms trigger. But when I owned the Queen Bee 124 I noted that its trigger was adjusted to near perfection. So I know it’s possible. I will first test this one during the accuracy test and then try to adjust it similarly.
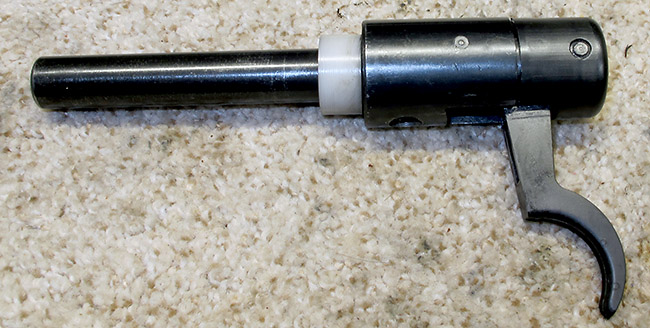
The trigger assembly includes the rear spring guide. That white Delrin or Nylon bushing is not factory. It’s supposed to work with the shorter mainspring to bring back some power. You will note a similar bushing or top hat on the piston end of the spring that does the same thing.

Rifle has been tuned
At this point it is obvious this rifle has been tuned. And tuned by someone who knows their stuff. Except for the black tar, this tune was specific and ideal. And maybe TIAT wasn’t available at the time this work was done.
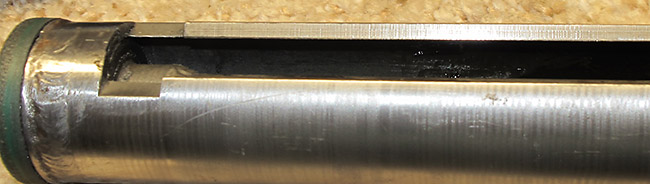
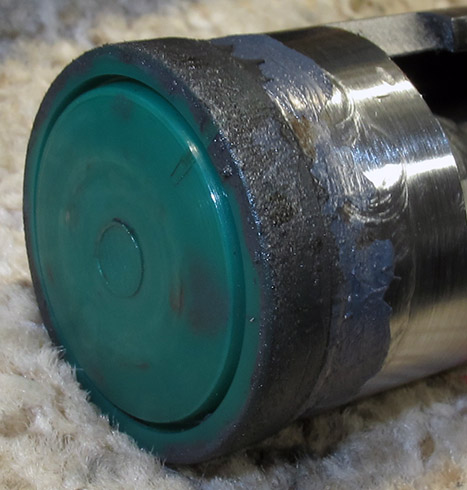
The flattened and hard breech seal I showed you in Part 2 is a clue that this work is no less than ten years and more likely 20 years old.
That breech seal is shot. There goes a lot of velocity! The bore could benefit from a deep cleaning, too.
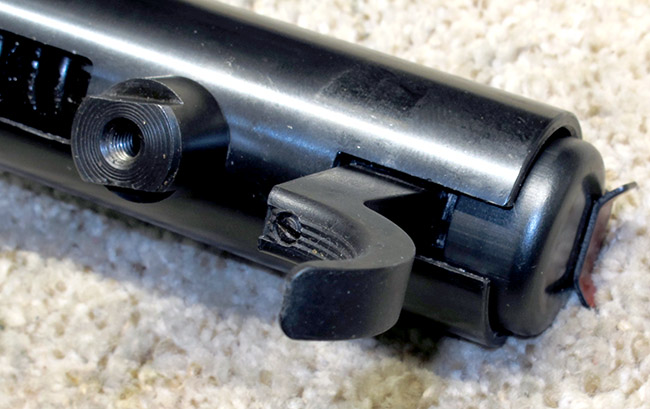
More proof of tuning
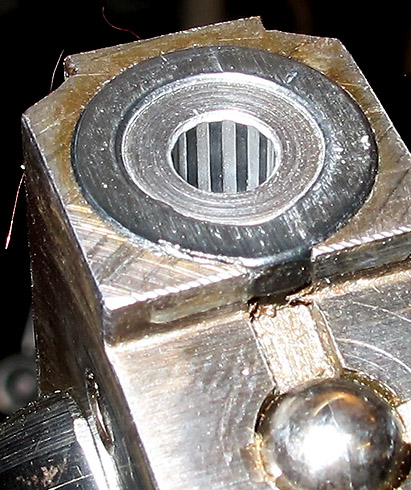
Tuning a springer like the 127 also means deburring and smoothing the steel parts that are in contact. I tend to do less but others tend to do more. This rifle was tuned by one of the “more” guys.
The surfaces of this cocking slot have been deburred and smoothed. This is clear evidence of aftermarket tuning.
Piston seal
The guy who sold me the 127 thought the piston seal needed to be reduced in size, but when I slid the piston out of the spring tube it was clear that the piston seal is either just right or it borders on being slightly too small. It is certainly not too large. Let me show you what a proper seal fit looks like.
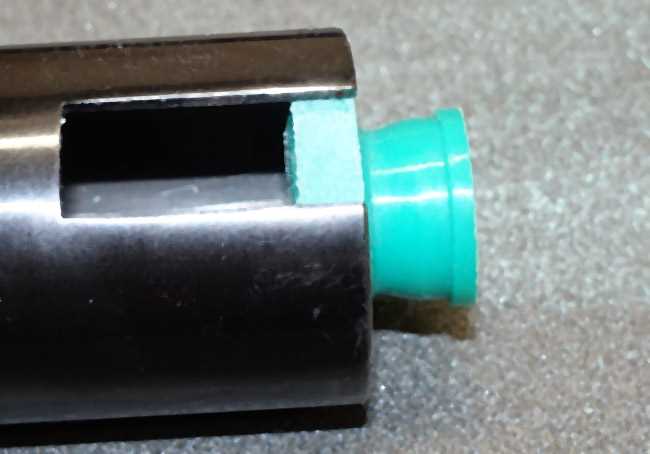
This is the piston seal I sized for the last FWB 124 I tuned. When it fits the spring tube like this, it’s sized correctly. If it was too large the seal would be distorted or folded at some place. After the seal sides are lubed with moly grease it slides smooth and tight in the tube.
The 127’s piston seal is sized correctly and also lubed as it should be.
Next
Now that I knew the condition of all the parts, I was able to place an order for parts. Fortunately for me it was just a mainspring and a breech seal. I ordered them last Friday and they should be here in a week or so.
My plan is to clean out all the black tar grease and then install the new spring and breech seal. I’ll show that to you. I will lubricate everything with TIAT and moly grease and then we will test velocity again.
After that we’ll look at accuracy and, if necessary I’ll do something with the trigger, though really I don’t think it needs it.


Tom,
Was there any preload left with that shortened spring?
Siraniko
Siraniko,
Yes, about 2 inches. A factory spring would have been 4-4.5-inches.
BB
BB,
Just a personal thing, but I would be most hesitant when retuning this to bring the power up much. I would clean the bore, replace the breech seal and use some TIAT on her, but be most hesitant about putting a stronger spring in her right away. I myself would be more concerned with tightening up those spread numbers.
Then again, I do have that lower power tuned Diana 34 which is likely to become my new “peanut eater”, so I might fully restore this to her old glory and see what she can do.
In my wanderings about the internet to see what else there is to see, I came across what Barra had at the Shot Show.
I saw their version of the JTS StealthHawk, the tacticool styled Barra 250z. They will also be offering their 1100z packaged in a nice Turkish walnut stock. This really is going to be exciting this year for most of you airgun folks. How in the world will BB get around to showing us all this stuff? I just might have to send him my round tuit.
Vortex or JM, that is the question. I prefer JM myself.
David Enoch
ARH is THE preferred sproing maker, most especially since he will make what you want.
RR, I believe Votek may also make springs to order.
RG,
You may be right. I for one do not know for sure. At this point in time, I will not argue with anyone concerning this.
Another interesting report, thanks! The rifling we can see in the photo of the breech seal is intriguing. With the light grooves and dark lands, it reminds me of the rifling in the most accurate gun I have (the Baikal 46M). This photo also show the flared muzzle (which apparently isn’t included on the newer Baikal 46M guns). I suspect that a good cleaning of the Baikal pistol’s barrel would make the lighter colored grooves stand out (like the ones in the FWB 127 do). Anyway, I am curious about the dark lands, it almost looks like the bore metal was blued before the rifling was cut. But that makes no sense to me. Any information on how the rifling on these two guns differs from most others might be something to consider regarding the accuracy.
Elmer,
The lighter colored grooves are lead deposits.
BB
Thanks, that makes sense. Would a thorough bore cleaning change the appearance?
Elmer,
Please read that picture’s caption.
BB
Thanks, so that’s how you could determine the bore needed cleaning. Nice to know!
Lead fouling/buildup in the bore is one way to determine if the bore needs cleaning. Another is when accuracy falls off and all other potential culprits have been eliminated.
Must assume that Crosman Premiers (hard pellets with antimony added to their composition) are partly to blame for the fouling in the bore of this FWB 127 since they were the darling pellets in the day that this FWB 127 was a youngster.
Kevin,
Some few air gunners might want a visually clean bore no doubt; but i would only clean a bore for your well considered second and best reason. ;^)
Well i guess if a gun fell in saltwater, mud, or some other dirt i would wash it out with boiling hot water.
The old saw about more barrels being ruined by good intentioned cleaning is way too true.
shootski
I have an off topic question:
I use Pellgun oil in all of my pumpers.
I recently read that Pellgun oil can leave a “red crusty residue” if it dries up.
I am not trying to start another airgun oil debate, but I am just wondering if there is any real concern – has anyone experienced this “crust residue”?
Thanks
Jeff
FWIW, here is my 2 cents (probably about what it IS worth): when I was 8, “about” 40 years ago, I had a Crosman 760 pumper, which got a LOT of use for a few summers, and I faithfully oiled the pump with pellgun oil. By the time I was 12 and hunting small game and deer with Dad, I “graduated” to firearms, and the airgun slept in a drawer in an oak chest in a damp basement. Recently, I got it back and the seals are shot and the barrel is a rusty horror. I have taken that gun all apart to small pieces and no crusty red stuff was found. Again, 2 cents’ worth.
Thank you for that. Certainly if Pellgun oil was going leave any red residue it had plenty of time to dry up in your drawer. That’s good to know.
Thanks,
Jeff
Jeff_290,
Almost all of any lubricant you put on a pumper wipe gets sprayed out of the barrel before to long.
If you were to have a falloff of power it might be found at the end of the compression tube and easily cleaned out with a properly sized wooden dowel with a Nylon stocking wrapped around it…just don’t use a women’s new stockings! That tip is from Tim at Mac1 Airguns.
shootski
PS: It really has very little to do with Pellgun oil or even Tim’s Secret Sauce.
Thanks for the info, shootski. I tend to get too caught up in the discussion of airgun lubrication and which one is best.
Jeff
Off Topic,
My Black Bunker BM8 finally arrived. Most inconspicuous packaging. A flat square box.
I think I’m going to try and create a new term … “Real Steel Composition” material. Rock solid stuff and probably the same stuff used in firearms. Extremely well detailed solid material.
OK, mine came with the threaded muzzle and cap. The pictures in BBs first blog may have been an early prototype. No barrel protruding and no release lever in the stock. The pic with the bayonet has a much smaller / shorter barrel then mine, dah, probably a .177.
My first, and only, uncleaned shot, in the dark, was like a .22cal short bullet fired. Serious shooter here. Premier 14.3gr. Hollow Point. I did not shoulder it shooting into the dark but the weight distribution seemed to reduce any recoil. Nice to shoot.
Be careful breaking the barrel open when the link to the gas piston is disconnected. It will fly all the way open fast without any resistance behind it. The metal finish / bluing is very well done, but not like a TX200 for sure.
The stock pivot pin location makes for an unusual feel when gripped but improves as the trigger slack is taken up.
That one shot I took, felt like I was taking up trigger slack and then it fired. Not sure what to think about that for now, one way or the other. Not much resistance there. No stage two? Need to check it out more. Could be nice if you get used to it. Don’t pull till you want to fire it?
The material surrounding the barrel, looks a bit different in its configuration and can probably be removed but it may retain the pivot pin for the gas piston link, and you will have a protruding sharp barrel block exposed, and no front sight. Think I will leave it alone. The side rails are right where I want to hold the fore stock so I may pad them or remove them and add some side rail adapters to the top. May do both and widen the grip area to reduce the felt weight which seems to be centered right there as well.
I like powerful black Tac-T-Cool airguns so I’m very happy with this one so far. YouTube accuracy videos have been impressive, especially for the price. Not exactly a one-hole wonder but it should do well enough.
Bob M!
OW!
That was me out there in the dark distance, right in the LEFT NALGAS/CULOS (BUTTOCKS!)
All joking aside, no release lever… So how does it unlock from the triangle configuration?
shootski
Shootski,
Like BB said it was probably foto shopped out, or just not installed at the time. There is a spring-loaded hook on the other side of the release lever inside the butt stock bottom that catches a pin in a slot at the bottom of the fore stock. The opening in the bottom of the butt stock is big enough to ‘swallow’ the cocking link and half the fore stock so the hook engages the cross pin to secure it. Without the release lever you can’t lock it up triangulated.
However … if that release lever should break off and still leave the hook engaged, you would have to punch out the hinge pin holding it in the stock. Easily accessible. It is well protected in the stock
You don’t really need the storage case to fold it up. It just fits in there unattached, and you can carry it using the opening in the stock just behind the pistol grip area as a handle. And it locks up tight, no looseness. Preferred anyway.
I will hold off on pictures and too much more info so as not to interfere with BBs next blog on it.
Another point. I actually prefer to wrap my middle finger around the butt stock hinge, under the trigger guard, instead of the grip itself, feels better and may help support it with an Artillery hold.
I also attached some UTG Weaver rail rubber protection covers on the sides and it really fills up the palm for more comfort.
Bob M,
Thanks for clearing that up and the first impressions report; i’ll bet it even helps Tom decide what to do in his future blogs about the Black Bunker BM8.
Glad the road was passable for the Delivery Truck and hope you get lots of good outdoor days to shoot and have some FUN!
shootski