This report covers:
- Pioneer BB gun
- Copy of a copy
- So I did
- Front sight for Slavia 612
- No problemo
- Problemo!
- Small drill bits walk
- Whew!
Today I will come “somewhat” clean on a couple of the little fix-it jobs I either have avoided for a long time or flat-out don’t know how to do.
Pioneer BB gun
The American Bicentennial in 1976 was a gala year-long celebration. I was in Germany at the time but I heard about it. Grand parties were held and everyone was euphoric that the nation held together for 200 years. There was no end of special bicentennial commemorative items available. Even the airgun community had one, the Pioneer model BB76 BB gun.
Copy of a copy
The Pioneer model BB76 BB gun was a copy of a Miroku percussion muzzleloader that was sold in the U.S. at this time. The Miroku was supposed to be a copy of the sort of gun that won the American Revolution. Nothing like the Miroku existed in the USA in 1776, but the public didn’t seem to care so they bought both that rifle and the Pioneer as well.
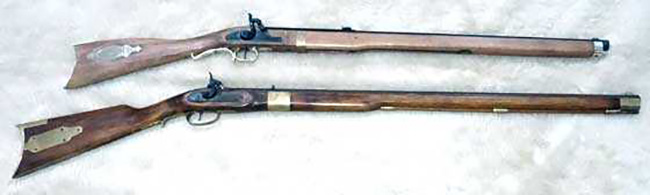
The Pioneer (top) and the Miroku rifle it copied.
I started a test series on this BB gun for you in May of 2019. In a comment to Part 1, reader Michael said, “No spoilers from me, but if you have any Marksman Premium Grade Steel BBs (not the Marksman Laserhawk BBs), would you try them in this gun? If you don’t have the Marksman Premium Grade BBs, could you get a rush order of them? :^)
So I did
Here is what I wrote in Part 2 of that report, “I was contacted privately by a reader who told me that the new Marksman Premium Grade steel BBs measure a true 0.177-inches in diameter. I find that astounding and a little hard to believe, because that would make them too large for many BB-gun barrels, I would think. They should also weigh more than 5.1-grains if they are really larger.”
I ordered the Marksman BBs and discovered that they are indeed larger than regular BBs. I measured them as 0.176-inches/4.47mm diameter. And guess what? The first one I fired fit the shot tube of my Pioneer BB gun rather tightly. So tightly, in fact, that it’s still in there — wherever “there” is. You see, I misplaced the shot tube for that BB gun and in the five and one-half years since that report series was written I haven’t located it. Unfortunately for me, it is unique to that gun only.
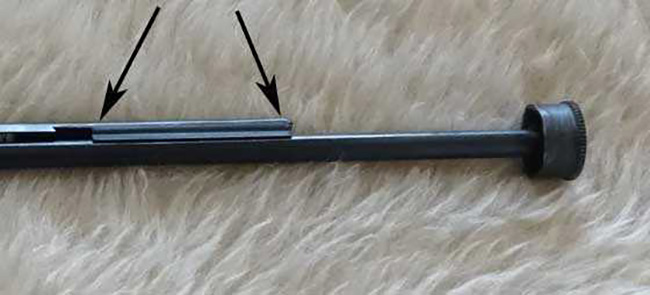
The Pioneer shot tube is a 50-shot forced-feed affair with the coiled spring sitting in a short extension above the loading hole (arrows). It is unique and unlike anything Daisy ever made. Pay attention to that short extension where those arrows point.
I looked for the Pioneer shot tube but all I found were Daisy 25 shot tubes. They look similar and they even fit inside the Pioneer, but they don’t work. I first checked all the shot tubes in my Daisy 25s and then I found all the spare forced-feed shot tube I own. They are all Daisy 25 tubes.
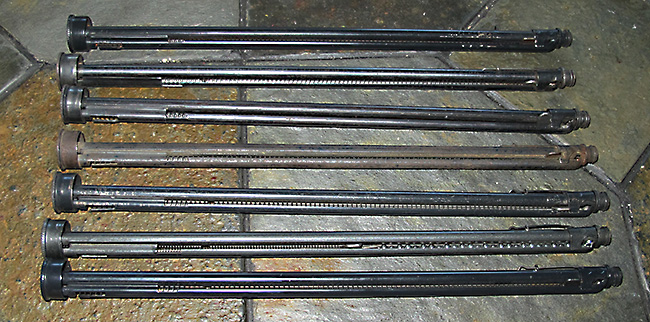
My collection of spare forced-feed shot tubes are all for Daisy 25s.
When I find the Pioneer shot tube again I need to knock the stuck BB out. I have tried and failed before — several times. So that’s a project waiting in the wings.
Front sight for Slavia 612
In January of 2024 I showed you the Slavia 612 airgun. It’s a youth-sized smoothbore breakbarrel that I got to shoot darts in. Two problems with that. The front sight is too low and it’s also twisted sightly to the right. At 12 feet the darts hit two inches high and two inches to the left.

No problemo
Fixing the sight should be easy — right? All I have to do is raise it a little and move it left. How best to do that?
I could just use epoxy putty to build up the sight, but the post is so small that I fear I’d be asking too much of the putty’s strength. So I thought to drill a small hole in the sight and insert a steel post to form the putty around. Yeah — that sounds like a good idea.
I watch the British TV show The Repair Shop and those guys are always fixing things that way. Now — how best to drill that hole?
I know! I’ll use a Dremel tool in a drill-press fixture. What could go wrong with that? So I bought a drill press fixture for my Dremel.
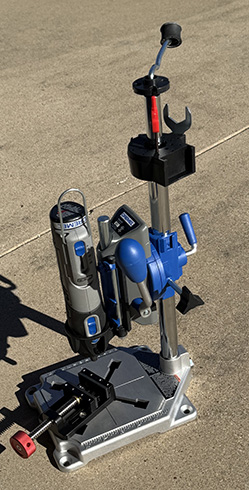
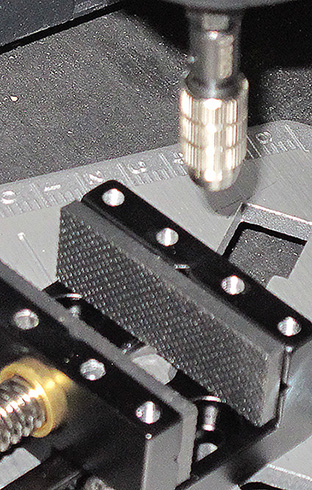
This drill press fixture holds a cordless Dremel rotary tool.
Problemo!
The tip of the front sight is tiny! I filed it flat to be able to drill into the flat but I didn’t have drill bits small enough. So I bought some.
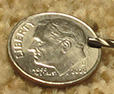
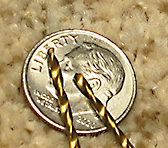
The largest of my tiny drill bits. These puppies are for drilling into jewelry.
Guess what? None of the collets for my Dremel tool are small enough to hold those tiny drills. I know! I’ll get an adjustable chuck for the Dremel that adjusts down to 0.0-inches.
This tiny chuck fits my Dremel tool and adjusts down to 0.0-inches. It will hold the tiniest drill bits.
But wait — what will fit into the tiny hole I drill — a wire cut from a small paper clip? Is that strong enough?
I know! I’ll buy some 1/16-inch-1.585mm drill bits and cut one off to fit into the hole after I drill it!
Sixteenth-inch drill bits are larger and stronger than the tiny jewelry bits.
Small drill bits walk
It took thirty minutes to align the dimple in the Slavia 612 front sight tip with the tip of the drill bit so I could drill it. But even with the Dremel turning as slow as possible the drill bit walked off the work as soon as any pressure was applied. I even turned the bit by hand and it still walked.
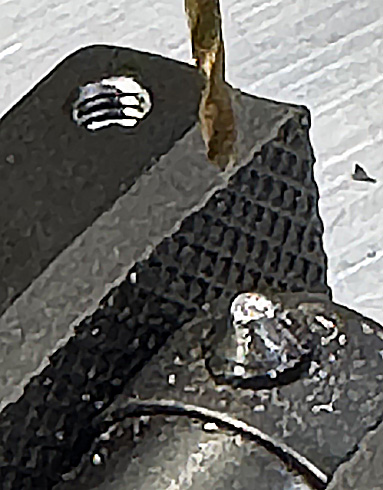
Even set to the slowest speed the drill bit walked off the tip of the front sight when turned.
I will file the front sight lower which will make the work surface wider. And I’ll use an adjustable pin vise/ hand held drill chuck to hold the bit.
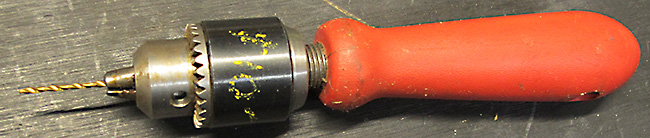
A pin vise will hold the drill bit on the next attempt.
Whew!
That is just two of the many jobs that await my round tuit. And don’t forget — I have to get a blog written five days a week. So it’s more than just the work. But at least most of my precharged pneumatics aren’t leaking down. Oh, wait — yes they are!
Tell me yours
Okay, I told you about mine…


BB,
Drilling tiny holes can drive you to distraction. First, set up everything as rigidly as possible, then use a center drill to make a dimple in the metal so that the drill point won’t ’walk’ away from where you want it to go. Look online for the proper rpm for the type (HSS, tool steel, carbide) and drill diameter. Oh, don’t forget cutting oil & don’t try to feed too hard.
If you’ve done everything right, plus a little smidgen of good luck, you should have a properly drilled hole!
Welcome to the world of drilling little holes! (And the smaller they get, the more exciting it can become.)
Have the best day that is possible!
Bill
billj,
WOW! You have posted my thoughts! See below.
I forgot the technical term DIMPLE…LOL!
shootski
B.B.,
For drilling sight post: Setup is key to success; nothing can be allowed to move even a tiny bit out of alignment. Use the sharpest and smallest point metal punch to make a dent centered on the sight to start the drill bit in. Use a cutting oil/paste; your Three-in-One will work. Light pressure and slow speed that increases as the drill begins to cut.
One question. Are your bits rated for the hardness of the metal you intend to drill? You indicate they are for drilling jewelry…mostly made with softer metals.
shootski
shootski,
The tiny bits are made of tool steel. Yes, the work was dimpled. But there is some vibration in the chuck, so it doesn’t turn evenly and is one of the problems.
The 1/16 bits are carbide. I hope the pin vise will help.
BB
B.B.,
May a skilled Elf sit on your shoulder and guide your hands!
shootski
Shootski
It IS nearly Christmas. Were he to lay a proper trap to catch the portly, bearded old guy ( not himself or any of the rest us Santa resemblers) he might ransom him for an elf or two, thus solving his hole making dilemma.
Ed
edlee,
Ed, I think i still have a couple of the Elf on the Shelf® in the store room.
I should send them to Tom. ;^)
He said he was going to use his pin vise which means he will need all the help he can muster.
Just noticed. There are a lot of he-he-he-he in the above sentence; definitely needs the Elves!
shootski
B.B.
Denny to the rescue?
-Y
Tom,
Roundtuits take a backseat to Honeydoos. Have to finish up the latter before I can do the former. Sometimes the stars align and the Honeydoos can only be done when I have done the Roundtuit.
Siraniko
Siraniko,
It is obvious by your post that you are quite familiar with round tuits.
RidgeRunner,
Eventually may mean tomorrow, next week, next month or maybe next year. The difficult we do at once. The impossible takes some time.
Siraniko
Siraniko,
I seem to frequently encounter the impossible.
I agree with billj and Shootski. Make the dimple where you want the drill bit to go. That should help a lot.
My gun collection continues to grow. I need another gun rack to keep some of them in. I bought my first gun rack but plan to make my own gun rack this time. Just have to get a round tuit…
BB,
My latest round tuit is the diminutive Falke 50 I picked up at the NC Airgun Show. I had promised to tell everyone of my escapades and so I shall.
I have bits that are .05mm. For putting holes in rocks. You know, for Lapidary purposes.
I received a Micro Hunter yesterday. This ‘project’ will put every other project off the stove, not even on the back burner!!
Not gonna be putting any teenie tiny holes in anything! Well….except maybe what ever is in front of the RAW.
Breeze,
Do you also cut cabs?
BB
BB,
I don’t think that drill press thingy is going to get the job done for you. Any movement/flex/walking on a drill bit that small will be a mess. I’d just mix up some JB Kwik, form up a sight, then finish my coffee and be done with it. Call it a mk1 prototype.
Derrick,
Yeah, I thought of that. Or epoxy putty. But I’m stubborn enough to see this thing into absurdity at least!
BB
I’d use an epoxy that has a metal filler and a quick setting time.
The Versachem Titanium 5 minute epoxy is looking interesting.
I can.
If Miroku had wanted to create a musket truly representative of a Revolutionary War piece, they shoulda made a flintlock version, right? The company, probably rightly, must have realized customers would have found shooting a flintlock a bit too challenging.
Still recall the hoopla about the Civil War Centennial; little FM got caught up in it and managed to talk mom & pop to let him have a kiddie percussion musket and pistol, made by Kadet in Parris, Tennessee – these could shoot cork balls powered by toy gun caps with enough force to knock down the rubber Civil War soldiers valiantly charging FM’s position.
Still have the pistol. The musket was accidentally left behind in a move, much to the young “re-enactor’s dismay.
As for projects, Round Tooits, lost parts and such, my sympathies Tom. Still have not gotten around to assembling a 1/9 scale VW Kübel model Mrs. FM gave Worser Half about FORTY years ago; as it is fifteen of those years it spent lost in the Casa FM attic.
FM,
I just looked on ebay and found several of the Kadet pistols and muskets listed for sale. With a PayPal account, your dreams can still come true.
Will have to check that out, if only for nostalgia purposes. 🙂
BB,
May be too late.
Yes, Center punch hole location. Do not overheat a Carbide drill bit by rotating it too fast, very slow. Also, try to leave the smallest amount of drill bit exposed from the chuck. Small hard drill bits break easily under pressure, especially if the driver is much larger and obscures the bending of the drill bit.
Let the drill bit cut with the lightest pressure required for it to cut. Start with short slow burst of drilling to ensure the drill bit is not wandering off. Re-center punch as required.
I only use oil for cooling, deep holes or repetitive drilling. Not for starting the drilling process. Establish hole first. Try spinning the chuck by hand, or small vice grip, to start the hole with light pressure on the Dremel.
I believe Dremel’s spin too fast for drilling. Reason it keeps walking around. Go SLOW.
I only use hand driven Hurdy Gurdy Type drills on aircraft and now most everything that requires precision.
In the field anyway. Otherwise, a solid drill press is a must. I can get by with a portable electric drill alignment tool. Port Align or something similar. Good Luck!
Bob M,
As you have noted, a Dremel is too fast.
Denny may have a slower and steadier drill press, but not our fearless leader. I think we are lucky to have him acquire a Dremel press. If he talks real nice to Denny, he might get the front sight of the Slavia fixed.
Words of advice,
You know, I never really considered myself a professional mechanic. I never stopped learning, and the term generally refers to a wrench turner. My Airframe and Powerplant license says I am, but the job covered far more than turning wrenches, especially when you throw in Avionics, Electrics and troubleshooting complicated systems.
Technician is the word that best describes it and that probably would cover being a mechanic for over 40 years.
One thing I have learned is power tools are not your ‘friend’. They are ‘time savers’ and should only be used by professionals who know exactly how to use them to avoid destroying things. An unregulated power tool is an item of destruction. If you have any make sure you fully understand how they work and how to use them. Especially when it comes to torque power and speed being applied.
You don’t need an unregulated 1/2″ drive air impact wrench if you only change a tire once every couple of years. A universal lug nut wrench or something that gives you added leverage will help keep you from stripping out threads.
And speaking of leverage, make sure you use the hand tool designed to work with the size of the hardware you are working with. A 3/4″ drive ratchet using two adapters to downsize it to a 1/4″ drive socket is a wreaking bar. The term “Adapter” means you are using something that was never intended for that particular purpose. Just stop and think about what you are about to do and take care… like pushing on a wrench when something ahead of it will smash your hand if you slip.
Bob M,
Words of Wisdom borne of training and experience.
I carry a breaker bar/tube in each of my vehicles.
I have never needed to use it on my wheel lug nuts since i use a torque wrench to instal and then check them. I have used them any number of times to save motorists along highways and byways who have had “garage monkeys” use impact tools to install their wheels and are now unable to remove lug nuts/bolts with the OEM lug thingies.
shootski
Me too. The tire irons that came with my vehicles were only 8 inches or so long. Not long enough to provide sufficient leverage.
My list of projects is very long.
First, I have a couple of Crosman 160 rifles in need of resealing.
Once I have that mastered, I will tackle resealing the AR78.
Third, I have a Crosman 111 and 112 also in need of resealing, but I need to figure out a convenient and cheap way to bulk fill them. I’m looking at my case of 500 or so powerlets and I think an adapter is the way to go.
Then I have the (new to me Disco) that I will need to reseal and start playing with.
There is the Diana Winchester collection, all of which will need TLC, chronographing and pellet testing.
Finally, there is the newest resident: the SigAir ASP20 .22.
But before we begin, I am converting a cedar closet into a gun closet.
Roamin Greco,
The Benjamin Discovery will be a joy to shoot…make it backyard friendly with a DonnyFL muzzle fitting(s) and suppressor; I recommend the Tanto, Tatsu, or Sumo.
Congratulations on the SIG ASP20 .22 Caliber!
Synthetic or wood furniture on that SIG ASP20?
Shoot it at least every month and your Gas Spring will thank you for a long time. Ed Shultz said that the ASP 20 powerplant benefit by not having the Piston Seal “welding” to the compression tube if you follow the use it plan.
shootski
Wood. But it was a good deal at an online auction. I couldn’t let it get away, since the last couple I saw sell on eBay were a lot more. The shipping cost was more than expected, but them’s the breaks, I guess.
I put a few pellets through the chrony, and it averaged 800 fps with JSB .22 RS pellets with a 2 fps standard deviation!
Does anyone out there know what Vintage .22 caliber Beeman Silver Jets and .22 Mount Star Jets (domed) weigh on average?
Roamin Greco,
I have a box of .177 Silver Jets. I don’t remember them in .22 caliber.
shootski
BB,
The sad thing about “Getting around to it” is that when you finally do, you may be pressed for time, and think you’ll squeeze in a task, but actually wind up rushing it, and, in my case, doing stupid things!
Months ago, my .22 Haenel model 1 died when the leather piston cup fell to pieces (hey, it was 83-years-old!).
I took the action out of the stock, built a spring press (which it turned out I did not need…no preload!), then let things sit for…months. On day, I had a small amount of time; hence, I figured I’d take off the end cap.
Like a dummy, I was working off an inaccurate diagram for this air rifle: it showed a threaded endcap, but did not show that the threaded lug to which you screw the stock is also male-threaded on the other end to screw through the receiver and into the endcap. Why didn’t I pop that lug off? A half-second of thought would have told me: “the lug has to protrude into the receiver; the receiver itself is too thin for it to be threaded through that alone.” But, I was in a rush, and “got really stupid”!
I put the receiver in a vise, applied pressure to the endcap, saw the match marks move apart a bit, and applied more pressure…then I saw the lug twist at an angle, and I was like, “stupid dave, stupid!!!”
I was able to get the lug out, and the endcap off…but it was sad! Here’s the write up from my friend, Gary:
“The beginning 5 or 6 threads had been crushed, rendering the air cylinder inoperable. Using files, thread chasers, a thread cutter, and brute strength, was able to repair the end cap so it would easily screw into the air cylinder body [note: Gary is a firearms gunsmith, not an airgunner, that’s why he called the receiver that; he repaired this as a favor for a friend…great guy!…thank God for him!). The leather air cup screw was damaged [half was broken off, but I did not find it in the rifle] and was replaced. The air cup was installed and it being returned to Dave soaking in oil to soften it as necessary for installation.”
Thank God for good friends like him! I WILL take my time on the re-assembly!
I wanted to show my operator-damage-due-to-rushing-instead-of thinking in the hope that it may prevent someone else from doing the same. 😉
Blessings to you,
dave
P.S. Here’s the parts as I got them back from Gary…nicely done! 🙂
Dave,
Thanks for coming clean! You have no idea of how many things I have screwed up in a similar way!
BB
Thanks, BB; that does make me feel a bit better, LOL!
Around to it.
Shootski, you are more professional than I using a torque wrench on wheel lug nuts, but I believe I have developed a calculated elbow for some jobs and the torque range is not that critical sometimes. However, the risk and liability would demand it for a customer or on the job. And certain custom wheels as well.
Since I retired, I find myself guessing the size of nuts and bolts instead of knowing by sight.
I have a handful of Crosman Mk 1 & 2’s to rebuild, under lever linkage on an M1A and my FX Independance now, the pump handle locked up, but all the rest are relatively new.
Unfortunately, I have not planned for many life changing events and unanticipated problems in my future. Operating on the assumption that I can fix almost anything has led me to accumulate an overwhelming amount of things to do and airgun repairs are not high on the list.
And now old age has entered the picture with lots of Round 2 Its needed to deal with it and prepare for the future. It all changes now. Time to unload.
Bob M,
As you may remember i own two SAABs, Classical collector vehicles for some but a joy to drive for my wife and i, they are going to be 1/4 century old soon; one is a 9-5 Aero with BBS wheels and the other a 9-3 Viggen with some of the few Viggen specific wheels that are still round with no run-out either radial or lateral.
FYI: The radial runout causes wheel hop but the lateral runout causes wobble and a great deal of damage to the entire suspension; may even cause a wheel’s lugs to loosen and eventually fall off. One of the key culprits of wheel runout is improper tire mounting (radial runout) and the other is lack of correct and even torque values on all lugs or bolts/nuts (lateral runout) in the rotating suspension elements.
I learned all that technical stuff from my EMPI split rim racing mags on my Porsche engine powered Karmann Ghia back in the late 1960s.
As far as getting older we should have learned to say this more often; No, you must learn do that on your own; i will help you as and if i can.
shootski
shootski,
In my younger days, I spent a few months working as a temp at the Saab headquarters in Orange, Connecticut, USA. Interestingly, every worker there was given a Saab to drive; then, periodically, their cars would be taken in for inspection (and they would get a loaner in the meantime) to see how they were holding up. The employees there were SO grateful for basically getting a free company car to drive. 🙂
Blessings to you,
dave
P.S. By the way, no free car for me; they were only for regular employees, LOL!
thedavemyster,
Ah! The Western SAAB “Mecca” only Trollhättan is more revered:
https://saabcarmuseum.se/en/
A forever curse on the involved General Motors leadership; May their personal vehicles breakdown at all of the most inconvenient of times OFTEN!
shootski
Roger that, LOL! Merry Christmas to you! And thanks for the cool link. 🙂
Bob,
I am reminded of the manuals produced for British machinery (mostly produced in the 1930’s through the 1950’s or 1960’s). “Tighten sufficiently” with no torque specs, scared the heck out of me. I would cautiously snug fasteners up, only to have one of the ‘old hands’ come over to say- “Do you want that thing to fall off?” and tighten it some more. Eventually, I got a feel for it.
What I did fear, was what was told to me by a motor pool mechanic while I was on active duty- “You know what a field expedient torque wrench is, don’t you?” “No.” “It’s easy, just tighten it until it strips and back it off a quarter turn!” (That made me extra cautious in driving anything that he had worked on.)
I think that I left my Round Tuit on a Block of Time, down in the shop. I must go look for it.
Bill
billj,
So you had some “Garage Monkeys” in your life as well!
My Father-in-Law could never pass a screw, nut, or bolt that couldn’t use some tightening. He tightened one of the bolts in his RV drivers seat that was loose…it was too long and at the top of the wheel well. …the occasional bottoming caused a radial groove CUT into the front left tire (USA) down to the cord when i found it after they had driven across the entire USA. Also not a single clearance lamp cover wasn’t cracked and the double roof was being held on by gravity alone since all the fittings had been pulled out of the body.
It didn’t end there but this is too much non airgun stuff already; he also needs to be allowed to rest in peace.
shootski
I still remember the first time I tried to rotate the tires on my little Miata, four hours and much aggravation later the job was done. The steel lug nuts had corroded against the aluminum rims. Then to be more difficult the steel of the brake disc against the aluminum rim making hard to remove even with the lug nuts loose. I had to use the weight of the car and bounce the suspension a few times to break the bond.
The problem was I had forgotten the rule my dad had used when getting a new car or tires. Remove one lug nut at a time clean and the lubricate, then tighten. He used old motor oil for lubrication. I changed that to anti-sieze and a torque wrench but the basic goal was to prevent the corrosion between the lug nut and the rim, with the change from steel rims to aluminum rims this is only makes the corrosion problem worse.
Sometimes you have to re-learn how to get things done.
Mike
bmwsmiley,
I polish my steel lug bolts and chase the threads each Summer to Winter four tire/wheel change; yes all four even though both our SAABs are front wheel drive. If the bolts are longer than specification by even a bit (thousandths) they are disposed of and replaced with new.
I also use anti-sieze very sparingly just as you do.
shootski
BB,
Sorry for making a left turn with the blog but a lot of us seem to have a lot in common and it doesn’t take much inspire additional, somewhat off topic, comments.
Galvanic (Dissimilar Metal) corrosion. White grease lightly spread around between the parts may help slow down or prevent it.