by B.B. Pelletier
Blog regular Fred PRoNJ is back with another great guest blog that’s actually a follow-on to his previous one, where he tested several of his guns for accuracy.
If you’d like to write a guest post for this blog, please email us.
Bloggers must know how to take clear photos and size them for the internet (if their post requires them), and they must use proper English. We’ll edit each submission, but we won’t work on any submission that contains gross misspellings and/or grammatical errors.
by Fred Nemiroff, aka Fred PRoNJ
I really enjoy shooting the Benjamin Trail Nitro Piston Hardwood air rifle. The cocking effort is relatively light for the power it produces (18 ft-lbs of energy), recoil is mild and it’s light. I can shoot this until I get bored, but I really wanted it to be as accurate as my spring-piston rifles. I know beans about accurizing a rifle, so my first cry for help was to this blog. I’ve never heard about crowning or recrowning a barrel until our blogger participant from Russia, duskwight, mentioned the “recrowning kit.”
Brian in Idaho, a fellow Three Stooges fanatic, told me about the trick of lapping the chamfer of the crown with a brass screw and polishing compound. It was either BG Farmer or Chuck who told me not to be concerned about ruining my barrel, that anything I did could always be salvaged.
Doing searches on the internet resulted in recrowning kits for sale — but for $360 and up. The kit consists of a reamer, a handle and a pilot that fits in the barrel so you keep the chamber and crown concentric and at a perfect right angle, respectively, to the barrel. No thanks. Then, I stumbled upon a YouTube video made by Larry Potterfield of Midway USA firearms supply, and I was off.
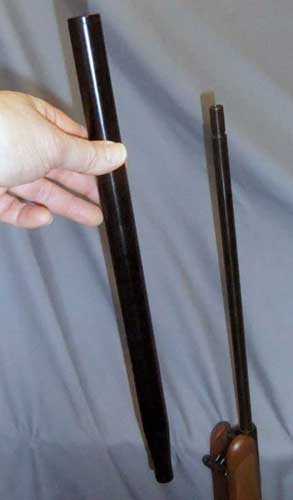
The first step was to remove the shroud from the barrel. Here, you can see that the muzzlebrake has a hex fitting:

Fitting an Allen or hex wrench into this and holding the stock tightly, the shroud unscrews in one piece. This shroud has a crown and chamfer and looks pretty good to my untrained eye.

Loosen and the entire shroud comes off.

That barrel is pretty ugly.
Now that I had the shroud off, duskwight had suggested I try shooting the rifle, as I might be pleasantly surprised. Nope. This is the target without the shroud:

I kept shooting pellets to see if I could achieve some type of group.
Here’s a close-up of the barrel crown and chamfer. Look closely, and you can see all the tool marks, especially on the chamfer in the barrel. Would fixing this really change anything?

See the circular grooves I’m referring to?
What you can’t see is that the crown is not perfectly flat and perpendicular to the barrel. Three passes with a mill file removed bluing on about two-thirds of the surface of the crown but didn’t touch the bluing on the rest of the crown. To me, this meant part of the crown was lower than the rest. Seven more passes, and I was now filing the entire surface.

This is after 10 passes, but notice the machine tool marks at 3:00. It would take 20 more passes with the file to remove this. I tried to enhance this photo to bring out those marks.
After 30 careful passes with the file, the crown was flat with no machine tool marks. I then took a piece of fine grit sandpaper and wrapped it around the file and polished the crown a bit to get rid of the file markings. Next came the chamfer.

The crown, much better condition than when new.
Using a variable speed drill and a large, brass wood screw whose head was just slightly larger than the barrel diameter, I dipped it into some ancient valve polishing compound I had in the garage and applied the slow-running drill to the barrel.

Following the YouTube video, I rotated the screw around the barrel for maybe 2 minutes. Here’s the result:

I did not mention this earlier, but I had shoved a piece of rope into the barrel to keep metal filings from falling down the barrel.

Here’s a photo using my DSLR, which gave me a better macro focus. The barrel has been cleaned up and the photo enlarged. To the naked eye (mine, at least) those markings at 12:00 are not visible. I suspect it may just be a reflection from the fill light I was using.
I took a rag, sprayed some Ballistol onto it and wiped the barrel, crown and threads, and down inside the barrel. I then pushed a cleaning patch down the barrel from breech to muzzle and reassembled the barrel. The entire operation took less time than typing this article. Now, for the test. Had I screwed things up?

The first shot, the one right in the X-ring, is my “fouling” shot. The next 5 produced that group which is .46 inches end-to-end. The center-to-center measurement is .24 inches. It’s right in the area of the expensive German rifles.
Later on, I shot another group that was .415 inches, which would translate to .195 inches center-to-center. Hmmm, I wonder if I could improve my other rifles? That Discovery wasn’t too impressive.

It worked! How cool is that? When one successfully modifies equipment in this way, it can only deepen ones connection to it. Well done. So, what is a mill file, and how did you keep the crown perpendicular with the bore?
hm
A mill file is a American pattern file that tapers slightly in width over it’s length, but is the same thickness over it’s entire length. It is a single cut file, one edge may be smooth. It is the general purpose file found in most hardware stores. If Fred has mastered the art of filing things flat and square with another edge or bore, he is doing very well . A man whom that I worked for, who had been trained in Hungary as an engineer, told me that one of the practical exercises that they were required to do as part of their training, was to file a cube . They were supposed to TRY ! to get it as perfect as possible. Filing is an art, an essential to working on guns. Personally ,files are my favorite tools. I have at least a hundered different ones,Robert.
Robert,
The old-time test of filing was to file a cube with perfect dimensions and perpendicularity. I have a friend who filed a one-inch cube that was right to a half-thousandth of an inch.
I doubt I was ever able to file that well.
B.B.
Robert,
Me too, I’m a minimalist, but I have files stashed everywhere, from tiny needle files to large ones.
Ah, this talk of files brings back some shooting memories. I was talking to my high school coach about a handstop that wasn’t working for me, so he said, “Just file it.” Without thinking, I blurted back, “Why would I want to file it?” (Thinking of the abrading tool.) He was a temperamental guy and his eyes flamed. He looked into the distance and took a long calming breath so as not to explode into a shouting rage. Then, when he had regained control of himself, he said carefully, “Put it away, so that you have it later when you might have a need for it.”…
But I should give him credit for patience too. When we were looking for something in a storeroom, I raised up a sort of hatch that opened sideways, and he backed smartly into it, ramming his lower back onto the edge of the hatch. Ow. But he didn’t make a big deal of it.
Matt61
Hey, this link came up on another forum today, and it caught my eye. Lot I never knew about how they made files in the old days.
Link:
http://www.hrionline.ac.uk/matshef/unwin/MSfilecutter.htm
With any kind of recrowning project (air rifle or firearm) is the angle/depth of the chamfer significant?
There are a couple different angles that are commonly used, but I doubt that it makes much difference.
Depth of the crown only needs to be deep enough that it goes into the grooves. About all deeply recessing a crown does is to help protect the crown right at the end of the bore in case the rifle gets dropped muzzle first.
I have recrowned a few and only lap in just enough that the lap has clearly reached the bottom of the grooves when inspected with a magnifying glass.
twotalon
10 degrees to 11 degrees seems to be the most common angle.
There were firearms experiments years ago with hi-speed photography to determine the optimum angle but, I think those were larger caliber and firearms only tests. Anyway, they came to some conclusions around the 11 degree angle. I would guess that 11 degrees + 0 degrees / – 2 degrees.
Fred….Peoples Republic of…….
You did not say how far you were shooting. However you did get a great improvement in accuracy.
I saw Larry Potterfield demonstrate this method on one of the outdoor channel shows. It is about the best you can do if you cant use a lathe on the barrel.
Those crown cutters can be tricky. The guide has to fit the bore VERY well. Then there is the problem of a choke if the barrel has one. The guide does not have a consistently tight fit when there is a choke, and the cutter will flop around. You still need to lap the crown because the cutter will leave burrs.
Recrowning can sometimes stop corkscrewing too.
twotalon
Great blog again Fred thanks.
I was wondering… I’m almost getting this kind of group at 10m with my NP and I think I’m the accuracy problem here do you think every NP needs the recrowning ? Or is it possible to have a good crown on my NP ?
J-F
JF,
I remember Kevin commenting on one of the blogs here in the comments section that on the Yellow forum, many NP owners were complaining about their rifle’s accuracy so perhaps this is a common problem with this Chinese made rifle. Do what I did, remove the shroud and examine the crown on the barrel with a critical eye.
Fred PRoNJ
Fred,
Good work. I’m actually surprised a crown job did so much, but happy that it did for you. More importantly, you now have another tool in the box, and its the good kind that you can pass on to others without losing.
Morning Fred,
Excellent results. Put me on the list of how did you keep the file perpendicular to the barrel. Thanks!
Bruce
Nice job Fred.
Thank you all for your comments – to answer your questions – the range was 28′, the same as my accuracy testing in my earlier blog. As to perpendicular, I just eyeballed the file and made sure it was laying flat against the beginning crown and not tilted to my eye when I started to file. The passes were slow and very deliberate – not like one tries to file through prison bars in the Three Stooges movies. I probably could have used a square or right angle the way I was taught many, many years ago in high school wood shop, to see if my corners were square but I didn’t think to do that. I was hoping that the crown was perpendicular to begin with and all that I hoped to achieve was to remove the tooling marks that were visible.
TT, when I was looking at those crown cutters, the first thing I thought of was a valve re-surfacing / cutting tool for cars as they are the same – pilot in the valve guide and carbon steel cutter to cut the valve angle. Now I’m wondering if a three or even five angle crown job would make a difference 🙂
Fred PRoNJ
Fred
What seems to be most important is that the crown (the real working part of it where the crown meets the bore) is square to the bore and free of burrs.
Otherwise, what the end of the barrel looks like makes no functional difference any more than a scratch somewhere on the outside of the barrel would.
twotalon
Fred,
I agree with TT, the extra angles would look cool, but wouldn’t be functional.
That burr-free crown being square with the bore is the important part.
Excellent job.
Lloyd
Fred,
This is a task I have always wanted to do myself, so thank you for showing us all how it is done. You gave me the confidence I need to follow in your footsteps.
B.B.
Fred,
Nice report, thanks for a great read this morning. Re-crowning is something I’ve thought of as too risky to attempt but you got me thinking otherwise.
ka
Nice work Fred,
Did you get help form Curly or Moe? I can picture how they would use that file, on Larry’s nose!
A lot of comments recently on these barrels and I’m guessing that your barrel was typical of the lack of crowning or finishing from the factory?
The old brass round-head bolt and lapping compound works pretty darn well doesn’t it?
Fred,
Darn nice job, with results to prove it.
Did you mention what type of grinding/polishing compound you were using?
Thanks for sharing the info.
Lloyd
Lloyd,
the grinding compound I used is/was by Cloverleaf (I have no idea if they’re still in business) and I bought it back in the late ’70’s when I rebuilt the 650cc engine on my Yamaha. It’s valve grinding compound and valve polishing compound (two different grits in two cans glued together) for automotive valves.
Fred PRoNJ
Clover Lapping Compound, 120 and 280 grit compounds (cutting/finishing) , $9.95 for 2 ounce container at Cylinder Head Supply Co. on-line.
LOL- I can’t believe that stuff is still around!!!
Fred PRoNJ
Fred,
You have boldly gone where I never would have! Great job! I’m impressed with your results. Soon, there will be a flood of rifles mailed in your direction. I hope you bought more than one file. 🙂
BTW, the credit for the “salvage job” should go to BG Farmer. I would have said, “ARE YOU CRAZY?!”
=Chuck
I’m not sure what you are saying about me :). If I did anything, which I don’t remember, it was just to give Fred a gentle shove into the pool, so that he could learn to swim.
BGF,
Fred said in his article, “It was either BG Farmer or Chuck who told me not to be concerned about ruining my barrel, that anything I did could always be salvaged.”
I was saying that it was you. You must have been the one more encouraging to Fred than I was.
-Chuck
Chuck,
I know — I just thought it was funny that you said it was crazy, but I talked him into it. Wouldn’t that make me crazy :)?
BGF,
Yes…I was crazy for not thinking you were crazy enough to make Fred do something crazy. But Fred’s been on this blog awhile so we know he must be crazy like the rest of us by now, anyway.
-Chuck
Everyone – send all your barrels to Vince. He’s cheaper than I am.
Fred PRoNJ
A friend of mine – a serious amateur gunsmith – told me about this same procedure quite some time back. I had a B20 with a real serious muzzle burr, but no amount of recrowning like this would take care of it. I finally took to cutting the bore-to-crown edge with a very small triangular file, and that finally fixed it.
Fred,
Very nice work! The improvement in accuracy is dramatic. Based on what you’re hearing from others with NP’s, would you say that this is a problem with these rifles coming out of the box?
Also, I wonder how long one can go on shooting an air rifle before it needs re-crowning (10,000, 100,000, 1,000,000 rounds)? I also wonder what types of pellets might cause faster wear requiring a crown job?
Victor
Victor and Mike,
I don’t know or have the answers to your questions. Just because I did a re-crown doesn’t make me an expert in this area. Sorry guys. I’m still learning like you.
Fred PRoNJ
Fred,
Understood. I’m sure that there are several contributing factors that necessitate a crown job.
Victor
Victor, I would think think that with an airgun it could be never? There are no jacketed bullets in the bore, no explosive and hot gases, no metal erosion as there can be in a firearm and especially larger/hotter calibers.
If the airgun barrel/crown is well mfgd/polished as of now, it should last a lifetime?
Brian in Idaho,
I was inclined to believe the same, but thought I’d ask since the gun that Fred re-crowned was a gun that he shot a great deal. It seemed that the re-crowning might have been necessitated by wear. Just thought I’d ask.
Victor
Victor,
if I gave the impression that I shot this gun a lot, it was not correct. Yes I do shoot it alot but I don’t think I’ve put 1,000 pellets down the barrel yet. So it’s not in the realm of possiblity that I wore anything out. The crown, from my untrained eye, was just poorly machined with lot’s of tooling marks left on the chamfer. Plus when I started to file, I discovered the crown was not perfectly flat or at least within the tolerance of that file’s cutting teeth. The other thing is I’m not sure if the shroud has a seal inside at the end that fits against the crown of the real barrel but there is something at the end there. If nothing else, I helped produce a better seal between the crown and the shroud at the muzzle.
Fred PRoNJ
Fred PRoNJ,
Understood. Pellets couldn’t have been the cause. Yes, clearly, the machining lacked “polish”.
I think you’ve definitely given a lot of us something to think, and be suspicious about (i.e., poor quality manufacturing).
Victor
Fred and anyone else,
Had a steroid tune done to a 392. Came back with good power but bad accuracy. Trying 16 different pellets got me only a 2″ group at 30 yards with rws super points. Sent it back to mac 1 they said the crown was bad. After they recrowned it now shoots none of the 16 pellets very well. The beeman bearcub now shoots the best but only back to the 2″ group. The rws super point group has gone to 4 inches. So the recrown had an affect but the gun is still not as good as I think it could be. So Should I keep searching for a pellet? I’ve cleaned the barrel and tried 3 different scopes/dot sites including the factory open sites. Any ideas anyone? Mike
For what it’s worth, this is a different “Mike” than the other guy who posts here………me.
Mike
Mike,
I had this same problem after a Steroid Streak tune. So I pushed a pellet through the barrel with a cleaning rod and I saw that the air transfer port had a large burr. I returned it to Tim and he took care of it. After that is was as accurate as any Blue Streak, which means about one inch at 25 yards.
B.B.
I just got a 392 and man o man is that rifle hard to pump. I love it but after a dozen shots I am pooped. Mine seems to be pretty accurate with the open sights at 50 feet. The rear sight is strange with its windage adjustment but it did zero out. I like that the rear sight is a little farther from my old eyes, much better to see it. I have not tried anything but Hobbys through it. What do you shoot BB? I have read that super domes work well.
Gene,
I haven’t shot a 392 in a long time, but the scope pumping problem is why the pump-assist 392 was created. You;ll probably pay $500 for one of the ten or so that were ever made.
I used to shoot Crosman premiers, but these days I would try JSB Exact 15.8 and 18.1-grain domes. And I only shoot these guns with open sights.
B.B.
Thanks for that, I shot a few pellets thru it with two pumps into a bucket of water and noticed no unusual marks on the pellets. That work? Mike
Mike,
Yes, it should.
B.B.
Going back to that accuracy blog, a couple of folks asked why I didn’t include the RWS350 that I own. My response was that it didn’t have a scope on it and I thought I wouldn’t be as accurate with iron sights as I would be with a scope. Well, last night, shooting from 28′ away, I achieved a grouping of .439″. Subtracting the .177 pellet diameter comes to a c to c size of .262″. I consider that ‘Mac” territory! And with a hard recoiling, hard hitting RWS 350 to boot. Still, I need to go to 30 to 35 yards for real results.
Fred PRoNJ
Fred, assuming that a gun barrel is a lathe turned part, I’m amazed at the lack of perpendicularity of the bore to the face of the barrel, almost as if it was faced as a barrel blank and the rifling was done as the second operation with no re-machining of the face to match the bore. Oh wait…Chinese and re-machining to match features don’t go in the same sentence, I think?
If so, then I would guess that those threads for the shroud are also off by the same amount of material you removed to make the barrel face flat and perpendicular? Of course, that assumes they indexed off the face before the rifling/bore was done?
Brian,
Unless you pay a lot of money for a barrel, it never touches a lathe. A barrel is drilled, straightened, reamed and straightened again. There may be some stress relieving. But no lathes.
B.B.
So how did they thread the end for the shroud? Don’t tell me it was a die thread!? Ouch!
I guess I have been making aircraft & missile parts at + / – .0005″ tolerances for too many years!
My Tech Force TF79/AR2078 Update
I have gotten a little bored with the standard 10 ring/bullseye targets so, I made a grid type target yesterday to test out the latest tweeks and mods on my AR2078. Made .75″ square grids with one, .20″ diameter “dot” in center of each grid, 6 rows of 8 grids or squares (48 total). I actually think this test is a little tougher than the standard bullseye, as the gun is moving to a new grid square for each shot.
Here’s the results at 10 meters with RWS R10 match pellets, bulk filled gun topped off after each 20 shot string and gun bench rested on sandbags. Targets/holes measured with Starret digital calipers with pin anvils, all are nearest outside of pellet hole to outside edge of .20″ dot. Range is inside garage, no wind, 64 deg F.
15 shots dead center (visual measure only, immeasurable beyond this due to paper fibers, could be off center by .007″/.010″)
20 shots within .015″ of center
7 shots within .023″ of center
4 shots within .083″ of center
2 fliers not called, no contact with .20″ dot, still inside .75″ sq grid, no reason (shooter?)
Here’s what has been done to the gun to date;
1) Bulk fill adaptor
2) Leapers 3-12x X 40 AO/IR scope with med mounts (very fine/thin reticle lines)
3) Trigger components lightly polished and moly added, trigger adjusted to 1.23 lb. pull
4) JB Paste through bore followed by cleaning with moly liquid (don’t ask, it’s some old Govt Mil-Spec stuff I have had for years. Green label states “Liquid-Cleaner-Moly Residual” in usual Mil terminology)
5) Hammer de-bounce device and narrowed bolt probe installed with new o-ring
6) Longer bolt handle
7) .355″ diameter polish of barrel crown (hesitate to call this crowning/grinding, more polishing to remove very minute burrs that snagged q-tip prior to polishing)
8) Adjustable target type butt pad installed
9) Target style bubble-level added for this test
Here’s what I have done to the “shooter”,
1) Had breakfast first
2) Put rum & coke and other libation liquids far out of reach
3) Concentrated on not interfering with steady rest after aligning scope, pull trigger only
Bottom line, I think I was lucky to get an an excellent barrel on this rifle and I do have a very good steady rest/sandbag set-up. The trigger is now like silk with a very crisp break and topping up the co2 at 20 shots makes a huge difference in vertical accuracy. Along with the scope, these are the 3 biggest contributors to this accuracy IMO.
I would sure like to be able to do this same test off-hand or with a sling, but I think I know what the results would be:-( so I probably wont try.
Victor,
Crowns don’t wear out. They are indefinite. They can be damaged-especially by improper cleaning methods, but just shooting doesn’t wear them.
B.B.
B.B.,
I didn’t know that the crown does not wear out because of pellets/bullets, but did suspected that improper cleaning was a contributing factor.
Victor
Fred PRoNJ, I’m a long way from having the confidence to follow in your footsteps, but I derive enormous comfort from these techniques for recrowning a muzzle. My M1 Garand must be cleaned from the muzzle and the brush is fairly tight. Try as I may, I just cannot avoid every now and then having pressure suddenly give way as I insert the brush into the muzzle and have the rod jerk forward abruptly. I imagine the end chipping my muzzle and wiping out my $500 accuracy job. I have spent some hours looking intently at what appears to be an irregularity at the muzzle, but I suspect that it is the rifling. As another means to restore accuracy, I’ve heard of counterboring the muzzle which seems to mean removing the rifling for some distance down the muzzle. One hears about this for old surplus rifles, and it is supposed to work well but I don’t know that it is as precise as recrowning.
Regarding the slide action on a 1911, that slide will keep working under adverse conditions. I read about an anecdote from the Korean War where a guy woke up, tightly cocooned in his sleeping bag against the arctic temperatures, and saw a Chinese soldier standing over him ready to deliver a fatal blow. The American emptied his 1911 from inside the sleeping bag and it worked fine. Still it is a good idea to keep the slide clear of clothing, hence the canted position. One of the mysteries of the 1911 design is how the thumb resting on the safety right next to the slide in the approved position is not affected by the slide moving at almost Mach 2 only millimeters away. I attribute it to the genius ergonomics of the design. It’s probably not good to think about this too much.
Victor, interesting about the baseball pitch. I had always thought of curveballs operating in a more or less horizontal plane. Isn’t there a different name for a pitch that drops abruptly? I agree about the drawbacks of the roundhouse kick with the exception of the low kick which is a staple of the Thai boxers. If there is such a thing as an unstoppable strike technique, this one comes pretty close. After my teacher had gone on about the virtues of the low roundhouse thrown to the lower leg, I asked him how one was supposed to defend against this, and he stopped for a moment and said, “Someone throwing a low roundhouse at you is a bad idea.” Yeah, that’s for sure. On the plus side, this is not a technique you will see except from a highly trained individual. On the other hand, you never know who you’re messing with. I was reading about all time great boxing trainer and sparring partner for Joe Louis, Eddie Futch. At the age of 74, he checked into an emergency room seeking treatment for a broken finger as the result of an argument over a parking spot…
Mike, interesting about the 21 foot distance; that’s about what I envisioned. Orin, a couple of suggestions about the flurry and the bull rush. For the flurry, do not stand and trade which is the instinctive impulse. You’ll take a lot of punishment at best. Find another way. I suggest footwork. While someone is throwing punches, they must be planted. Nobody throws strikes with any effectiveness while moving. The bullrush offers some interesting and elegant possibilities. Again, do not stand and receive the charge. One option is to use the German infantry doctrine of WWII which was to break the attack with a counterattack. This has the effect also of using the opponent’s momentum against them. You can use an open hand to the head region, or meet them with the point of the elbow upraised. However, both are hard to practice because they are so dangerous, the second in particular. (Incidentally, the raised elbow is one element of the close contact position for drawing your weapon.) More elegant than these is a sidestepping technique. Sidestepping a charge is very hard to do. The fight or flight reaction just does not work this way. But a sidestep can be assisted by simultaneously shoving the assailant’s head sideways with the open hand. As the head goes, so goes the body, and they will go flying. It’s fun and unlike the striking counters is not dangerous. You can have someone simulate rushes at reduced speed and you will see how this works.
And then, there is the suggestion of Jim Brown, color commentator for the first Ultimate Fighting Championship. “Jim,” they said, “what would you suggest for so and so” who had just been pummeled in the first round. Jim responded, “You got two good legs.” Ha ha. He was not asked back as a future commentator
(Commentator: Where was that kick thrown, Jim?
Jim: Well, I would say that it was just about right in the middle of his face.)
but I thought he was hysterical.
Matt61
Try this while cleaning your M-1. Insert the cleaning rod in the muzzle without a patch or brush all the way to the open action. Next, screw a cleaning brush onto the rod while it is in the action. Turn the brush as you feed a cleaning patch around it. Apply your bore cleaner and pull it out through the muzzle. This is a little slow but helps protect the muzzle and keeps dirt out of the action.
Mike
Matt61,
Use the correct size soda straw to act as a bore guide for your cleaning rod when you clean from the muzzle end.
The straw can slide onto your cleaning rod, then attached your bore brush. Guide the brush into your rifling, stop, slide the soda straw past your crown, then continue feeding your cleaning rod down the bore.
kevin
Matt61,
Dewey makes a bore guide for the M1.
http://www.midwayusa.com/viewproduct/?productnumber=669772
[Edith/Tom, I didn’t see that Pyramyd AIR carries anything like this, so please forgive the link. I won’t get my feelings hurt if you want to delete this posting for linking to another company]
Matt61,
There are two types of curve balls; overhand, and side (usually at about 45 degrees). The overhand is harder to hit because it cuts straight down, orthogonal to the bat swing, which is horizontal, leaving a very small cross-sectional time window (even smaller than a fast ball). The other pitch that drops down is the sinker. The curve is slower velocity and has a wider vertical trajectory, while the sinker is faster such that, as they say, “the bottom drops out”.
Low kicks were very common amount people that I fought. We were taught to injure limbs, including arms and legs by punching or kicking them. For instance, if I see a good opening, I will punch someone in the inside of the arm, just to punish them. I’ll do the same to a leg. We were taught to do everything with “kime”, meaning very hard and with focus. The untrained opponent will know he’s in trouble when even a push hurts. Leg sweeps are VERY common, and practical (I know from experience, and in particular, from being on the receiving end). From experience, I have seen more people lose fights because they relied too heavily on the round house kick. To the trained fighter, it’s one of the easiest things to catch. Once caught, you have a great amount of control over your opponent.
I didn’t see Jim Browns commentary, but he actually makes a good point about running. Again, we were taught that the first thing that we should do is avoid a fight. As Dale Carnegie says in his book “How to Win Friends and Influence People”, the way to win a fight is to avoid it in the first place. The same applies to fighting. Hollywood, and sometimes our own imagination, get us to believe that we can plan (choreograph) a fight through. That’s not what Martial Arts are about. Martial Arts are about serious training so that your body is effectively a fighting machine. The more and harder you train, the better your body is at executing. There were many times when it felt as if my body was operating quicker than my mind. That is what you want to achieve. I said in a previous post that practical goals could include just being better at escaping a situation. At a minimum, by sparring, you should get better at maintaining presence of mind. Someone who has never been hit really hard in the face will often go into shock, losing all effective consciousness. One goal of Martial Arts should be to realize that you are not as fragile as you might have thought. The more fundamental goal is to make your body at least as responsive as your mind. About a third of our training was exercise and hard drills, Most of the remaining two thirds was Kata, and the remaining was sparring. We exercised specifically to enhance our physical ability to fight. We did drills to perfect our form in blocks, punches, and kicks. We did Kata to practice executing our form perfectly while in motion. We did Ipon Kumite’s to practice our form under the stresses applied by another human being. Ipon Kumite’s are essentially Kata’s done with someone else. They attach, you block, and you counter strike. They are done FULL FORCE, so you have to be alert and ready. They are somewhat the equivalent of choreographed fight scenes that you see in Hollywood, except that they are shorter and done full-force with the intent of causing damage (for the person attacking, and for your counter strike). Again, our dojo could never operate as a business, as they would keep very few paying customers. BTW, I know first hand the full effect of being kicked by the ball of the foot. That is precisely how I was kicked in the stomach during my breathing and tension exercises. Not everyone can handle such a kick.
Victor
Oops! Carnegie said “argument”, not “fight”. In any case, both should be avoided at all costs.
Fred,
Now, can you see how easy it was? My congratulations on your success and welcome to the club named “I am my own gunsmith”. It’s not the easiest accurizing operation, but you passed through it admirably. One of my favourite Genghis Khan’s quotes sounds like “Don’t do anything if you’re afraid to do, but if you’re doing something – don’t even think of being afraid”.
So, crown matters. I would suggest your next step to be some bedding, it’s even easier than crowning and then, perhaps, some spring tweaking. And perhaps there lies your
Matt61
Counterboring barrel’s end is quite typical measure for old surplus Mosin rifles, to remove that cone in the barrel end that appears after too many shots. When it’s done with a steady hand (or using a lathe) and properly sharped drill it’s almost as good as crowning, restoring accuracy to former level or even improving it. However keep in mind words like “steady” and “properly”, as improper counterboring might ruin even the bad result you have on your hands, so choose wisely.
duskwight
Sorry, some trouble with keyboard or my fingers.
…And perhaps there lies your less that half-inch group.
Duskwright,
I have you to thank for starting me out on this project. OK, now I’ll start researching bedding the action into the stock. You did want another blog from me, didn’t you BB??
Fred PRoNJ
Fred,
Anytime, my friend.
B.B.
Duskwight, how have you been? How was this winter for you?
Any new gun projects or purchases?
Brian,
This winter is mostly losses, almost no gains.
On February 24 my Grandma died, less than forty days since Grandpa’s death. She was already in a very bad condition weeks before all that, so she fell asleep and didn’t wake up. I think they just couldn’t get along without each other.
Considering airguns – I’m waiting for first batch of parts to arrive and thinking on the stock for it. B.B. told me that original JW stock despite its beauty has one great disadvantage – sooner or later it’s going to split when one tries to remove the action. So I’m thinking on “dressing” my two-pistoner into two-part chassis type stock. I want to keep the wood as a basic material, however not so long ago I considered famous Izh-32 target single-stroke as an inspiration. It has a very intersting modular steel-and -wood stock: http://www.tourbaikalland.ru/items/big-20040503-475121.jpg Well, time will show.
duskwight
Duskwight,
That is the way to go for the stock.
B.B.
Fred,
I’m late to the party but greatly enjoyed your temporary hosting.
You’re one of those guys that “takes the bull by the horns”. I like that. Good job and thanks for sharing. Great photo’s too.
kevin
BB,
I,m a machinist and seriously into air-gunning.I re crowned all my guns , and there all tack drivers,but my crowns have a radius instead of an angle.A radius draws more air away from the skirt of the pellet once it exits the barrel, like how water follows a radius.
I just had the same problem with a TF79 ,the grouping was horrable.After I radiused the barrel my groups were .082 ctc.
Rich,
I don’t understand what you mean by a “radius”. Can you provide a link to a picture of what you’re talking about?
Fred PRoNJ
Sounds like a variation of the common crown seen on service pistols… And the middle image (just before they start cutting an 11deg) on http://riflestocks.tripod.com/targetcrown.html
Reversed, spherical radius, basically the reverse shape of the bolt head that you used to polish/lap. It has a theoretical angle from it’s outer edge to the theoretical centerline and top of the radius at the bolt head/hemisphere. If you made a full impression of the hemisphere into the face, it would be steeper than 11 degrees, more like 20 to 30 depending on diameter.
Rich,
That’s incredible! Please tell us more!
Victor
The radius is not a common one that is found on Wulfraed’s web link, my radius starts perpendicular to the bore so there’s a nice even flow of air that wraps around the nose of the barrel.Crowning Airgun’s are totally different than crowning firearm’s, the diabolo design hates forced air in back of it because it’s waight foreword plus the air is hitting a cone,not good.The more air you take away from the pellet the second it leaves the barrel you get better accuracy.I try to chuck up a barrel in the lathe when ever possible,but when I can’t made a special tool that connects to a drill, It looks like a round over bit from a wood router but smaller and has a .177 pilot.
That’s the same thing many muzzleloaders are using (me included), as it makes loading much easier without the risk of coning to accuracy. Everyone assumes there is a slight loss of accuracy over a normal target crown, but no one has been able to find it — maybe its actually better; either way, we’ve got to get the things loaded :).
Radii are always better, and look better too!
Do you turn yours on a lathe Rich and finish by polishing?
Guys, I have a lathe and was thinking about pulling barrel off of Benjamin and turning to true up the crown. Is the barrel just threaded into block? Any tips on removing without damaging?
Buzz,
The barrel is press-fit into the base block and may be epoxied. I wouldn’t try to remove it.
B.B.
Does anyone know the PRECISE Crosman spec
for the Benjamin 392’s barrel bore?
“Miking” my pellet assortments
(with my CHEAP Chinese digital caliper,
hence my question to those better tooled;)
– gives anywhere from
.218 (Crosman hollow Point Hunting)
to .224 (H&N Kodiak-HP, 18.21gr)
to .223 (Predator Polymags)
But these are, of course, all averages.
The reason I need more precise info, is:
Brownell’s shows FOUR size brass pilots
for the .22 cal (1/2″ 79degree) recrowning, and/or refacing, tools
( https://www.brownells.com/.aspx/pid=18295/Product/BRASS-PILOTS )
they are:
080-943-211WB Fits .22 RF Muzzle (.211″)
080-943-213WB Fits .22 RF Muzzle (.213″)
080-943-022WB, Fits .22 RF Muzzle (.215″)
080-943-023WB, Fits .22 Centerfire Muzzle
ALL are ALSO quoted as “Caliber: 22 Caliber (.223-.224)
Material: Brass”
I want to do a precision crown before embarking on
the EXTENSIVE adapter/shimming/#6-48t threading needed,
to get this Williams peepsight to compensate for the
fact my new 392 shoots erratically but reliably enough
2-4″ to the left (and sometimes low)
at 12 yards.
MEANWHILE -Spending this SECOND day trying to get
all that paint out of the barrel
and off the crown- if there is one…
Yesterday’s effort with acetone STILL left
large stains of that paint less (and more) than an inch from the muzzle
-and a very dull looking bore.
You can hardly see the rifling at the muzzle end.
Sounds like you could use a micrometer with a friction thimble, so that consistent pressure is applied each time.
Also, make sure you have the rifling grooves at the same orientation when measuring.
If you have paint /in/ the barrel, that too could affect the measurement.
If Acetone isn’t doing it — buy a can of Methyl-Ethyl Ketone (MEK), and a good ventilation fan to use outside {I had to use MEK to remove the acrylic varnish I’d used to hold alarm foil to old, less than clean, windows — deadly even with as many windows and doors open for air as possible}.
Thanks Wulfraed –
I’m kinda hoping for the simplest (paint) explanation.
Paint being what apparently “forms” the “Crown” on these guns, doesn’t exactly scream the (admittedly “acheivable, but not stock” ) quality I assumed when buying it, after reading about the ancestors it evidently doesn’t resemble. The biggest disappointment was probably when I discovered the more obscure posts that admit to Crosman(SHAME!) having gone to Al valves some years ago, and PA giving up the pump-assist mod.
Being an engineer (BSEE) and a classical musician (now retired,) I’ve never been what the Kinks would call “The World’s Most Physical Guy;” and with the aches, pains and “junk (numb/painful) hands” my profession (computer, carpal tunnel) and hobbies (surfing-dislocated shoulder; and kart restoration- metalworking) have caused; I could use a little more help than even Tim’s Extended Billet promises – of course I’ll try it, when (being retired on SS,) I save up the money again. I’m sure in the meantime I’ll try the much cheaper ‘split spring’ approach. I don’t give a cheap-ass Al valve much past the warranty period anyway.
I just hope while i’m saving up, Tim doesn’t retire, and even that he decides to turn his own SS steroid valves as I saw mentioned (though why not brass to be more authentic-and consistent ?) We’d certainly pay for whatever it cost to do brass, and many others have mentioned that. IMO doing beryllium/brass springs would also make sense.
Anyway, we’ll see whether my second day of Acetone scrubbing and quickie/cheapo crown job (dremel-ball-bit hand tool & toothpaste polish) will help – as soon as the rain stops so I can shoot outside.
-Rod