
by Tom Gaylord
Writing as B.B. Pelletier
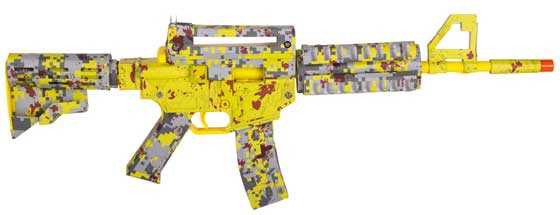
Paper Shooter Zombie Slayer.
This report covers:
- I started out as a kid…
- Time to cowboy up
- Today’s report
- 138 pieces
- Plastic parts and steel screws
- Special tips
- Parts go in one way, only
- It worked!
- Last tip
When Val Gamerman, president of Pyramyd AIR, asked me if I wanted to put a Paper Shooters Zombie Slayer Kit together and report on it, I jumped at the chance! I think that surprised him, but he didn’t know my history.
I started out as a kid…
I have been interested in how things work all my life. When I was given a watch for my 10th birthday and told it was waterproof, I promptly held it under the faucet. It wasn’t waterproof, by the way. When I was told that the way to carve an elephant from a block of wood was to remove everything that doesn’t look like an elephant, I set about with a jack knife to find the pachyderm. Looked in lots of wood blocks — no elephant yet. Lots of stuff that doesn’t look like one, though.
I took apart clocks, radios, bicycle hubs — you name it and I disassembled it. Only one problem. I never put anything together again. Once, when I was a teen, I helped a buddy assemble a 327 Chevy engine, but I don’t think my help was appreciated. I think my real contribution was that Dan worked at record speed to get the engine finished before I could give him any more help.
Time to cowboy up
Then I became a writer. Edith convinced me to start writing a newsletter about airguns in 1994, and for a short while it was fun. But eventually the day came when I had to disassemble an air rifle to tune it for an article. Up to this point I had always watched others. There was no problem with the disassembly — I had that nailed. This time, though, things had to go back together, and, even worse, they had to work!
Many foul words were uttered as I learned my new skill. And perhaps skill is too strong a word. What did Hippocrates say? “I will take care that they suffer no hurt or harm.” Time passed and if this was television there would have been a couple commercial breaks. During that period I “learned” how to work on airguns.
Today’s report
Which brings me to today’s report. The Paper Shooters Zombie Slayer kit is a thirty-dollar advanced lesson in how airguns work. Actually, it is a lesson in how airsoft guns work, for that is exactly what you are building — an airsoft gun that shoots spitwads. Oops! Did I just say that? I meant handmade paper projectiles. This kit provides what you need to create the projectiles, and it also comes with a bag of them ready-made. I’ll cover that in a later report. Today I want to discuss putting this thing together.

Two-part wad mold.
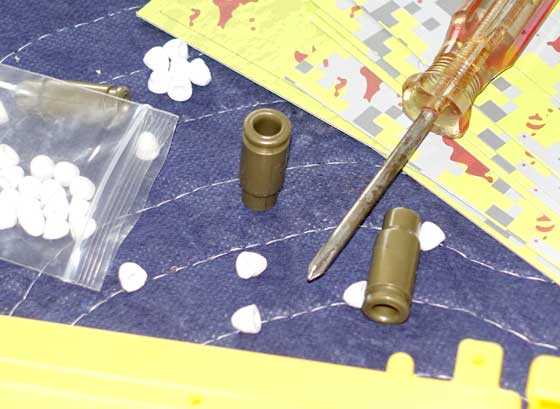
The kit comes with wads ready to shoot. They are loaded into the cartridge cases that feed through the magazine as the gun is cocked.
138 pieces
That’s what it says on the box. There are 138 pieces inside that have to go together before this thing will work. Actually, since many of those “pieces” are stickers for the camoflage finish, the actual number needed to get things working is less. Set aside about 2-4 hours for the job. Technically it should take 30 minutes, but even the guy on the You Tube video demonstration flubbed it a couple times.
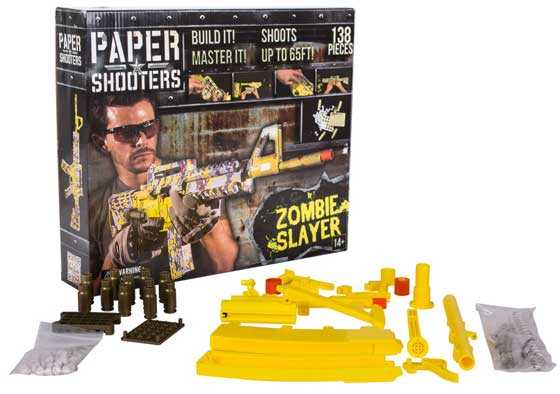
This is the kit.
Plastic parts and steel screws
If you have ever assembled a kit like this you know how daunting plastic parts and steel screws can be. If you haven’t — relax. You are about to be educated, and this lesson only costs $30. Heck — that’s cheaper than an extension course at the local community college!
Steel screws are very hard. Plastic parts are relatively soft. When the screws bottom out there is virtually no feedback. You can keep right on turning the screwdriver ’til you are blue in the face. The guy on the assembly video on You Tube uses an electric screwdriver. Unless you are an orthopedic surgeon who replaces joints all day, I recommend you use a manual driver. Using a power driver with this kit is like putting jars of nitroglycerin on a vibration table to make sure the tops are on tight!
But the kitmakers must have thought they were being too easy, because they also did NOT use self-tapping screws — or even screws with a point. The screws have flat tips that barely fit into the plastic sockets they go into. So watch the orientation of each screw shaft. In plastic is it real easy to install a steel screw on an angle.
Special tips
Remember what I said about turning the screws indefinitely? I did that on the magazine release and I twisted the screw head off the screw shank! There is no way to extract a steel screw shank from a plastic part, so I used Gorilla Glue to cement the two pieces together. This part has to move in operation, so every 10 minutes while the glue was setting up I had to move the parts back and forth to keep them from getting glued in place. It worked! Don’t you try it, though. You be smart, instead, and check how far each set of parts is supposed to go together before you assemble them.
After doing the above I started holding the parts in one hand while screwing them together with the other. To stop the bleeding of a finger that has been punctured deeply by the sharp tip of a Phillips screwdriver, use copious amounts of Hydrogen Peroxide. Swearing loudly as you do this also seems to help. I found it impossible not to.
Parts go in one way, only
Besides the plastic parts and steel screws, the next most frustrating aspect of this assembly is those parts that will fit together several ways but only operate one way. The instructions are just line drawings and they do not show many of the critical details. So mistakes are possible. And, with a refined skill set like mine, they are practically guaranteed!
I assembled the gun and it didn’t work! Sure I had installed the butt upside-down (two ways and of course I chose the wrong one), but that wasn’t the problem. When I pulled the charging handle back to cock the gun, nothing happened. It was the Hammerli trainer all over again!
Then I watched the You Tube assembly instructions — Part One — and the guy casually mentions that you had better install the piston with the cocking notch pointing down or the gun will not cock!
Oh, no! My worst nightmare! I now had to disassemble a plastic gun by removing many steel screws! Do you think the ceiling of the Sistine Chapel could use a second coat of paint?
But for you, dear readers, I did it. Well, for you and also the fact that I did not want to contact Val Gamerman and ask for a second kit because I had destroyed the first one through my ineptitude.
It worked!
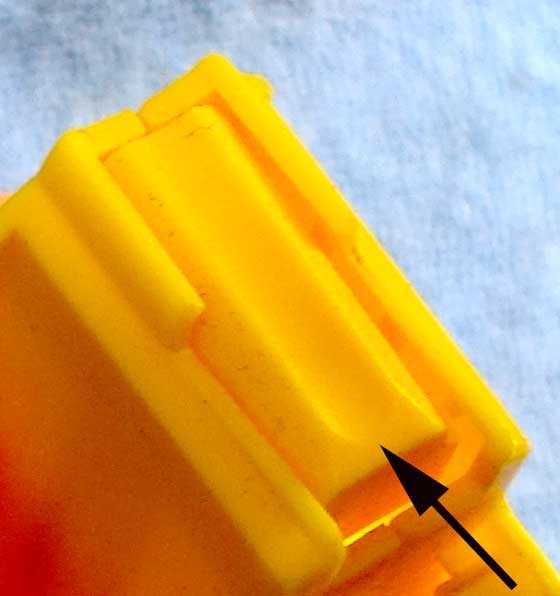
I was able to disassemble the gun and correct the assembly. Yes, the piston rod was upside-down, making it impossible to cock.
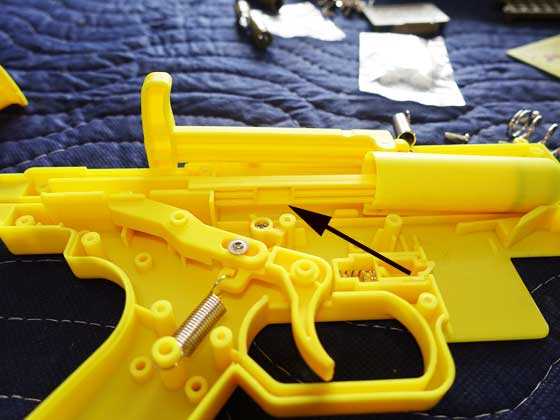
The notch on the piston rod (arrow) catches on the sear to cock the gun. It is just as easy to assemble this upside-down and the gun will not work.
I also discovered that I had installed the magazine follower the wrong way, naturally, and the cartridges that hold the wads will not feed. I knew from many years of playing with Mauser rifles that the follower was backwards. But that was only after assembly.
The magazine follower is closed on one end (arrow) and open on the other. Naturally I assembled it backwards.
The assembly drawings lack some of these critical details, so either listen to me or watch You Tube. When the gun was assembled again, the screws still held, so it was a success.
The gun now cocks and shoots. A paper wad comes out of the muzzle with good velocity. I still have to put the camo stickers on, but before I do I want to make certain the gun’s function is flawless, because once the stickers go on the screws will be hidden.
I noted that the wads exit the muzzle with good velocity. I estimate 80-120 f.p.s. They are cone-shaped and have hit the target 10 feet away on their side, so stability is not as good as a 6mm airsoft ball. I will test that for you and show you how to load the gun in a future report.
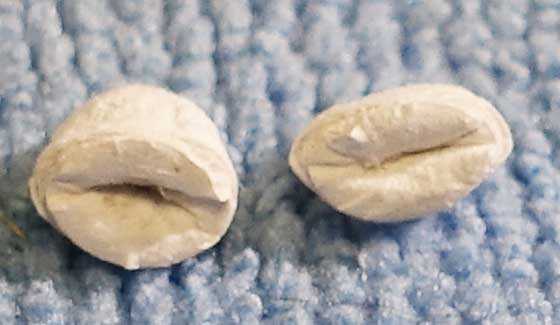
These two wads struck a hard target on their sides, which is why they appear flattened.
Last tip
Silicone grease and oil are good lubricants for a gun like this. Oil the piston seal, which is an o-ring. Oil the trigger mechanism. Oil anything else that needs to move smoothly. This is one time you can forgo the $15-a-bottle silicone chamber oil and use the cheap spray from the hardware store.
I will have a lot more for you, because I really do think this kit is a wonderful training tool. Some of the reviews critcise the gun for being made of plastic, but I look at it a different way. This is not an heirloom airgun. It is an inexpensive way to learn a lot about how a spring-piston airgun works.

Nice to get to peek behind the curtain with THE WIZARD as our guide!
I continue to be fascinated by this blog because of the humility of the author and just as importantly by his unwavering interest he has in all things that shoot.
Sometimes the things that shoot don’t interest me but the passion to report on all of them with such zeal makes me envious.
Kevin,
Don’t confuse humility with honesty. I find if I tell everyone how bad I am up front, they don’t have to do as much of it for me.
I really did poke my finger with the screwdriver and it did bleed a lot. I really did assemble the butt upside-down. I am an ongoing comedy show and you guys are my audience.
B.B.
Glad to see that someone besides me has problems with their “firearms” :-0
Bob
BB
When i was in 4th grade the teacher told me to cut out some letters for the bulletin board. I messed up so badly she had some girl do it. I have never forgotten that lesson.
Fido3030
BB
First very nicely written report today. It was very interesting to read.
And now about the gun. I absalutly love it. The assembly and what and how it shoots. I will get one with my next PA order just because.
And both of my daughters like helping me work on things and even just watching sometimes while I explain. So this will be a nice little project we can do. I’m excited. Got to do 2 smiley faces on this one. 🙂 🙂
B.B.,
After getting over the initial ??? reaction when pulling up today’s topic of choice,…… Very nice article. I liked the early background as a “newbie” tuner. Now that your a ol’ vet at tuning,….I think you can attest that even a TX is easier to take down than this. By the way, reviews by owners swear there is a 5-10 fps boost once the stickers are applied. I saw it on the internet,… so as we all know,…. it must be true! 😉
Chris,
A power boost already! Man — this is some project. 😉
B.B.
B.B.,
Because the velocity increase is attributed to the application of the camoflage, I wonder if the improvement is not able to be observed on a chronograph.
Michael
Michael,
I would use my virtual chronograph in that case. The old screen-door-to-the-hickory-tree chrony! 😉
B.B.
Hmmm, maybe a tune for this “gun” is in the works? Trigger job and maybe a gas piston? LOL
BB,
LOL! I have actually been thinking about getting one of these things. It appears to be more substantial than I thought it was. I am quite curious to see the results of your using the bullet mold.
RR,
I will be sure to report that. The instructions say to use tissue paper, which is how they get the projectiles so smooth.
B.B.
HaHa! Many decades ago, when first learning to work on things my older brother told me that blood on parts is not a good lubricant. Years later I finally figured out he was right! Best!
When we was kids building muscle cars to race at the local dragstrip. There was a saying.
If you didn’t draw blood when you were building your car it wasn’t going to run.
Hmm now I realize why my cars ran so good.
🙂
I wonder if the tissues with lotion will work good, already lubed so to speak…
Mike,
What a great idea! I never thought of that. It will either work well or not at all, because they don’t dry out. I’ll give it a try.
B.B.
I always check the blog before starting work to see what is on the table. Wasn’t ready for the image that popped up and almost spit coffee all over the monitor (won’t repeat my comments).
So I HAD to read what this was all about. Had me in stitches BB!
Got to get me one of these! Would of loved to have one in my first childhood! A spitball gun would have been awesome – I always used a pen-tube (for stealth reasons).
When teaching college I often found that the students were not aware of basic assembly procedures. I thought I would add some notes and suggestions for those who do not have a lot of experience in assembling things…
– work in a clear well lighted area.
– allow your self twice as much time as you think it will take – don’t rush
– READ AND UNDERSTAND ALL INSTRUCTIONS BEFORE STARTING
– familiarize yourself with all the parts, make sure nothing is missing ahead of time.
– identify each screw type/size and know where it goes – the wrong length in the wrong part WILL cause problems.
– check all parts before starting assembly and remove any plastic flashing (burrs).
– make sure that mating parts fit together properly and that you see where the alignment pins, tables or latches are before forcing anything. Frequently, mass-produced parts need a bit of tweaking to get the best results. Strategically adding a shim or a washer where needed can often improve performance or durability.
– using a suitable NEW (sharp) drill bit (with your fingers and light pressure), chamfer the plastic bosses to make a lead-in to help get the screw threads engage properly.
– be sure you have the correct screwdriver for the job – some philips screw drivers have pointy tips and some are flattened and be sure it is the correct size for the screw. Check that they match properly because it will make the job a lot easier – and safer! A poor fit will require too much force to keep the bit engaged with the screw making it very difficult to feel if it is driving in properly. With plastic bosses and metal screws, use moderate pressure and just turn the screwdriver – don’t force the screw, if aligned properly it will advance as fast as it can.
– use a bit of silicone grease (readily available from plumbing departments) on the screw threads to prevent them from galling and stripping the thread out of the boss as they are installed. Pre-threading the part before assembly (run a lubricated screw in and out) will often make things easier. If tolerances are tight, I will sometimes use a proper “tap” to thread the hole.
– if there are multiple screws per part, get all of them started and tighten them all (each a bit at a time) together. Aligning and taping the pieces tightly together before hand often helps the assembly go well.
– be wary of spray silicone, some of the propellants will attack some plastics. Test before using!
– lubricate (silicone grease) moving parts as you assemble them. Don’t use too much lubricant! Just a thin film, not a gob 🙂
– Clean the mold-release oil off surfaces with rubbing alcohol before applying your “performance enhancing” decals.
Sorry for being so long-winded. Hope this helps.
Hank
Hank
When BB mentioned a while back he was going to do a report on this gun. I said cool a spitwad gun. Then I asked about if he ever did the Bic pen and spitwads as a kid. With out getting BB in trouble and bringing back maybe a not good memory. He said yes. 🙂
Hank,
I bet you were the kind of professor that the students waited 20 minutes for after class started, to see if you were going to show up! 😉
B.B.
B.B.
I was always 30 minutes early for class and usually students were there waiting to ask questions – often about things not related to the curriculum.
It was the ones that wanted to keep me an hour after class that were the problem 🙂
The most important things to me: Learning-Teaching-Learning
Always enjoyed my years as a professor.
Hank
I just watched the video that is linked to the PA description of the gun. Click on the top picture. Pretty cool video.
Tom,
I hope that you are staying high and dry in all of this weather.
I’m looking forward to the velocity and accuracy tests. I hope that you are planning to test it will all kinds of paper. Please include the old standby – notebook paper that worked so well in school. Also, if it will work with wet paper, how about some splatology examples.
Jim
Jim,
Oh, Em, Gee, Jim! I guess I should turn this into a series. 😉
B.B.
I’m just wondering if it will shoot airsoft rounds?
The paper projectiles sound inexpensive and fun but time consuming.
B.B.,
JerryC. has no doubt caught wind of this and I am sure a “gage” is in the works. 😉 No doubt,… a grain scale and fps and fpe testing will follow. Hey,….. at least (one) shot over a chrony and some easy math.
C’mon,…. you know you want to! 🙂
BB,
It’s probably ok, and heck, it’s a $30 gun. But, silicone sprays typically contain a solvent, either toluene or xylene, that will likely soften the plastic. I’d stick to the usual silicone oil or grease if you want the gun to last awhile.
I wonder if a diabolo shaped wad would fly straighter?
Also wonder if somebody could come up with a salt shot shell type of load, i.e. a bug-a-salt load.
Hmm…$30 eh?
That’s what I see in this gun too… A long range bug assault. If it’s fairly accurate to 15-20′ I’ll probably get one.
Reb
No….you load a bug in the gun, and shoot it into the wall .
twotalon
TT
🙂
Twotalon,
Yup,…..that is for that one single fly that has been successfully evading you all week. Catch it live and send it on a very special “last ride”.
I would be drilling out each screw hole and putting in inserts.
StevenG,
That is scary! I thought the same thing. I am not sure what that says?,…… I am not going to think about it too hard though….. I guess I would chalk it up to improving an existing design. And hey,…for 30$,….what the heck?
And hey,…. on the serious side,…. if it helps a youngin’ or an oldie get some confidence on tearing into something, this would be a good first lesson.
Hi BB and the group . What an enjoyable article. Before commenting on the gun, I must share my experiences “I started out as a kid” . We must have had similar childhoods, as from as long as I can remember. around age 4 I was always accused by my parents of “taking stuff topart” All trips to our local dumps were a treasure pit of stuff to take home and “take topart”. Alarm clocks were real cool examples . Also those same dumps allowed me to learn a bit about shooting as sometimes Dad would let me shoot at cans with his Stevens 22 rifle .
As far as the gun is concerned, will hold off buying it for awhile . I have a Raspberry PI 3 computer ordered and with a little luck, maybe I can “put it together, rather then take it topart’
Harvey
Had no idea what the heck this was for most of the article. What a concept. I may have had a trace of the tinkering bug myself. At the very dawn of my memory, I remember the excitement surrounding the moon landings. At that time, I received a kind of plaster piggy bank in the shape of an astronaut. There was a slot in the helmet for coins. I was fascinated at how invulnerable he looked. So, I tried swimming him around in the bathtub. Somehow I had intuited the fact that astronauts train with their suits underwater. Let’s say that the piggy bank disassembled itself in short order, and I came to recognize my limitations in tinkering.
Never heard if anyone has experience with a potato shooting gun which I used to see in comic books. It looks like a similar concept to this gun.
Matt61
I’ve tried looking up spud guns with the search box but I guess that’s one gun that slipped through the cracks. And when I Google them they usually turn out to be firearms in that they use a combustible propellant
Reb
I have a spud gun that is powered by compressed air and is quite a bit more powerful than one of the standard combustible propellant versions. I think that defines it as an air gun. At one time there were lengths of rifled pvc pipe available for the barrel making them air rifles. I think many of the web sites have been taken down due to liability concerns.
I finally have my Apache Fireball holding air after many experiments with valve seals and gaskets. The old gun was heavily abused over the years. I had to gently blast the receiver with a torch to get the valve out. I bought 5 pounds of #4 buckshot yesterday. I put a scope on it but it is not very accurate so I took it off. I fabricated a blade for the front sight and used a notch rear sight I found in my parts box. It will be good for plinking and should send a can flying. It packs quite a punch with the .24 cal round balls. When I get time I will see what the chrony gives for fps.
Don
I always wondered how those things shoot.
I’ve seen some decent prices on them but also figured that meant they were missing something that would require fabrication.
Glad you got yours shooting now!
Did they really make a .25 Disco?
Rev,
I don’t know of any .25 Disco barrels. I have read that the Disco barrels are a direct fit in the Apache air rifles. I have plenty of .22 air rifles so I was just wishing for a .25 Disco barrel. I think all the other crosman barrels with the same OD would be too short. I need at least a 20 inch barrel.
Not sure what the dimensions of the .25 Marauder barrel is. I will have to check that out. I think they have a larger OD.
I have seen some Apache rifles from $150 to $250 that look complete and clean. The valve parts all need to be fabricated. The pump system looks like a Benjamin 310 series but has a cone inside the seal that can be tightened to expand the seal. The check valve and exhaust valve are a little like Crosman and Benjamin with no direct exchange of parts. At least not that I could find.
The #4 buck shot should be good for small game if I can get better accuracy. The .177 bb barrel insert is steel and has scuffed up the rifling in the .24 barrel. It may get better with more shots I will see.
Should of been Reb not Rev
Don,
Take some pictures as you go. I think our readers would be interested in hearing about your gun.
B.B.
B.B.
I will get some pictures. It.looks like rain all day today. I will try my open sights at 15 feet indoors.
The gun is held together with luck . After I play with it a while I will take it apart and get some pictures of its insides.
The design of the Apache has some good features. Mostly very simple. I think if the company would have stayed in business they would have become good air rifles. There are just a few details that could have been changed to make them more reliable.
I will take some pictures and get in touch. Keep up the reports. I read them all and most of the comments.
Don
Matt61
Me and my brother both had potatoe guns. We use to make sure we did some target practice with them on the 4th of July.
And by the way. Anymore new info on your sling. I been reading what you been doing with it. I know I use to have a blast with them when I was a kid.
Matt61,
Not even close as Reb pointed out. My brother in law made one from a 5′ long, 1 1/2″ PVC pipe. Spray hair spray into a “port”, seal, a Coleman twist and spark igniter does the rest. An easy 100 yds. with a 30-45 degree upward muzzle angle. It was cool, but I do not plan on making one.
Toss in some sour cream, chives and bacon crumbles,….well,….then I might consider. 😉
Chris.
My mother was appalled that I didn’t retrieve the potatoes so we could eat them. A snowman at 30 yards makes a great target.
See above response to Reb. I shot the Apache with buckshot today. it shoots hard but not very accurate. Looks like it will give 1.5 inch groups at 15 yards. I have heard the Discovery barrels are a direct fit. If they made one in .25 cal I would give it a try.
Benji-Don,
Congratulations on getting ‘er to shoot! As for taters,…. my Grandmother used to say we should be able to see through a potato skin after peeling it. Apparently, a Depression can leave some lasting effects. It stuck with me. Keep us posted as to the progress.
Matt61
I vaguely remember the Spud Guns. The link below shows the gun.
https://en.wikipedia.org/wiki/Spud_gun
I think it was one of my cousins that had one.
Don
BB,
You have called this an airsoft rifle and it is indeed equipped with the prerequisite orange muzzle, but other than the muzzle, is it labeled such because the projectile is other than steel or lead?
RR,
Nope. That was just me using license to explain the design a little better.
B.B.
At first blush, I had NO interest in this article. Zombies? Really? Then I realized it was a spitball gun. Barely ieven starting it. It’s a testament to the good writer that Tom is that I ended up reading the whole thing! Sucked me right in. Then, I got the humor, honesty, humility, humanity, the childhood angst. Yep. Been there, done that. Took apart a pocket watch at about age 8 and never got it back together. Check. I even grew up about 15 miles from Tom. Musta been something in the water with all that NE OH rain!
Motorman
Motorman,
Where did you live? I lived in Stow until I was 14, then we moved to Sharon Center, a village outside Medina.
Left the Buckeye state for California when I was 16.
B.B.
BB, Reading about your struggles to assemble this makes me re-live some horrible youthful experiences. I was never very successful at disassembly or reassembly, and today I much prefer to just use an airgun, not tinker with it.
But I am also very impressed that Crosman manages to sell the 760, professionally manufactured, for just a few dollars more than the build-it-yourself zombie killer. Crosman must be the champ of low-cost assembly. In fact, I think I paid $29 for my 760 just a few years ago.
Flintrocker
IMHO some of the newer low cost Crosman and Daisy airguns give excellent performance considering their price. They’re really super examples of modern design. The latest 760 and the Daisy 74 are two examples. I have lots of fun experimenting and modding them, and if i mess up, no big deal.
Fido3030
Flintrocker,
In year one of “American Airgunner” we actually filmed the assembly of the 760 at Crosman. You would not believe how fast those guns go together! That footage never made it to the air, unfortunately.
B.B.
BB
Would love to see that video!
Fido3030
Fido3030,
Unfortunately Paul Capello owns that footage and he is no longer with the show.
B.B.
BB
Thank you. I would have liked to seen a 760 put together by someone who knows what they’re doing!
Fido3030
Well now … A lot came to mind with the option of shooting a ‘bug’ into a ‘wall’ using this new gun. Would you need to use a ‘Bug Buster’ scope ? And surely you would have to remove its wings first to avoid any ‘fliers’ and if you didn’t, and it came back to hit you without ever bouncing off the wall, what would you call it? Being Bugged ? If you use a crony to measure its speed would it be a ‘fly-by’ or ‘fly-over’ speed?
Could you shoot a regular house fly without wrapping it in tissue first or would you be restricted to using only ‘horse’ flies and large beetles that fit the bore? Perhaps a tissue wrapping chart for various bug sizes? For some reason the comedian Kramer has popped into my mind…Back to the blog.
A lot of people don’t know about Reed and Prince screwdrivers….Not saying you don’t…(There are over 15 types of screw head designs and of course special gunsmith tools) They are like a sharp POINTED Phillips and usually destroy a Phillips screw head, or hand, because they never really ‘seat’ into a blunt Phillips head to engage it. Using the proper size tip to ‘fill’ the screw head is a must. They are sized by number. 0 being the smaller to 4. A #2 tip is the most common one used.
When you reuse a screw that has ‘cut’ it’s way into something soft to make threads start off by softly turning it backwards by hand as you would to ‘unscrew’ it and feel for it to kinda drop into the original thread so you don’t wind up stripping it out.
There are tools to remove broken / stripped screw shanks called EZ OUTS but probably not good for use on soft stuff or very small screws. They are an absolute must for aircraft and engine mechanics and …. there are ‘NEVER’ any left over aircraft parts.
Just looked at the screwdriver in the picture and it sure looks like a pointy Reed and Prince tip. Or is it a deadly #1 Phillips? Hard to tell sometimes.
Know this… as a general rule anything metal that comes from the far east is probably too brittle… screws, or too soft…. tools. “Wonder” metal is very popular over there.
Bob M
Enjoyed reading your comment. And all so true about the tools.
And when we gage threads at work with the go and no-go gages we always turn them backwards till they drop into the threads on the part. Then srew and unscrew them as normal. That also works good on fine threaded mating parts before you assemble them.
Sounds to me like you done some time in the machine shop and parts assembling to me.
Gunfun1
Not exactly but very close. I’m a retired Aircraft Maintenance Tech. In the Navy I worked on just about everything that can fly from Helicopters to F14’s. I was the guy kneeling down on the flight deck giving the thumbs up to launch an F14 off the flight deck of a carrier. Just like in the beginning of the movie Top Gun. Talk about an exciting place to work!
After I retired from the USN with an A&P License, I went on to major airlines working on DC-8’s, DC-9’s and ended up retiring again as a Lead Flight Line Maintenance Rep at Lindbergh Field SAN with Boeing 767’s…. ‘Shop’ time was for paperwork. In between Navy tours of duty I went to a GM Fisher Body & Fender School but decided it would make a nice hobby instead. Tools were a very big part of my life…I have a small room full of them. I think it all started with my first bicycle and an Erector Set when I was a kid. I still have my first tool, a short pocket wrench with bulbs on each end cut out for 5 different nut sizes each end … fit everything on my bike. Not sure if a ‘Skate Key’ is considered a ‘Tool’ but I still have it too !!…..
Bob M
Very cool. I love the stuff you mentioned.
The shop I still work at now in in the old days use to make the flight deck portable jet aircraft jacks and the bomp loading dolly’s. Also the jet engine changing cradles and the cranes. We also made the firing pins for land mines and different 20, 25 and 30 mm projectiles. The 430 grenades and stuff for the laser guided bombs and among other stuff. Been a interesting job through the years is the best I can say.
And who would ever know what a skate key is now days. Do kids skate anymore?
But the big question is do you do air guns?
Gunfun My reply accidently went to the bottom of the blog.
Thought I responded to your question once, but I don’t see it here so it must have gotten lost in sub-space somewhere.
BB, I grew up in Chesterland, proud graduate of West Geauga High School and Kent State University. Happiness was NE OH in the rear view mirror. Been in St. Louis for almost 40 years.
Speaking of which, I’m looking for folks in this area to shoot with / hang out with / talk air guns with, etc.
Motorman
St. Louis, MO
Motorman,
Ohio in the rear view mirror. Yes, I can remember that. My mother, grandmother and I drove from Ohio to San Jose, California in 1963. We went on Route 66, which didn’t have a song at the time. So we didn’t know how cool we were. We even drove there in a ’56 Chevy, before they turned cool.
I loved the experience, because I could reinvent myself in California. I went from a C student to an A student, because California education standards were lower than those I had been used to.
B.B.
Gunfun1
I mostly collect air guns. I enjoy doing some exterior mods for fun but not really a tuner of fine foreign rifles. I hunt yard pests here in the country with one of my FX Indys and plink some with the rest. I just received some seals for some Daisy 200 pistols I have and look forward to restoring.
I sent BB some pics of two custom ‘Railed up’ Marauders I have with R Arms stocks. One named ‘Heavy Metal’ and the other ‘Full Dress’ …. Like them better than my Armadas.
I honestly do not know how many airguns & airsoft guns I have locked up with some real steel. I have 10 different models of the Colt SAA, and probably a half dozen Evanix rifles alone. Even have a copy of the first wire stock Daisy and a tin toy space gun pistol that shoots sparks!
I’m not really into performance mods though.
Bob M
Bob M
Sounds like some exciting guns to me.
And I like modding. Not for what most people do. I’m not after how fast they can go. The performance I’m after is how smooth they shoot along with accuracy and adequate power for how a particular gun is used. And I have had a bunch of guns over time. Not to collect but to learn about how the different guns worked and shot.
But definitely have had my share of fun with air guns. Can’t see myself stopping anytime soon. 🙂
Gunfun1
Your moniker says it all… gunfun, and I fully respect your desires. To each his own ! There is a lot of diversity in airguns, and aside from a clunker now and then, like the short lived, lawyer designed, re-make of the Daisy 1894, which I modified back to a 1960’s set up, you generally get what you pay for. Being able to better the operation, performance and looks is a great source of satisfaction and pride we all enjoy sharing.
I am at odds with people who think any gun that doesn’t have a hand made laminated wood stock and can’t put 10 shots in one hole is a piece of junk. I can afford the best of the best, if I want, but there are many who may have to keep within a budget to enter the hobby and discouraging words do nothing to promote our sport.
As with any gun the first question to ask before making a purchase is “What do you want to use it for ?” BB and this blog go a long way to help people become informed buyers and enthusiasts.
As you get older you begin to feel lucky about sharing some of your life span with certain gifted people who enrich your life. Be it a president, singer, teacher, writer, relative, boss or good friend and BB is well on his way to joining that list for me and many others I imagine. This blog is very satisfying.
I thought it highly coincidental that we were born two days apart, among other things, but to hear we both rode around in 56 Chevy’s is getting ridiculous.
Bob M
Bob M
The more we live the more we learn.
The more we learn the more we live.
GF
So you are around .
Got to do some shooting today .
Unfortunately the best I was getting was about a quarter inch at 25 .
By the way, trigger pull is 3.5-4 . Ounces that is .
twotalon
TT
I would be happy with a 1/4″ at 25 yards.
And of course you know I’m going to ask what pellet.
And if the gun is a smooth shooter which I’m guessing it is sinc it’s a pcp.. I would like that trigger. As long as you can feel stage 2.
GF1
Exact 8.4 was about tops . One of the AA 8.4s was close as well as one of the FTT .
Nothing really shotgunned like most of the rifles that BB tests.
Maybe I should clean the barrel for the first time too .
Put a Hawke 4-12 with a AMX reticle on it . Very fine crosshair.
twotalon
TT
All sounds good.
Except the barrel cleaning. I guess you want better results?
Maybe just a couple drops of some RWS silicone oil in the lead of the barrel. That usually does the trick for me. A lot simpler than barrel cleaning and maybe safer on the barrel too.
GF1
I will simply do a pull through with clp breakfree and a few dry patches. That’s all .
Nice to shoot a lot and still have a lot of air left .
Need some sleep now . Usually not up this late .
twotalon
TT
Ok and l want to know what happens.
So holler when you get results.