by Tom Gaylord
Writing as B.B. Pelletier

Beeman P1 air pistol.
This report covers:
- Tools
- Step 1
- Step 2
- Step 3
- Step 4a
- Step 4b
- Step 5a
- 5b
- 5c
- 5d
- Step 6
- A special tool
- Step 7
- Step 8
- Release the clamp slowly
- Step 9
- The piston seal
- Summary
Today is the day I disassemble my new/old Beeman P1 pistol. Several readers have been waiting patiently for this report.
Tools
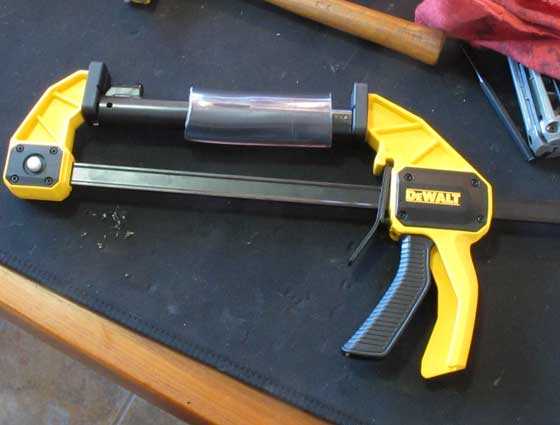
The tools you need are:
12-inch/30-cm trigger clamp
A set of pin punches
2mm Allen wrench
2.5mm Allen wrench
Plastic/rubber hammer
Medium slotted screwdriver
A 5-inch length of clear vinyl tubing with a 1.25-inch (31.75mm) inside diameter
It will also help to have a couple small flat-bladed screwdrivers to help pry the piston out at the end of disassembly. Let’s go!
A lot of this will be pictures. The captions will explain what I’m doing.
Step 1
Remove both grip panels.
Step 2
Loosen the 2mm Allen screw at the bottom front of the gun

Loosen but do not remove the 2mm screw at the bottom front of the pistol.
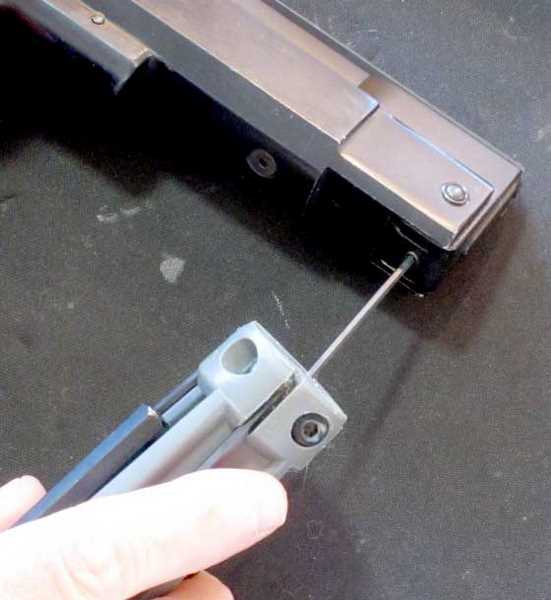
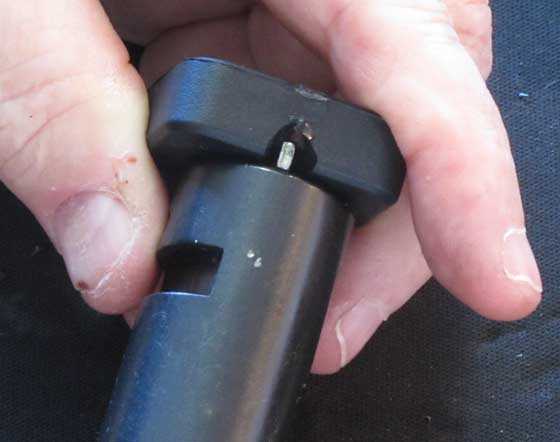
Step 3
Stick a paper clip through the interrupter hole in the grip to hold it fast.
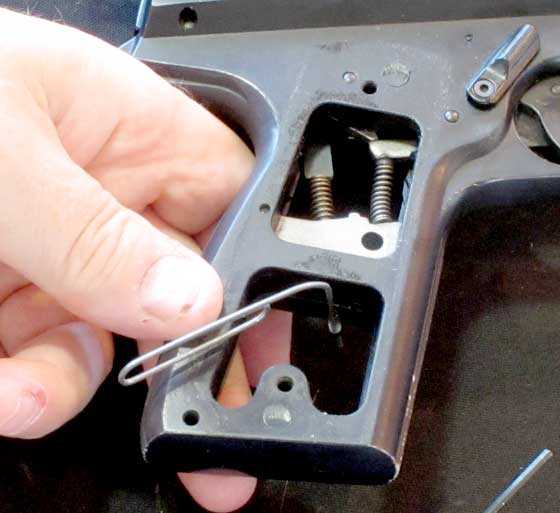
A paper clip through the hole in the interrupter holds it fast.
Step 4a
Drive the front pivot pin out of the gun.
Drive the pivot pin out.
Step 4b
Remove the top of the pistol. Lay the pistol on its sights (upside-down) and ease the top that contains the barrel off the bottom. This will take some doing if the pistol is old and hasn’t been apart, but if you thumb back the hammer that locks the upper at the rear and apply upward (downward?) pressure, the top of the gun will come out of the bottom. The twin cocking link arms have to be slid to the rear of the powerplant to remove them, but you will see what to do.
The top of the gun, containing the barrel, lifts off the bottom. Invert the pistol to do this. The twin cocking links slide to the rear of the pistol to release.
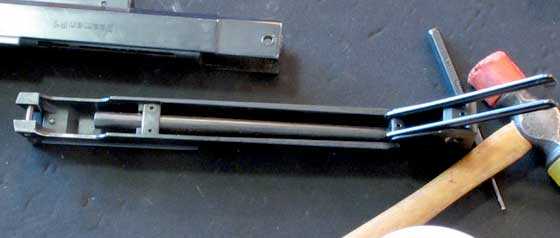
There is the barrel. Now you know where it lives and how it is held in.
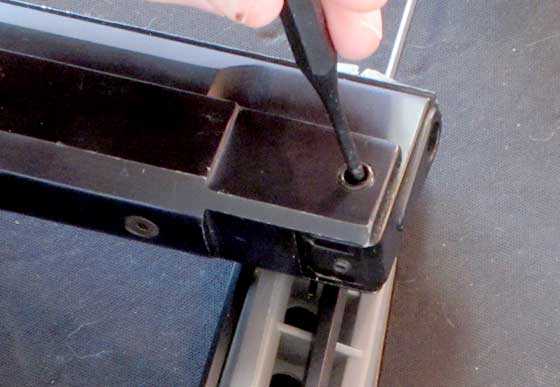
Step 5a
Loosen but don’t remove the 2.5mm screw on the bottom of the frame. There’s only one. I didn’t take a picture of this one.
5b
Drive the large pin out of the rear of the frame, left to right.
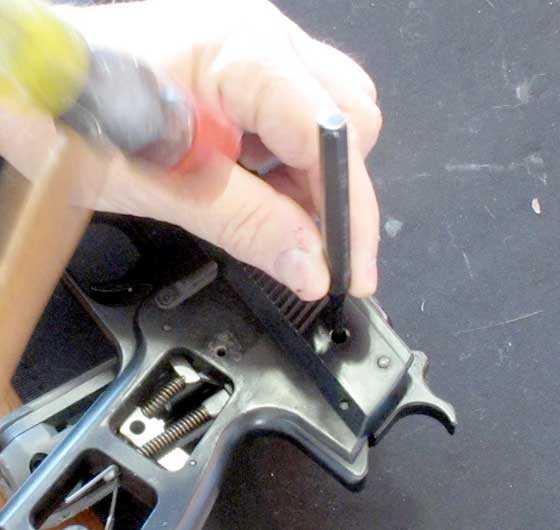
Drive the large pin out, left to right. Notice I’m not removing the small pin that’s behind and above it.
5c
Pull the hammer back. This unlocks the powerplant.
5d
Loosen the 2.5mm screw some more more and tap it in with the soft hammer head. This screw holds the powerplant inside the lower frame of the gun. Unscrew it as far as it will go and tap the screw head to loosen the powerplant assembly more. Then remove the screw.
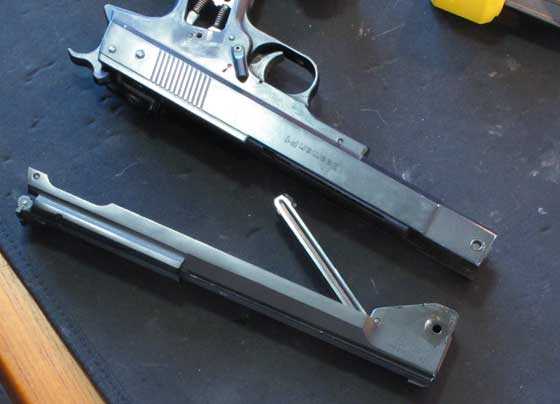
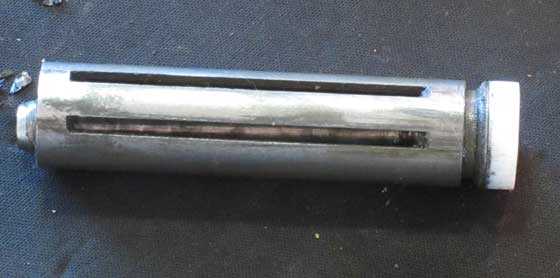
Step 6
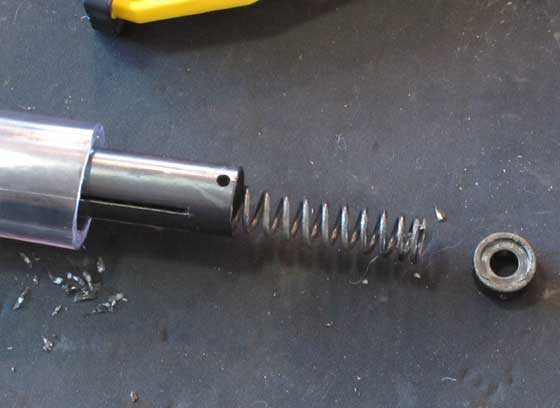
Remove the powerplant assembly from the lower frame. My gun has probably been together for 40 years and it was difficult to remove this assembly, but persistence paid off.
The powerplant assembly contains the piston and mainspring. This is what makes the P1 go! It is still assembled at this point.
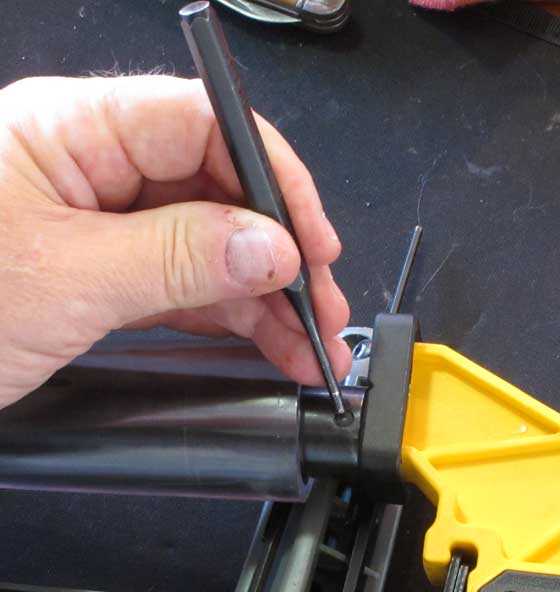
A special tool
Now you have to make a special tool. The 12-inch trigger clamp needs a notch on the lower part of its face on one end. The pictures will show how and why.
A knife is used to notch the bottom face of one end of the trigger clamp. This notch will fit a small projection on the powerplant.
The notch fits that small silver projection on one end of the powerplant. That will hold the powerplant in place when it is clamped!
Remember that 5-inch piece of clear vinyl tubing? Slide it over the powerplant before installing the powerplant in the clamp.
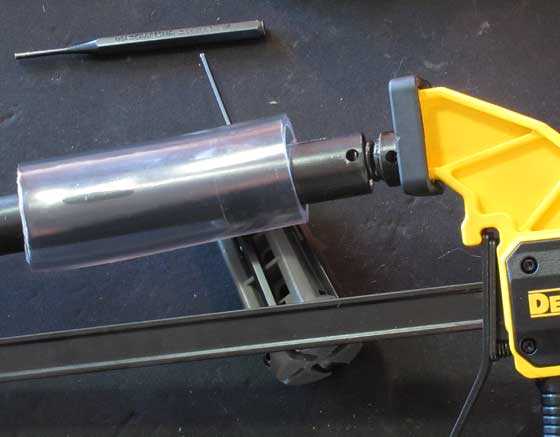
Step 7
Put the powerplant in the trigger clamp.
The powerplant is in the clamp with the clear tubing around it. That small silver projection is inside the notch we made at the left of this picture.
Step 8
Remove the end cap.
Now we will take the tension off the mainspring and you will see what the clear tube does.
Drive out the pin to release the end cap. The clamp will hold the powerplant, so make sure it is secure in the jaws before that pin comes out!
Release the clamp slowly
Now we will take the tension off the mainspring. Tap the trigger of the clamp lightly with the hammer and the clamp jaws with open slowly. Keep the clear vinyl tube around the spring as it comes out of the powerplant. The spring guide is not in the end cap. It’s inside the piston. So the spring can get out of control as it relaxes outside the powerplant tube.
I slid the clear tube back so you could see the mainspring. Beyond this far out, the clear tube needs to be in place.
Each time the hammer taps the trigger more spring comes out.
The mainspring was under a lot of compression!
Step 9
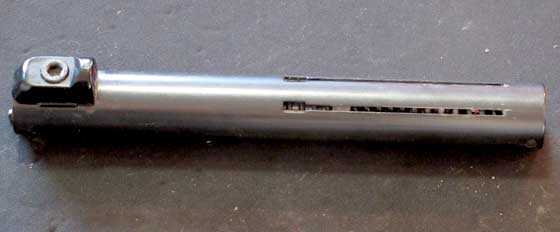
Remove the piston. My piston was tight inside the compression chamber and it took a lot of prying with screwdrivers through the many holes in the compression/spring tube that are there for that purpose — I think! But it came out.
The P1 piston.
The piston seal
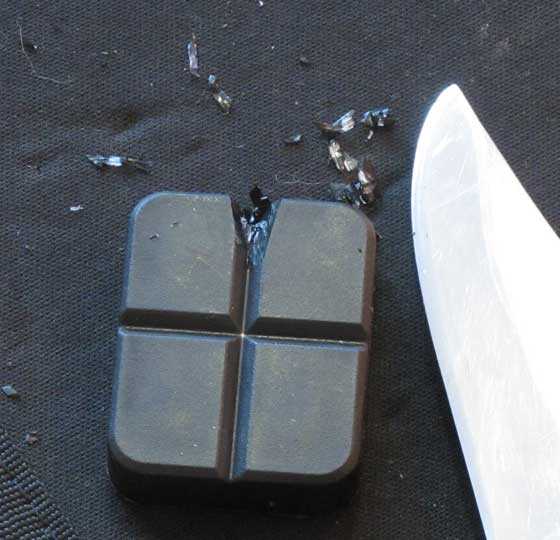
The piston seal is like new. I have no intention of replacing it.
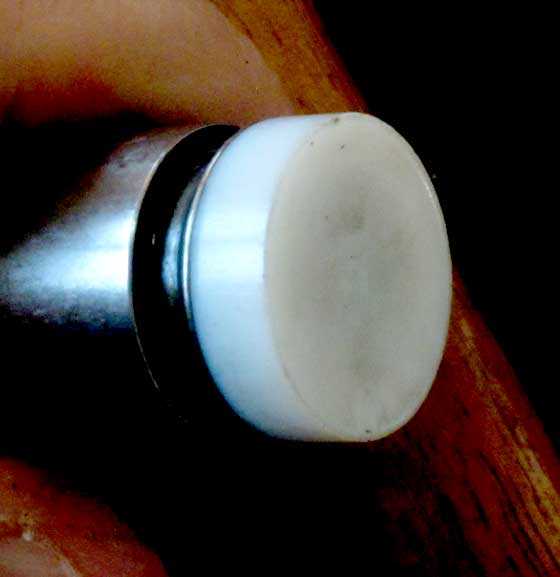
Piston seal is perfect!
The mainspring, on the other hand, has a slight kink. It’s usable, but since I have a new one that I got with the pistol, I’m replacing it. The old mainspring was caked with a dry crumbly substance that looks like dried-out grease. It was even shiny! From the outside of the powerplant it looked like moly, but it’s not.
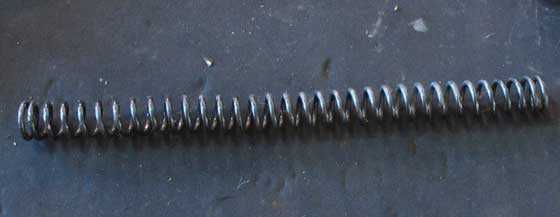
The mainspring is not bad, but I have a new one, so I’m replacing it.
Summary
This entire disassembly took 45 minutes, which included taking all the pictures. Had I just worked on the gun it would have taken half that time. This process goes quickly and easily. I haven’t done it for 21 years and it still went fast.
Next I will lubricate the pistol and assemble it. Then I’ll test it for power again.
I still need to find why the pistol hesitated between low and high power, so there is more to be done. I’m enjoying this.


B.B.,
This is one airgun I am in awe of the overall design. It appears to be robustly made and very difficult to improve upon. If the dry firing the pistol twice is the recommended procedure to fully seat the piston seal. There doesn’t seem to be much evidence of it forming. Do you happen to have an unused seal for comparison purposes?
Siraniko
Siraniko,
I do have a new seal, but you won’t see any difference. As white as it is, it looses a lot of definition.
B.B.
That is awesome
Thank you . I am going to lows tomorrow and will get the parts to make the tools. I think I will get a main spring and seals before I take my P1 apart. But thank you for this instruction.
Racer X,
Don’t forget the little o-ring that serves as the breech seal.
B.B.
Nice use of the clamp. “lightly tap” the release trigger would be key as I think that heavier tap would result in a sudden and full release. Nice report.
Chris,
Yes, that trick is a great thing to know.
B.B.
B.B.,
All this time I’ve had two DeWalt mainspring compressors hanging above my workbench and never knew what they were for! ;^) Mine even look about the same size as yours.
I agree with Chris about the valuable tip regarding tapping the clamp trigger. I don’t recall clamping anything under spring tension, but if I ever do, I’ll remember that.
Michael
B.B.,
I have to ask,… assuming the clamp is long enough, could this method be used on a springer rifle?
Chris
Chris,
Sure thing! That was how guys used to build their own.
B.B.
BB,
I just saw one of these for sale at a very reasonable price. It was real hard not to buy it since it is on the short list, but I have a few other projects I need to work on before I bring another tenant into RidgeRunner’s Home For Wayward Airguns.
RR%,
Sometimes we don’t adopt guns — they adopt us.
B.B.
BB,
Tell me about it. I had no intention of being an antique air rifle collector, but the numbers sure are growing around here. I guess the word is out that I really enjoy these old gals.
RR,
Anything under $200 would be a steal for one of these.
B.B.
BB,
With what looked to be a decent pistol scope it was $285 I believe. An excellent price, but right now the wallet would not be able to stand that.
B.B.
What was the special tool you got at Home Depot? Clamp, clear tubing, none of the above?
-Y
Yogi,
Clear tubing.
B.B.
B.B.,
That’s the same clear tubing I’ve used to de-ping several pcp’s. The FX Cyclone was especially annoying. Another airgun use for that clear tubing.
B.B.,
Recently, I was target shooting on my 30 yard range. I was pausing between each shot to just relax body and mind in an effort (or non-effort) to consistently use the artillery hold (a term that has crossed the Atlantic), follow the breath, focus with both eyes open and relaxed and a few other things I can’t name at the moment.
I have been shooting more accurately, lately. It has helped a lot to have the monthly “get together”. The three years I was dedicated to archery were the years I was part of a club.
So, I was on my little range and I remembered “Zen in the Art of Archery”, by Eugen Herrigel (1953).
http://www.ideologic.org/files/Eugen_Herrigel_-_Zen_in_the_Art_of_Archery.pdf
Like many works, this was has been critiqued and criticized:
http://citeseerx.ist.psu.edu/viewdoc/download;jsessionid=CB13F300F939EDEA9C32D792DC4900F7?doi=10.1.1.732.5892&rep=rep1&type=pdf
And so I was thinking about Zen and the Art of Airgunnery, not something religious or even very mystical, just something about mind and body and applying knowledge.
Last evening, while I still had a bit of sun light left, I was shooting my Titan GP at 15 yards and I was shooting better than I have before. Fifteen yards isn’t much, but I was so pleased to be hitting the mark so well.
This blog, and the comments by so many have also been a group I am pleased to be part of. Thank you for your efforts, sir.
~ken
Ken,
I think everyone who pursues a sport actively has times when they notice an increment of improvement like that. When I stopped competing in 10-meter air pistol I was crossing the threshold from Sharpshooter (530/600) to expert (545/600). If I had continued I would have remained at the higher level.
B.B.
B.B.,
I have no doubt you would have made expert. I think of two things in this regard (at this moment); one is the quote by the violinist Jascha Heifetz; “If I don’t practice one day, I know it; two days, the critics know it; three days, the public knows it.”
I know the exigencies of life cut your practice short.
The other is a statement made by someone I don’t remember. He said that practice doesn’t make perfect, that perfect practice makes perfect. A bit of hyperbole, I think, but if he means to become mindful of the nuances and actively seek to work them out, then I suppose I can go with it.
~ken
Ken
Right I get it, shooting gives me the same consciousness I feel traveling down the highway for miles on end. You know the time and miles fly by and next thing you know you have arrived. Same with shooting. How long have I been out here ? Is a frequent question for my wife.
Coduece,
I understand, completely.
~ken
Kenholmz, as a short term archer and a long term martial artist, I say thank you for that link to the, “Zen in the Art of Archery.” =D
Dave,
You are most welcome.
~ken
=D
I do want to point out that my Titan GP has been the more difficult to shoot well with. I will begin backing up from 15 yards and see how I and the Titan can do. The Titan is .22 caliber. My F4 is .177 and I am doing well at my 30 yards. Recently, with the F4, I won the Quigley pale at 70 yards. Winning means you get the pale, holes and all, by being the last person to score a hit on it.
~ken
“This process goes quickly and easily.”
Yes, B.B., quickly and easily…for you!
That would have taken me 2 hours…if I didn’t have this cool guide…great report and great pics. =D
BB,
This may be the best set of disassembly instructions I have ever seen. Very well done!
Cocking the P1 puts an unusual side stress on my forearm and elbow. That is my main complaint with the P1.
With my Scorpions you are just pushing your arms together. With the Tempest you are pulling your arms apart. Either of those movements is easier to do.
But, for compact power, the P1 wins.
David Enoch
David,
My P1 cocks just like a Tempest. It’s just harder. What am I missing?
B.B.
Tom ,
Great blog . In the shop I use our floor drill press as a spring compressor. I clamp the tube in the vise and use the shank end of a drill bit as a guide so when the spring starts kinking on install it wont kick out . Of all the guns we service this is the second hardest spring after the FWB124. If someone wants to tackle one of these , this is definitely not the model to learn on. BE CAREFUL.
Gene,
What a great idea! Tomorrow’s blog will humor you.
B.B.
Hi BB,
Maybe you are right about the Tempest. The Tempest is a little shorter.
When I cock the P1, I hold the pistol grip in my left hand (I am left handed) and push the top of the action forward with my right arm. It gets my elbow sore.
David Enoch
DavidEnoch,
Here’s something you might experiment with. I used to have a Webley Hurricane (stolen) and presently still have my Webley Premier MK II. Over the years, when shooting with friends, I noticed everyone had a hard time cocking them. It was always easy for me since I didn’t try to muscle them. I do not know if my technique can be used on a P1 or similar style pistol that has a squared off barrel housing, hence the suggestion to experiment. I unlatch the barrel, raise up as far as possible to get a good hold, curl my fingers around the top and place my thumb at the bottom of the barrel. The off hand holds the grip and points the barrel at about a 45 deg. angle. The strong hand pushes up with the thumb simultaneously twists the strong wrist applying torque. I just tried it with my weak (left) hand and found it works easily that way, too.
I’ve also never felt any undue pressure on my elbow in doing this. I believe this can be used on the P1 but only if the ergonomics permit.
Larry in Algona
Should have been twists the WEAK wrist applying torque. The secret is all in the wrist twisting to create torque.
LMNo
BB,
Off topic. I had asked you whether you know if a Rekord trigger would work in my 1965 HW50. An email from Weihrauch clarifies that it would not. I am pleased that they would reply so quickly with tech support for a 52 year old rifle.
Ton,
Thanks for closing the loop for me.
B.B.
Ton,
Is this something that changed with later HW50s? I bought one new from ARH in the mid-70s that had a Rekord trigger or at least ARH said it did. It was my very first air rifle so I didn’t really have much knowledge back then. I do know that it was one of the finest rifles I have ever owned. Later I traded it to Jim Macarri and I remember him telling me he wanted it because it was different than any of the other HW50s he ever saw.
Jim,
Welcome to the blog.
No, Ton’s rifle is older than the ARH model 50s. The earliest ones had a simpler trigger.
B.B.
Hello Jim,
BB has answered your question. Mine has an end cap that unscrews which is different to the models of today. The trigger on mine like BB says is very simple. Weihrauch May have had variants in between. No matter which variant, they are all well made rifles. I will not part with mine.