by Tom Gaylord
Writing as B.B. Pelletier
This report covers:
- The best laid schemes…
- Strike while the iron is hot
- Many stories!
- The new spring
- What is scragging?
- Special note about the end cap
- Assembly
- Job done
- Plans change
- Cocking effort
- Summary
The best laid schemes…
…gang aft agley (often go astray). And so it is with my new/old Beeman P1 pistol. I’ll tell you about it after the report.
Strike while the iron is hot
I assembled the pistol for today’s report, wanting to work while it was still fresh in my mind. A box of parts looks different after you have set it aside for awhile — or at least it does in my house. Critical parts disappear and things you remember being easy are suddenly difficult. Let me start at the end. I timed the assembly and it took 90 minutes, or about twice what the disassembly took. I took far fewer pictures, so let me give you a breakdown of the times. The time to assemble the powerplant was 85 minutes and the time to assemble the remainder of the gun and test-fire it was 5 minutes. Obviously there is a story to tell.
Many stories!
Actually there are many stories. Let me begin with the big one, which is the new mainspring. It is longer than the spring I took out of the gun yesterday. A lot longer!

The new mainspring (bottom) is much longer than the one I took out of the pistol.
The new spring
There is more to say about the new mainspring. First, note that it looks bent in the picture. The old spring now looks straighter. Is it canted? Yes and no. It is canted, but it’s not what you think. The spring is not bent. The compression I put it under to try to fit it into the spring tube has started scragging the spring. And, this spring really needs to be scragged! The difference in length between this one and the old one shows that dramatically.
What is scragging?
Scragging a coiled steel spring means compressing it and leaving it compressed for several hours so the grain structure of the steel wire realigns. After scragging the spring will be shorter overall, but just as strong and efficient. Here is a report I wrote about it.
As a result of not being scragged the new spring fought me at every turn! That clear vinyl tube isn’t just for safety — it serves as an external spring guide, because under pressure from the clamp this spring squirms like an earthworm that’s been salted!
Do you see the spring guide on the new spring? It took me 20 minutes to get it to fit. The spring guide has a very slight belling at its end that the spring has to fit over. The new spring didn’t want to go. I had to file the inside edges of the coils that had been flattened, plus there was a small burr on the bell of the guide that had to be removed. Once all that was done the spring went on, though I had to force it.
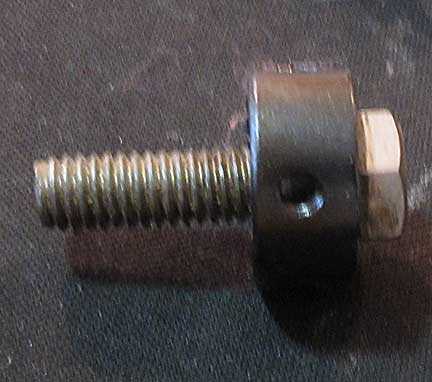
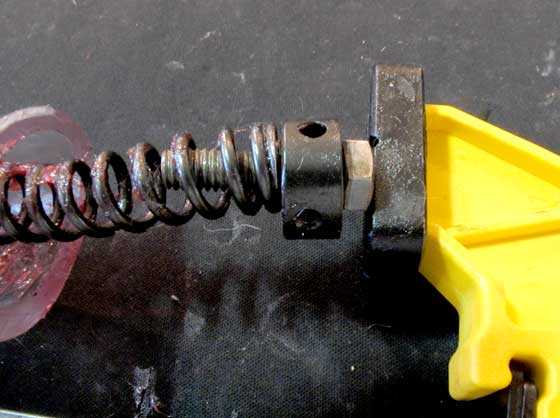
But, try as I might, I still could not get that new spring inside the tube. It kept squirming to the side and out of the clamp. I even “invented” a rear spring guide to help get it in. It’s just a bolt that is supposed to keep the spring from kinking as it’s being compressed. It would be wonderful if it worked, but alas — no joy!

The bolt through the end cap is my “special” temporary rear spring guide. Sorry for the focus. My hands were greasy and I didn’t want to get it on the camera.

Here’s how the improvised spring guide works. As you can see, the spring wants to kink right away, and there are about three more inches of compression to go!
The mainspring kept kinking and slipping out of the clamp, launching the end cap with some force until I pulled the plug and decided to put the old spring back in. After seeing how bent the new spring became from this work, I knew it had to be scragged before it will go into the powerplant. I’m sure that Heidi, who assembles these for Weihrauch in Deutschland, scrags them first!
I lubricated the piston body and the mainspring with Tune in a Tube (TIAT) grease. I may lose some velocity but the pistol should become much smoother shooting.
Even the old spring fought me a little, though not nearly as much. When I drove in the pin that holds the end cap, the bolt that serves as a rear spring guide prevented it from going through the cap. However, one side was sufficient to hold the cap until I removed the bolt and tapped the pin all the way through.
Special note about the end cap
The pin that goes through the end cap to hold it on the spring tube goes in either side of the cap equally well. But there is only one way to do it right. A third hole in the bottom of the cap has threads to receive the screw we removed yesterday in step 5. Look at the last photo above and you will see this hole at the bottom of the end cap. If you assemble the cap upside-down it will go together, but there will be no hole to receive that screw and you will have to disassemble the powerplant to correct it.
Gene Salvino of Pyramyd Air’s tech department made mention yesterday of using a drill press to install the new spring. That’s a much better idea than the trigger clamp I used. Also, Gene says the P1 is not the spring gun to learn on, and I heartily agree. It’s very straightforward, but the mainspring is a challenge, as you have seen.
If you don’t own a drill press, my way with the bolt might still work. The bolt needs to be thinner (1/4-inch), to allow the cross pin to penetrate deeper and perhaps twice as long as the one shown above. It can’t be too long or it will hit the spring guide that’s in the piston and you won’t be able to get the end cap where it needs to be, for the pin to fit. Some form of the bolt might work. I think the drill press is the best idea though.
Assembly
I got the powerplant together and buttoned up this time. After that it was just 5 more minutes to finish assembling the gun. Before I drop the powerplant into the lower frame, though, let me show you inside.

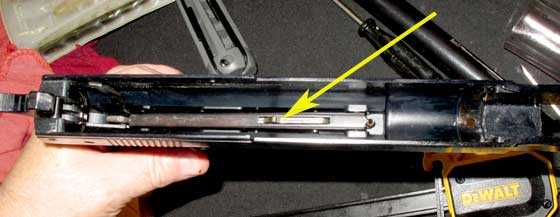
Looking down into the lower frame where the powerplant goes we see the piston catch (arrow) that some may call the sear.

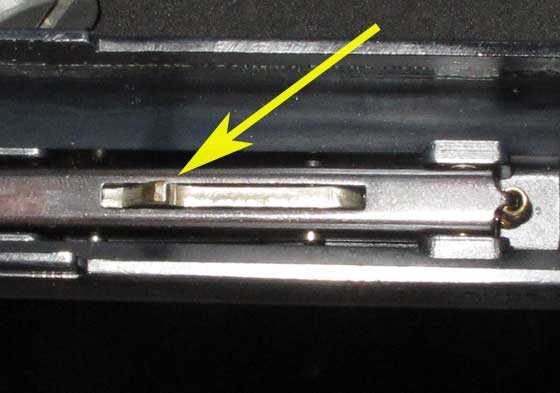
Here’s a closer look at the piston catch. When the sear releases it, this catch is pushed down and away from the spring-loaded piston.
Job done
Like I said, after the powerplant was finished the rest was easy. Once the gun was together I test-fired it several times. It is now dead smooth, thanks to the TIAT grease. I compared it to my first P1 that I tuned with Beeman Mainspring Dampening Compound back in 1996 and this one is a shade smoother. Neither pistol vibrates but there is now less of a jolt when this one fires. Of course we didn’t know about Tune in a Tube back then.
Plans change
As I said at the start of this report, I had a plan to test the velocity of the pistol today, but that has changed. It now feels like a gun that’s just been tuned and I want to get some shots on this tune before I test velocity again. So I will test the accuracy next, and the velocity after that. I suspect the velocity has gone down somewhat, but the pistol is now so smooth that I probably won’t complain.
Cocking effort
What happened to the cocking? Does the pistol still hesitate at the low power notch? No, it doesn’t. The spring in this pistol feels a couple pounds harder to cock generally than the one in my first P1, and we know from testing it that it is, but it now moves smoothly past low power to high.
Summary
What about that new spring? Well, it needs to be scragged, so I will do that before I try to stick it in a P1. However, I’m thinking that this pistol may remain together if it continues to perform like it is.


I went back to reread your review of the Ruger/Umarex Embark, and just found 4 parts. But, in part 4 you mention that you were going to mount a scope and redo the 25 yard groups. I didn’t find this part 5. Did I miss finding it?
Thanks, Jon
Jon,
Not yet. It is still coming.
B.B.
Thanks, Tom.
B.B.,
Why did you use a sash clamp instead of a regular compressor? Is the pistol too short to fit? I would have thought a length of 2×2 would have added sufficient length to allow the user of a regular spring compressor. No evidence of rust nor abnormal fitting of parts. Could the dry slightly kinked spring have been the reason that caused the pistol to prefer the low velocity cocking? Now that it has been lubricated the spring doesn’t drag on the cylinder wall allowing you to cock it to high power smoothly.
Siraniko
Siraniko,
Lubrication is the reason for the smoothing I think. I used the clamp that I used back in 1996 when I did this the first time. There are several ways to do it.
B.,B.
You never get the spring issue with a Webley…… Incidentally, Webley/Hatsan have given up production of the overbarrel design. A final small batch ha s been produced. Another legend passes after 90 years, sic gloria transit mandi, or similar!
Ogilkes,
It is just as well. It is my understanding the Hatsan quality was not that of the UK version. It certainly isn’t with the air rifles. Perhaps now these will start to have resale value.
BB,
I can certainly understand leaving it alone now that it is smooth and more pleasant to shoot, most especially if the accuracy has not been negatively affected. This thing was never a hunting pistol. It was meant to punch holes in paper and fend off the pack of feral soda cans. That usually does not take much power.
B.B.,
I have a dumb question. If a spring has a subtle cant, how does one determine that it is canted? From the photo in this and the previous installment, the flaw is not easy for me to see.
Does rolling it on a flat surface reveal a canted spring? If the answer is yes, how does one determine that a “bendy” spring, such as the new one above, is not canted? It would likely roll more unevenly than the old spring.
Michael
Michael,
Yes, rolling on a flat surface is the best way to see if the spring is bent.
I should have explained this, but my comments were based on knowing a lot about the two springs. One was new, so I knew it was scragging instead of taking a permanent bend. The other was old, which told me the bend was permanent.
Does that help?
B.B.
B.B.,
It does help.
I suppose, too, that if a particular air gun is firing or cocking abnormally, a bent mainspring is one of the “usual suspects.”
Michael
Michael,
Thank you for suggesting a very special blog for tomorrow! 🙂
B.B.
:^)
Ogilkes——-MUNDI, not mandi. But you were close enough to make your point. ——–Ed
BB
Looking at what you were doing to get the spring squished back in, and the way the spring was fighting you, all it would have taken is for your clamp to slip and you could easily have ended up eating some flying metal .
tt
TT,
Yeah. I kinda figured that out! I do like the drill press method though.
B.B.
Off topic, but I am seeking a (stock) synthetic stock for my .22 Walther LGU. I tried Amazon and E-bay and finally sent an e-mail to the Umerex site. I would appreciate any help if anyone has any other ideas or links. Thank you, Chris
Chris,
Perhaps your email to Umerex will help, searching around I did not find the stock but found the complete rifle. You are looking for something like this.
Mike
Mike,
Yes, that is it. I have the wood version but find the pistol gripped/thumb hole stocks more comfortable and hopefully lighter weight. I think that I would enjoy it more. This situation is a fine example of a manufacturer offering,…. or (not) offering aftermarket parts. I am just starting to look, but I should have been able to turn up something pretty quickly, at least one would think anyways.
Chris,
It may be that their manufacturing model is to build X number of stocks and the same number of actions with no leftovers, but I am interested in what comes back from your email.
It would indeed be nice if they will supply the stock only.
Mike
Mike,
Many makers do. Yes,.. I will be most interested too. I will keep all posted as to the info. attained or lack thereof. Thank you for your interest in my quest and your input. Thank you, Chris