by Tom Gaylord
Writing as B.B. Pelletier
Today’s report is written by reader 45Bravo.
Like many airgunners, reader 45Bravo doesn’t care for “glowy thingie” sights and turns them into solid sights. Today he tells us how to do it.
If you’d like to write a guest post for this blog, please email me.
And now, over to you, 45Bravo.
Fixing fiberoptic sights
This report covers:
- In response to you
- Choice of filler
- What you will need:
- To remove the upper
- Watch that spring!
- Remove the rear sight blade
- Clean before filling
- What I used:
- What I did:
- Bonus tip:
In response to you
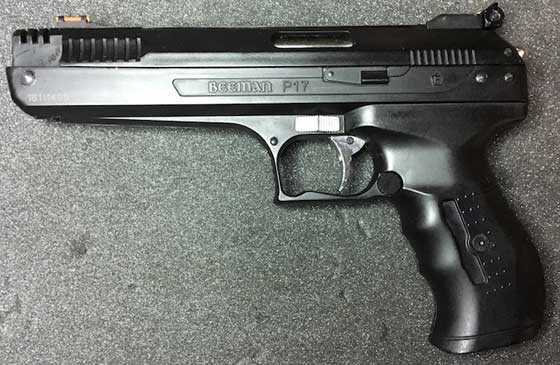
In the comments of the blog about resealing the Beeman P17 , several readers expressed an interest in an article on how to remove the fiber optic sights, and make the sights more suitable for target shooting. There are a few different ways to do this, and I will cover some of the ways to do them as we go along.

The Beeman P17 is a great air pistol, but the fiberoptic sights make it hard to shoot targets.
Choice of filler
On this pistol I chose to use thick super glue and baking soda as a filler, as the gun has no recoil, and I wanted to widen the front sight just a smidgen. It also isn’t under any stress, so it doesn’t need to be reinforced, and I wanted to see how well this material would hold up on a polymer airgun. I had used this mixture in the past building/repairing nitromethane powered radio controlled boats, but that was working with wood and fiberglass.
When removing fiber optic sights on firearms in the past I have used JB Weld 2-part epoxy, and I have also used the JB Weld “Steel Stick” steel reinforced epoxy putty that you can buy and knead it into a dull gray lump to mix the 2 parts. Use that as a way to fill the gaps and build up the sights.
What you will need:
• Small wire cutters or fingernail clippers to cut the fiberoptic rods.
• If you decide to remove the upper assembly from the gun, you will need the same 2mm Allen wrench, and ⅛ inch punch and small flat-bladed screwdriver that we used in the P17 reseal blog.
• A Phillips head screwdriver.
• Your choice of filler
• Some small files available from Harbor Freight, or small fine emery boards to sand the filler after it sets. (don’t let the wife find out you used her emery boards, so make sure you hide the evidence.)
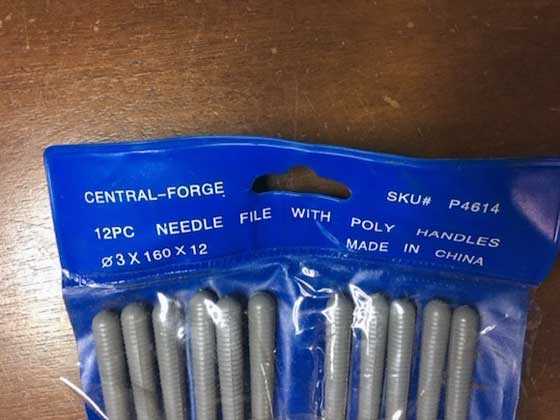
Small cheap files are ideal for this job.
• A durable epoxy paint. I chose Rustoleum Black Appliance Epoxy paint as it is what I had on hand.
If you decide not to remove the upper from the pistol (the route I chose), I suggest putting a small plug of paper towel in each end of the barrel to keep out the dust.
To remove the upper
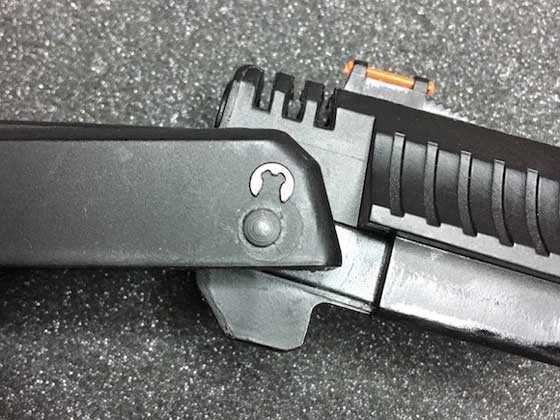
If you choose to remove the upper, you use the 2mm Allen wrench to loosen the set screw that retains the pin as was done in Part 1 of the P17 reseal blog, and then remove the piston rod retaining pin.
Step 1 to remove the upper is to loosen this 2mm Allen screw.
With the screw loose, drift out the pin and disconnect the linkage from the piston rod.
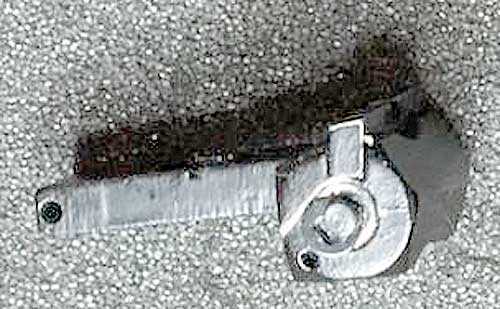
Then remove the small E-clip on the left side. It retains the front pivot pin that the upper pivots on when you open the action to pump the pistol.
Now remove the E-clip from the upper pivot pin. Then drive the pin out from the left side to the right side using the ⅛ inch punch. Lift the upper “slide” assembly off and set the lower aside.
To remove the barrel, remove the 2 Phillips screws that hold a flat barrel retainer under the rear of the slide, then the barrel should move backward just a bit, and just come out. Set it aside also.
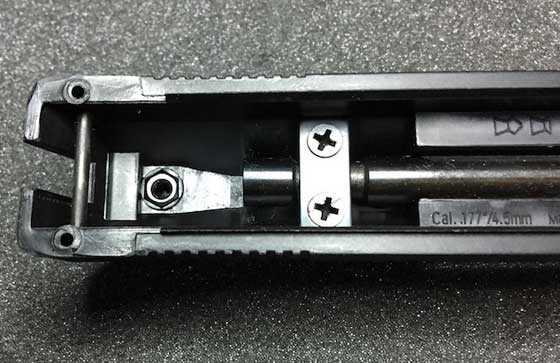
Remove the two barrel strap screws, push the barrel backward a bit and remove it from the upper.
Watch that spring!
Tip: Put a piece of tape over the nut under the rear sight elevation screw to keep it in place during this upgrade. Or just be careful to keep up with the nut when you remove the rear sight elevation screw, being careful not to lose the spring that is between the “slide” (what I call the upper) and the rear sight.
Using the wire cutters or nail clippers, cut the fiber optic tubes on the front and rear sights, they are slightly larger at their ends, to prevent them from falling out.

Cut both fiberoptic rods so they can be pushed out of their holes.
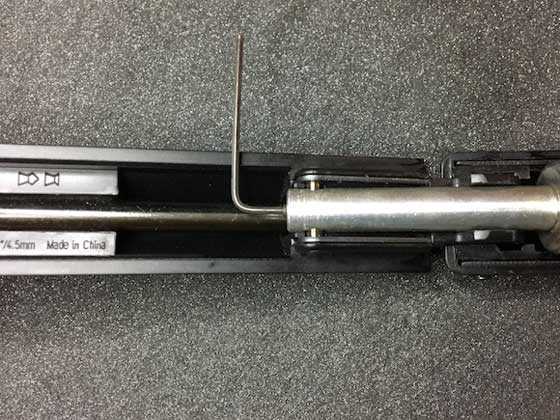
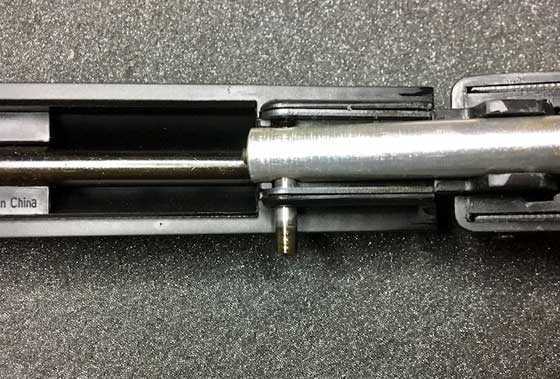
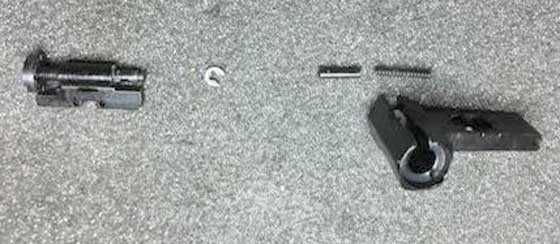
The rear sight pivot pin (1.5mm x 16.5mm) should just push out with a toothpick, as it is no longer under spring tension. Then the rear sight assembly will come off.
The rear sight pivot pin should just push out with a toothpick, since it is no longer under spring tension.
Remove the rear sight blade
On the left side of the rear sight assembly, there is a very small E-clip that retains the rear sight windage screw. The rear sight windage screw has a spring-loaded plunger under the screw head that keeps tension on the sight, and also engages the detents under the screw for positive windage adjustments.
Tip: If you press the rear windage screw to the left side, depressing the plunger, the E-clip will stand proud making it easier to remove.
Remove the small E-clip from the rear sight adjustment pin.
The sight blade and screw will come out the right side of the sight assembly, be careful not to lose the plunger and spring from under the windage screw.
The rear sight is disassembled.
Remove the windage screw from the sight blade.
The rear sight blade is asymmetrical, and only goes in 1 way. The thinner side of the blade goes on the right side to clear the windage screw head.
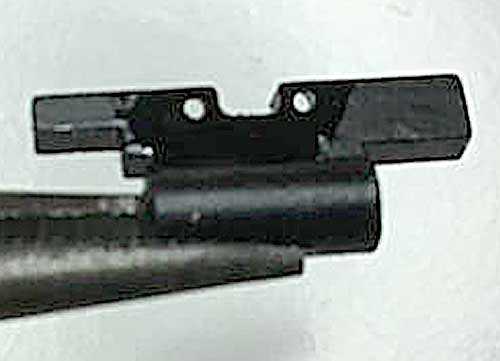
The rear sight bladed is thinner on the right side to clear the head of the adjustment screw.
Clean before filling
Clean the metal rear sight blade with alcohol or acetone, or some other cleaner to remove any oils that may have gotten on the blade.
Fill the 2 small holes in the rear sight with your choice of filler, you can have a little extra as some fillers have a slight shrinkage as they cure, and you can sand or file off the excess after it cures. (it’s better to have a little too much than not enough.)
What I used:
I put a small dot of super glue in each small fiber optic hole, then sprinkled a little baking soda in the holes. I did this to both sides, and let the filler build up just a little on the sight blade.
The baking soda and superglue hardens almost instantly. Set the rear sight aside to cure.
After it cures, carefully file the excess filler until it is flush with the metal of the rear sight blade, do this on both sides of the sight blade.
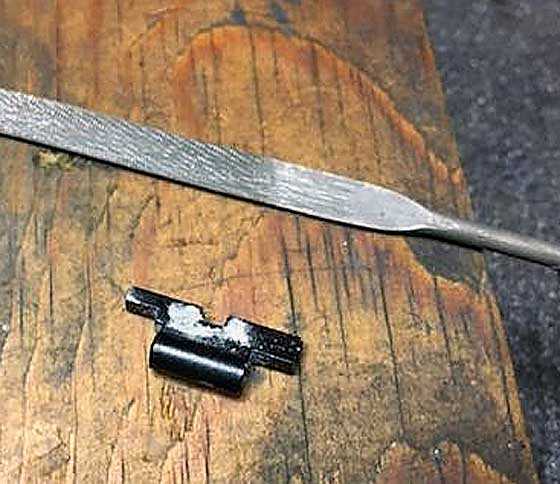
After the filler cures file it flat on both sides of the rear sight blade.
Clean the front sight area with alcohol. Don’t use acetone to clean it, as it may damage the plastic.
Clean the plastic front sight with alcohol before modifying.
If you are happy with the width of the front sight, cut an old plastic gift card (or old credit card) into 2 small pieces in the general size and shape you want the front sight to be.
Then using a clothespin or small clamp to hold them on either side of the front sight.
Using a toothpick, or small tool, fill the small gap between the card stock with your filler, making sure it goes into the holes in front and back of the front sight, and slightly over the top of the sight.
Here again, having a little extra is better than having too little, as you can file the sight height, length and shape to your liking. It also helps if the filler is a little thick to keep it from running out from between the card stock before it cures.
After the filler cures completely, remove the clamp, and the card stock to see how your sight came out.
What I did:
I would put a dot of the thick superglue on the sight, then sprinkle a little baking soda on the glue, the another dot, and more baking soda, until I built it up to the height and width I wanted.
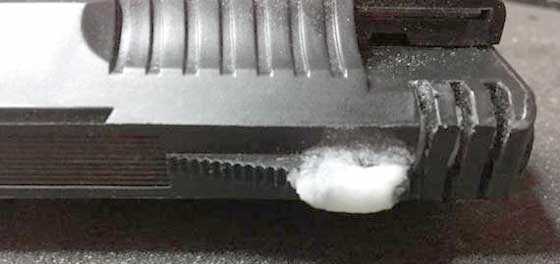
The front sight is built up with superglue and lots of baking soda.
You can now use the files, or emery boards to shape your sight to the height and profile you want.
The front sight has been filed to shape.
Using either compressed air, or some type of brush, clean all of the dust left over from the sanding.
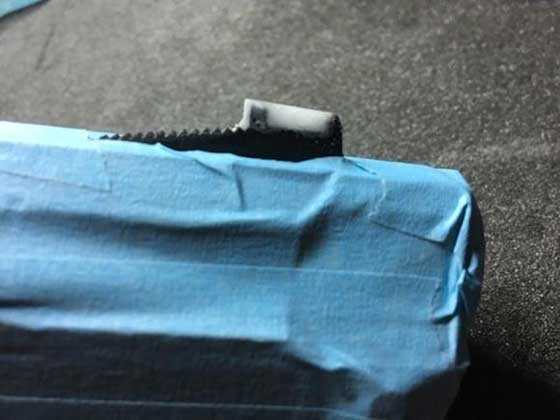
Tape off the front sight, covering everything you don’t want painted.
TIP: when painting small parts like the rear sight, either put a toothpick, a long screw, or something inside the threads to hold the sight, giving you a better grip on it, and a way to handle it without touching it.
Paint the front and rear sight, several light coats are better than 1 heavy coat, allowing time to cure between coats.
You can see the holes where the fiber optics were in this photo after the first coat.
The rear sight blade has received one coat of black paint. You can still see the holes that were filled.
After everything has cured, remove the tape, make sure everything is clean, reinstall the barrel, being careful not to tighten the barrel strap screws too much as the polymer is soft. Just a little past snug is good.
Assemble the rear sight, make sure the plunger and spring are in place, oil it lightly if you want. Make sure the thinner arm of the rear sight blade on the same side as the windage screw.
Insert the windage screw, and depress the plunger with the screw head, and carefully put the small E-clip back in place to retain the windage screw in the rear sight assembly.
Install the slide on the upper by putting the barrel pivot pin in place, it goes in from right to left, then reinstall the E-clip on the pivot pin.
Attach the piston to the slide assembly with the pin, and tighten the set screw to hold the cross pin in place.
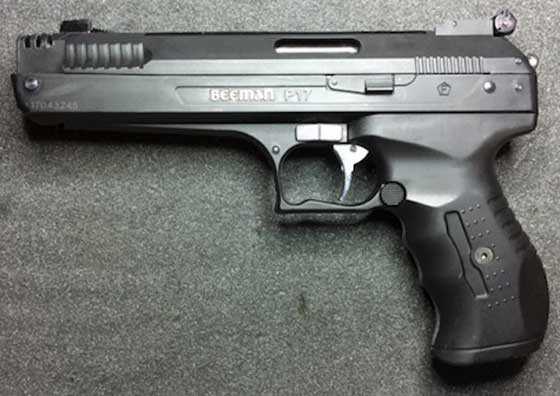
The finished project!
Function test the pistol, and sight it in.
This can be done to other weapons with fiber optic sights, but if the gun is subject to recoil, or heavy vibrations. I would suggest using the strongest filler you can.
Bonus tip:
As you see from the completed photo, I added some silver paint to the Beeman lettering, using a Pilot Ultra fine paint pen.
With handling, and rubbing, it will wear off, but it is easy to touch up, and dresses the pistol up just a little.
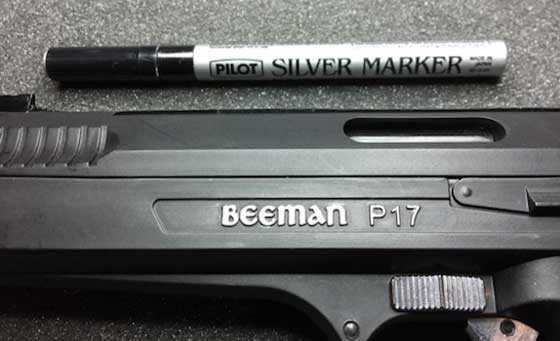 The silver marker on the raised lettering dresses up the pistol.
Cheers,
45 Bravo


Trijicon might have something nto say about that. But not a bad solution!
What is wrong with fiber optic sights?
For hold over or under ALL open sights suck!
Fiber optic works fine at sight-in range. IMHO.
-Y
Yogi,
Well, it is obvious that someone must like them or they would not exist. Well, no that is not true. I can see marketeers foistering these upon us, thinking this is what we want whether we like them or not. They know what’s best for us, even if they have no idea what they are selling.
As for open sights, most of my airguns have open sights. I have been using them since I be a wee bairn. Over 50 yards I do like to use scopes, but at closer ranges the open sights work better for me. Parallax is not an issue either.
Glowy thingys work fine for quick shots but are too large for fine shooting.
Of course, all of this is my most humble opinion and no one else needs to agree with me. 😉
“Glowy thingys work fine for quick shots but are too large for fine shooting.”
RidgeRunner, I concur with your opinion; 45Bravo, I like your solution. =>
LOL! My solution is to not get them in the first place. Glowy thingys are a deal killer for me unless thay can be easily removed. I am not shooting a deer behind the shoulder, most especially not with my .177 air pistols.
Now I could go along with tritium sights on a hand cannon for quick close range battle.
Bravo,
Fine write up! Baking soda? Why that and not something else? Is it mixed first, then applied? or the glued applied and then the baking soda sprinkled on/over? Why this method over the JB weld type putties?
Good Day to you and to all,………. Chris
Chris
It’s very strong and light weight. We used that method building RC planes from balsa.
We would tack two pieces of wood together in a few spots to hold them (think of tack welds when welding metal). Then we would sprinkle the baking soda (matter of fact I think we used baking powder) down the seam and use our finger tip to form a fillet. Then take thin Super glue and run it down the fillet. It drys hard and fast and smooth. Looks really nice when it’s done.
Never thought about it with a air gun but sounds good to me. I have used JB Weld epoxy before though and it works nice. It can be formed smooth by dipping your finger in water and smoothing it out. It’s almost like modeling clay when you get it wet to form it.
Chris,
Cyanoacrylate will bond many things so all kinds of stuff can be used as a “filler”. Baking soda (sodium bicarbonate), is ideal because of the way it interacts with the CA at a molecular level.
Here is an excellent explanation of how it works… https://www.youtube.com/watch?v=1hY1jyGNzIo
The beauty of the CA/baking soda combination is how easy it is to pack into the area to be filled, how quickly it sets up (pretty well instantly), that it can be machined to suit and it takes paint well.
For large gaps (> 1/8″) it is best to do a couple of fills as the CA may not saturate all the baking soda the before it sets up.
Neat stuff to work with.
Hank
Hank,
Thank you. That is really what I was asking,….. the “molecular level” reasoning. Not that I know much about that stuff,… but that is what I would want. What is best?,.. but more importantly,…. (why) it is the best? 😉
Chris
Hank,
I like to cook and it is amazing how much chemistry is involved in cooking well. A bit of anchovy in many dishes to boost the “meaty” flavor. You will never taste them. A tsp. of vinegar when boiling potatoes will leave them tender,… but will look as fresh as just cut. A tsp. of baking soda will have the opposite effect and break them down quicker. Vodka pasta sauce? Only alcohol will release a certain flavor compound in tomatoes. Only a tsp. is required,…and,.. while I have it out,…. a “wee bit” (or not) for the chef. And,…. on and on……
So yea,…. I have always been into the “why” of things.
Chris
Chris,
I like cooking as well but am typically banned from the kitchen LOL!
Many of the things we do involve chemistry and we don’t even think about it – cooking, as you point out, is probably the best example – recipes are formulas. …But if you make sourdough bread the “sponge” starter is alive (really!) and needs to be cared for like you would a pet.
But then it is what is combined, in what percentages and how it is combined that determine the end result. Some times with surprising results …like melting sugar and a food preservative together makes a rocket fuel …don’t ask me how I know this LOL!
Watch that video if you get a chance – the guy reminds me of my chemistry professor.
Cheers Chris!
Hank
Hank,
I just now watched it. Ouch!,.. my head hurts! As he said,… maybe more than I wanted to know! LOL! 😉 Let’s just say that I fell a wee bit short of “all that” in school. On the other hand,… I could tell you how to rebuild a 350 cu. in. Chevy engine!
That is the other thing,…. things have to make some sort of (mechanical) sense to me for me to understand them. How? Why? Quantify? No doubt,… probably some sort of future fatal brain disorder! 😉
Thank you,….. Chris
I tried to watch the video, but unfortunately, audio became charlie brown teacher language (wonk,wonk wonk wonk wonk?)
The same thing happened in highschool chemistry class with my teacher when he talked, about 2 minutes into his explanation he started speaking klingon..
Now for some reason, my college chemistry teacher didn’t have that problem, he made it fun and engaging, not monotonous and boring.
Ian
Sorry I have not been able to reply, Full day at work, Meetings with the bosses. 7am-7pm..
We also used Microballoons for filling work with the planes and boats.
https://www.amazon.com/Top-Flite-Microballoons-Filler-8-Ounce/dp/B0015H1FDI
But if you didn’t have any on hand, we always used baking soda.
We didn’t know (or care) about how it worked on the molecular level, all we knew is it was close to the microballoons in feel and consistency, and it filled and sanded well.
Ian
Bravo
Nice report.
45Bravo,
Great little write up. A classic case of experience elsewhere can be used here. I will have to keep this in mind if one of those glowy thingys ever show up here.
Is it baking soda or powder? Or does it matter in this case?
Rk
It does matter, baking soda (sodium bicarbonate) is what you want to use. Please see my comments to Chris USA above.
Hank
Hank
Right now I don’t remember which we used.
So if it is baking soda. What happens if you used baking powder? The CA (super glue) won’t cure? Just curious what the difference is in the end result.
Maybe you have some baking soda and baking powder and you can try both with some CA glue and post some pictures and what happened.
If I had baking soda and baking powder I would do the experiment and post the results. And remembering more right now I really believe it was baking powder because it gave a more solid result. The baking soda I believe is more like how pot metal is. What I mean is like air bubbles when baking soda is used.
Someone tries the experiment I would like to hear what happens.
GF1,
The baking SODA kicks off a chain-reaction (by messing with the electrons around the molecules) in the cyanoacrylate causing it to polymerize.
I don’t know about baking POWDER but I suspect that it is (chemically) inert as far as the CA is concerned and is no different than something like sand.
Accelerators are available and other things (like moisture in the air) can set the CA but baking soda is a convenient filler/hardener that is readily available. Works for me. 🙂
Hank
Hank
Yep I have used accelerators too with building the RC planes.
And you know what else works to speed up the CA glue for curing. Spray some atomized water out of a bottle it works too. But not as good as the accelerators. Oh and that’s without baking soda or baking powder. 😉
Oh and you must not of read that link I posted about baking soda and baking powder. Read it and you will see why either works with CA glue. And check out the link about vintage radios. One guy is talking about repairing guitar’s. He grinds up bones to work with CA.
Rk
Check out the links below I posted about the baking soda and baking powder.
45Bravo,
Nice report – thank you for posting!
Hank
Another item from the R/C crowd is that the Ca glue should be thin body (water thin or close to), so it can soak into the baking soda vs beading up on top.
Great write up 45 Bravo, thank you!
Will
Yep that’s what we used when we did it. The thin CA. There was a medium and a thick CA which did not work right.
Here is something on baking powder and super glue.
https://vintage-radio.net/forum/showthread.php?p=825336
Also here is something about baking soda and baking powder.
https://www.google.com/amp/s/www.bonappetit.com/story/baking-powder-vs-baking-soda-difference/amp
B.B.,
Still here, just quiet these days.
A few months ago I put a few rounds through a Daystate PCP and that feeling of being like a cat on catnip left me feeling like I was missing something. If I intended to continue shooting piston driven air rifles I would need to move to a TX200 MkIII or an HW97.
Now I have an opportunity to purchase a lightly used unregulated Maruader in .177. Actually, I could choose the .25 but I think the .177 is better for me at this time. The seller says he considers $200.00 to be a fair asking price. I know Jerry and I know his passion for air arms.
The rule I have learned to follow is to not look at any “savings”; look at the price and consider whether it is what I want and is it a good value. I believe this is truly a great value.
Of course, that is only the entry to the dark side. Nice entry, though.
I hope and pray you are doing well, sir.
~ken
Ken
I would go for either if they were offered to me. Probably even both for that price
Ken,
That is a great price! I would go with the .177, but I have a .25 so maybe that colors my opinion.
B.B.
B.B.,
The decision is not especially easy. If I were looking at hunting small game I would, of course, go for the .25 at least. The Marauder doesn’t have the electronics of the Daystate I had the pleasure of shooting a couple of times, but there has been plenty of information on the Marauder and I believe that by following the path you and other have laid out, I could be quite pleased.
Early in December I expect to actually be able to shoot some pellets with the .177 and make a final decision.
~ken
Ken,
Good to hear from you. I have the .25 in an RAI stock. They are nice. Personally,… it would be a big deterrent to hand pump. I never have and pretty sure I would (not) care to. Auto pumping and a tank adds cost. Consider that.
If not sure and already comfortable with springers,… then a TX 200 or LGU would be fine alternativities. I have had them both in .22.
The big thing with jumping into the PCP “pond” is that they are not as hold sensitive and you can shoot better quicker and more often. In my opinion,…. that is really the bottom line on PCP’s. More power potential is the other adder.
Also,… I would consider what else is out there in the PCP world. You are considering a “leap”,… so take your time and ask lots of questions right here.
That is my 2 cents,……….. Chris
Chris USA,
Thank yo for your comments. I can’t say I am comfortable with springers. Of course, I have never had the opportunity to shoot a TX 200 or LGU.
As for taking the “leap”, I have put rounds through a Hatsan .30 Carnivore and a Daystate .177. It was like being in a sweet dream. Of course, there is more to it than that and not all of it is as sweet.
I would buy a .25 in a heart beat, but only if I could have more than one rifle. And I don’t expect to be able to jump into the $1000+ rifles.
I have been reading Tom’s blog since 2011, and other reviews in print and video about various rifles. I will certainly ask questions of everyone.
Thank you,
~ken
Chris USA,
I don’t know if you noticed, so I want to tell you here. I appreciated your feed back. Fortunately, I was able to purchase the .177 and the .25 Gen2, synthetic stock Marauders. I also got a hand pump with it. I found pumping from 2000 psi to 3000 psi to be rough going. I can do it, but I am good for 2 magazines worth on any session. Ultimately, I do want an easier way, but I am still more than pleased to have these two Marauders.
~ken
Ken,
I did see. Congratulations! 🙂 Do know if they have been tweaked or modded in any way?,… or just pure stock?
Chris
Chris,
Both have been tweaked. Jerry keeps meticulous notes and he gave me several printed pages I will need to read. I don’t have to rush, though, because I will make no changes before I am fully acquainted with what I now have. I will also need to get a chronograph and what have you.
Thank you for your feed back. I will offer some kind of update down the road and I’ll post it in whatever the most current blog report.
~ken
Ken,
On a chrony,… I can recommend the Shooting Crony with remote corded read out. However, Shootski has been touting some new ones and I have seen others that are like little micro units that you shoot over. I (do not) know about the newer ones,…. but if getting one now,.. I would look around to what is new.
Chris
Chris USA,
Thanks again. I will be doing some research so I will look for “remote corded read out”. I believe Shootski must be speaking of the Doppler Radar chronographs. Very interesting.
~ken
Ken,
On the large rifle you were thinking of,… I remember seeing an old picture of several men standing in a row and a huge rifle was laid across (all) of their arms. Also, there was “punt guns” ? for hunting geese and such that were very large and long. That is the best I can do for ya’.
Chris
Chris,
It’s all good. I appreciate it. Yes, I do remember something about the “punt guns”. I’ll have to do a search on that.
For now, my wife says she is waiting in the car.
Later,
~ken
Ken,
If your are trying to build up your future “air gun brownie points”,…. keeping the wife waiting in the car is NOT the approach I would be taking. Just sayin’,.. Bud.
LOL! Chris 🙂
Chris USA,
I was out the door within a minute of writing that she just called me. Definitely don’t want to keep her waiting.
~ken
Ken,
Here you go.
/blog/2018/10/the-punt-gun/
B.B.
B.B.,
Ah, yes. And I have even read that report on the punt gun. It seems I need my memory jogged frequently. It seems my memory goes jogging on its own and I have to try to catch up with it.
Thank you,
~ken
Kenholmz,
Ken you said, “Now I have an opportunity to purchase a lightly used unregulated Maruader in .177. Actually, I could choose the .25 but I think the .177 is better for me at this time.” Do you have a choice between the two calibers for this great price? Also is this .177 a Generation 1 or 2 Marauder? I guess you know best your purpose for the piece but the difference between the .177 and the .25 is much greater in a PCP than it would be in a Spring Piston Powerplant. The ultimate power of the .25 caliber PCP, on a percentage basis, is so much greater! Although some really heavy for .177 pellets have come to market the .25 are bigger and even bullets (slugs) are within the realm of possibility these days.
Once you turn the corner, gear up with a fill system…you have joined the Dark Side and going back to the innocent days of Springer’s is not an option anylonger! Three decades of experience with the Dark Side speaking the TRUTH to you.
Come on over….
shootski
Shootski,
Thank you. I haven’t actually asked for a price on the .25. I would love to have the .25, but then, I would love to have and shoot even larger calibers.
I will re-read B.B.’s report on the .25. My issue is that I plan to shoot some paper and shoot some knock down silhouettes. If for one moment I intended to hunt I would have to go for larger calibers than .177.
Thank you for offering some input. Now I will have to think some more.
~ken
Ken,
Thinking more on something, when you have the time, is almost never a bad idea.
Given this bit of information, “…I plan to shoot some paper and shoot some knock down silhouettes.”. I would add that the paper and the silouettes don’t have the problem that Field Target targets have with clipping; as a matter of fact the .25 will knock down that chicken when the .177 would cleanly miss or maybe just wobble it! Depending on the barrel choice on the .25 it will likely be better than the stock .177 Crosman.
I will add one additional bit of knowledge obtained over the years of PCP care and feeding: Compressors are nice, even the new automotive battery powered ones, but they all increase the maintenance load. Carbon Fiber tanks are still the most versatile if you have a good (and cheap) fill source nearby. The Cascade method works to increase efficiency of fills, reduce air waste, and number of trips to refill. Bigger tank volume is better (cost/benefit) but portability goes down a bit (nothing like with Steel SCUBA tanks) with size.
Feel free to ask specific questions you may have, none of them are stupid with $$$ on the line.
shootski
PS: the life of CF can now be extended to 30 years of Service Life and I believe it will be increase to Indefinitely with a regular five year test cycle. Just like Steel and Aluminum are currently treated.
Shootski,
Thank you for all of this information. My biggest problem now is reconsidering the .177 vs .25. The is no .22 in this mix or I would be asking for feedback on that.
~ken
Shootski,
I appreciate all you provided. Well, I was able to buy both the .177 and the .25. I also got a hand pump in the deal. Yes, I will plan on buying a carbon fiber tank. Having gotten a reluctant blessing to buy the rifles, I need to wait a bit before I spend more. Still, I am more than pleased to have both of these Marauders.
~ken
Nice work.
I too dislike fibre-optics. I can see they may help sometimes with poor or inconsistent light, but in any other situation they are rubbish.
Personally, I’d have used black Sugru for the holes in the rear. It’s handy stuff.
I did it, I clipped the fiber optics from my sights last evening! Oh, that felt good! I replaced the rods with brass rod and gooped the front sight with JB Weld, mixed with a little Cab-o-sil to thicken the epoxy a little more. The front sight needed to be wider to make it look more like a pillar than a golf ball on a tee. This is going to be better than original when done, thanks 45Bravo for showing us this idea.
So I restored the sights after clipping out the glowy thingies and discovered there was more to do to make the sights more like how they “should be.”
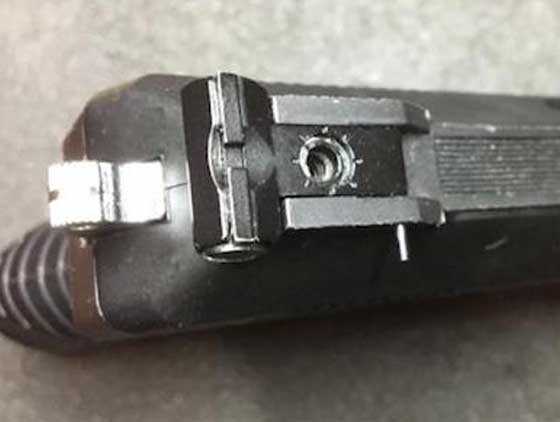
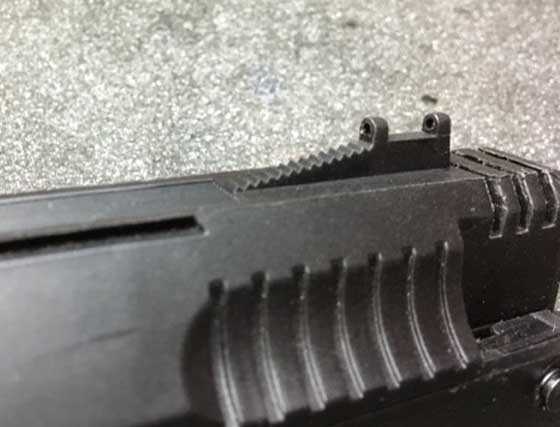
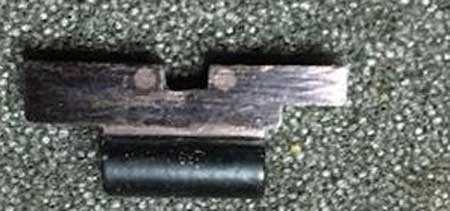
The rear sight was very narrow across the top, with a very short flat section with which to level your front sight while aiming, this was visually “cramped” The notch of the rear sight also has to be wider, because I made the front sight wider to see it better. So a “new notch” was screwed and glued on (see picture). The screws pass through the holes that held the glowy thingies. This gives a nicer sight picture.
You have to be careful not to make the front sight too tall, or you’ll run out of UP adjustment in the rear sight.
All said, there is a nice, broad pillar of a front sight that fits between a properly-sized rear notch, with space for light on either side of the front sight for a good sight picture for more precise shooting than I could achieve with the original sights. It took some work to get there, but it was worth it. Thank you B.B., thank you 45Bravo!
I can only post one picture, it’s of the new notch, with the tiny screws that hold it on.
Will,
Good for you for applying something you learned on this blog! 🙂
B.B.