Tom Gaylord
Writing as B.B. Pelletier
This report covers:
- Several entries
- Norica bullpup
- Nerf gun
- Two great entries!
- Maximus Blowhardus
- Learned something
- Spaghetti blowgun
- Catapult gun
- Without further ado, My plinker:
- Some of the features I incorporated:
- Penny shooter
- The simplest entrant
- Stonebow
- Wow!
- A hard job
- Summary
Today we learn who is the winner of the Design an Airgun contest. It began on September 10 and was supposed to end at the end of the month, but several readers asked me to extend the closing, so I did. The contest ended last Friday, October 16.
Several entries
There were several entries. Some were blue sky dreams and nothing was built. I didn’t take them seriously. But some folks submitted more than one entry and they built all of theirs. I considered everything on the basis of the contest rules, which were:
1. I’m guessing it will be a BB gun, but it doesn’t have to be.
2. I’m guessing it will be a smoothbore, but again, it doesn’t have to be.
3. When I say build an airgun, it doesn’t have to work with compressed air.
4. It can be any kind of powerplant — so long as it doesn’t use an explosion to launch the missile.
5. The winner would be the niftiest design that the most people could build.
Now let’s see what people did. First is reader Jim.
Norica bullpup
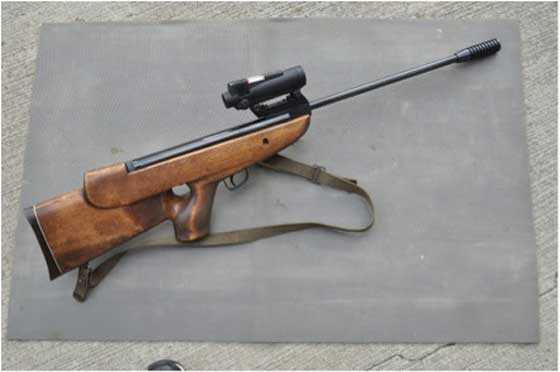
This project was done back in the early 1980’s. It started as a semi-finished Norica model 61 air rifle sold by Beeman. The original kit consisted of an air rifle with an un-finished stock. I suppose the idea was to capitalize on the popularity of unfinished muzzle loader rifle kits at the time.

Norica right.
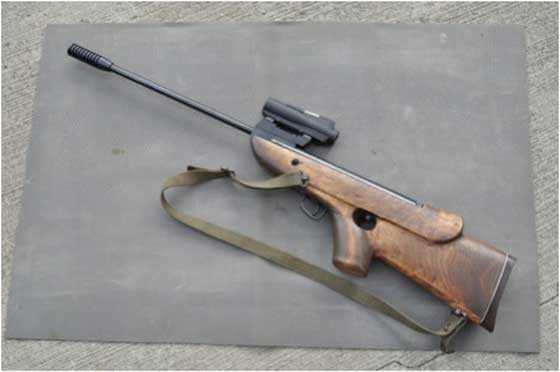
Norica left.
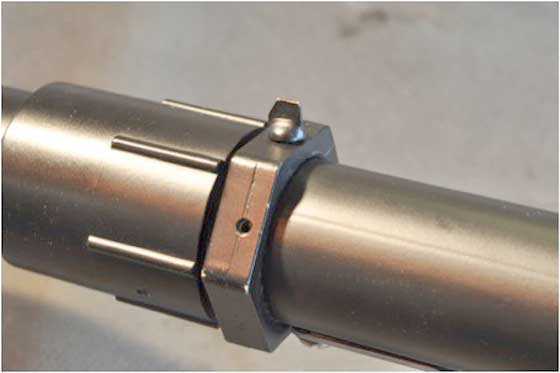
I had the opinion that the sight must be mounted to the barrel for accuracy, as opposed to the typical break barrel with the sight on the receiver. Since this moved the sight forward, a bullpup design would place the eye closer to the sight. It is interesting to see how popular bullpup designs have since become.
The stock is carved from several birch boards glued together. Finding a location for the rear action screw drove the length, with locating it above the pistol grip. The trigger transfer mechanism is steel, with lightening holes drilled to remove mass. I had limited access to shop equipment at the time, so the construction is a bit crude. The stock is Accraglass bedded to the action, again with the idea of improving accuracy.
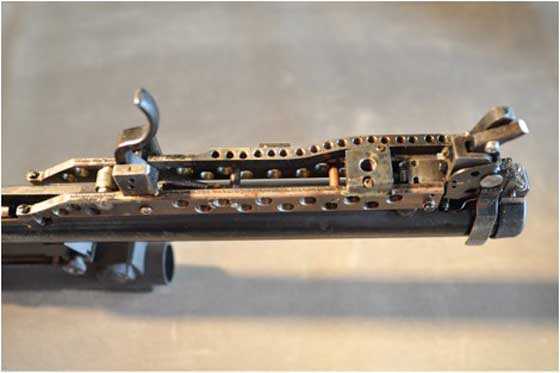
The Norica trigger was moved forward for the bullpup design.
The sight is an all-plastic ambient light red dot sight of unknown origin, but was cheap at the time. An aluminum spacer raises it to eye level.
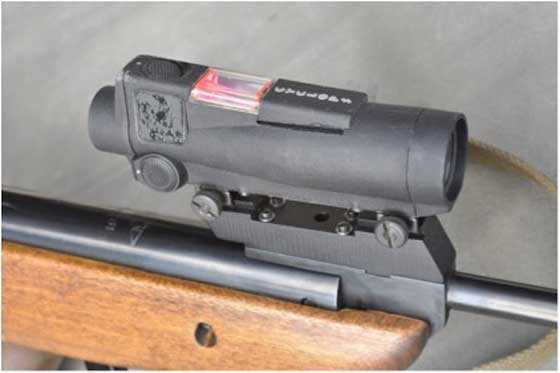
The sight uses ambient light, so no batteries are required.
Accuracy was very disappointing. At the time, all I had were Beeman Silver Jet pellets. The rifle has not been shot in years. But knowing what I now know from the various articles of tests & tuning from master Gaylord, I may give this gun another try.
This is one of reader Jim’s first two submissions. It was submitted almost as a guest blog, so I decided to make it look like one. He clearly did a lot of work to this gun! Could anybody do it? Probably not. But we can all appreciate it!
Nerf gun
Submitted at the same time by Jim is this plan to build a Nerf gun.
Back in the early 1990s I built three Nerf® guns from PVC pipe. This was before the huge proliferation of styles now available. I tried to give the guns an ‘authentic’ look that would not be accepted in public.

Homemade Nerf gun.
Now, having some shop access, I was able to turn the PVC parts and make the rest of the parts. The barrel is several layers of hobby tubing soldered together to fit the dart and the PVC fitting.
Sights are strictly cosmetic. Rear sights were salvaged from other air guns that were converted to scope use. The front sight is a brass blade soldered into a screw slot.

Nerf gun rear sight.
Nerf gun front sight.
The piston head originally used a piece of urethane machined to provide a ‘parachute’ type seal. However, like my FWB 124, the urethane eventually hardened and broke apart. I added an O-ring seal instead, but never removed the remains of the original urethane.
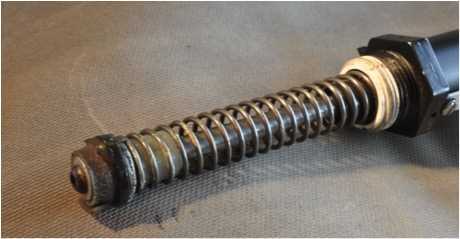
The Nerf gun piston.
I have yet to modify my other two pistols. The spring is just a hardware store spring. Parts are lubricated to increase velocity as much as possible.
The triggers are surplus M98 Mauser triggers I purchased from an advertiser in Shotgun News. The trigger mount is silver soldered to a steel tube to position the trigger to the sear. Aluminum and brass collars center the tube to the external PVC body.
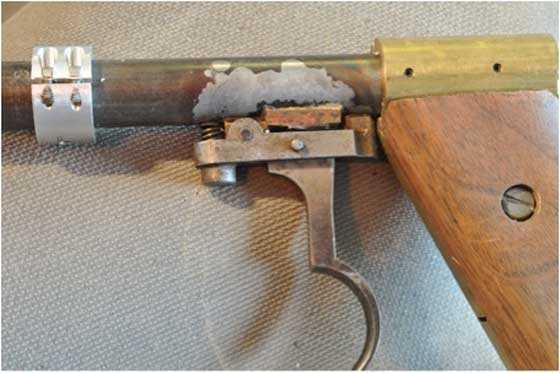
Here is a ’98 Mauser trigger attached to the steel tube of the Nerf gun.
The sear is a collar pinned to the piston/ cocking rod and is chamfered to allow the trigger to reset when the cocking rod is pulled back, it has been hardened to reduce wear. Shown here is the relationship of the trigger to the sear.
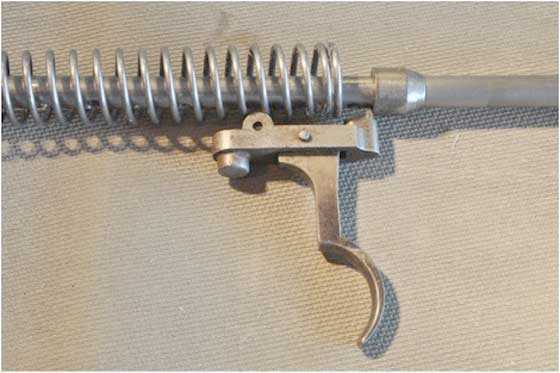
Here’s how the trigger interacts with the sear.
I added a spacer to the cocking rod to prevent the piston from slamming into the plastic PVC fitting when fired. Several fittings were broken & remade before I limited the piston travel. A couple of O-rings help to dampen the hard stop (shown on the handle that’s pulled out on the rear sight photo). The grip is bent square brass stock with walnut grips cut to fit — also shown on that photo.
The finned Nerf darts sail quite nicely, and will fly about 40 feet. My daughters were in high school at the time, and these were very popular when they had friends over.
Two great entries!
These were two great entries. Unfortunately they were submitted in Microsoft Word format that contains all sorts of embedded code, so they took me many hours to sort out and strip off the code that couldn’t be used. Plus the photos were embedded in the document, which means they had to be pulled out and reformatted. Most word processing programs are not friendly to online publishing software. If you want to submit a guest blog, please ask me because I have to give you some submission guidelines first.
Jim also sent a great submission of a pedestal-mounted potato gun cannon. It’s even more complex than the first two, and I am saving it as a guest blog of its own, if I can get Jim’s permission. But here is a picture of it.
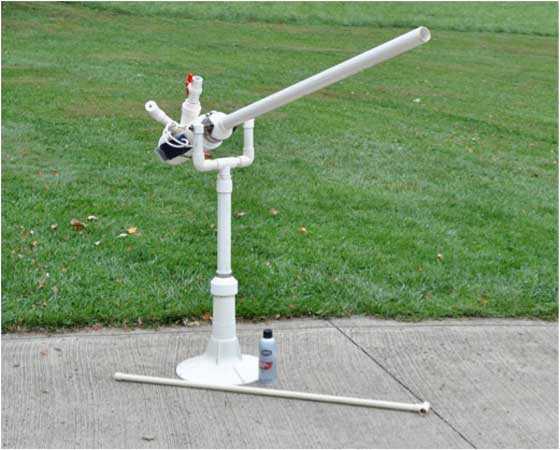
Reader Jim also gave us a potato cannon submission that I hope you will read about in the future.

Maximus Blowhardus
Reader pacoinohio whom I once jokingly called Pinocchio (and I heard about that from many readers!), sent us his submission that he calls Maximus Blowhardus.
Well I’ve been thinking about my entry. What to do? What to do? They say you should play to your strengths. I am after all a plumber. Not really, but I do know The Prime Rules of Plumbing — Water runs downhill; you get paid on Friday; don’t pick your nose on the job.
So, here is my gun plumber entry that I call—

Maximus Blowhardus.
It is simple pieces of black iron pipe, a couple of brass ball valves and some PVC bits.
Design criteria began with caliber selection which was dependent on projectile availability. Found a bag of wine corks that seemed suitable, so I settled on 1” pvc. Power supply? Oh yeah, air compressor in the shop. That helped with the rest of the parts selection.
Took about 20 minutes at the big box store to get everything and another 20 minutes of assembly. Hooked up the air hose. Compressor is regulated at a modest 100 psi. Inserted a cork in the barrel, filled the reservoir and then attempted to fire. Stress ‘attempted’. The cork did not fly. Too much air passing by. Paper patching to the rescue.
I wrapped the cork with paper towel (Brawny for those taking notes) for a moderately snug fit in the bore. Second shot went about 25’. Hmmmmm……. what if I dampened the paper patch? This allowed for a tighter wrap and resulted in a 30’ distance. It also revealed that the bore was filthy. Yeah, I reused a piece of PVC. Important lesson — Always clean the bore. Brief break to do that and then back to testing.
Up to this point, I had been using both valves. Fill reservoir, shut off fill valve, then open discharge valve. On the next shot, I did not close the fill valve and just opened the discharge valve. Almost 90’ distance. Enough.
I think I have achieved proof of concept. Low pressure requires a large volume of discharge air. On the last shot I had added the air compressor tank and air line volume. So next step is to reduce caliber of bore. I think I will go with 1/2” and continue firing tethered for maximum air. I will have to turn the corks to size. Toying with using o-rings to seal to the bore. Lots of options of size, material, durometer, etc. And then there is lube. Have to polish the bore of the new barrel. So many rabbit holes.
Learned something
Well, we learned something from Paco’s submission. If you are going to shoot with low air pressure, you need plenty of it. One-hundred pounds per square inch may sound like a lot, but to airgunners it’s definitely low pressure!
Spaghetti blowgun
Reader minuteofsomething made an unusual submission in the form of a You Tube video. Let’s watch.