
by Tom Gaylord
Writing as B.B. Pelletier
Today we have another guest blog by reader Ian McKee who goes by the handle 45Bravo. He tells us about fixing some vintage Crosman plastic grips and some other tips he has for us.
If you’d like to write a guest post for this blog, please email me at blogger@pyramydair.com.
Take it away, 45Bravo.
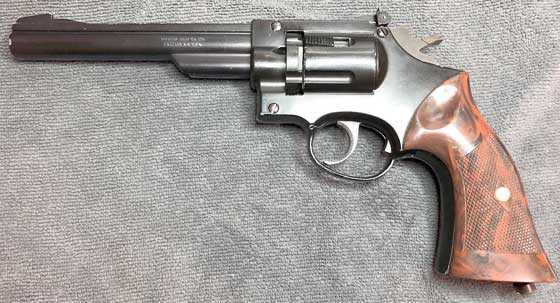
Crosman 38T.
Grips & tips
This report covers:
- The grips
- Now for some useful tips
- Barrel alignment
- Velocity adjustment
- Leaks
- Cleaning and protecting your vintage airgun
Judging by the interest in B.B’s Crosman 38T blog, this is a very popular vintage CO2 revolver that seems to have flown under some people’s radar. Since I have one on my workbench at the moment, I thought I would share a few helpful tips from the Crosman Factory Service manual, and some things I have learned from working on one.
The grips
I’ll start with the grips. Unlike the Crosman Mark I & II pistols that have a metal tube in the grip frame to house the CO2 cartridge , the 38T is different. In this model you have to remove the left grip panel to change a cartridge. The grip panel is held in place by a metal clip that is attached to the grip and clamps onto the CO2 cartridge when it is installed in the gun. The grip then aligns to the frame by two locator pins on the pistol’s grip frame.
Since the grip is held in place by a CO2 cartridge, people sometimes left a cartridge in place thereby shortening the life of the CO2 face seal.
TIP: If you decide to leave a cartridge in the gun, tighten the piercing screw just enough to hold the cartridge in place, not enough to compress the face seal.
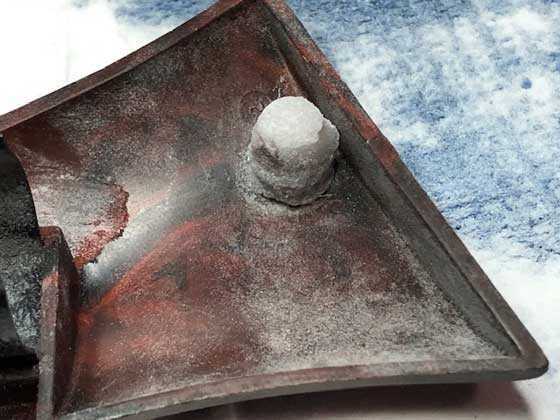
The plastic grips are now over 40 years old, and may have become brittle. On this pistol, the lower grip alignment post is broken and the top one is deformed from repeated use.

The locating pin hole at the bottom of the left grip panel is broken. Where the metal spring clip attaches there is also a hairline crack on both sides.
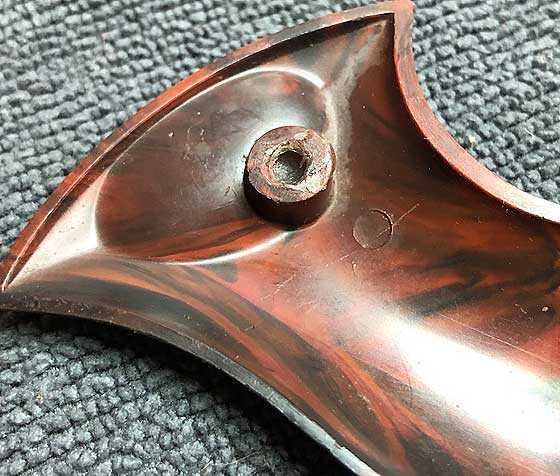
The locating pin hole at the top of the left grip panel is deformed from use.
All of these faults should be repaired. They will only get worse in time, so now is the time to fix them.
[Editor’s note: I discovered when searching for Crosman 38Ts, that damage to the left grip panel is a common problem with these guns. Several guns are being sold with either a damaged panel or even a missing left grip. There are no replacements other than from donor guns, so fixing the panel is the only way to go, unless you plan to make custom grips.]
I chose to use superglue and baking soda for the repair. When mixed these materials create a chemical reaction that hardens instantly. I don’t know the science behind it, but I remember some readers discussing the science after I used it on the Beeman P17 sight fill in blog.
To give the plastic post some extra support I wound part of a ballpoint pen spring around the damaged part. I then used the superglue and baking soda to build up the area in layers. Once it had hardened, I used small files to shape it to the approximate size, and shape.
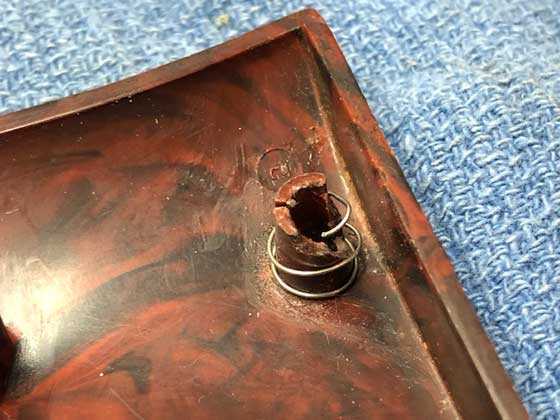
This section of ballpoint pen spring reinforces the location pin hole, so the superglue and baking soda has something to shape it.
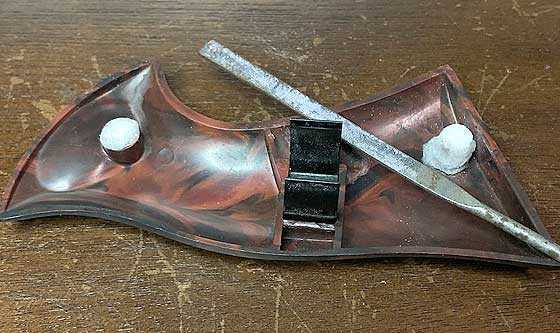
The baking soda/superglue mixture hardens right away. The next step is to file it flush or just below flush.
When you finish the posts need to be either flush with the grip level, or just a smidgen below level.
Here I am cleaning up the repair of the bottom locating hole.
I used a drill press with a Dremel tool round ball bit to make the dimples for drilling the alignment pin holes. That allowed me more precision than if I had just tried to drill them out freehand.
Another reason I chose the superglue/baking soda repair is, as you can see, the white repair area stands out like a sore thumb.
When both locating holes were repaired I used a Minwax stain marker that’s used to cover scratches in wood furniture, as the baking soda/super glue absorbs the color readily. The red mahogany color is a perfect match for the grips on this pistol.
(Note: the color and pattern of the grips vary from pistol to pistol, no two are identical).
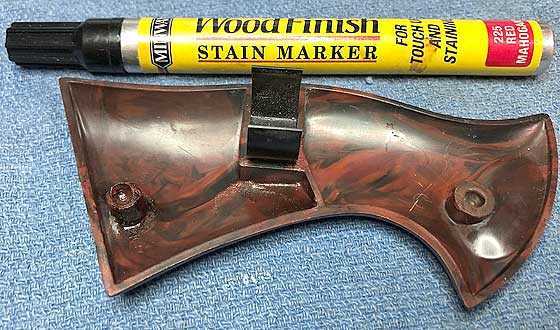
Minwax 225 Red Mahogany stain marker blended the two repairs very well.
Now for some useful tips
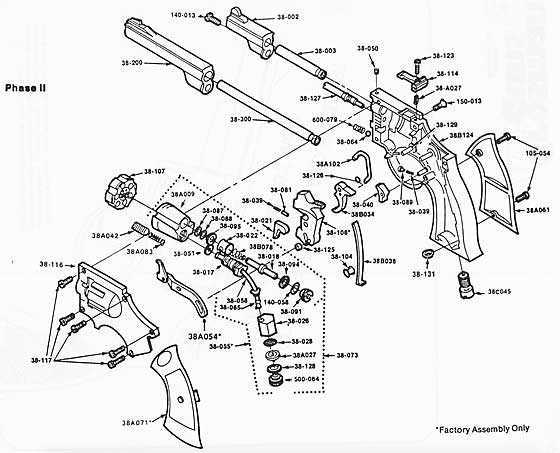
According to the new Blue Book of Airguns, the Phase I pistol has a metal rear sight and cylinder as mentioned in Part 1 of the 38T blog. The Crosman Factory Service Manual shows that it also has a 1-piece cylinder base pin and screw that the cylinder rotates on, and holds the outer barrel in place.
The Phase II pistol has a plastic rear sight, a plastic cylinder, a 2 piece cylinder base pin, and a screw that holds the outer barrel on. Like Tom, I have no clue how the Phase III model differs.
[Editor’s note: one of our readers said that in Phase III only .177 caliber was available. But no other differences were mentioned.]
Barrel alignment
Sometimes the sights may not have enough adjustment to get your point of impact to meet your point of aim. The manual says to remove the outer barrel, and then loosen the grub screw on the top strap (38-050). Then you can rotate the inner barrel to a different position to adjust your point of impact.

Velocity adjustment
The manual says there may be two reasons for a low velocity, first improper lubrication of the moving parts. Or, the velocity adjuster is either missing, or not in the correct place. Yes that’s right, this pistol has a velocity adjustment! It is a small spool-shaped spacer between the frame and flat hammer spring, shown as part # 38-104 in the exploded parts view above. If yours is missing, you can use a small nut, or plastic spacer
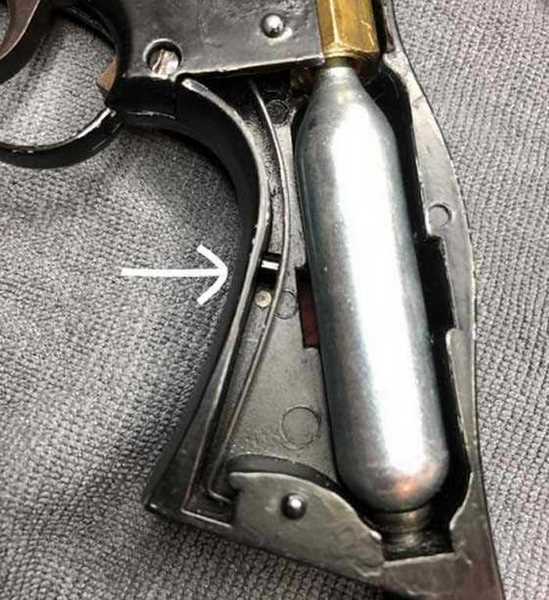
That spacer (arrow) puts variable tension on the hammer spring to vary the power of the gun.
For best results, the service manual suggests it be placed about 1 ¼ inch from the bottom of the spring, but since we don’t know the diameter of the original, it will be trial and error.
Leaks
If the pistol is leaking from somewhere other than the CO2 piercing seal, you will have to remove the left side cover to locate them.
DO NOT REMOVE THE COVER WHILE THE GUN IS PRESSURIZED!
The piercing block is under 800 psi or more when there is gas in the gun, and the block is held in place by the side cover only.
Once the gun is degassed, remove the sear spring and plunger (38-89 & 38-39), and the ball detent and spring (600-079 & 38-064) so they don’t get lost.
You have to hold the piercing block in place while you pressurize the gun. Use a parallel clamp or something similar, do not use vice grips, or other sharp-jawed tool that will damage the softer pot metal of the gun’s frame.
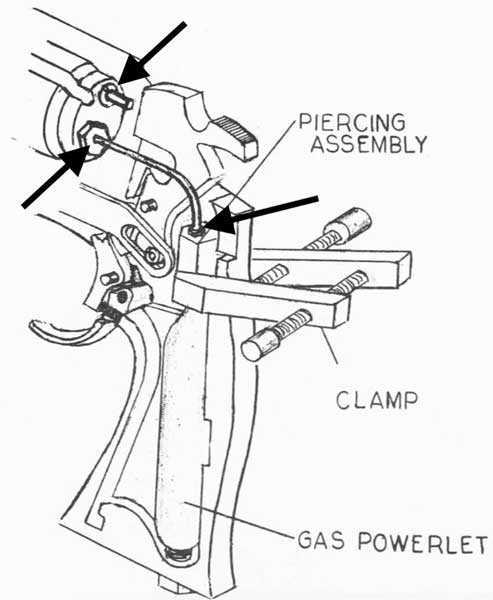
Use a clamp to hold the piercing assembly in place when you pressurize the gun to check for leaks.
Put a several drops of Pellgun oil on the indicated areas (three arrows) to see if any bubbles form from leaks. If there are leaks, you can try tightening the connections just a little, if that does not stop the leaks, put your small parts back in and just wait until your seal kit comes in the mail.
Cleaning and protecting your vintage airgun
I have been using Renaissance Wax for a while on my airguns, and for others I have worked on for friends. It is a brand of microcrystalline wax polish used in antique restoration and museum conservation. It cleans and protects the surface; so far I am quite pleased with the product.
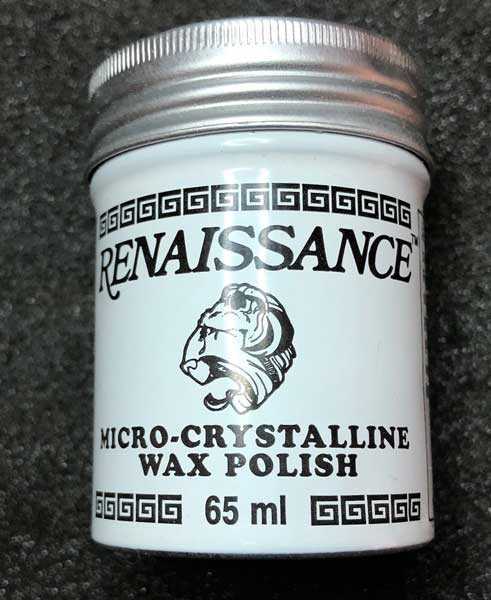
After repairs I use Renaissance Wax to protect the surface of the guns.
So there you have it, a quick repair, and hopefully some insights into a very neat vintage CO2 pistol.
Take care, and be safe.
Ian


G’day BB,
You sent me an email about a month ago, unfortunately I was in hospital with a mild stroke. Could you refresh me on the stock article.
Cheers BobfromOz
Bob,
I have sent you an email.
BB
Ian,
Thanks for the article. Neat tricks and tips.
Siraniko
Ian,
Nice report. I love to see how things work. The exploded view has more parts than I would have expected to see. The only Co2 gun I have 100% down was a Beretta 92FS,… and man did it have some parts.
Cool repair on the grips. I remember the conversations of plastic and wood repairs in the past too. I think that Hank (Vana2) had quite a bit to say. I do remember the baking soda and super glue recipe being discussed.
No fix required for the cart clip base block that had a couple of cracks?
Fine report,… Chris
Yes I did fix the base, but just wicked in some slow set CA glue and clamped the cracks closed until the glue set.
The repair was so minor and easy, I didn’t think about covering that part, but the next time I will.
Thanks for reminding me.
Ian..
Ian,
Thanks! I really appreciate the Super Glue/baking soda tip. I will likely use it on my Maximus sights. The glowy thingy rods easily pop right out, but leave holes which the light shines through. If I fill these holes and color it black, or maybe even just leave them white, these become some very nice sights. They are made by Williams.
I know this may be a shock to some, so everybody should sit down and take a couple of deep breaths before proceeding. I do have a CO2 pistol at RidgeRunner’s Home For Wayward Airguns. My brother-in-law gave me his very leaky Daisy Powerline 45 many years ago. I have made a couple of minor attempts to seal it, but it is still a no go. I guess I am just going to have to break down and see if I can get a seal kit for it.
RR say it isn’t so!…
I was looking on flea bay to see if any vendors were selling complete kits for the 45, but none I could find at the moment.
There are parts available out there online, you may have to piece one together your self.
But, part#15 the complete valve cartridge can be bought ready to drop in.
Heres an exploded view to help you along.
We MAY get you hooked on gas eventually.
Ian.
Not likely, but I would like to get it going.
Ian,
By the way, thanks for the exploded view. I have taken it apart a few times since it showed up at RRHFWA. Daisy sent me some cartridge seals a while back. I may check them out first for the rest of the seals.
It would be kind of neat to get it working and send it back to my brother-in-law. He used to shoot the neighbors’ cats with it. Now he has a house full of them. I wonder what he will shoot at now?
Good article; learned a lot – had no idea about the power adjustment. Need to look at a couple things on the recently renewed/refurbished 38T to see if anything needs attention but it is shooting well and FM is a graduate of “if it ain’t broke don’t fix it” school. Do recall being told to “keep the grips” when shipping the Crosman for repair. The reason is clear. The sight is also impossible to find except from possibly a parts gun.
A couple of videos which may – perhaps not – be useful here:
https://www.starbond.com/tutorials/superglue-baking-soda
https://www.youtube.com/watch?v=mjNEUEcykiY
45Bravo,
Great report! I so did not know about the velocity adjustment; very interesting.
Also, I wish I had read this a few years ago:
“Since the grip is held in place by a CO2 cartridge, people sometimes left a cartridge in place thereby shortening the life of the CO2 face seal.”
Yes, I was one of those people, LOL!
Thanks for the great write up on these cool old guns.
Take care,
dave
FM,
I recommend avoiding the upper level tinkering class, “If it ain’t broke, fix it till it is”. Terrible results have been known to descend on the graduates.
jumpin
Oh, yes! As FM learned in a very hard way when he put low-lead avgas in the fuel tank of his MGB – because, you know, it was ethanol-free. Genius.
I’ve known about the superglue/baking soda trick for decades. I use it in building models. But, unlike when I was a kid, where a built kit had a shelf life of about 48 hours, my adult built kits have lasted decades and here is some info based on that. One aircraft I built 30 years ago I did that trick to fill some wing gaps. Well after a recent cleaning I noticed paint beading up like scale rust under the paint. Brushing it off revealed the superglue is breaking down chemically. Just thought I’d throw this out there. 30 years is a long time but who knows, it may be caused by the percentage of each you use.
70gtvert,
Some of us switched to microballoons for the BS chemistry reasons on our plastic models. Even then you need to choose the glue and microballoon material/composition carefully.
shootski
Ian,
Thanks for the report, I ordered some Renaissance wax. I have a couple of guns with plastic grips that need repair.
Don
Benji-Don,
I have been using Renaissance wax for decades; even talked B.B. into trying it! People way more into restoration than me steered me to the wax.
If you have axe, knife or sword don’t forget them.
shootski
Bravo45,
Ian thank you for the great guest blog!
I learned more than one thing from your blog so I am ahead for the day. I now understand the why of the two part arrangement of the cylinder in these gas guns. Also, the Power Adjustable feature opens up many other guns that do not have the spool could also be made adjustable with a small modification! COOL!
shootski
More so when modifications lead to more fun. Except (1) if not legal and (2) one gets caught in a jurisdiction where aforesaid mods are not legal.
https://www.youtube.com/watch?v=J8vj7FmVwhQ
FawltyManuel,
I was thinking efficiency MODS only! ;^) LOL!
shootski
How much effect does the power adjuster have?
tom is doing a report on the .177 & .22 version, I am sure he will cover that.
Ian
Ade C,
Yes, I will cover the effects of the power booster. I think I will try it on both airguns, but only following my regular test.
BB
Ian,
very good blog – I particularly liked, well, there is a whole bunch of things to like here – rotating the barrel, superglue baking soda, power adjuster. This will be a very helpful addition to my knowledge base.
Fred formerly of the Demokratik Peeples Republik of NJ now happily in GA
45Bravo,
Where doth one procure the Crosman Factory Service Manual(s?) of which thou speaketh. Would be a grand tome to possess, no doubt!
Half
A treasure trove of valuable info.
Many Thanks!